
NREMT Skillset/Airway Management
| Part of | NREMT Skillset |
|---|---|
| Subskills | Oxygen Administration O2 Tank Assembly and Disassembly Nasal Cannula O2 Administration Non-Rebreather Mask O2 Administration Nasopharyngeal Airway Placement Oropharyngeal Airway Placement Bag Valve Mask Ventilation Flexible Catheter Suction Rigid Catheter Suction Pocket Mask Ventilation Stoma Ventilation |
| Equipment | Prehospital PPE EMS Jump Bag CPR Pocket Mask Airway Manikin Nasal Cannula Non-Rebreather Mask Nasopharyngeal Airways Oropharyngeal Airways Battery Operated Suction Unit Bag Valve Mask Oxygen tank with regulator |
| Acting roles | emergency medical responder emergency medical technician EMT EMR paramedic |
| Pathologies | compromised airway hypoxia |
| Body systems | respiratory system |
Airway management is included in this California-based EMT program as it is required for skills verification for California Registration.[1]
Airway Management is the first step in the competent care of the compromised patient. Hypoxia, or lack of oxygen, can cause neurological damage within minutes, and airway management is one of the most urgent interventions the EMT can perform in the prehospital setting.
This NREMT essential skill video covers the basic skills of Airway Management and follows the checklist order for the Foothill College Airway Lab manual practice scenario. This skills lab combines the content of both the NREMT BVM Ventilation of an apneic adult patient Checklist and the NREMT Oxygen Administration by Non-Rebreather Mask Checklist, and conforms to the guidelines from 2020 American Heart Association Guidelines for CPR and Emergency Cardiac Care
Positioning
[edit | edit source]Before any more invasive airway management steps are tried, simple positioning of the patient to improve the patency of their airway can be very effective. How you position the patient must take into account their level of consciousness (i.e. ability to protect their own airway), and the likelihood of traumatic injury to the spine which could be further injured by maneuvers intended to open the airway. As a general approach:
- A Conscious patient in whom you do not suspect trauma should be encouraged to take a position of comfort. Often this is seated, or leaning forward on their arms (also called the "tripod" position which patients in respiratory distress will often assume spontaneously)
- A Conscious trauma patient, if there is reason to suspect the patient may have a spinal injury, requires C-spine precautions when managing the airway, and one should not be compromised for the other. For trauma patients immobilized on a backboard, elevating or turning the backboard can assist respiratory efforts and protect the airway.
- The Unconscious patient without spinal injury can be positioned on their left side, known as lateral position, or with their head elevated, known as the recumbent position to help them protect their own airway. If you need to open the airway, performing a head tilt-chin lift is the most common technique in the non-trauma patient. Appropriate airway adjuncts may also be used.
- The Unconscious/Unresponsive trauma patient should be considered to have a spinal injury until it may be definitively ruled out. Use a jaw thrust to open the airway, and consider airway adjuncts.
Oxygen
[edit | edit source]Supplemental oxygen is administered to increase the effectiveness of patients breathing in providing adequate oxygen to their tissues. It can be administered at either low- or high-flow, depending on your patient's needs. Oxygen is the most common drug administered by EMTs in the prehospital setting, has few side effects, and as such, oxygen therapy should be considered first line treatment in many situations.
Oxygen Tank Assembly
[edit | edit source]CAUTION: Medical gas cylinders contain high pressure gasses which can turn the cylinder into a dangerous projectile if it is dropped or hit against anything. Always keep at least one hand on the Oxygen cylinder at all times when assembling the regulator, and secure in place once done. To safely open an oxygen tank:
- Verify the cylinder contains medical oxygen.
- Assemble the tank with a matching medical oxygen regulator, hand tightening the regulator only.
- Check the regulator seating by turning the valve stem counterclockwise one complete turn with the gauge facing away from you and listen for leaks.
- Fully open the tank and then turn back 1/4 turn, and check for tank pressure. A full tank has 2,000 psi and should be refilled/taken out of service when the tank pressure reaches 500 psi. The regulator will not function properly if the tank pressure drops below 200 psi.
Oxygen Administration
[edit | edit source]Select an appropriate oxygen delivery device based on the patient requirements:
- Nasal Cannula which provides oxygen between 1 and 6 liters per minutes (LPM) is appropriate for patients who need low flow supplemental oxygen or cannot tolerate a mask
- Non-Rebreather Mask (NRM) provides oxygen between 10 and 15 LPM for patients who require higher concentrations of oxygen and are breathing with adequate tidal volume (amount air that moves in and out with each breath)
- A Bag Valve Mask (BVM) should be chosen when the patient requires assisted ventilation in addition to supplemental oxygen. The flow rate for a BVM is typically set at 15 LPM. A patient may be ventilated with room air via BVM if necessary due to no oxygen/delayed availability of oxygen.
For each device:
- Connect the oxygen tubing from the mask to the regulator oxygen output port.
- Turn the regulator dial to the flow rate for the device being used.
- Pre-fill the reservoir bags on NRM or BVM masks prior to placing the mask on the patient.
- Place the mask on the patient and adjust to ensure good fit around the face.
- Verify that the reservoir does not completely collapse during respiration and adjust the flow rate as necessary to avoid having the reservoir continually collapsing and not completely re-inflating between breaths.
The BVM provides various oxygen concentration depending on configuration:
- BVM alone without supplemental oxygen will deliver approximately 21% O2 (the amount found in room air).
- BVM connected to O2 with tubing only and no reservoir bag attached mixes room air and supplemental oxygen, delivering approximately 50% O2 to the patient
- BVM connected to O2 with tubing and a properly inflated reservoir bag will deliver 100% O2
Oxygen Tank Disassembly
[edit | edit source]As with assembly, keep at least one hand on the Oxygen cylinder at all times when disassembling the regulator, and secure the tank in place once done.
To safely close and store an oxygen tank:
- Using the wrench, tighten the valve stem clockwise until snug, but not overtightened
- Turn the dial on the regulator to bleed off the pressure. If the hissing continues longer than 1-2 seconds, the valve is likely not fully tightened
- When the hissing ceases, loosen the retaining screw on the back side of the regulator and remove the regulator by sliding it away from the valve opening of the tank to allow the indexing pins to disengage
- Secure the tank to prevent it from rolling or falling, and stow the regulator and wrench
Airway Adjuncts
[edit | edit source]Airway adjuncts assist with maintaining the airway by supporting the soft tissue and keeping it from obstructing the oropharynx or nasopharynx.
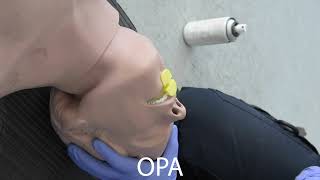
Oropharyngeal Airway (OPA) - The OPA is a curved, rigid channel that is placed in the patient's mouth and oropharynx. In conjunction with manual airway maneuvers, it can provide a patent (unobstructed/clear) airway in the unresponsive patient by supporting the base of the tongue and providing a protected channel. To use:
- Assess the patient's gag reflex - if present, the OPA cannot be used, and consider a NPA.
- Select the correct size for the patient - the device length should equal the measurement from the patients ear lobe to the corner of the mouth.
- Insert the device with the curve either sideways or towards the roof of the mouth and, once it is well into the mouth, rotate so that the curve is away from the roof of the mouth while advancing it fully into the mouth. Settle in place with the flange against the lips and the tip of the OPA retaining the posterior portion of the tongue.
- Reassess airway for adequate breathing, and recheck periodically.
Nasopharyngeal Airway (NPA) - The NPA is a longer flexible tube intended to be inserted through the nostril into the patient's nasopharynx. As it is smaller in diameter, it is a less effective airway adjunct, but should be used when the patient has a gag reflex, or has extensive trauma to the face and oropharynx. The NPA may cause epistaxis (nose bleeds). To use:
- Select the correct size for the patient - the device length when left in its natural curve should equal the measurement from the ear lobe to the tip of the nose.
- Lubricate the distal end with a water based gel.
- Inspect the nose for obstructions or septal deviation and choose the most open nare (nostril).
- Insert with the beveled opening turned towards the septum and slide towards the back of the nose slightly rolling the NPA back and forth. Seat the flange on the base of the nasal opening.
- Reassess airway for adequate breathing, and recheck periodically.
The use of an airway adjunct does not eliminate the need to be vigilant in managing the patient's airway.
Bag Valve Mask
[edit | edit source]The Bag Valve Mask, also known as a BVM, Ambu Bag or manual resuscitator, is primarily used by EMTs to ventilate an unresponsive patient in situations in which the patient's tidal volume is inadequate. It is recommended that when using the BVM, an airway adjunct also be used. To ventilate a patient with a BVM:
- Choose the proper mask — The mask should fit over the bridge of the nose with the base of the mask resting between the lower lip and the chin.
- Provide an adequate seal — The mask should create a tight seal. You should not hear air leaking around edge of the mask while you ventilate the patient. The mask should not be pushed down onto the face, but rather, the patients face should be pulled into the mask without closing off the mouth in a "C" or a "CE" grip. An excellent tutorial on sealing can be found here.
- Ventilate smoothly — At a rate of 1 breath every 5 to 6 seconds for an adult, squeeze the BVM bag over 1 to 1.5 seconds with a consistent pressure that is just enough to get visible chest rise on the patient. For an adult patient, this is typically 500 to 600 mL. The ventilations should not be forceful, or too high a volume for the size of patient, as this can force air into the stomach (gastric distention), which could cause vomiting an/or aspiration, or reduce the the lungs ability to fully inflate.
When possible, the bag valve mask should be a two person skill with one rescuer maintaining the mask seal, while the other squeezes the bag. This has been shown to be more effective at delivering adequate ventilation to the patient.[2]
Suction
[edit | edit source]Basic airway management and airway adjuncts will not protect against aspiration of gastric contents should vomiting occur - there is no replacement for effective suction. Airway suctioning should be performed whenever the patient's airway is potentially obstructed by secretions or foreign bodies. Field suction equipment consists of the following:
- Battery operated suction pump
- A vacuum canister for collection of fluids
- Flexible suction tubing
- Rigid suction tips for oropharyngeal suction, the most common of which are the Yankauer or tonsil tips.
- Flexible suction tips for nasal and stoma suction, commonly called "French catheters" which can come in several diameters measured in French or Fr
- Water for rinsing and flushing the suction tips
Both flexible and rigid suction tips can be "Whistle-tip" configuration meaning they have an opening close to where the tip attaches to the large diameter suction tubing in addition to the suction opening at the end. This "whistle" opening provides an alternate entry for air into the tip which means that suction at the end is very weak when this hole is open. Placing a finger over the opening directs all the suction to the tip, turning it "on". If the suction catheter does not have an opening, suction at the tip is continuous as long as the suction unit is on.
Suctioning
- Assemble — Attach the both vacuum side of the pump and the vacuum tubing to the fluid collection canister.
- Test — Turn the vacuum pump on, and test the tubing connections by bending the vacuum tubing to occlude it and listen for the sound of the pump to change indicating it is working harder. If this does not happen, check the airtightness of the seals between the vacuum pump, the canister and the tubing, and check that the canister lid is seated.
- Measure — Attach the appropriate tip for the type of suctioning being performed, and measure from the tip of the nose to the ear lobe on the patient to note how deep to insert the suction tip
- Suction — Insert the suction tip to the measured depth and then cover the whistle opening to suction only while withdrawing. For catheters without a whistle opening, the tubing may be kinked during insertion to prevent suction during insertion. Suction for no more than 15 seconds in an adult, 10 seconds in a child and 5 seconds in an infant
- Rinse — Suction tips may become clogged or jammed with debris, withdraw the tip and remove debris and flush with water as needed to maintain adequate suction.
- Oxygenate — Oxygen administration should be provided after suctioning.
Pocket Mask
[edit | edit source]A pocket mask, or pocket face mask or CPR mask, is a small valved mask that can be carried on one's person and used to safely deliver rescue breathing during CPR or respiratory arrest. It is not to be confused with a BVM. A pocket mask kit consists of:
- 2-3 sizes of conforming face mask to fit pediatric and adult patients
- A one-way filter valve through which the responder blows to prevent cross contamination of potentially infectious bodily substances.
- Optional oxygen port. Exhaled air from the rescuer is up to 16% oxygen. Some pocket masks may have a built-in oxygen intake tube, allowing the responder to deliver up to oxygen 50-60% oxygen.
To use:
- Choose the proper mask — The mask should fit over the bridge of the nose with the base of the mask resting between the lower lip and the chin.
- Provide an adequate seal — Maintaining any necessary C-spine precautions, hold the mask to the patients face with two hands to create a tight seal. You should not hear air leaking around edge of the mask while you ventilate the patient.
- Ventilate smoothly — At a rate of 1 breath every 5 to 6 seconds, administer air to the patient by exhaling through the valve and observing the patient's chest rise. The tidal volume delivered is limited by the lung capacity of the rescuer.
While a pocket mask is not as efficient as a bag valve mask, it does have its advantages when only one rescuer is available:
- The pocket mask it easy to carry.
- The mask allows the solo rescuer to use two hands to create a seal which provides a superior seal on the patient's face, and allows the responder to perform a jaw thrust a on patients who may have a spinal injury.
Documentation
[edit | edit source]Documentation of Airway Interventions should be included in the Patient Care Report (PCR) in the form:
- When documenting oxygen administration, document flow rate and administration device, as well as patient response. Example: "Patient placed on NRM/NRB at 15 lpm; patients SpO2 increased to 98% with a reduction in work of breathing and respiratory rate."
- When documenting airway adjuncts, document adjunct used, size, and patient response. Example: "Patient noted to have no gag reflex. 110 mm OPA sized and placed without issue."
- Any changes in the patient care must be documented, this includes examples such as stepping up O2 administration from 2 lpm to 4 lpm via nasal cannula or graduating a patient from a nasal cannula to a non-rebreathing mask.
- If the patient requires suctioning, report the volume suctioned and it's physical properties (blood, phlegm, water, vomit).
- If the patient has been intubated, the depth of the ETT in centimeters must be documented. It is commonly documented "at the teeth".
Self Assessment
[edit | edit source]- Use the integrated management of the apneic patient practice scenario until you can perform the skills smoothly
- Practice using the mouth to mask ventilation, NPA, OPA (adult), OPA (infant/child, Oral suctioning and Oxygen Administration skillsheets for the individual subskills
- Practice ventilating the Airway Manikin with the BVM ensuring adequate chest rise and fall and no stomach inflation
- Use the Airway Scenario with a classmate to practice
- Test your knowledge with this quiz
Tips and Tricks
[edit | edit source]If practiced properly, the activities described in this simulation module will familiarize you with the proper use of the actual equipment used in the field, help you internalize the workflow, including when to get what type of equipment ready, and how to determine whether you have achieved a patent airway and whether there is stomach inflation. The lowest fidelity aspect of the simulation is the airway manikin itself. It is well documented in the literature that there are quite a few limitations with using manikins for simulating airways.[3] However, the benefits of employing manikins in learning airway management are:
- Reproducibility and consistency of the learning environment
- The opportunity for repeated or unlimited practice sessions
- The opportunity to practice rare clinical events
- The absence of potential patient harm during training
It should be recognized by the user that while the anatomical structures are similar, the low fidelity of the tissue feel coupled with the absence of complicating factors such as secretions, foreign bodies, narrowed airways, and trauma that often accompany managing an airway in the field mean that 'perfect' execution of the skills taught in simulation will only provide a solid grounding in the basic physical and logistical skills of managing an airway in the field.
Additional Resources
[edit | edit source]- Ventilation via BVM with PEEP
- Intubation - Although EMTs are unable to intubate a patient, they may assist in the setup of the procedure for a paramedic.
References
[edit | edit source]- ↑ https://emsa.ca.gov/wp-content/uploads/sites/71/2017/07/Skills-Form-7.1.17.pdf
- ↑ Davidovic, L. et al. (2005). Comparison of 1- versus 2-person bag-valve-mask techniques for manikin ventilation of infants and children. Annals of emergency medicine, 46(1), 37–42. https://doi.org/10.1016/j.annemergmed.2005.02.005
- ↑ Ward P.A. et al. (2016) Man vs. manikin revisited - the ethical boundaries of simulating difficult airways in patients. Anaesthesia, 71(12), 1391–1407. https://doi.org/10.1111/anae.13526
| Authors | GSTC |
|---|---|
| License | CC-BY-SA-4.0 |
| Cite as | GSTC (2020–2025). "NREMT Skillset/Airway Management". Appropedia. Retrieved July 10, 2026. |