Z-plasty was first described in 1837 by Dr William E. Horner in Philadelphia for the treatment of a lower eyelid scar contracture resulting in ectropion. It is a random-pattern local flap and has since become an essential tool within the reconstructive surgery repertoire. Z-plasty is primarily used to (1) lengthen contracted scars resulting from burns and trauma, (2) reorient conspicuous scars for better alignment with natural skin folds, and (3) deepen contracted web spaces.
Prior to proceeding, visit the following pages for foundational content on the general principles of reconstructive surgery:
Flap Design[edit | edit source]
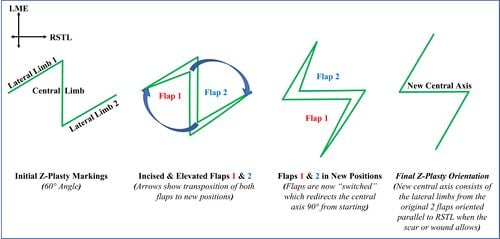
Z-plasty is named for its resemblance to the English letter “Z”. It is formed by a central limb and two lateral limbs, resulting in two equal and opposing triangular flaps. When the flaps are transposed, the central limb is reoriented and lengthening is achieved.

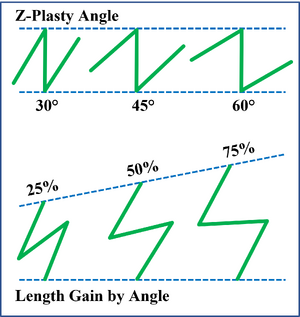
When designing a z-plasty, the central limb is placed in the direction of desired lengthening (eg the central axis of the scar contracture). The lateral limbs are then placed at either end of the central limb at a predetermined angle. Designing a larger angle between the central and lateral limbs will result in greater lengthening after flap transposition. Angles larger than 75 degrees, however, can result in excessive tissue recruitment and a dog ear deformity. The figure below illustrates how increasing the angle between the central and lateral limbs will increase the amount of lengthening achieved.

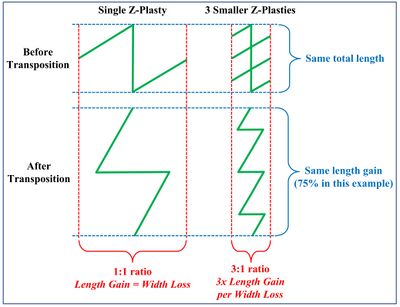
In areas that are cosmetically sensitive or have limited adjacent tissue for recruitment - like the face or hand - a single large z-plasty can be replaced by a stack of multiple smaller z-plasties. This allows for the same degree of total lengthening but with less narrowing, and therefore less distortion to surrounding tissues.

Indications[edit | edit source]
- Linear contractures that cross joints (eg elbow, knee)
- Circular contractures around body orifices (eg nostril, mouth, etc)
- Web space contractures (eg neck, hand)
- Planned interruption of linear surgical incisions
Contraindications[edit | edit source]
Because z-plasty relies on the recruitment and transposition of adjacent tissue, it cannot be performed in the setting of inadequate adjacent tissue, nearby aesthetic landmarks, or poor skin laxity.
Instruments[edit | edit source]
- Marking pen
- 15 scalpel
- Toothed adson forceps
- Skin hook
- Needle driver
- Suture
Surgical Technique[edit | edit source]
- Mark the central limb along the axis of the desired lengthening. If possible, orient the central limb perpendicular to the relaxed skin tension lines (RSTL).
- Mark the lateral limbs at either end of the central limb. Ensure that the lateral limbs are of equal length to each other and to the central limb. Ensure that the angle between the lateral and central limbs is adequate to achieve the desired lengthening.
- Review your markings, taking care to confirm that the adjacent skin is suitable for recruitment (i.e. no critical landmarks involved, sufficient tissue laxity)
- Incise your markings through epidermis, dermis, and into subcutaneous tissue
- Elevate the triangular flaps in the subcutaneous plane. Aim to maintain a minimum of 4mm of subcutaneous tissue attached to the flap dermis. Use a toothed adson or skin hook to apply upwards traction at the apex of each flap as you elevate. Continue elevation to the base of each triangular flap.
- Transpose the flaps by reorienting each apex to the far corner of the opposite flap.
- Confirm the viability of both flaps after transposition by observing for skin edge bleeding
- Inset the apex of each transposed flap using a buried horizontal mattress suture. Place the buried end in the flap apex. If the inset flaps are under undue tension, remove the suture and continue flap elevation to improve flap mobility.
- Complete the remainder of the closure using simple interrupted sutures
Complications[edit | edit source]
- Flap necrosis. Flap necrosis is most often the result of overly thin flaps. The random pattern triangular flaps of a z-plasty derive their vascular supply from the subdermal plexus. If the flaps are made too thin during elevation, their vascular supply will be compromised and necrosis will ensue. Flap necrosis can also result from inset under tension and aggressive tissue handling. To prevent flap necrosis, ensure that flaps are elevated with at least 4mm of subcutaneous tissue and inset without undue tension.
- Dehiscence. Z-plasty dehiscence can result from poor suture technique or surgical site infection.
References[edit | edit source]
- Borges AF, Gibson T. The original Z-plasty. Br J Plast Surg. 1973;26(3):237-246. doi:10.1016/0007-1226(73)90008-8