

An electric lawnmower that utilizes solar power as an energy source will address a number of issues that standard internal combustion engine mowers do not. An electric lawnmower with a solar charger will be easier to use. There is no messy dangerous gasoline to deal with. It will eliminate those pesky trips to the gas station for fill-ups. Just plug the mower into the charging station when not in use and it will be charged and ready for your next mow! Most importantly it eliminates the emissions of an internal combustion mower.
The basic idea is to convert an older non-working gas mower into an electric-powered mower by replacing the gas engine with an electric motor that runs from a 12-volt battery. This battery will be charged using photovoltaic panel (A.K.A. - solar panel). I chose to convert an old gas mower rather than just starting with an electric mower due to cost and so I could design the power output. I also planned on using as many used materials as I can. This will help to save these materials from ending up in our already over filled landfills.
The Plan/Design[edit | edit source]
I would like to claim that I came up with this solar charged electric mower idea on my own but the truth is I came across an article about one in a "Home Power" magazine (Issue 107) awhile back and have wanted to build one ever since. When the opportunity arose to use it as a project in my Engineering 305 class at Cal Poly Humboldt I jumped at the chance.
Motor and Battery Sizing[edit | edit source]
To start with I needed to design a mower that would fit my needs. I have a yard that takes about forty-five minutes to mow so it was important to size the battery accordingly. To do this I had to find out what kind of amperage the motor would be pulling for the forty-five minutes it takes to mow the grass. This is dependent on the type of motor used. Motors are rated in HP (horse power) and I wanted around the same HP as a standard internal combustion mower. The newer gas powered lawnmowers are about 4 to 6 HP and the older mowers are around 3 HP. According to the article in "Home Power" magazine 1 HP of an electric motor is equivalent to about 4 HP of an internal combustion engine. I was hoping to purchase a 1 HP motor but after pricing them I decided I needed to go with the least expensive motor that would get the job done. This turned out to be a 12 VDC, 3/4 HP, Dayton electric motor. (See below for details on parts and cost.)
The 3/4 HP Dayton motor is specified to pull 58A with a full load. I used this figure to help determine the size battery I needed. I knew I wanted a 12VDC battery, they are easy to find, use, and come in a variety of sizes. The next step was to figure out the amp-hours I needed to run this particular motor for 45 minutes. Amp-hours are a measurement of the length of time it takes to discharge a battery at a certain amperage. For example; a 35 amp-hour battery should give 35 amps for an hour before being discharged. I know I want to run my mower for 45 minutes but I'll just round it to an hour to be safe. Although the motor is rated for 58A, that amperage is with a full load and typically while mowing I will not be running a full load. While just spinning the blade (not cutting grass) the amps will only be about half of the full load or 30A. So a 40 Amp-hour battery should allow me to mow moderately tall grass for about 45 minutes to an hour. It just so happens that I had a 40 amp-hour deep-cycle battery from a past project. (See below for details on parts and cost).
-
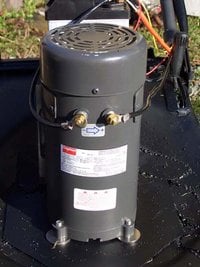
Motor
-
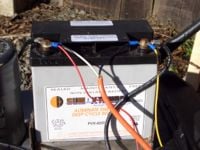
Battery


Solar charging station[edit | edit source]
After the grass is mowed I'm going to need a way to charge the battery for the next mow. Luckily, my grass only needs to be cut once every week or two. This allows plenty of time to charge the battery with a solar panel. I had originally planned to build a structure that would house the entire mower then mount the solar panel on the roof. Due to time constrains, lack of yard space, and lack of good stationary solar access I decided to build a small portable solar charging station. This will allow me to easily store the mower in the garage while placing the charging station in direct sunlight.
-
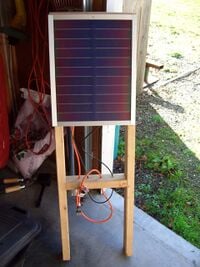
Charging Station

Solar Panel and Charge Controller Sizing[edit | edit source]
I have an 11Watt solar panel from a past project that I am using to charge the battery. It is rated at 16.5 operating voltage (Volts) and.62 operating current (Amps) in full sun. (See link below for details on parts and cost)
To figure out how long it takes to charge the battery I use this calculation I found in the owner's manual of a DieHard Battery Charger:
(Amp Hour Rating * % of charge needed / Amps) * 1.25 = hours of charge time
Say my battery is discharged down to 50%, according to my systems setup the calculation would look like this:
(40 Amp-hour battery *.50 charge needed /.62 solar panels Amps) * 1.25 = 40 hours total charge time.
-
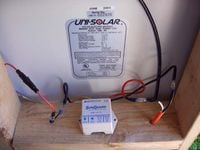
Charge Controller

I also have a 12V 4.5A charge controller from a past project. This is wired between the solar panel and the battery. The controller stops the battery from discharging through the solar panel when the sun is not out and the panel is not creating electricity. It also regulates the voltage to the battery. Varying voltage to the battery can significantly shorten the battery's life span. (See below for details on parts and cost).
Bill of Materials[edit | edit source]
| Quantity | Materials | Source | Cost ($) | Total ($) |
|---|---|---|---|---|
| 1 | used lawnmower | yard sale | 5.00 | 5.00 |
| 1 | electric motor (Dayton 3/4HP, 12VDC) part #: 6ML04 | Graingers | 312.00 | 312.00[1] |
| 1 | solar panel (UniSolar 11 Watt) | Affordable-solar.com | 120.00 | 120.00 |
| 1 | charge controller (Morningstar SunGuard 4.5A, 12V) | Affordable-solar.com | 39.00 | 39.00 |
| 1 | voltmeter | Kragen Auto Parts | 22.00 | 22.00 |
| 1 | ammeter | Kragen Auto Parts | 16.00 | 16.00 |
| 1 | battery (Sun Xtender 40 AH) | windsun.com | 90.00 | 90.00 |
| misc. electrical (wire, etc.) | local electric store | 25.00 | 25.00 | |
| misc. hardware (nuts & bolts) | local hardware store | 20.00 | 20.00 | |
| 1 | switch (70A) | Industrial Electric | 50.00 | 50.00 |
| Total Cost | 699.00[1] | |||
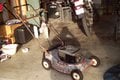
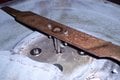
Stripping the Old Mower[edit | edit source]
After searching various yard sales I found and bought this old lawnmower for $5.00. (You can't beat that price!) As you can see it needed a lot of work. I was hoping to remove the internal combustion engine by loosening the bolts that attached it to the mower deck. No such luck. They where rusted to the deck so I spent a large amount of time cutting the deck with a rotary tool to allow the engine to be removed. I used some spray on paint remover to remove a majority of the red paint. Then I used a wire brush to remove all the rust. After that I sprayed the rust spots with a rust retardant to stop the rust from spreading.
This mower was in pretty bad shape, if I took on this project again I would try to find a mower in better shape. It may cost a little more but that money could be easily recouped by the savings in time and effort.
-

Old Mower Deck
-
Old Mower Deck
-

Old Mower Deck
-

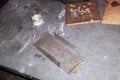
Stainless Steel Patches


Fabricating the Deck[edit | edit source]
After stripping the mower and removing the engine I was left with a mower deck with a huge hole in it. I went to a local scrap yard and found a couple of small sheets of stainless steel about 1/16" thick. I then cut the steel to the proper size to cover the hole in the deck. Before welding the new stainless steel deck to the mower I drilled five holes; one in the center to allow the shaft of the motor to sit under the deck and four more around the center hole to allow the motor to be mounted to the deck. It was important to make sure the center shaft hole is centered on the mower. If the shaft is not centered when the blade is mounted to the shaft it could rub against the sidewall of the mower. After the holes were properly measured and drilled I carefully welded the steel over the existing hole in the mower. There were still a few spots where rust had eaten through the mower so I cut some additional pieces of steel to weld over the smaller rust holes. These patches can be seen in the image on the lower left. The 1/16" stainless steel worked well for this application. It is thick enough to support the motor and fairly easy to work with when the proper tools are used.
As mentioned in the stripping the old mower section, the whole process of fabricating a new deck could have been avoided by purchasing a mower in better condition. One that allows the engine to be removed without taking part of the deck with it.
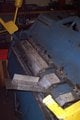
Mounting the Motor[edit | edit source]
When mounting the motor to the mower deck the most important thing was to make sure it was centered and properly secured. I made sure it was centered by measuring an equal distance from the sides of the motor to the outside diameter of the mower. I secured the motor to the deck with four 3/8" bolts with washers. Adding washers between the motor and the deck allowed me to raise different sides of the motor to level. I needed to place two washers on the front two bolts to bring the motor up to level.
I struggled with the decision to the way I should mount the motor. Should I face the terminal studs toward the back of the mower to protect them and to allow easy access to the battery or toward the front to allow the battery mount to attach to the motor base? After trying the different variations I realized that the battery must be mounted to the motor base to provide the proper support to the battery. (See battery mounting below for more info.)
This method of battery mounting is working out well. I have had no issues.
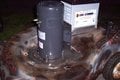
-
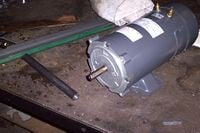
Dayton 3/4HP, 12VDC Motor

Mounting the Blade[edit | edit source]
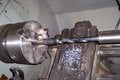
Unfortunately, when removing the old blade from the old mower I was unable to salvage the piece that attached the engine shaft to the mower blade. This meant that it was necessary to fabricate my own blade mount. I found a piece of metal rod about 3/4" in diameter in the scrap pile in the HSU metals lab. I bored a hole into the rod at about 3/8" in diameter (the motor shaft diameter). This would allow the rod to slide over the motor shaft. Next the rod needed a key way milled to allow a key to be inserted. The key connects the rod to the shaft and keeps the rod from slipping while the shaft is rotating. Then I cut the rod to length and welded it to an 1/8" thick metal plate that the mower blade will be bolted to.
After the blade mount was finished being fabricated I inserted it on to the shaft. Then to make sure the mount was supported vertically I drilled a small hole completely through the mount and shaft. This allowed me to insert a bolt as an added safety measure.
When the blade mount was securely mounted I bolted the mower blade to it using two 3/8" nuts and bolts with washers.
All in all the fabrication of the blade mount went well. The parts were free (except the nuts and bolts) so the only true cost was the labor and it seems to be doing its job well. The only thing I would change is the lengh of bolts I used. I used about a 1-1/2" bolt for both the blade and the blade mount. They really only need about a 1/2" bolt.
-
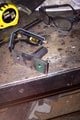
Detached Blade Mount
-
Drilling the Mount
-
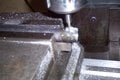
Milling the Mount
-
Blade Mount
-
Mower Blade Mounted


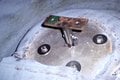
Battery Mounting[edit | edit source]
Once the motor was mounted I needed to find a place for the battery to sit. As I mentioned in the mounting the motor section, the base of the motor was facing the rear of the mower and would provide a solid mounting surface for the battery mount. To get the proper weight distribution I wanted to mount the battery as close as I could to the back wheels. This would allow the handle bars to serve as a lever and allow the mower to easily pivot when on its back wheels.
Using a piece of stainless steel I purchased from a local scrap yard I fabricated the battery mount. I started by placing the battery in the center of the square piece of stainless steel. Then I marked the outline of the battery on to the steel. Next I cut the corners to allow the sides that extend beyond the battery to be folded up. After folding up all four sides I welded them together for support. The battery fits tightly into the mount so no excess strapping is needed.
I then added a small piece of steel to the front side of the battery mount at a ninety degree angle. This piece extended from the battery mount to the deck of the mower to help support the battery when bolted to the motor base (see bottom right image). The other end of the battery mount rests on the raised back of the mower.
-
Folding stainless steel
-
Partially complete mount
-

Finished battery mount
-
Placement of battery mount and motor


Electrical[edit | edit source]

The electrical was one of the more complicated parts of this project. I had originally thought it would be rather simple, just run some wires from the battery to the motor add a switch and that would take care of it. As I started to do so I realized it wasn't that simple. I needed to have gauges to measure the volts and amps of the battery, the wires needed to be correctly sized, and a switch for a 12V 60A system can't just be picked up at the local hardware store.
Lets start with the wire sizing. Wires are sized by gauge, the smaller the gauge the larger the wire. The Dayton 3/4HP motor pulls 58A according to the spec sheet. It turns out that a #6 wire is rated to handle 75 amps so that's what I used to connect the motor to the battery through the amp meter and switch (see wire diagram below). I used a 16 AWG wire to connect the voltmeter to the battery and a 16 AWG medium duty extension cord to connect the battery to the charging station. According to the extension cord label it could handle up to 13 amps. This should be more than enough for the.63 amps the solar panel puts out.

I found the gauges at a local car parts store. I wired the ammeter in series and the voltmeter in parallel. The ammeter helps to give me an idea as to the amount of amps I'm pulling when mowing the grass. This in turn gives me an idea as to how long the battery is going to last before needing a charge. The voltmeter tells me when I need to recharge the battery. According to the battery manufacturer the battery is fully charged when the voltage reads 12.7 V. When it reads 11.75 V the battery is down to 30% and needs recharging.
I originally wanted to use a breaker for the on/off switch but after searching for awhile I noticed that a 60A 12V circuit breaker is not readily available. Luckily I found a switch that could handle 60A at a local industrial electric supplier. I also added a 100A fuse between the battery and motor.
Solar charging station electrical:
I also used 16 AWG for the connections between the solar panel and the charge controller. I put a 1.5A fuse between the solar panel and the charge controller as specified by the manufacture.

Solar Charging Station[edit | edit source]
After the mower was assembled and ready to go I needed a way to charge it. A used a 11 Watt Uni-solar panel that plugs into the mower when not in use. This panel is made to charge a 12V battery at.62 amps in full sun. I screwed a couple 4' long 2x4s to three cross supports to serve as a mount for the panel (see picture at top of page "Charging Station"). This makes for a light portable sturdy structure. I needed something I could easily move to the best solar access.
I also mounted a Morningstar SunGuard charge controller on to one of the cross supports. It is hidden behind the solar panel to protect it from the weather. (see picture at top of page "Charge Controller")
Although this solar panel is able to charge the battery I would have liked to get a larger one (if I had the money). As stated on the Home Page it takes about 40 hours of direct sunlight to charge the battery from 50%. Here in Humboldt County direct sunlight is not always prevalent. In optimal conditions we may get 5 hours a day in the winter. This means it would take eight days to charge the battery from 50% to 100%. On the bright side, the grass can't be cut when it's raining and it is usually raining if it is not sunny in the Pacific Northwest.
Testing[edit | edit source]
Testing the mower proved to be more difficult than I had anticipated. Wouldn't you know it, the only time I have ever been excited about mowing the lawn and it rained for a week straight? I did manage to get some tests done in my garage and even mowed a little grass when the rain let up.
Reserve Capacity Test[edit | edit source]
I bought the Sun Xtender deep-cycle PVX-420T over two years ago and have never used it. The manufacturer recommends running this test if the battery has gone unused for over 6 months to ensure the battery is capable of providing the necessary capacity to perform properly. After the battery is fully charged (12.7V) you are supposed to discharge the battery at 25 Amps until the voltage reads 10.5V. Luckily the mower pulls 25 Amps when running (not cutting). So I turned it on and timed how long it took to go from 12.7V to 10.5V. This ended up taking well over an hour. The PVX-420T was rated to do this in 61 minutes. So the battery passed this test with flying colors. If it would have taken 49 minutes or less, the manufacture recommends replacing the battery.
Fifteen Minute Mow Test[edit | edit source]
I was anxious to get out and try the mower so during a break form the rain I did just that. The wet grass didn't provide ideal mowing conditions but I will take what I can get at this point. I measured the battery voltage to be 12.5 (about 90% capacity) prior to mowing. I had the mower deck set to the second to highest position and the grass was moderately long and wet. I watched the ammeter while mowing and it was pretty consistently pulling 45-60 amps. I mowed for about fifteen minutes (about 1/3 of my yard) and when I finished the battery voltage read 12.25 (about 60% capacity). Not bad considering the grass was wet. I figure that in ideal conditions (moderately long dry grass) the mower should pull between 40 and 50 amps. At that amperage the 40 amp-hour battery should last about an hour before becoming completely discharged. Completely discharging the battery is not good for it so I will only run the mower for 45 minutes which is about how long it takes to mow my lawn. This should leave the battery at about 11.75 (about 30% capacity).
Testing the Charging Station[edit | edit source]
Once again the rainy weather did not provide the ideal conditions for testing the solar panel charging station. Therefore, I had to use a battery charger to recharge the battery to a safe level. I used the 2 amp setting on the charger. This gives the battery 2 amps at a constant voltage in until it reaches about 80% (12.4V) capacity. It then starts to vary the voltage and this is not good for the battery. At this point I take the battery off the charger and plug it into the solar charging station. In a full winters day sun it raised the battery from 12.4V (80%) to 12.5V (90%) so I know its working. I plan on using the charging station at greater lengths when the weather allows me to do so.
Conclusion[edit | edit source]
Over all I really enjoyed completing this project. It was a lot of hard work but most things worth doing are. In retrospect there are only a few things I would change. First, I would find a mower that could be easily disassembled or at least able to be disassembled. This would save time and labor on the fabricating portion of this project. Next I would invest in a larger solar panel, at least 50 Watts this would allow the battery to be charged quicker and require less sun between mows. I would have also used a breaker rather then the switch I installed or mount a fuse between the battery and motor. This would help to make the system safer and protect the motor if the amperage rose to an unsafe level. Besides that the mower runs great and I'm looking forward to quiet pollution free mowing from here on out.
If you have any questions feel free to e-mail me at createfreedumb at hotmail dot com
Project Credits[edit | edit source]
Jeremy James
Cal Poly Humboldt
Humboldt County, CA
createfreedumb at hotmail dot com
See also[edit | edit source]
- Humboldt photovoltaic gallery
- Solar wiki
- Wogga's Solar Mower Page http://web.archive.org/web/20180618181701/http://solarpowermower.wikia.com/wiki/Solar_Power_Mower_Wiki