
Open Source Hardware Enterprise Plastic Granulator
Spring 2016
[edit | edit source]Current Status of the Project (4/9/2016)
[edit | edit source]Currently, the plastic granulator is completely assembled. Our group has started to test the granulator's capabilities of what types of plastic it can granulate and the throughput capabilities.
Plastic Granulator
[edit | edit source]Project developed by Andy Schaub, Lucas Wilder, and Peter Gorecki

Abstract
[edit | edit source]Our mission is to build an Open Source Hardware Plastic Granulator. The granulator will be able to granulate all types of plastic, but we will focus on granulating PET, PLA, ABS, and HDPE. This design will also be focusing on being able to manufacture it at a low cost. This is because we want anyone with access to a machine shop to be able to produce the granulator. Another main goal for the granulator is to have it run off of single phase power. This is because most granulators being produced run off of three phase power. With three phase power not being common in households and since we want the general population to have the ability to produce one we would like them also to be able to use it without have to find a place that supplies three phase power.
With the granulator, our enterprise will be able to take recycled plastic and granulate it into usable feedstock for the recyclebot to make 3D printer filament and then sell the filament to help sustain our enterprise in the future.
The design our team has created can be seen on the right.
Bill of Materials
[edit | edit source]All of the detailed drawings for each of the parts used to make the plastic granulator can be found below. Also, the fasteners needed to assemble the parts are listed.
- The base rods are the supports used to hold the shredder up. There are four base rods needed to manufacture one granulator.
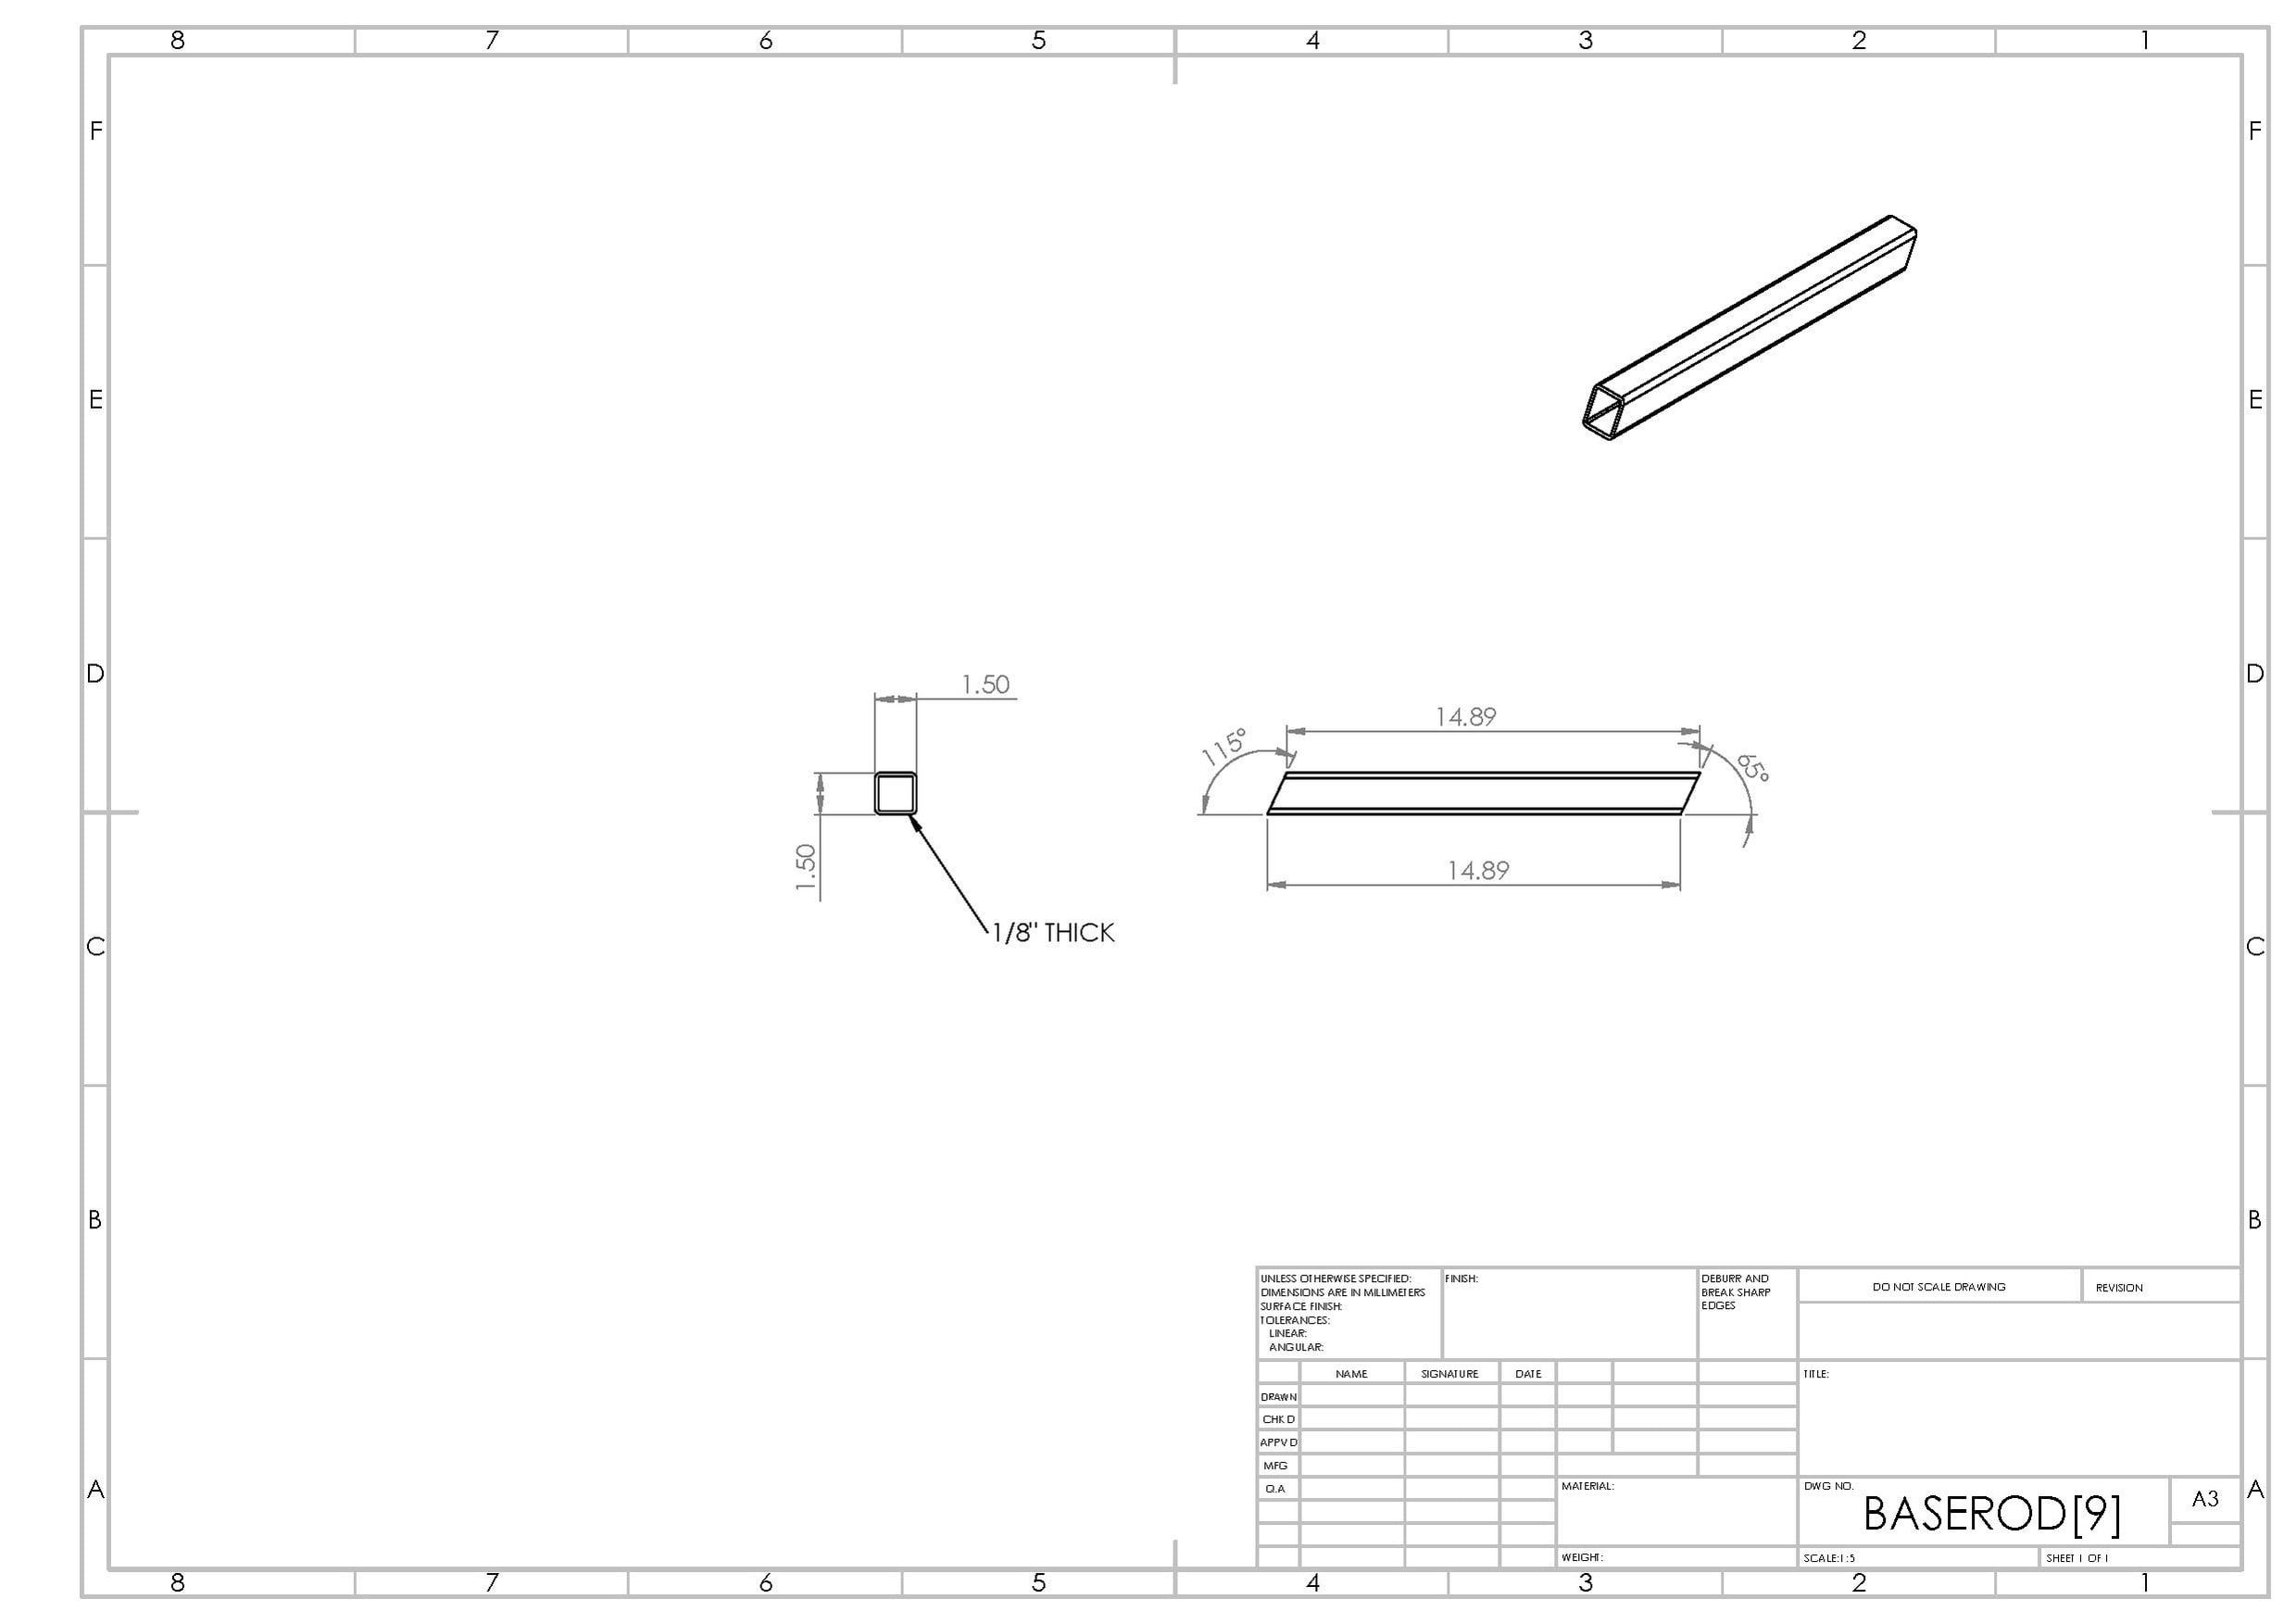 These were made from a 1/8" 1.5" square tubing
 - The bed knife is what the rotary blades use as a cutting edge. There is only one bed knife needed to manufacture one granulator.
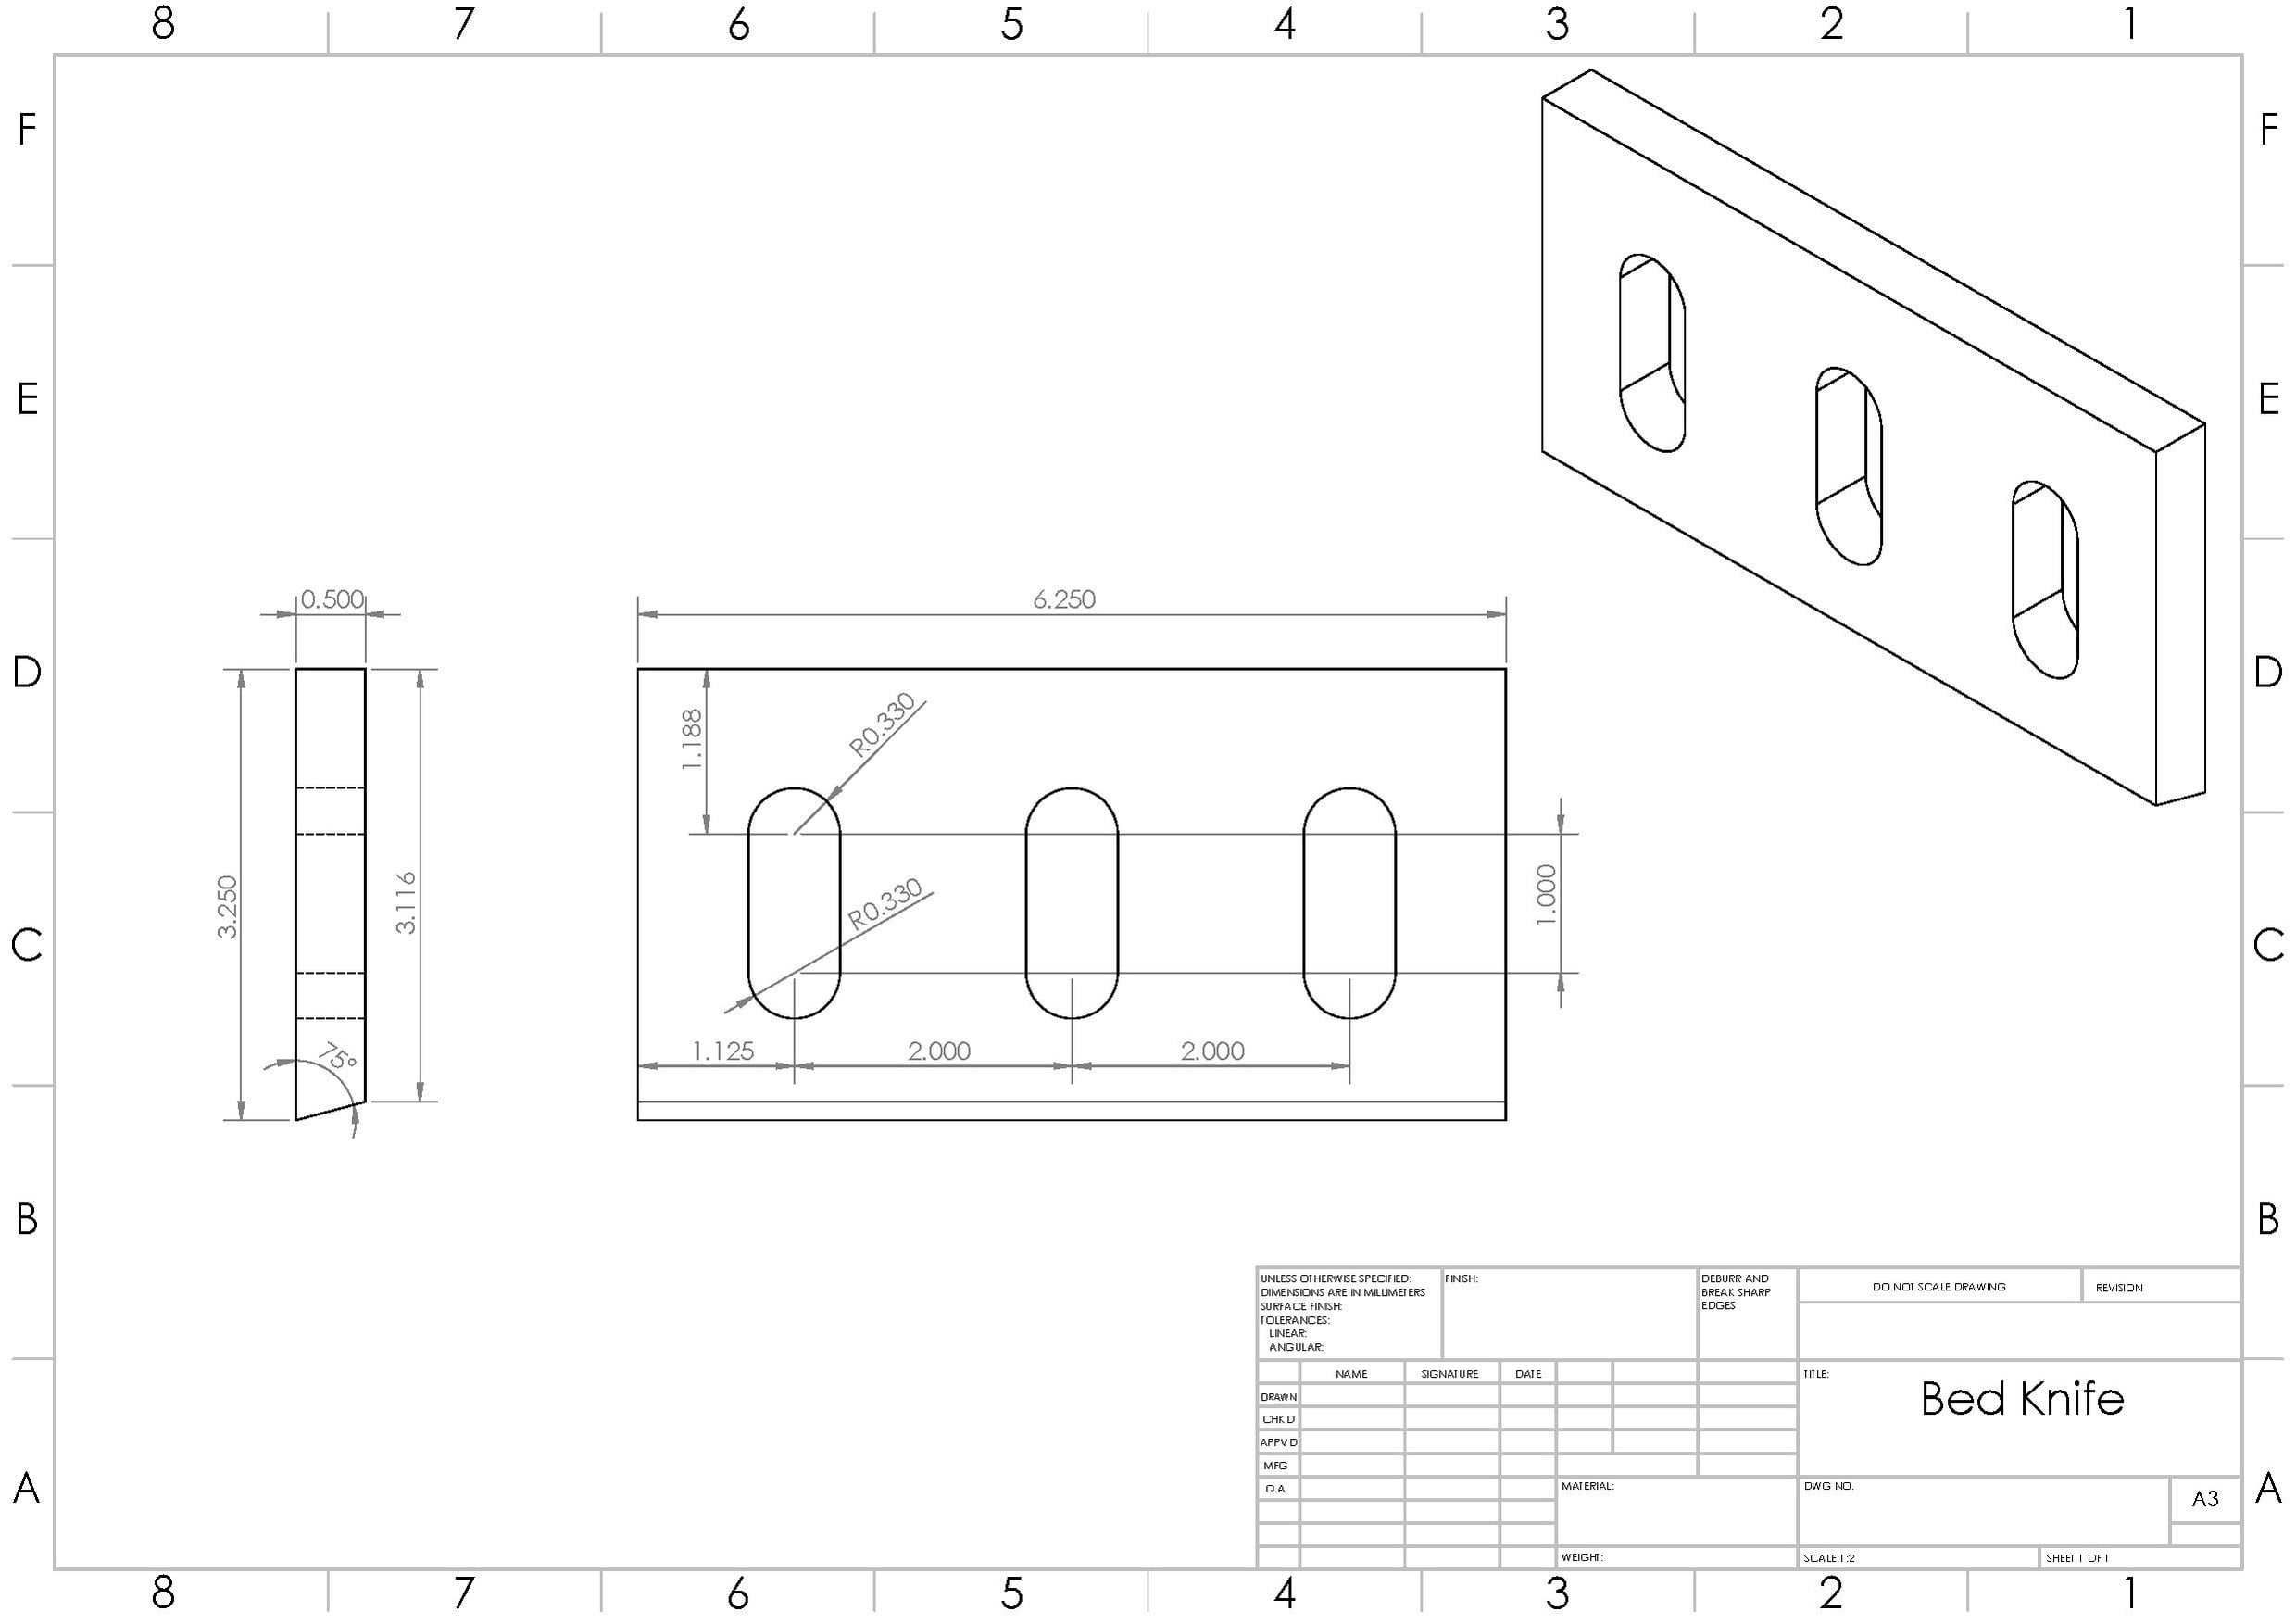 This is the website used to order the bed blade: Services for Plastics
 - The blade supports are mounted to the shaft and is where the rotary blades mount. There are two blade supports needed to manufacture one granulator.
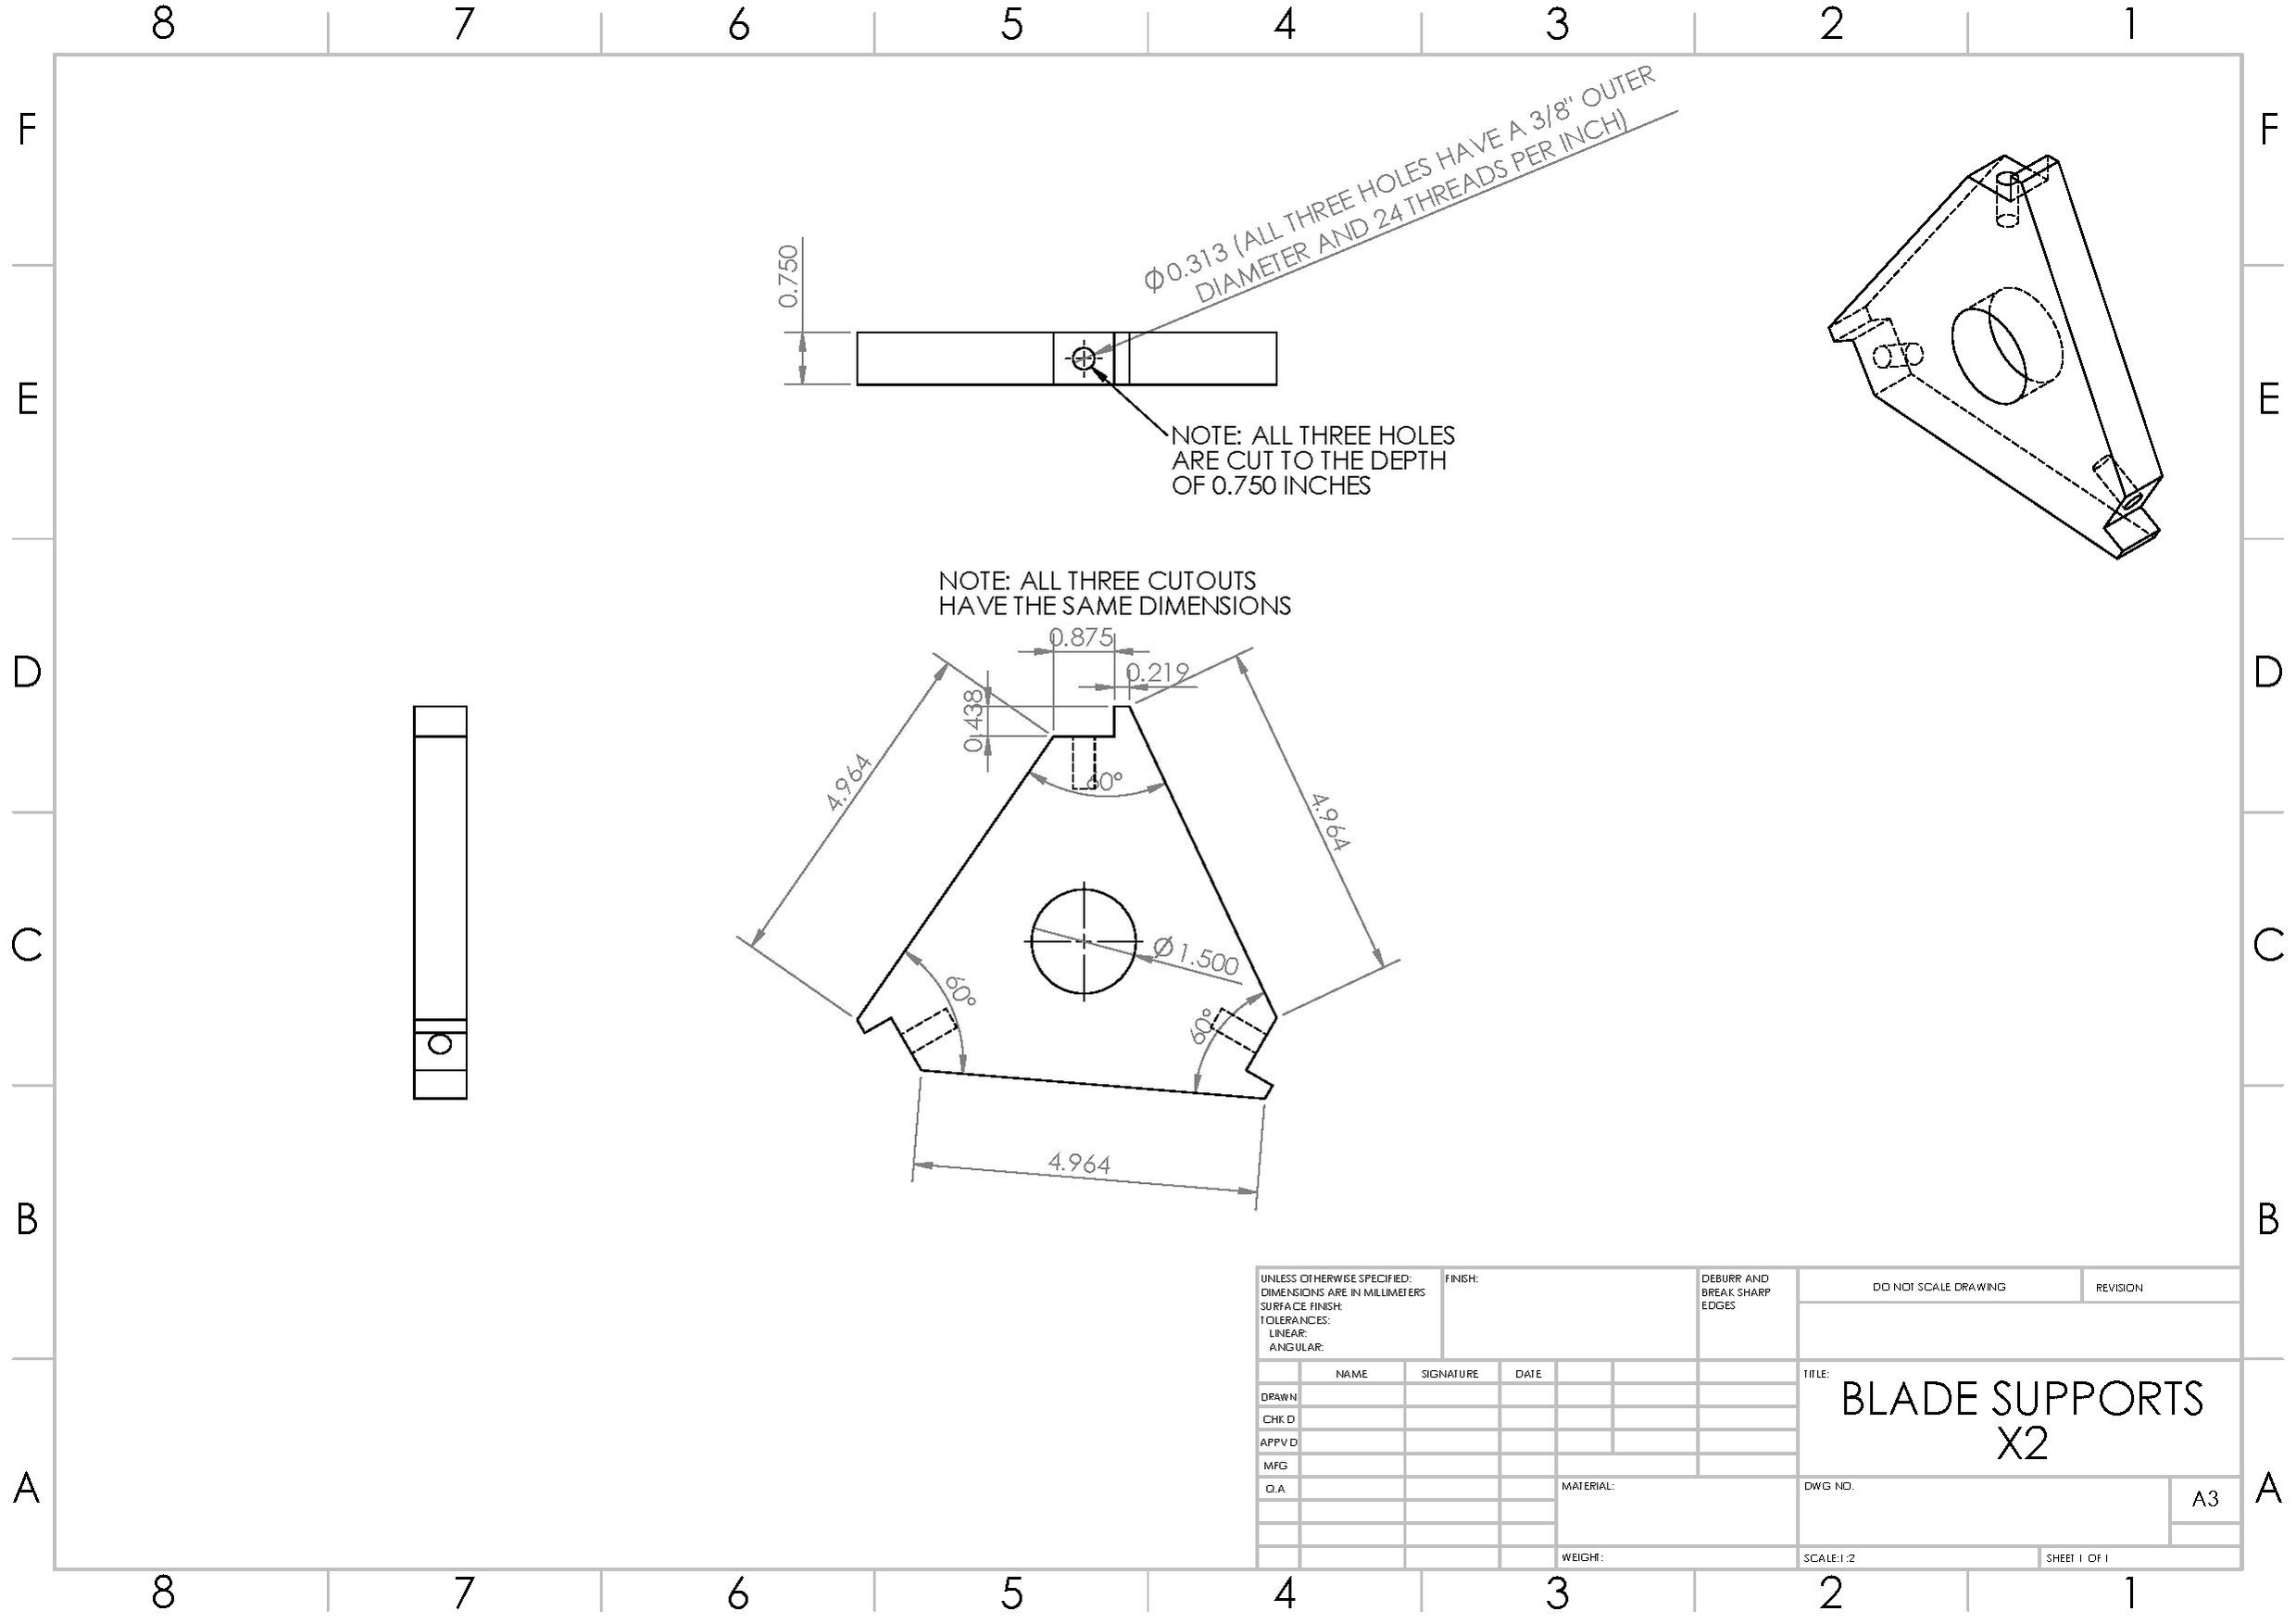 These were made from a 1" steel plate.
 - The blade side plates are used to plates on the side of the granulator that is used to connect all of the parts. There are two blade side plates needed to manufacture one granulator.
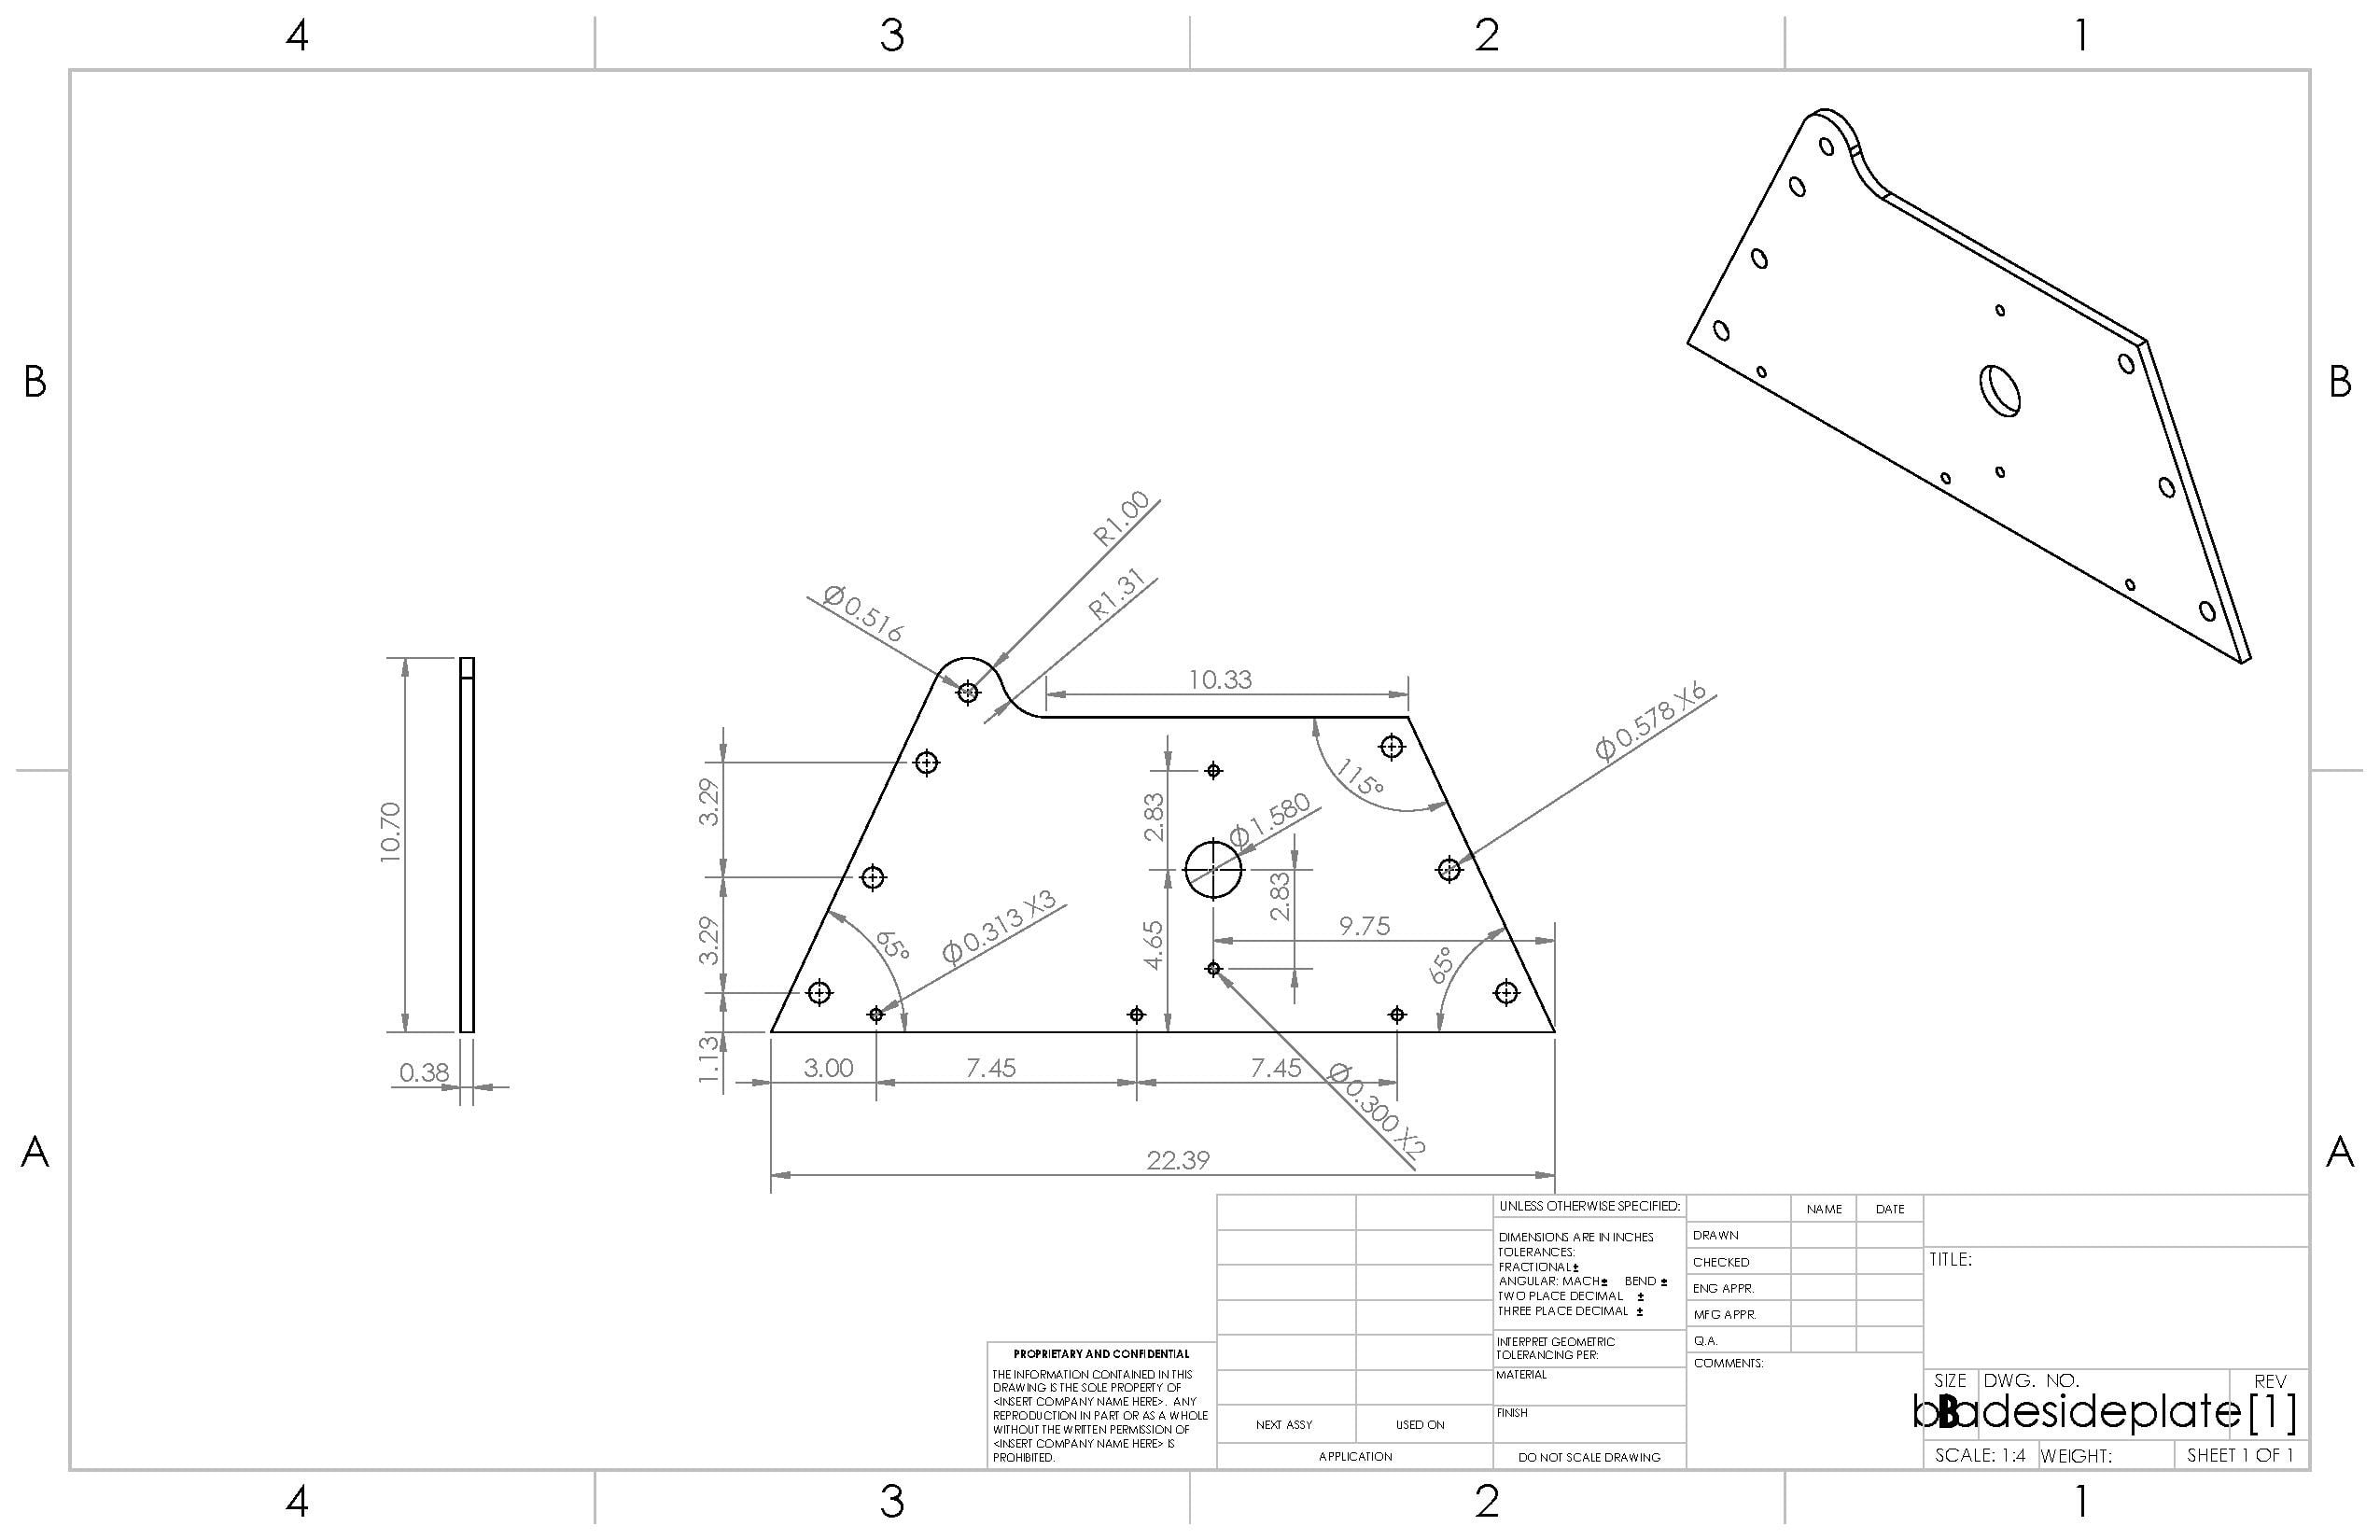 These were made from a 3/8" steel sheet.
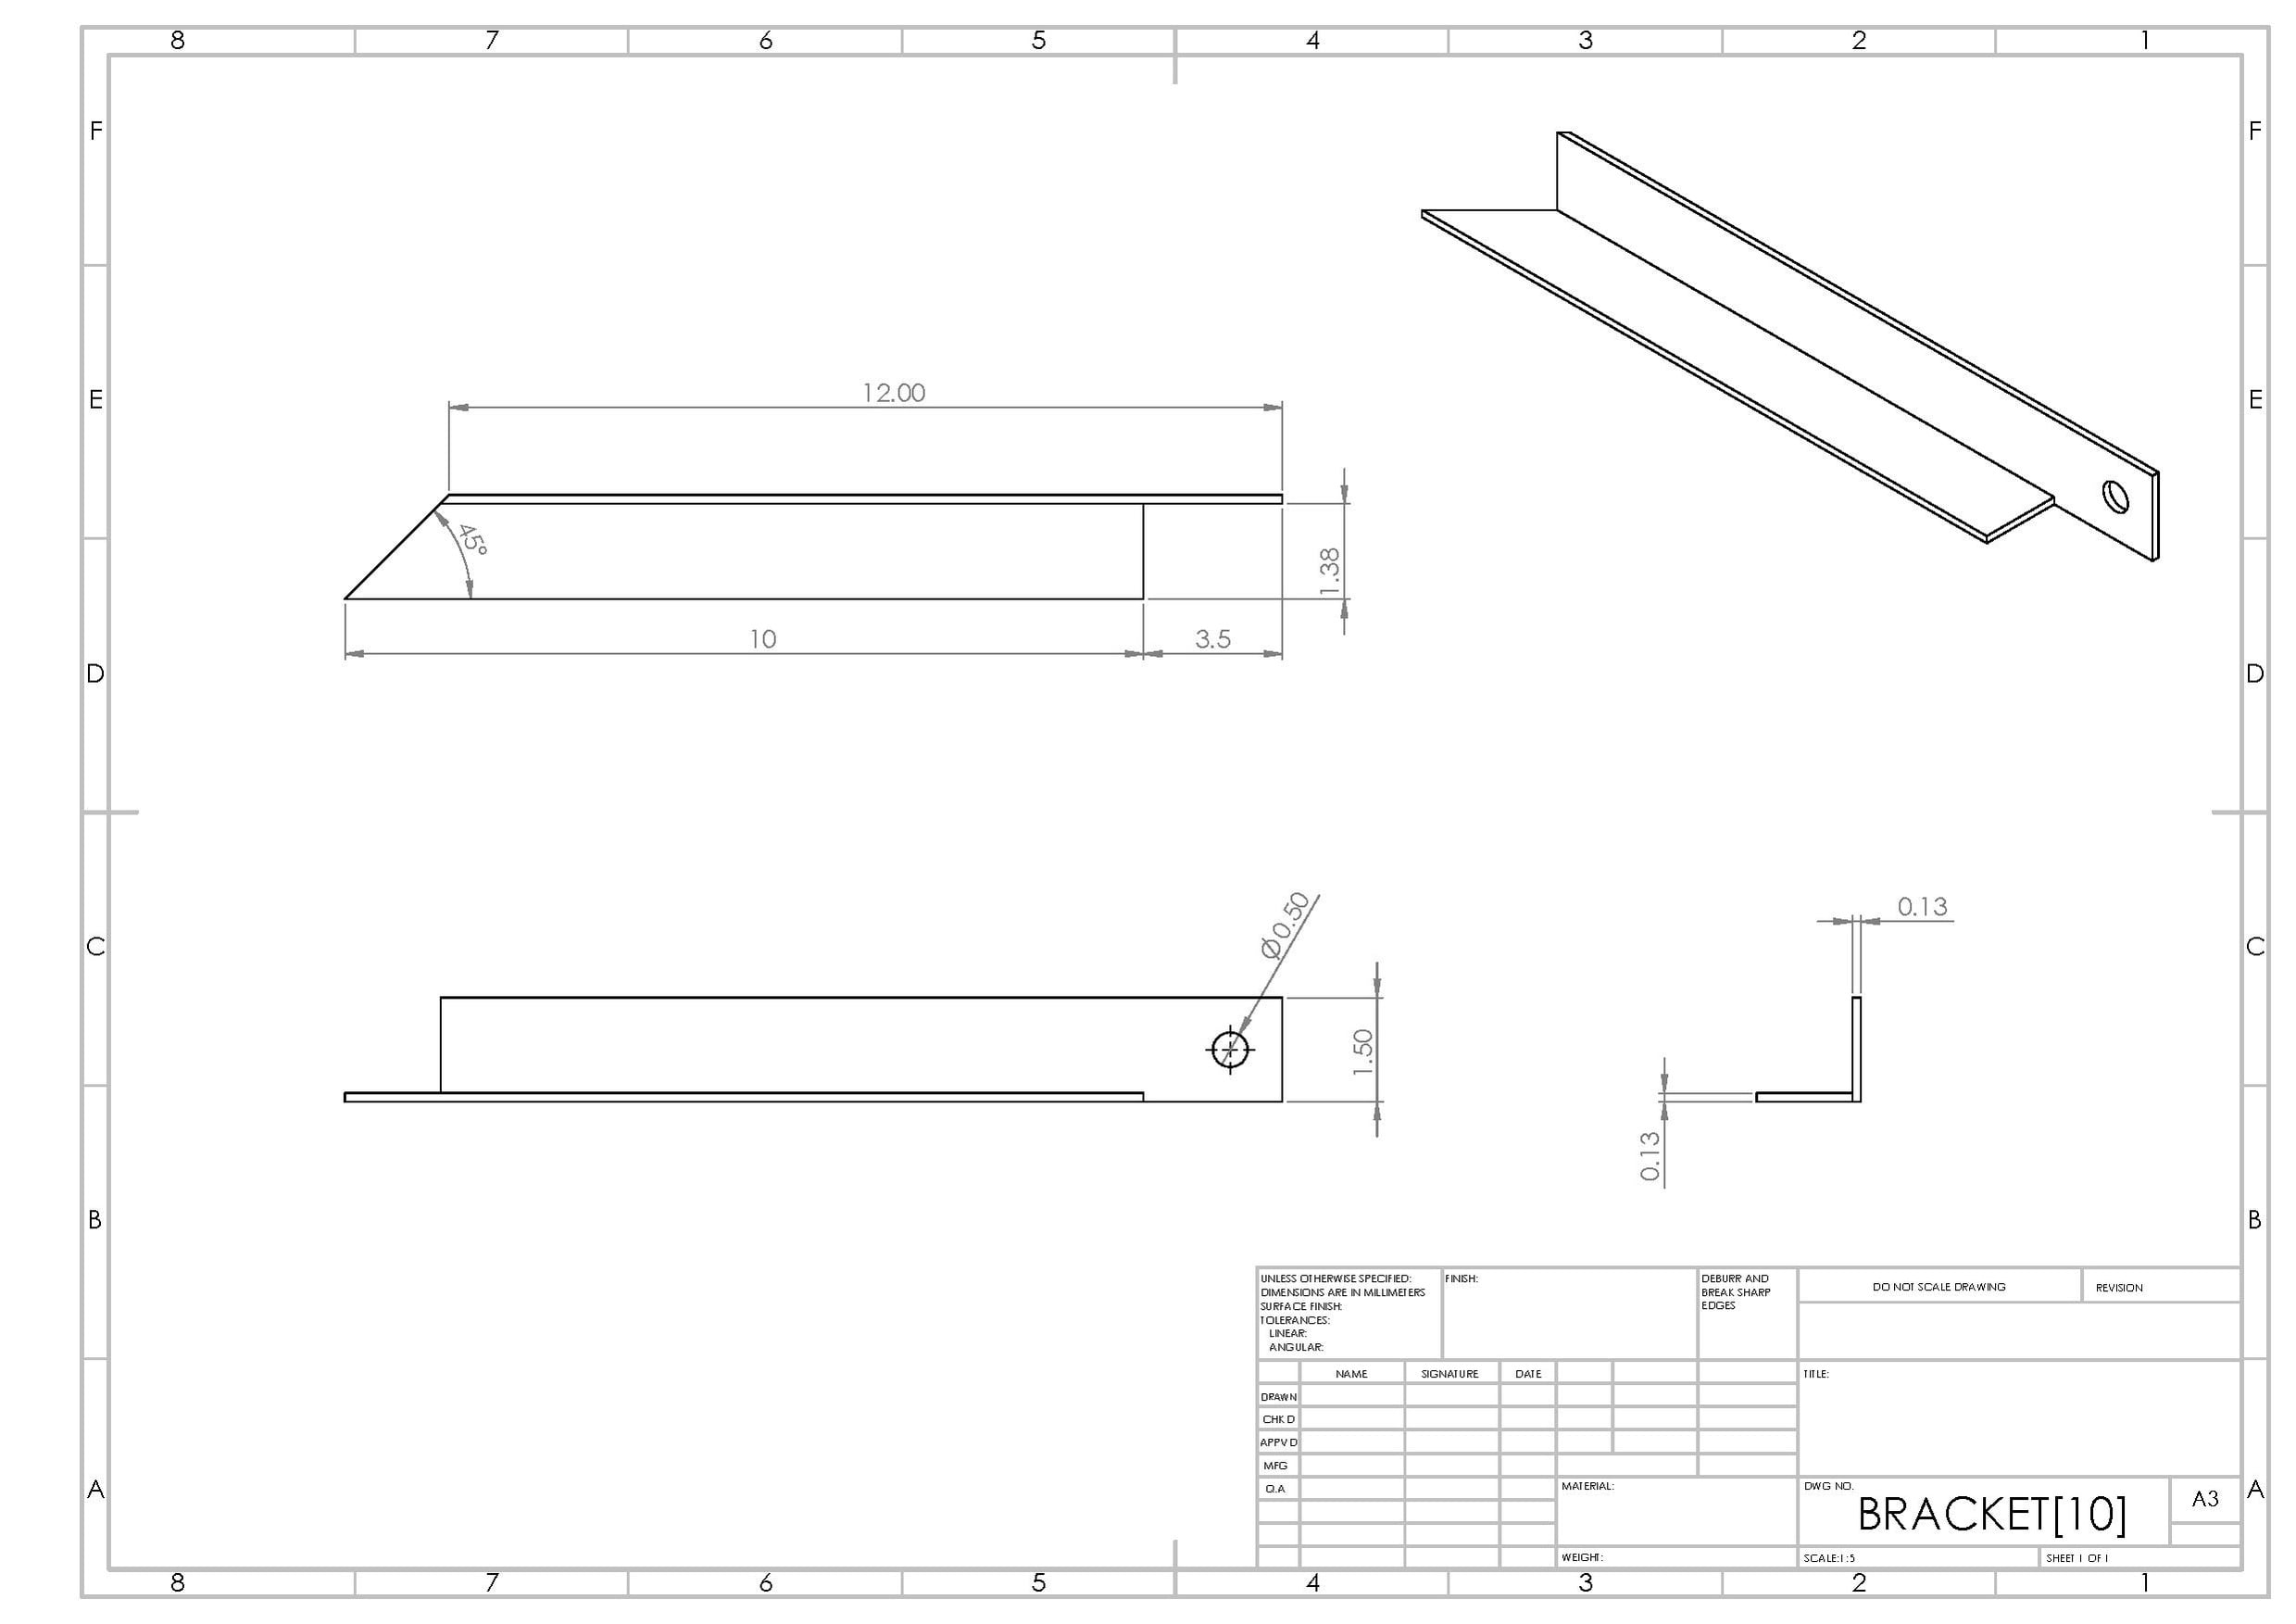
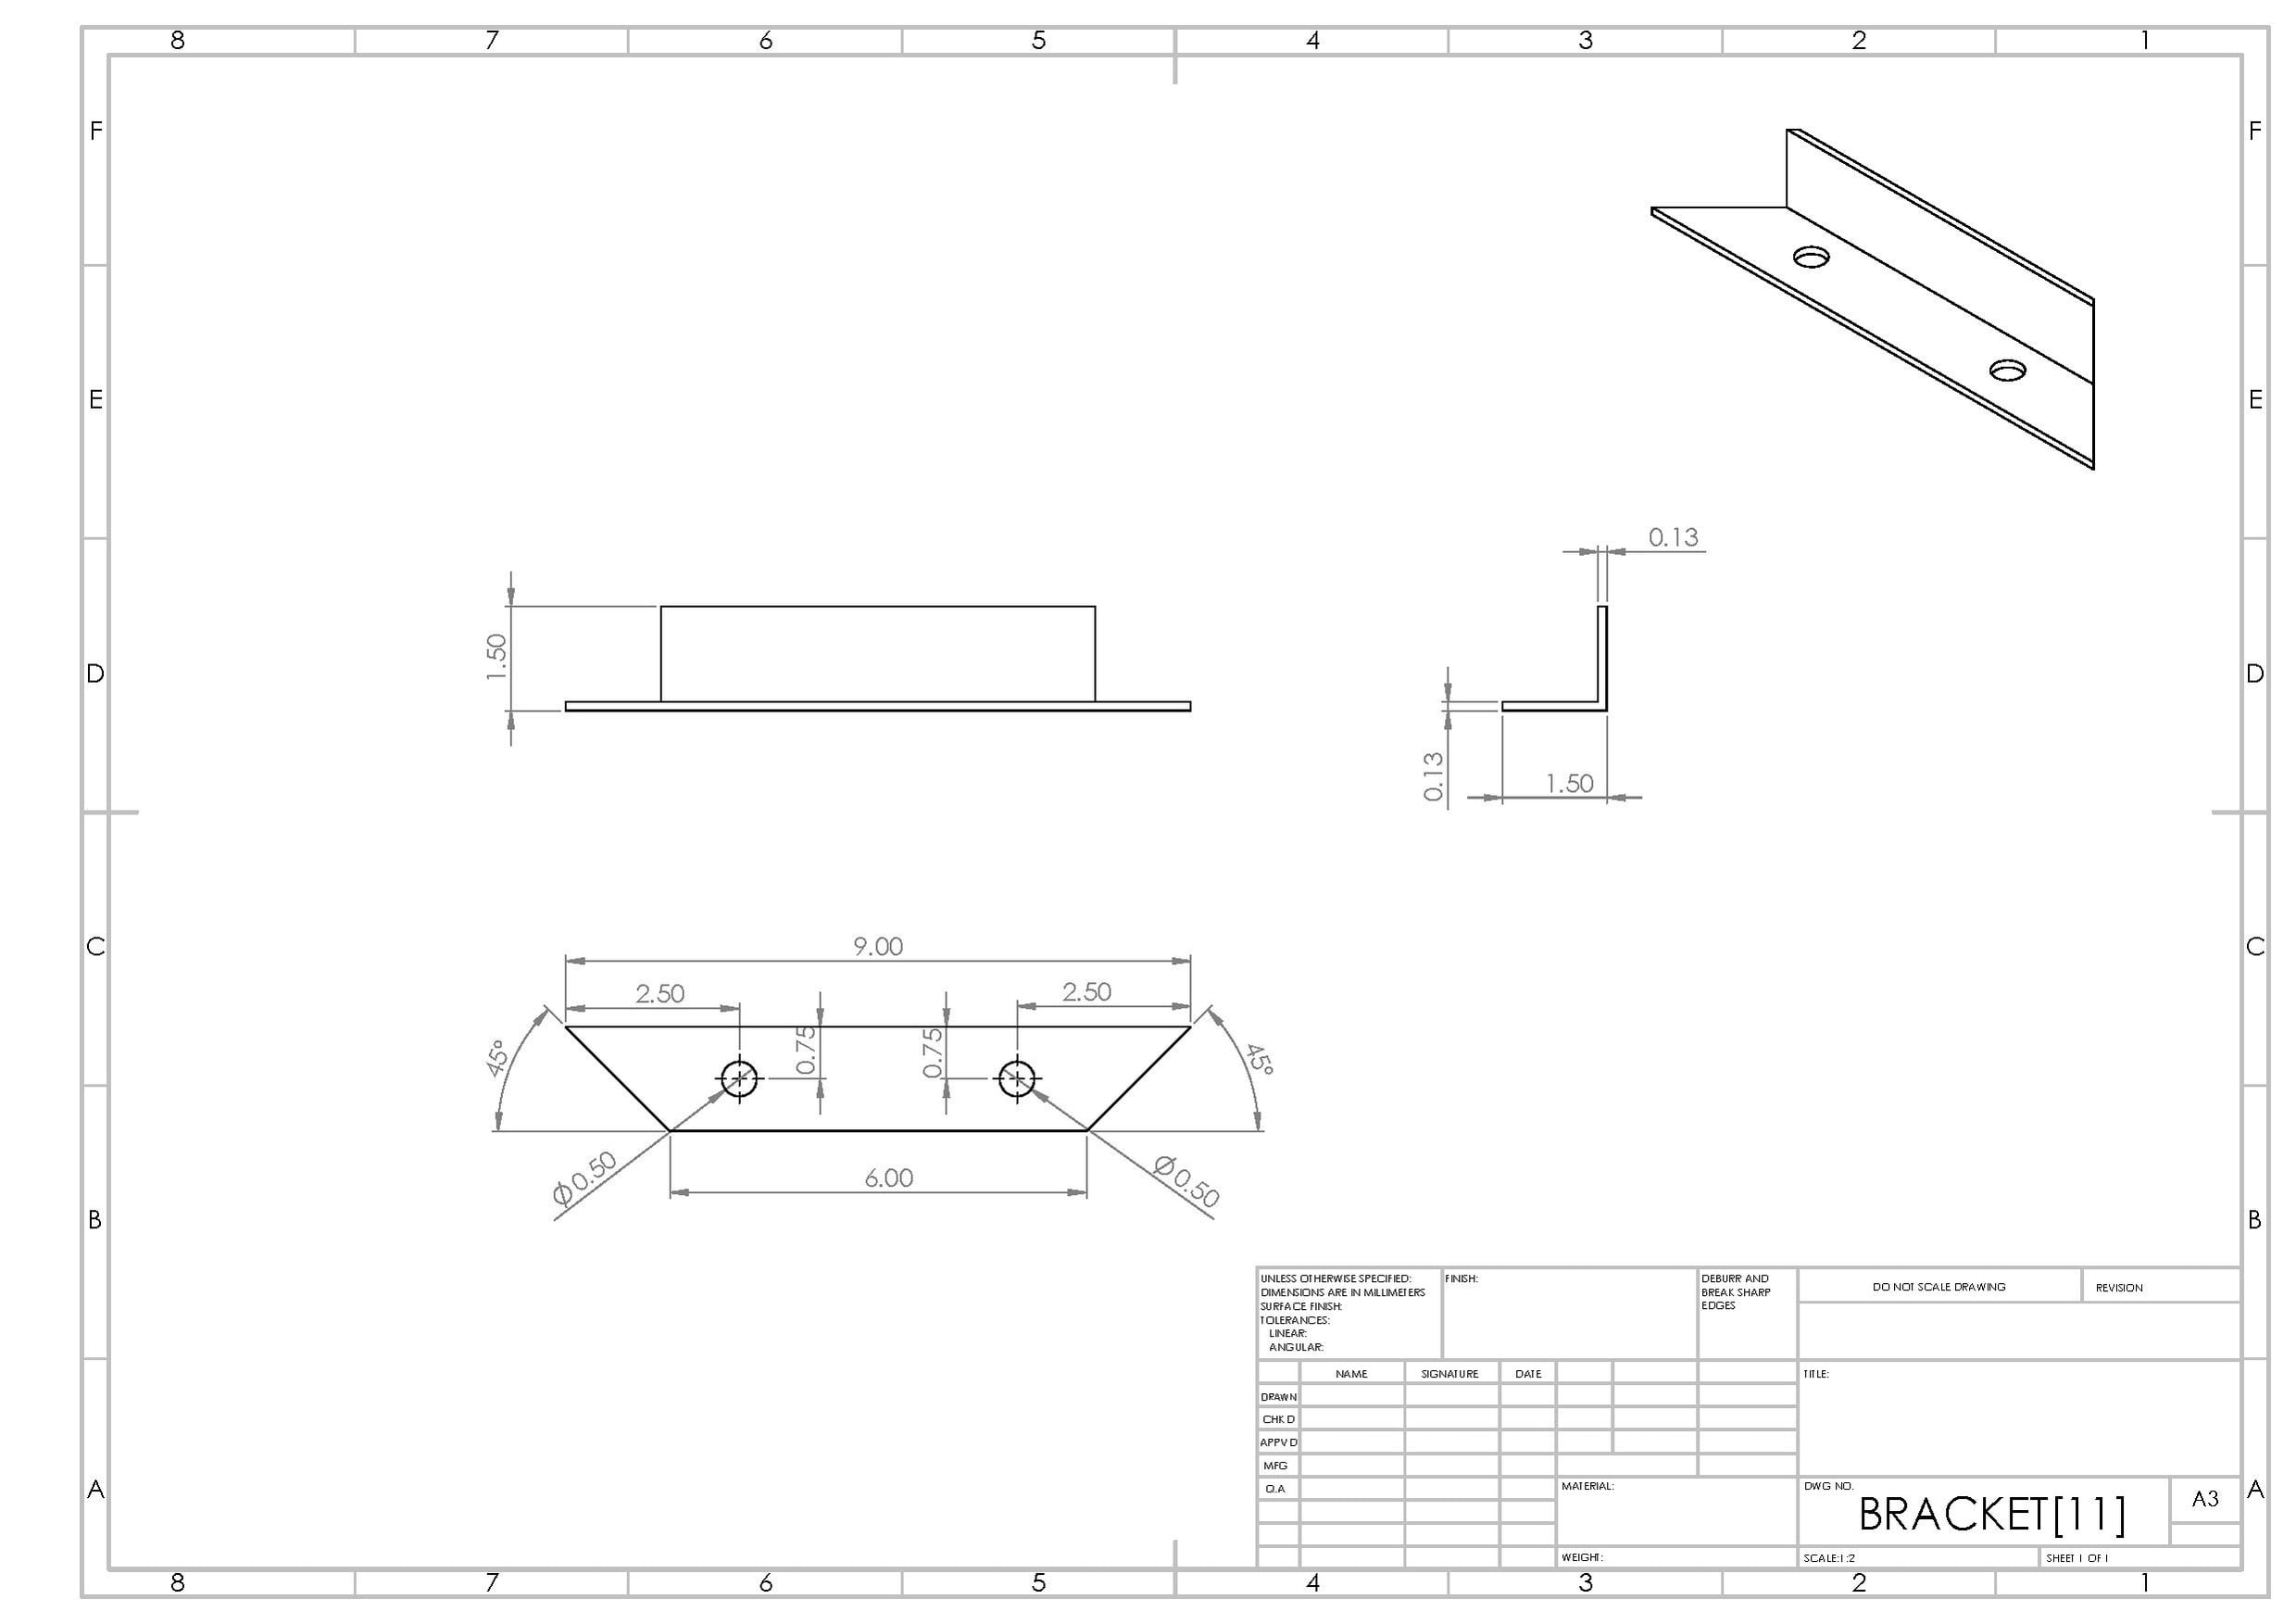
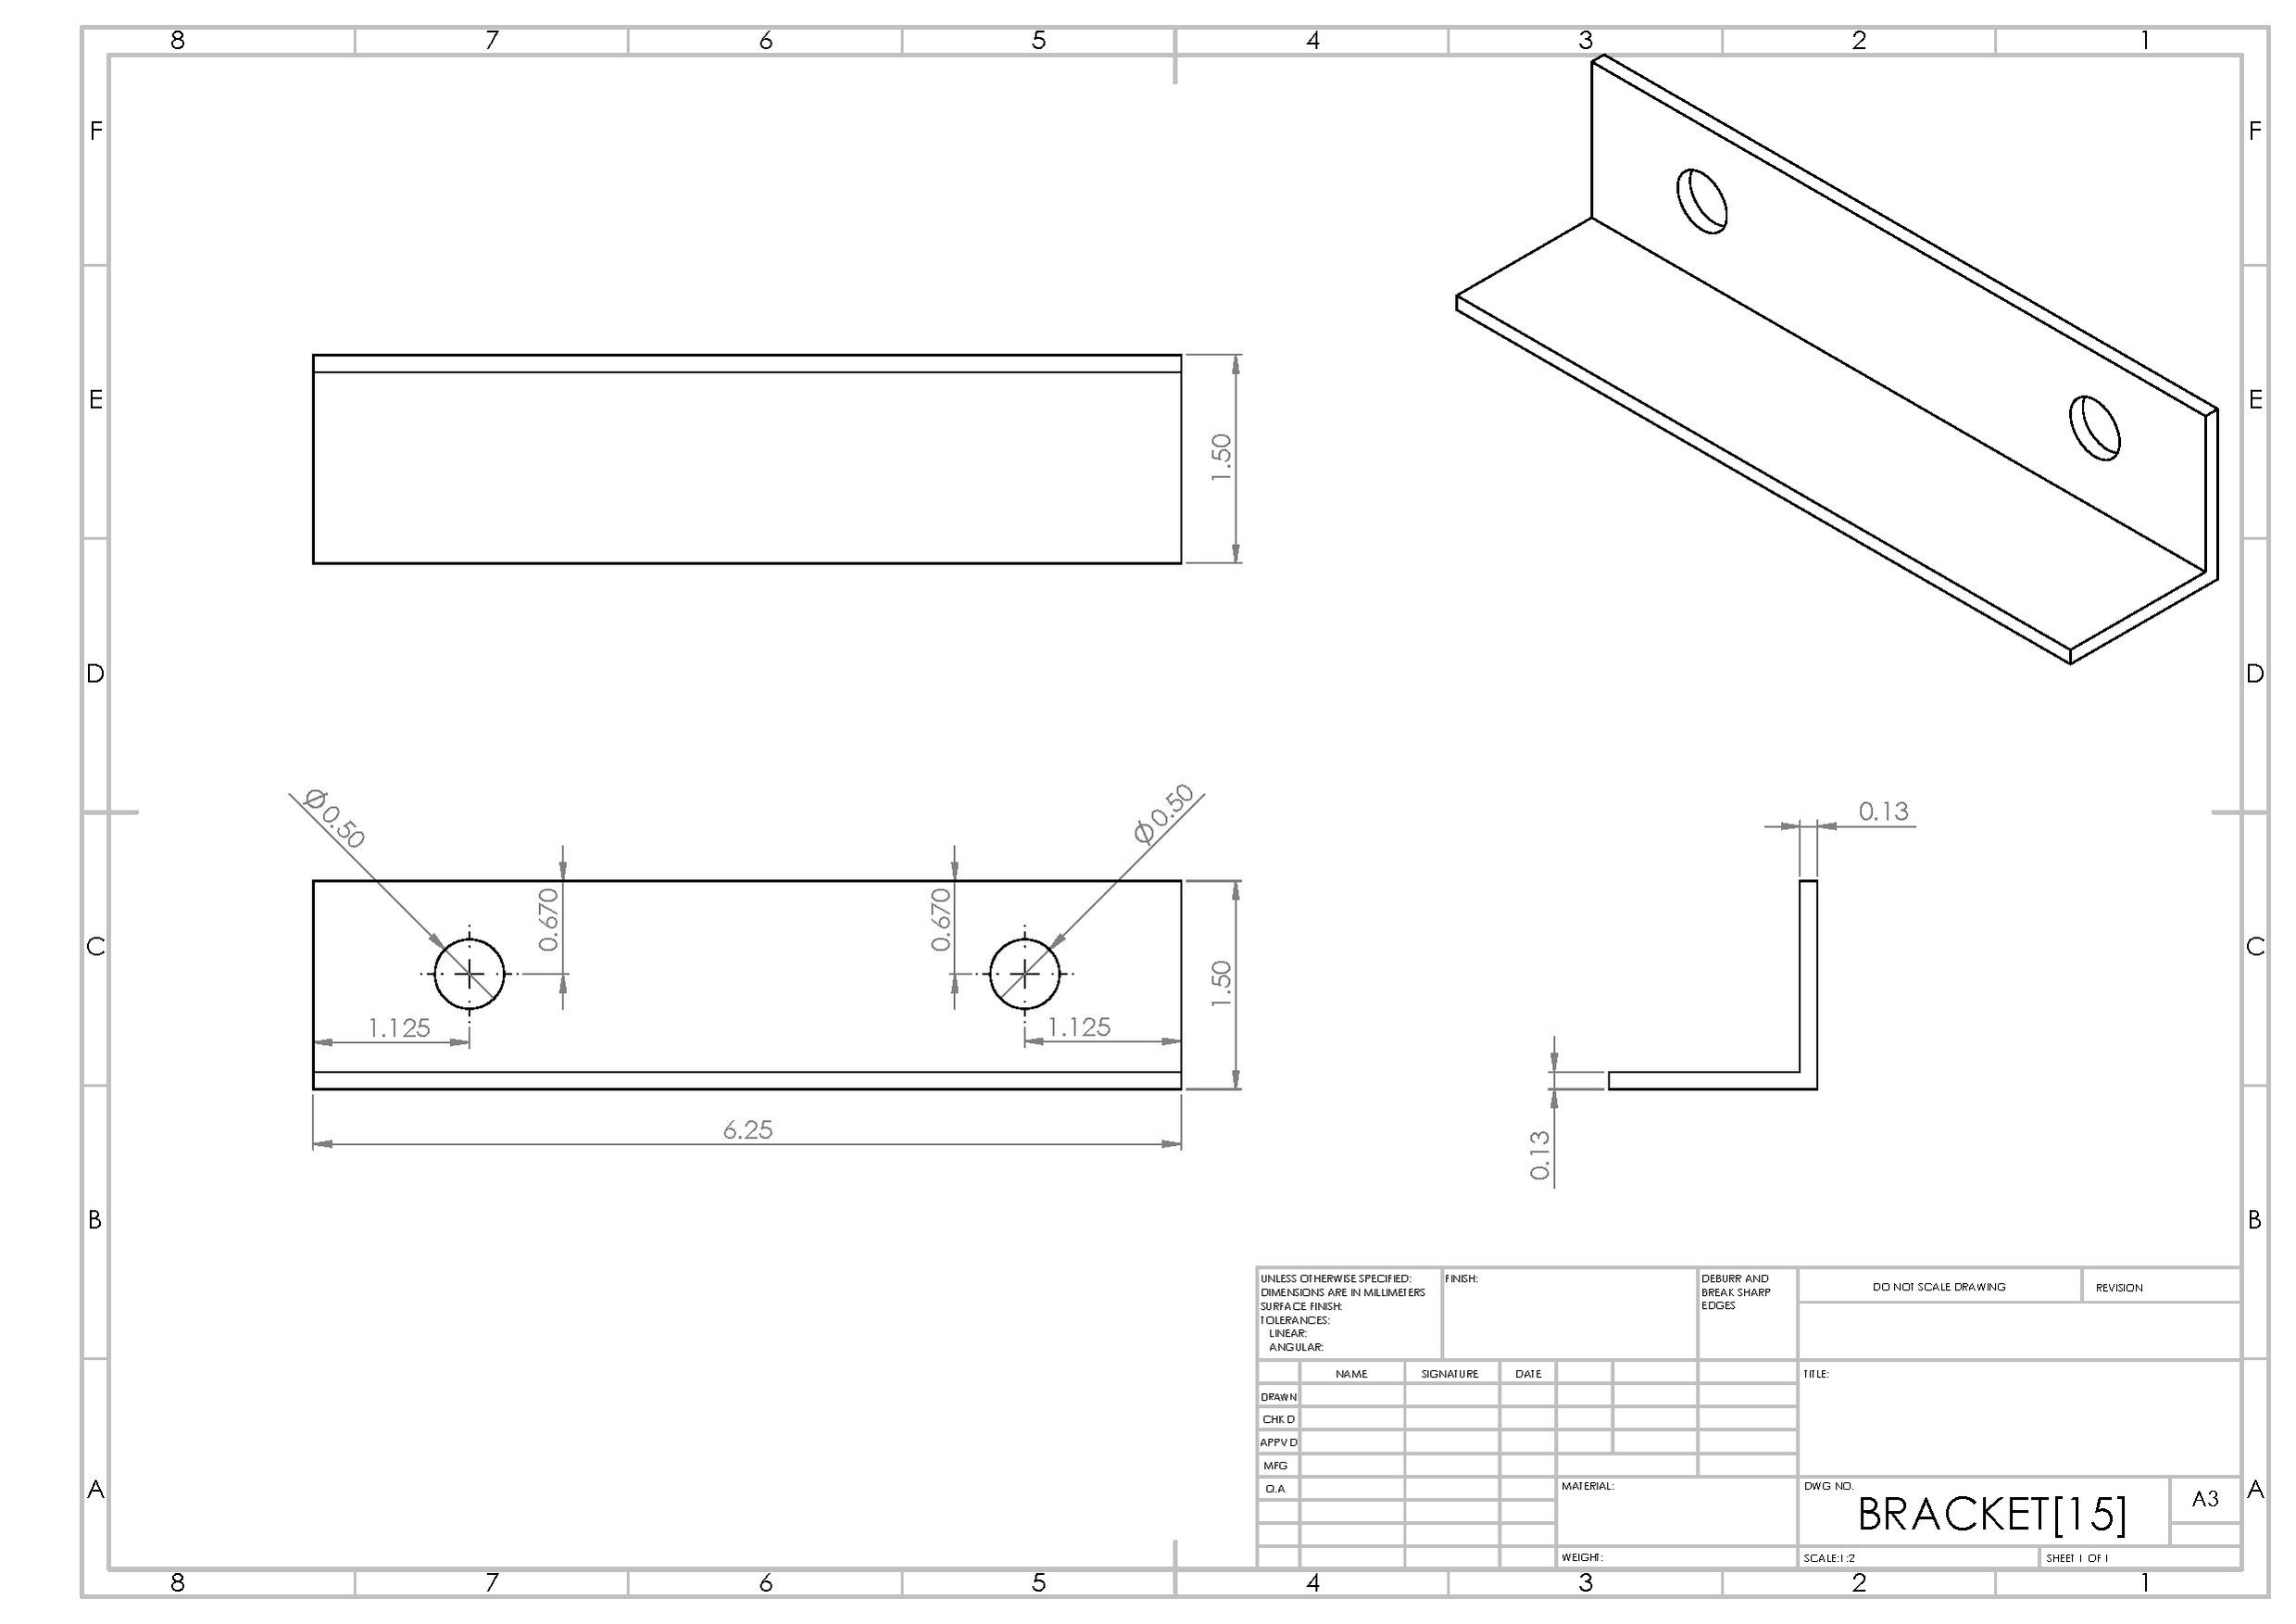
 - These next four files are the bracket mounts that connect the hopper to the main body of the granulator. These were all made from 1/8" thick 1.5" angle iron.

- The clampplates are used to mount the screen and blade bed to the shredder. There are four clampplates needed to manufacture the granulator.
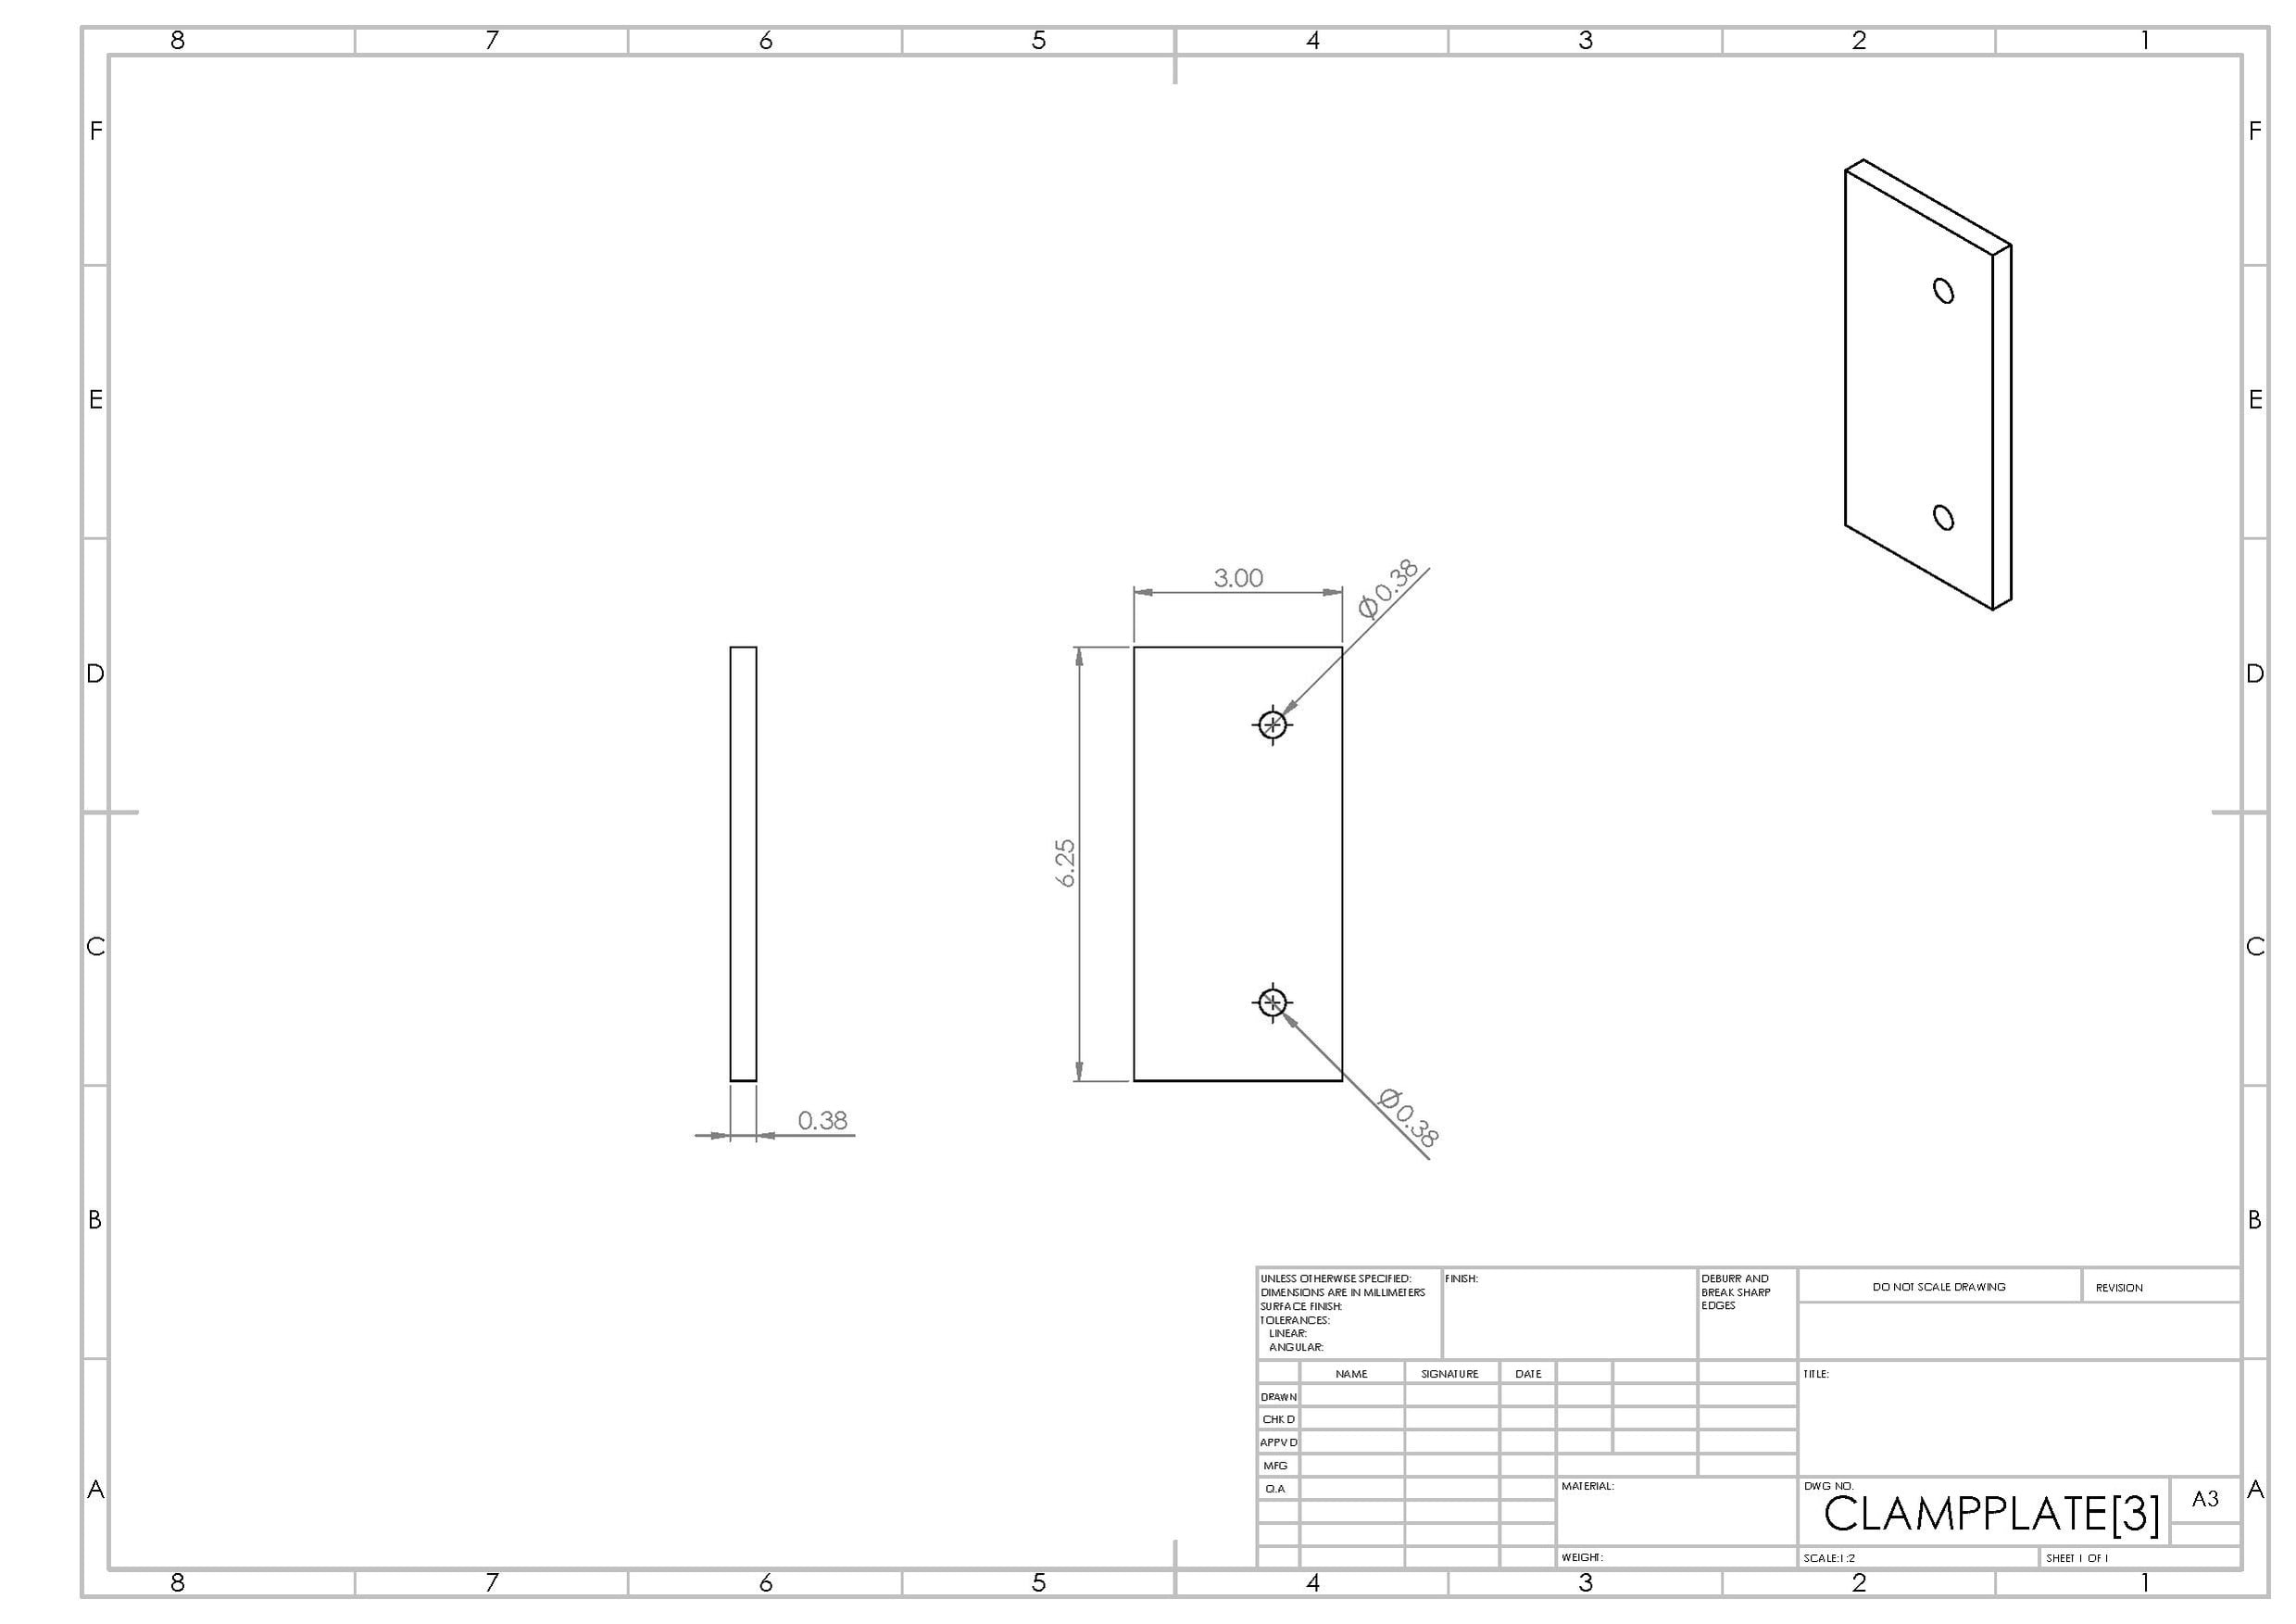 These were made from a 3/8" steel sheet.
 - The collection bin is what is used to collect the plastic that is expelled from the granulator. There is only one collection bin required to manufacture the granulator.
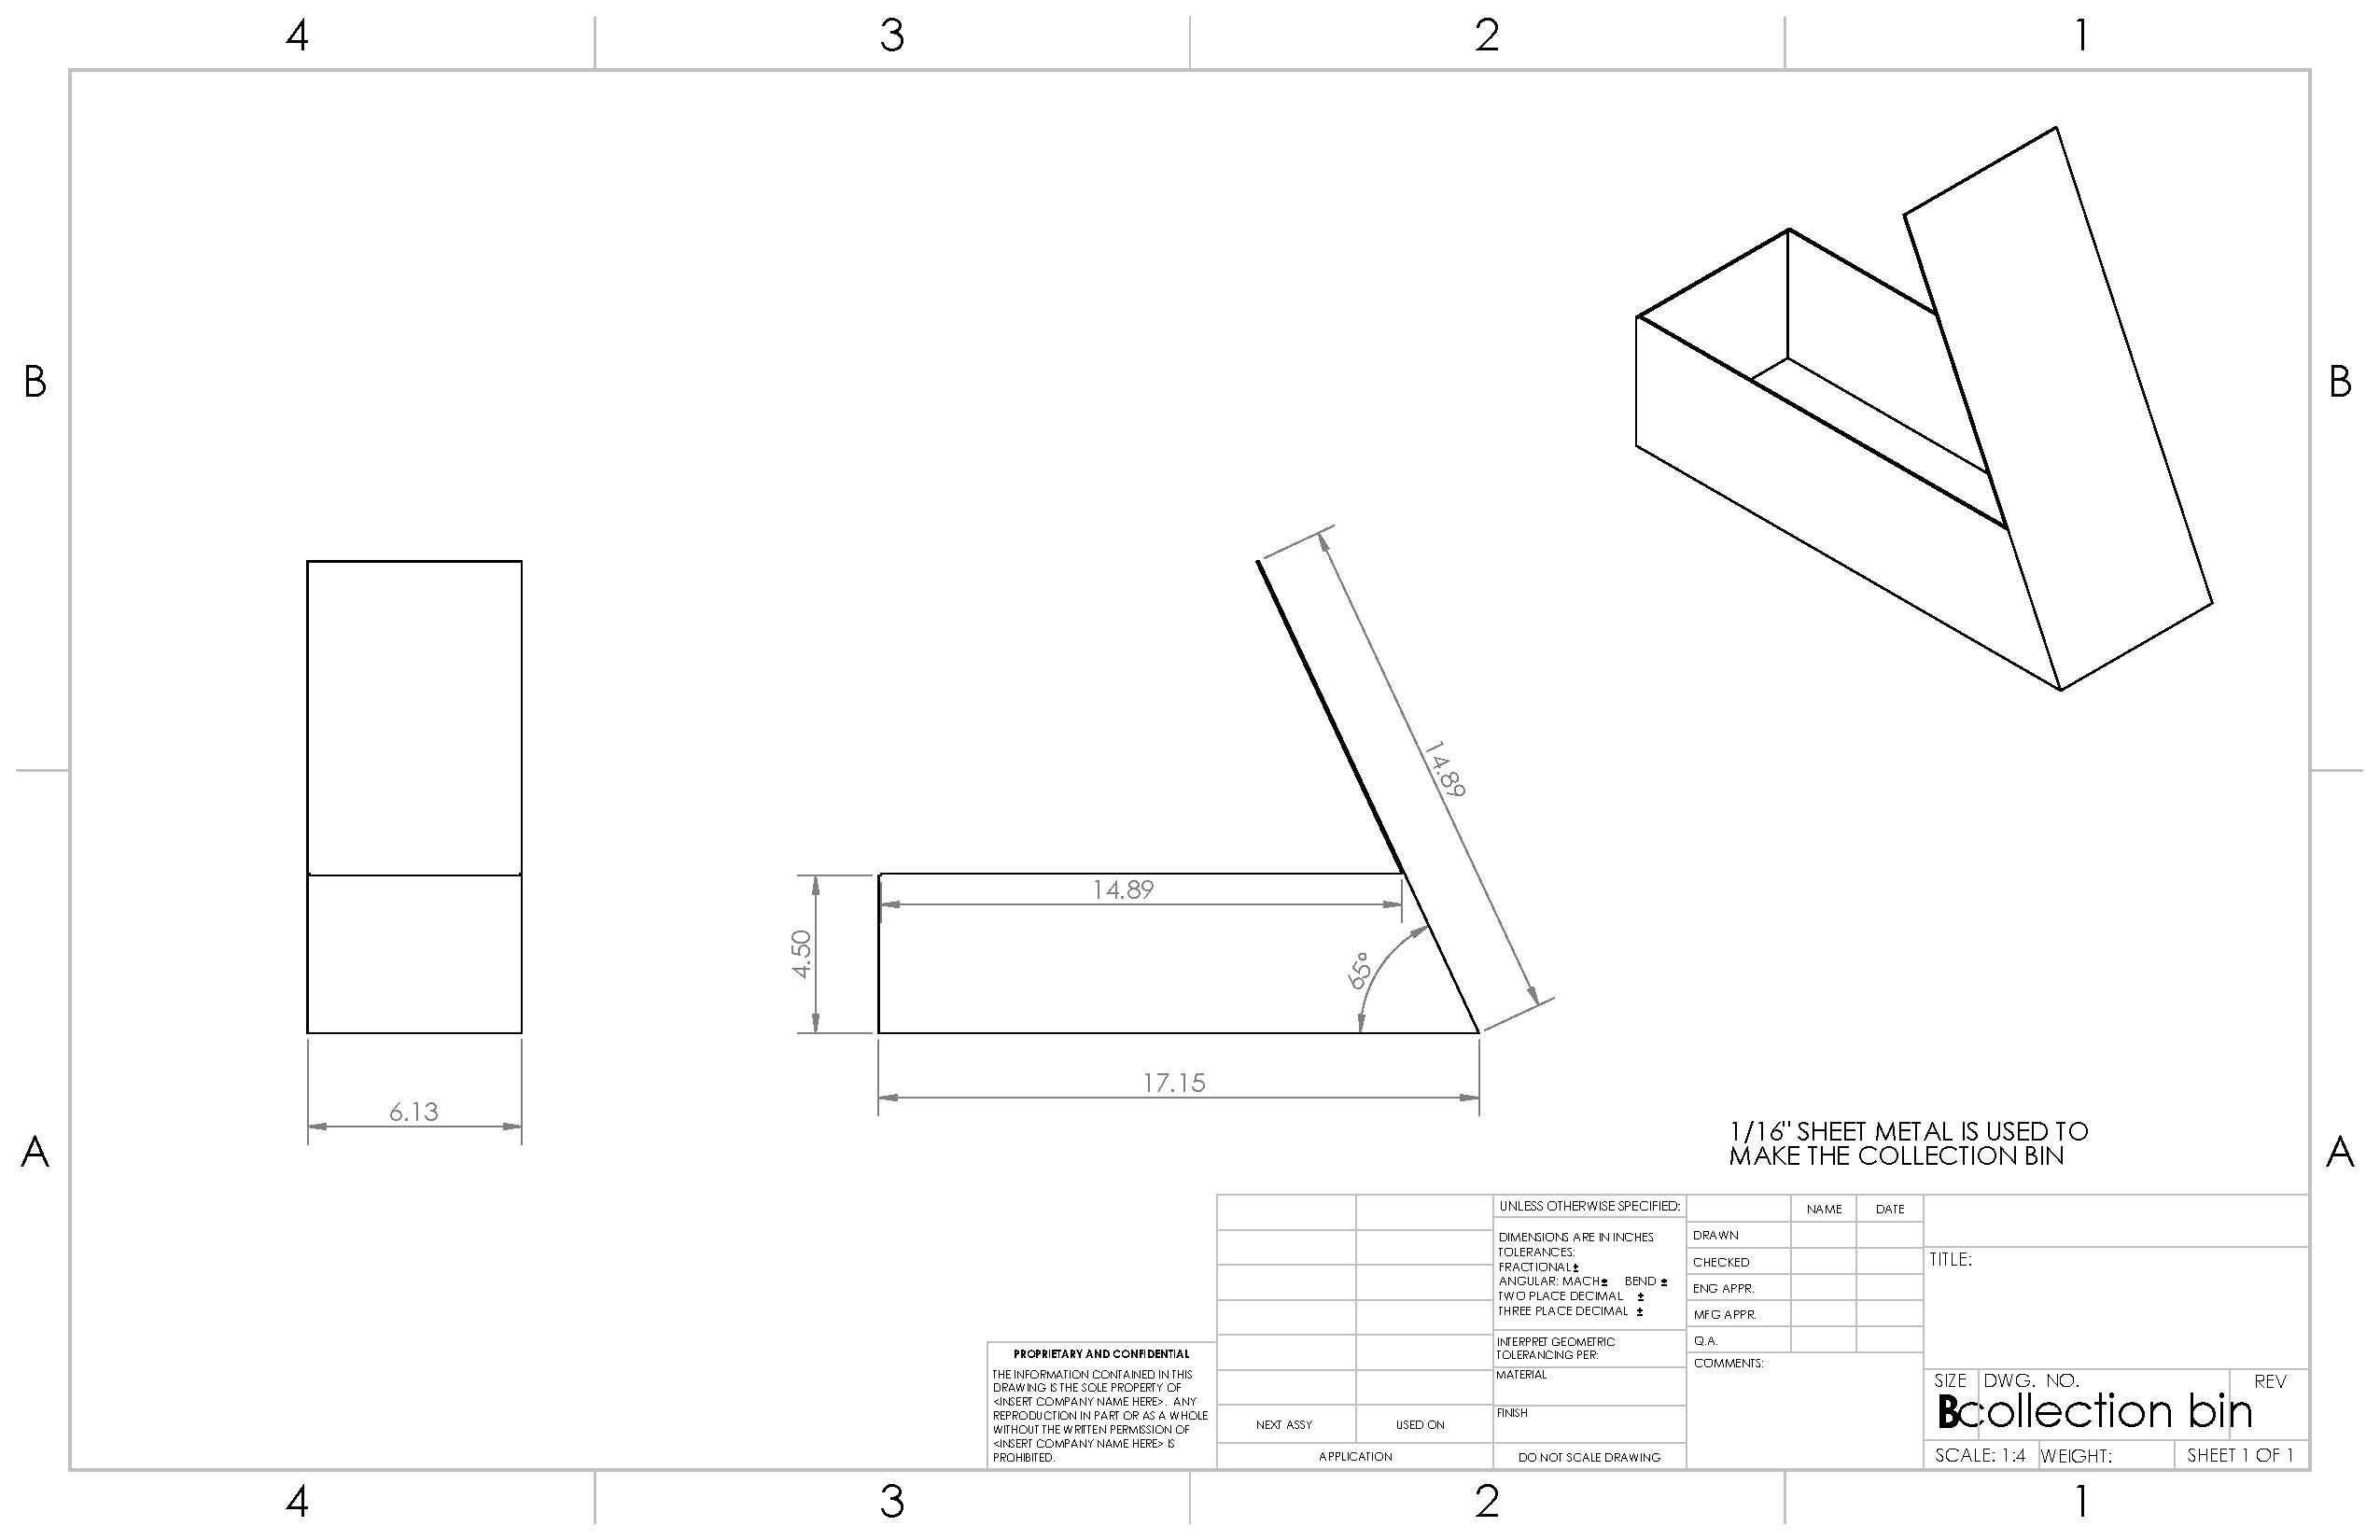 This was made from 1/16" thick sheet metal.
 - The flywheel is used to assist the blades to provide more force to shred the plastic. There is only one flywheel required to manufacture the granulator.
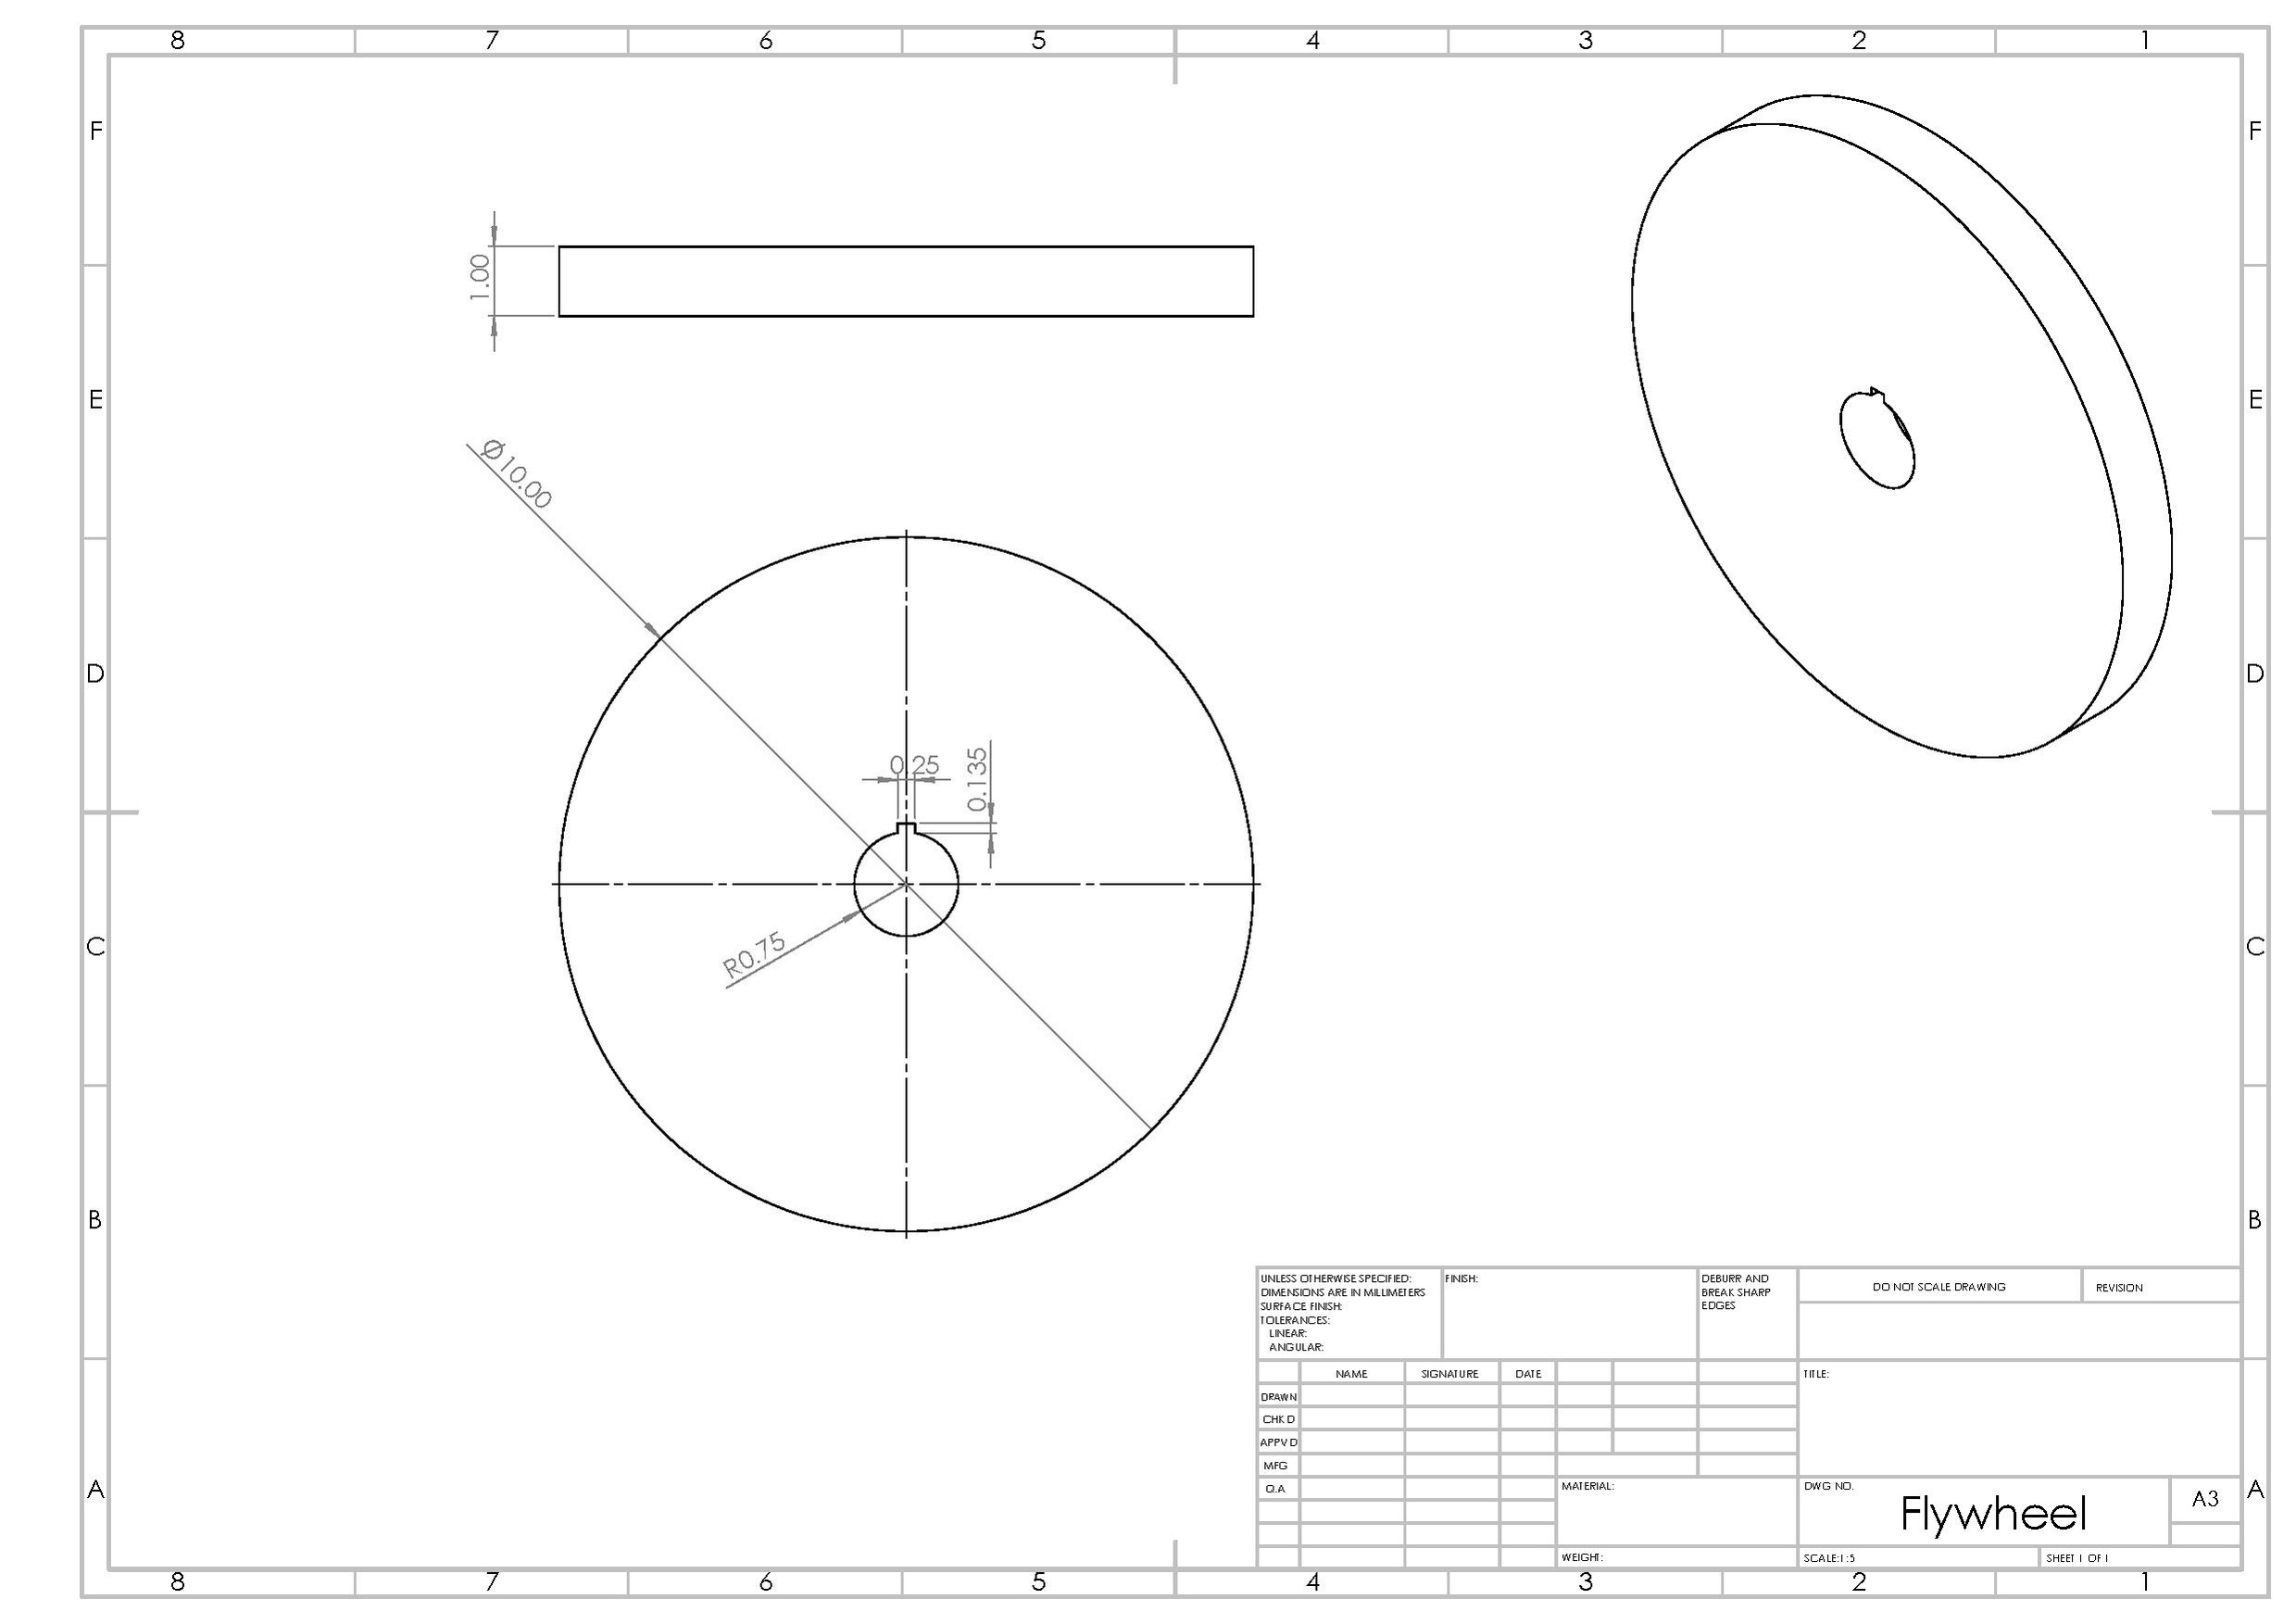 This was made from a 3/4" steel plate.
 - The motorplate is used to mount the motor to the granulator. There is only one motorplate needed to manufacture the granulator.
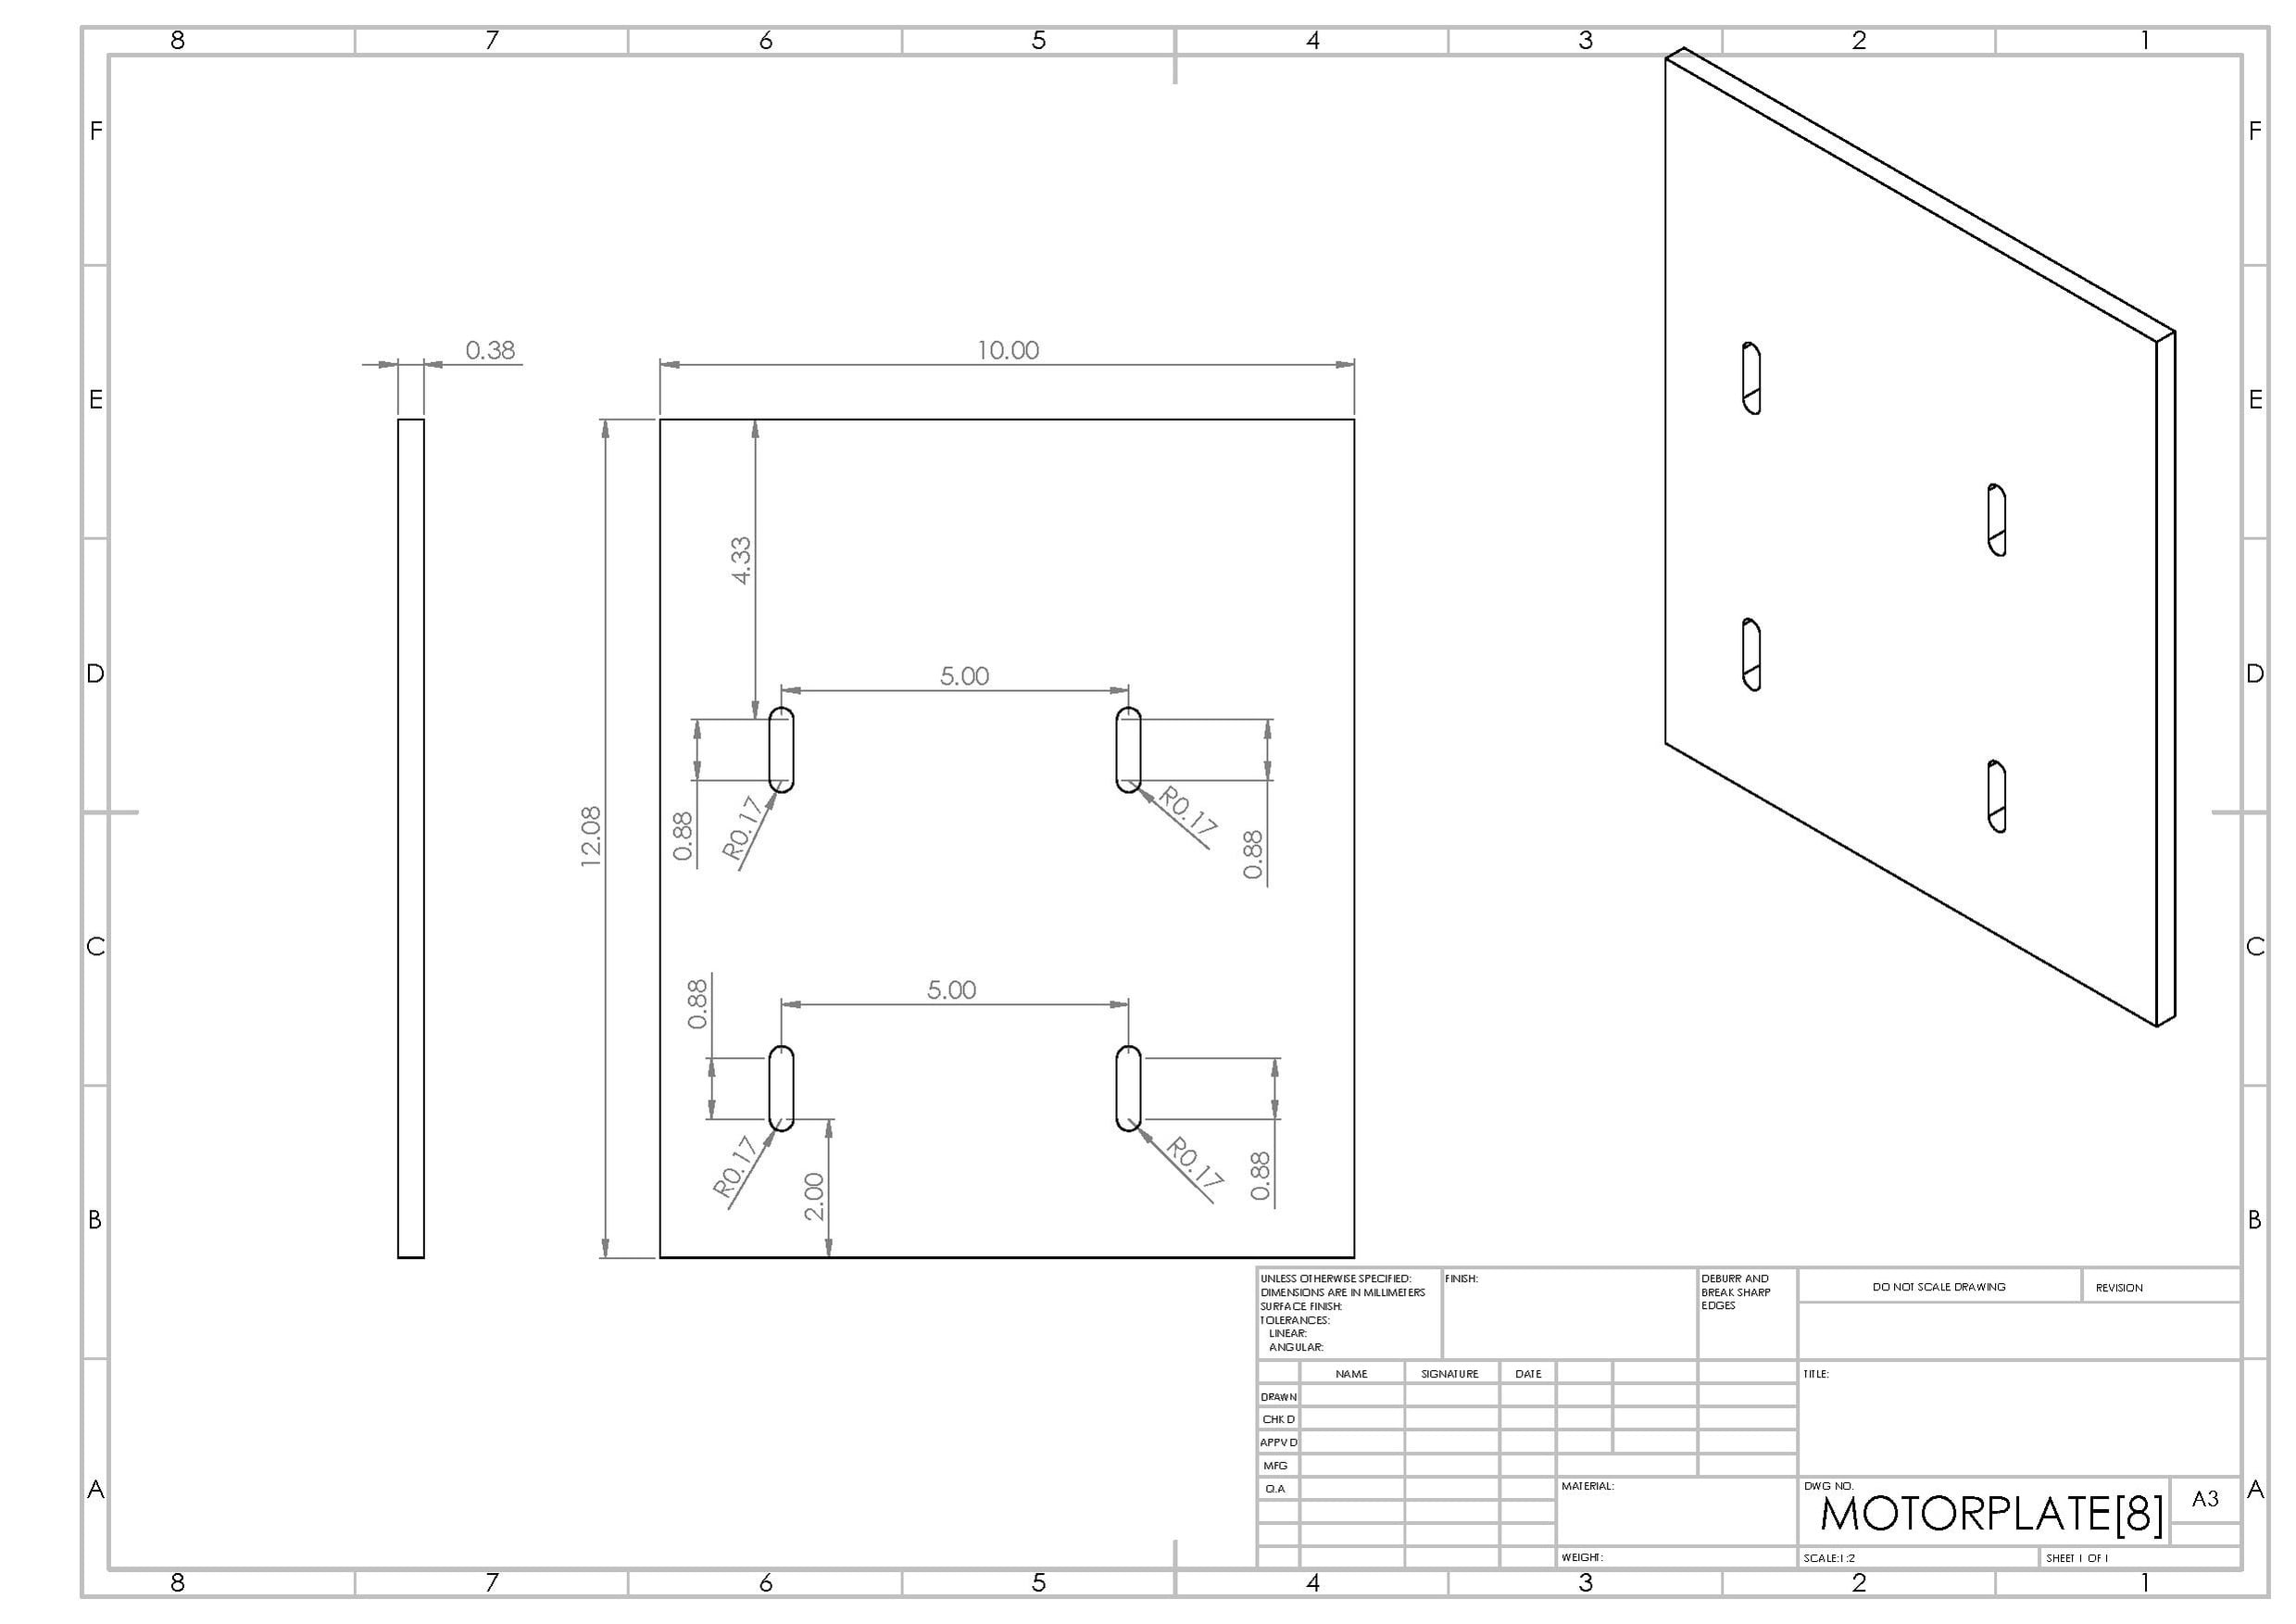 This was made from a 3/8" steel sheet.
 - The rotary blades are the blades that spin around on the shaft to shred the plastic. There are three rotary blades needed to manufacture one granulator.
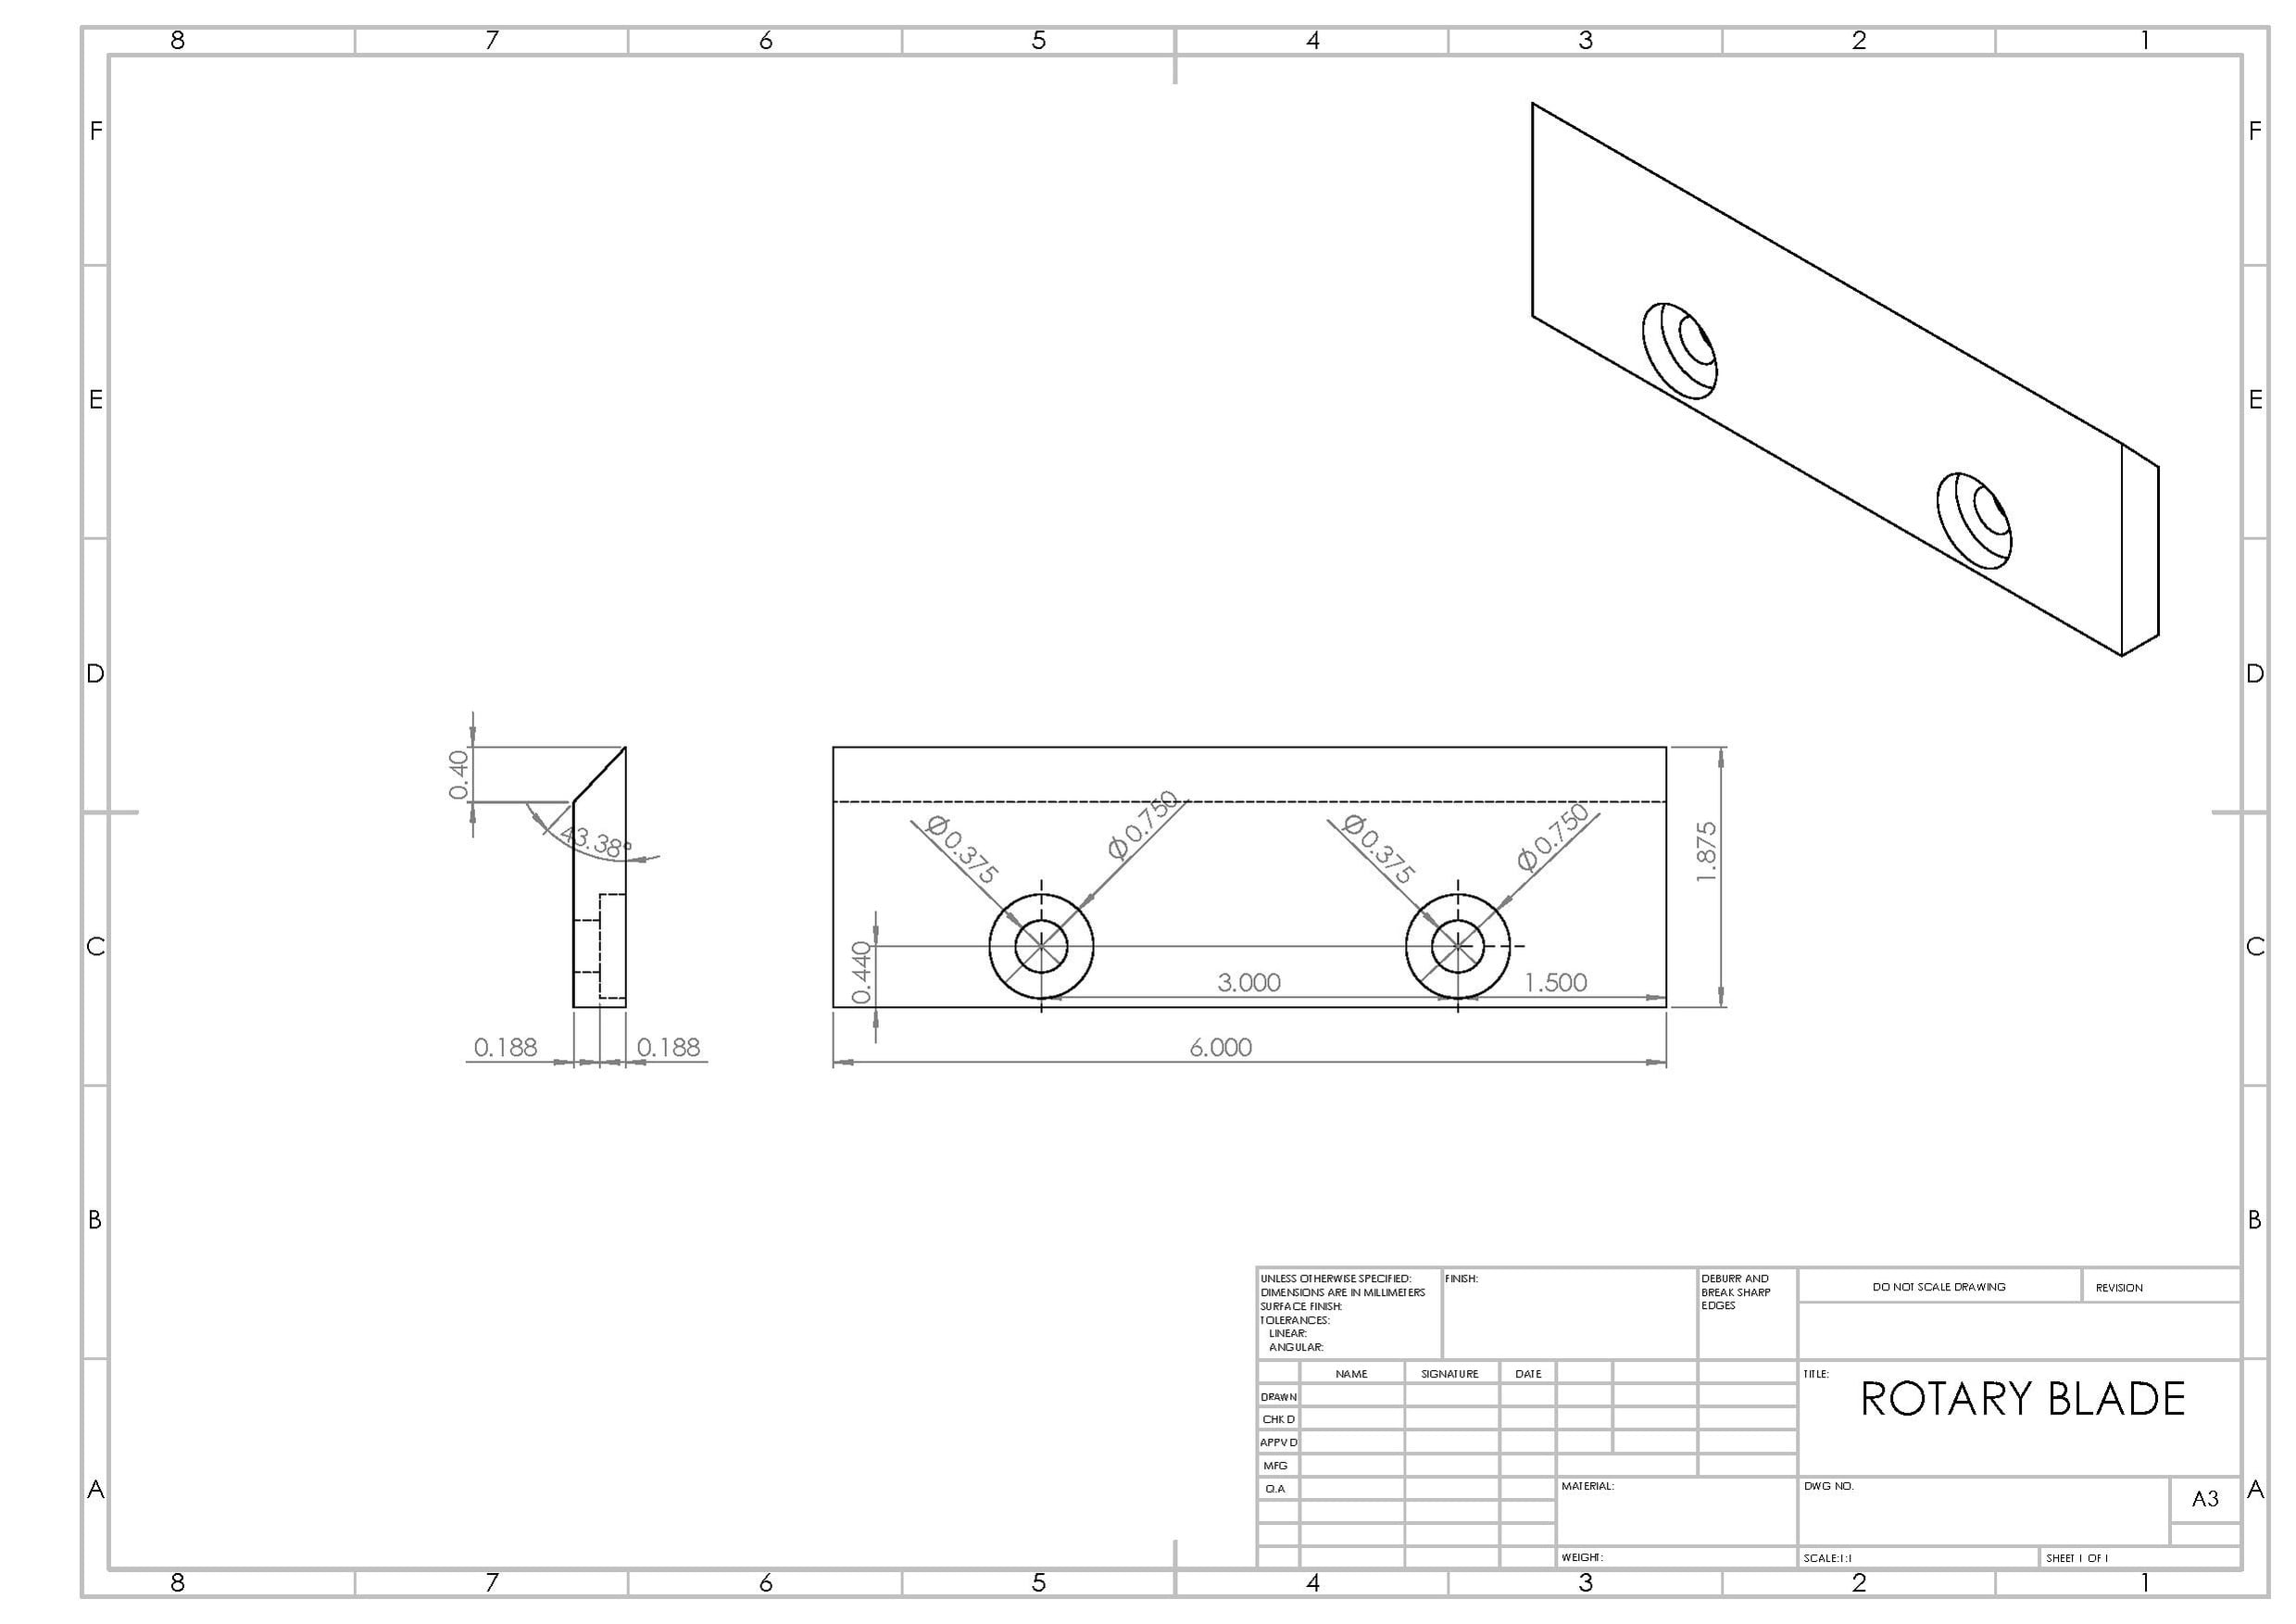 This is the website used to order the rotary blades: Services for Plastics
 - The slideplate is the plate that is used as the backing between the hopper and the blade bed and to guide the recycled plastic to the cutting edge. There is one slideplate needed to manufacture the granulator.
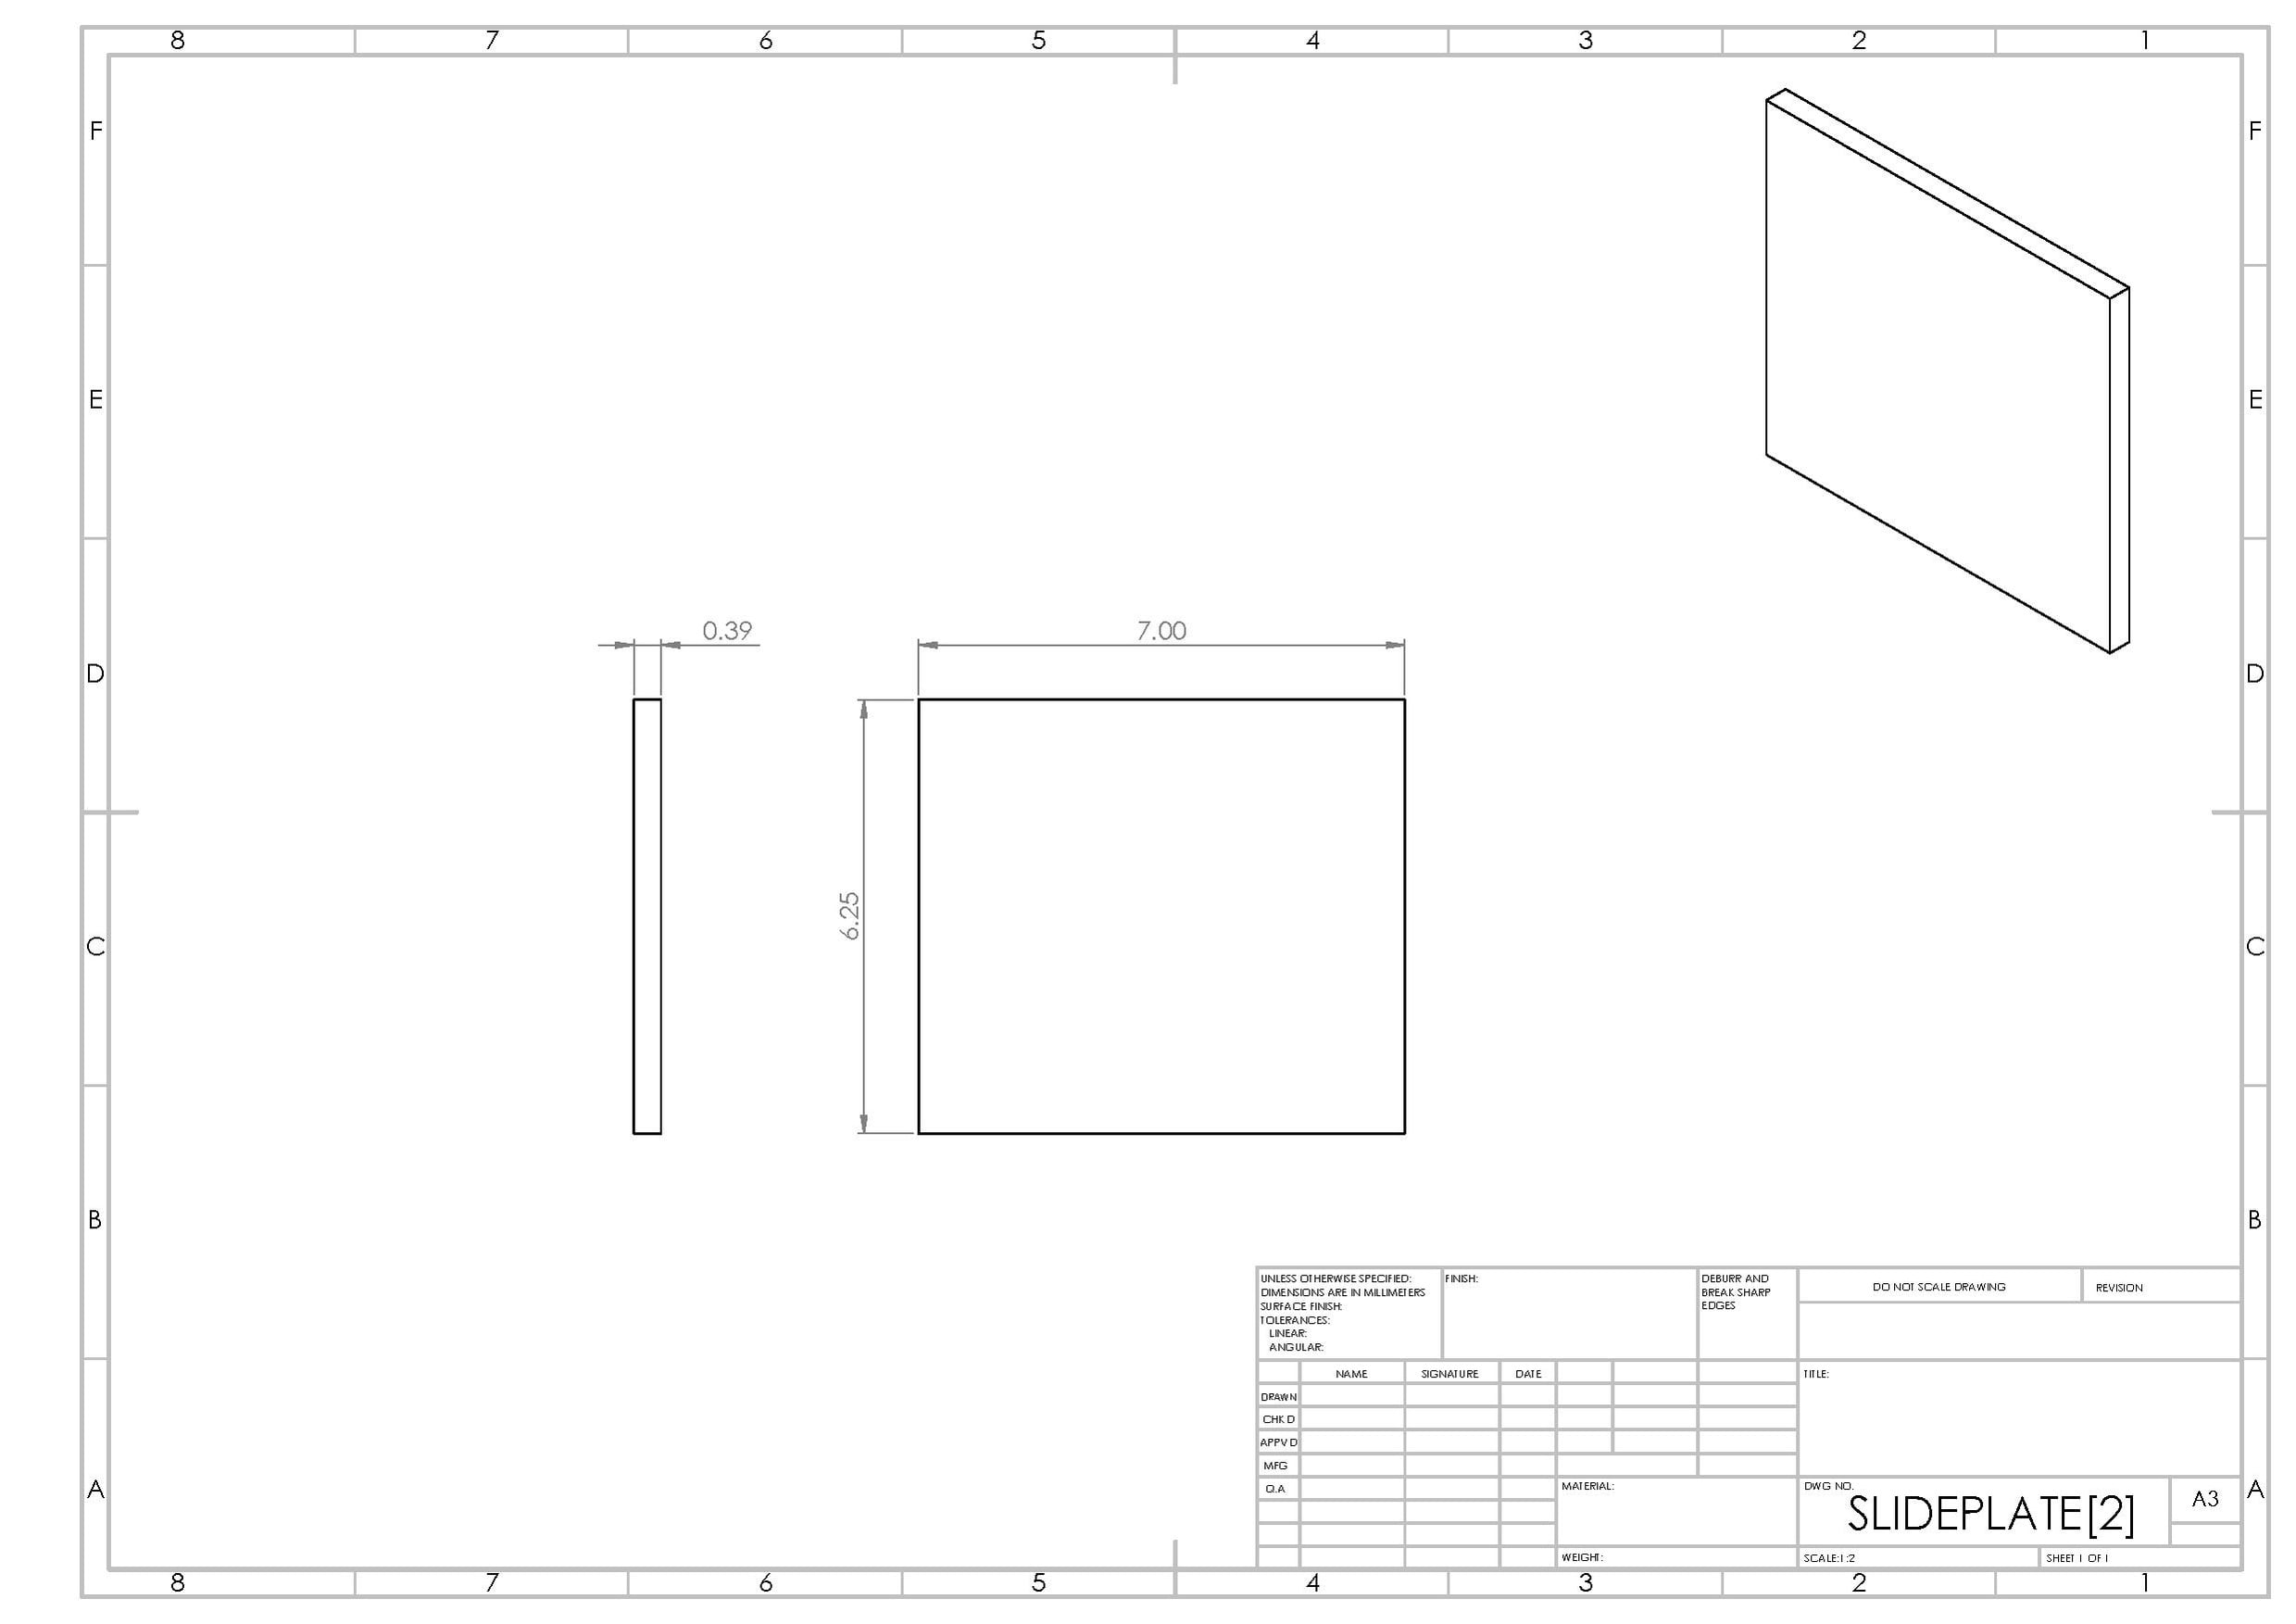 This was made from a 3/8" steel sheet.
 - The shaft is what the blade mounts are mounted to and is what they rotate about. There is one shaft needed to manufacture the granulator.
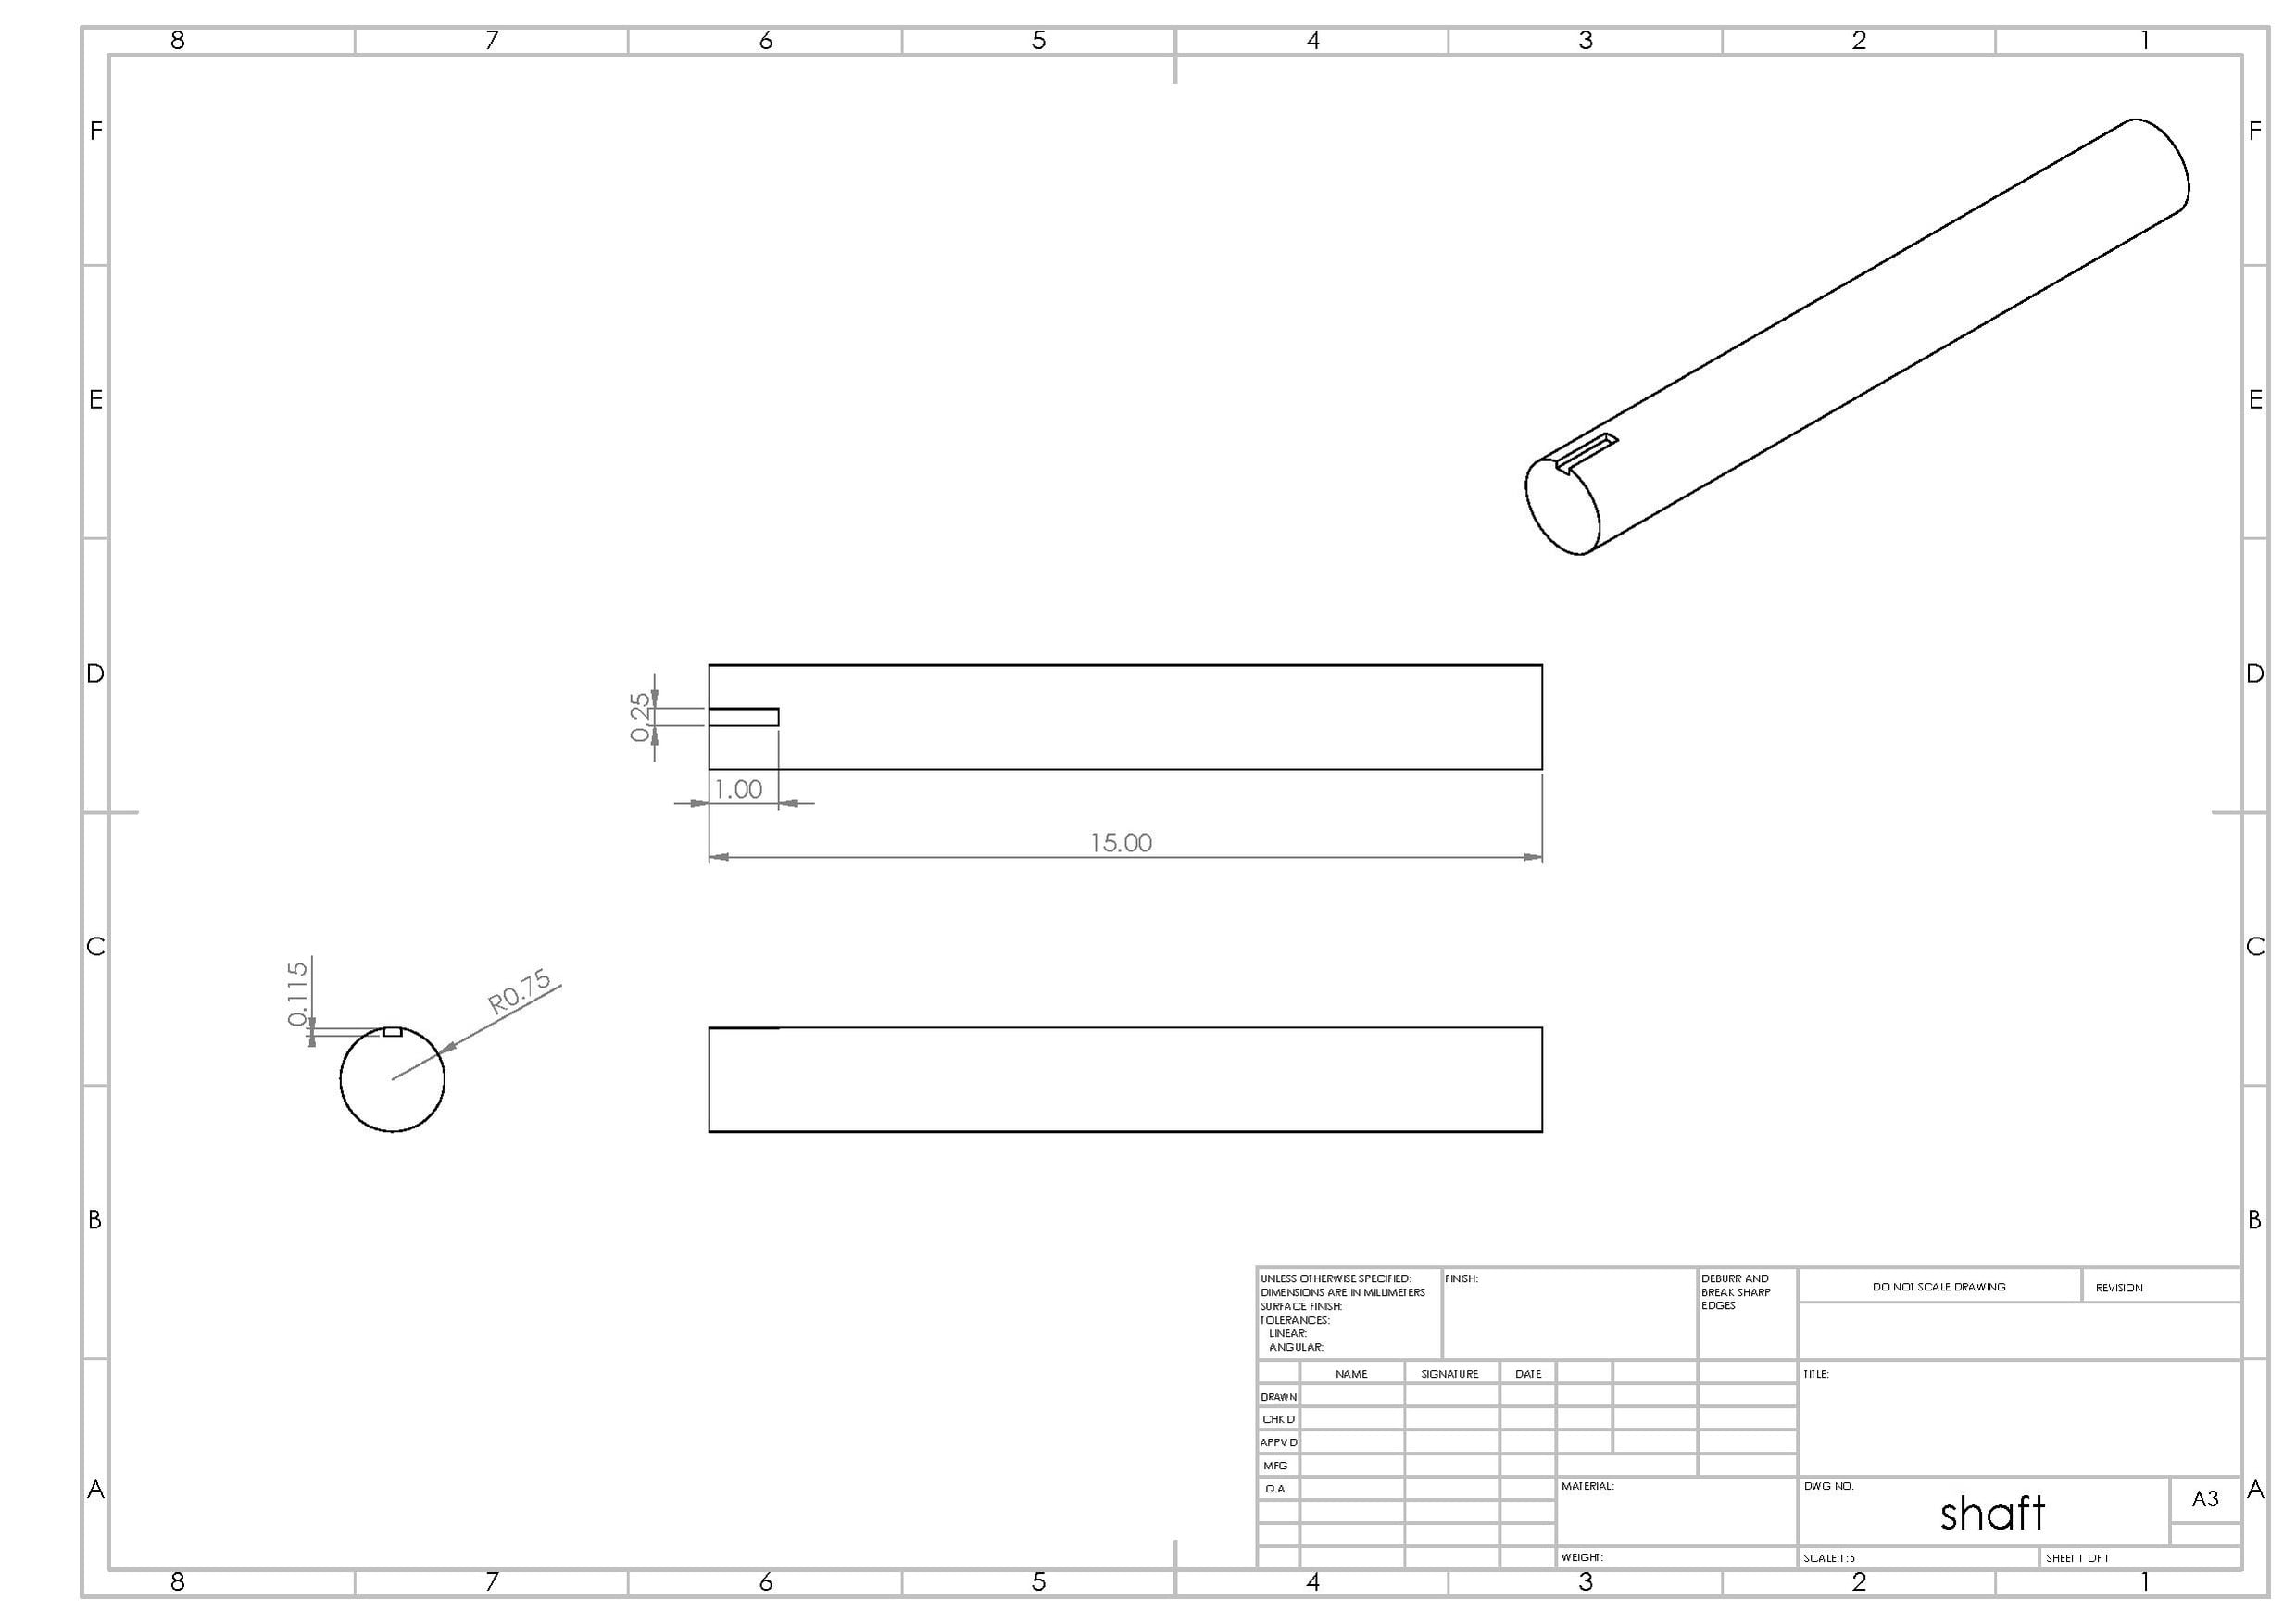 . The shaft is made out of a 1.5" diameter rod.
 - The hopper is what is mounted on top of the granulator and is what is used to help the user dispense waste plastic into the machine without the user getting too close to the blades. Only one hopper is needed to manufacture the granulator.
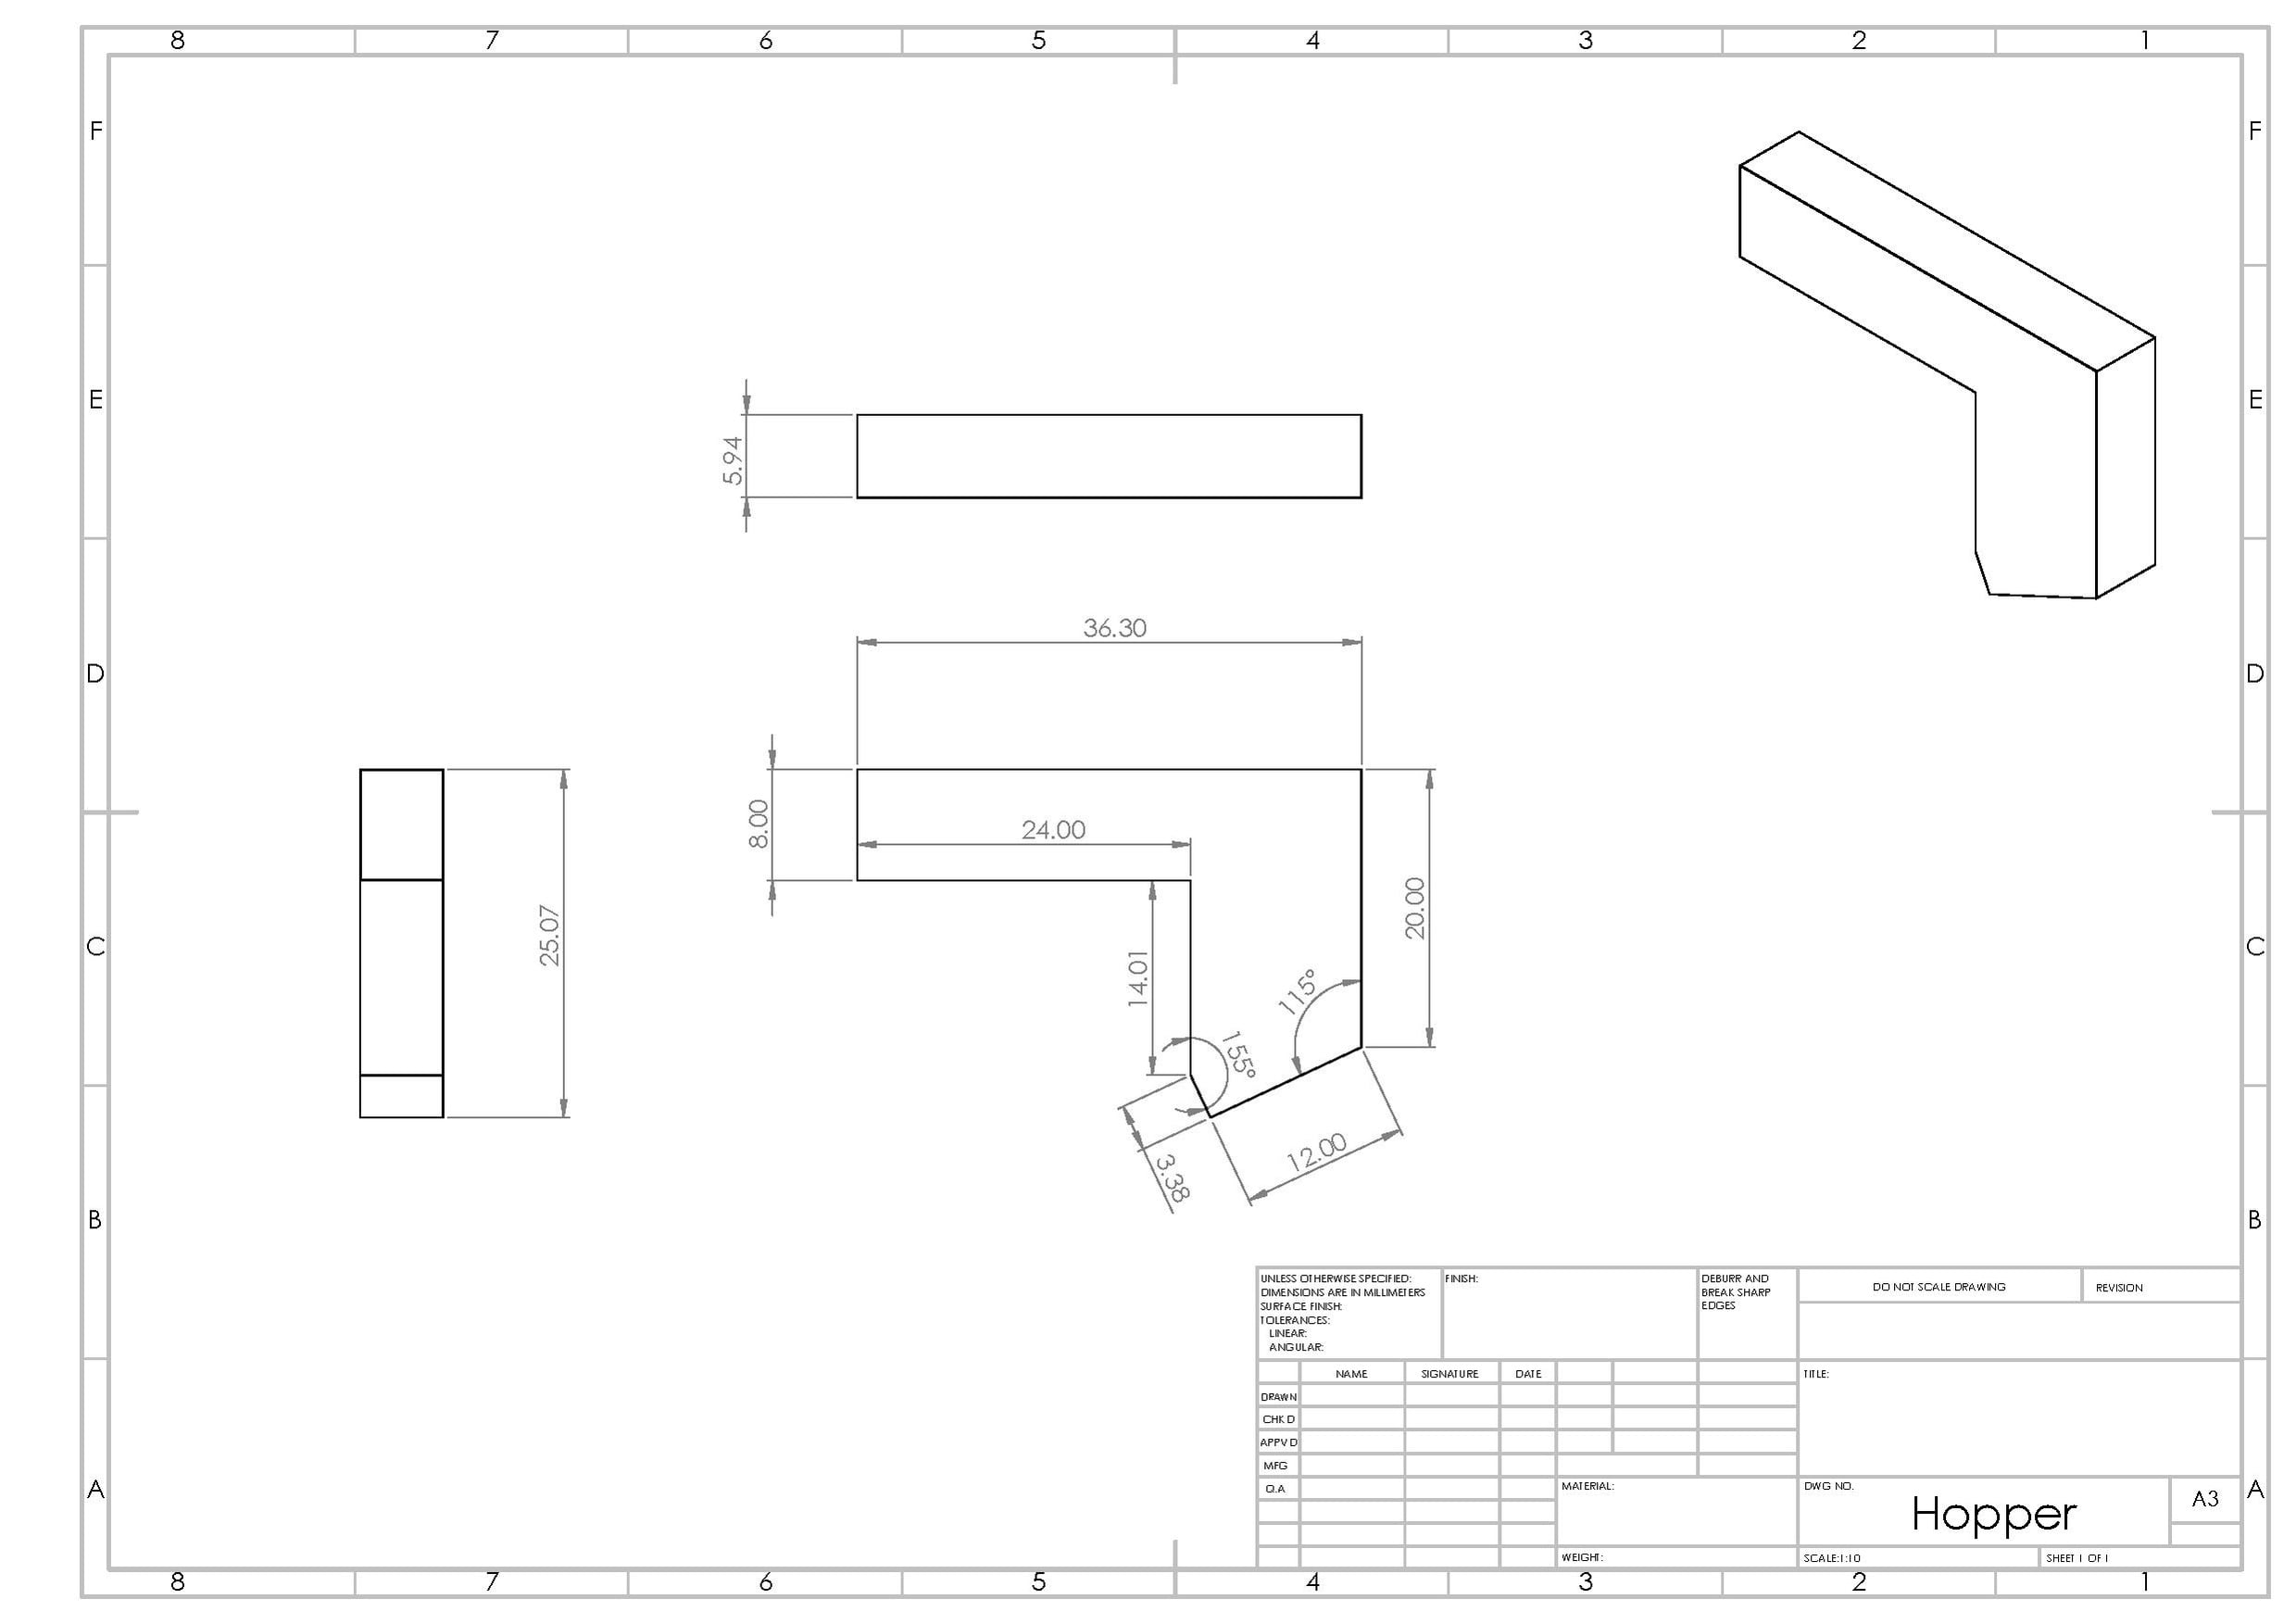 The hopper is made out of 1/16" thick steel.
 - These next parts were all purchased from the McMasterCarr website.
A 2 HP motor that runs off of a standard wall outlet was chosen to run the shredder.
To mount the blades onto the blade mounts, two 3/4" long, 3/8" diameter bolts are needed to fasten each of the three blades.
1 in ¼-20 bolts for hopper and collection bin installation.
¼-20 nylon locknuts for hopper and collection bin installation.
3/8 in x 3 in coarse thread bolts.
3/8 in coarse thread locknuts.
2-1/2 in x 9/16 in Grade 8 fine thread bolts for screen and blade bed installation.
9/16 in Grade 8 fine thread nylon locknuts for screen and blade bed installation.
1-1/2 in x 9/16 in Grade 8 fine thread bolts for leg support installation.
9/16 in Grade 8 fine thread nylon locknuts for leg support installation.
Two bearings will be needed to mount the 1.5" shaft on the frame. These bearings will need to have mounting bolts to fit the respective holes for the bearings that are chosen.
Update:
Free CAD 3D models will be uploaded as soon as Appropedia allows these types of files to be uploaded.
Tools needed for fabrication of the Plastic Granulator
[edit | edit source]There are several manufacturing methods that we needed to use to create the Granulator, causing us to need many different pieces of equipment:
- CNC plasma cutter
- MIG welder
- Drill press
- Brake press
- Tap set
- Mill
- Allen wrench set
- Socket wrench set
- Grinder
- Hand drill
- Chop saw
Skills and Knowledge Necessary to Make the Plastic Granulator
[edit | edit source]There are several specialized skills that will be required to produce the shredder these include:
Manufacturing Skills
- The ability to proficiently use the tools listed in the section above.
Assembly Skills
- Must be proficient with the proper torque for bolts to be tightened to
- Must be able to read and properly follow assembly drawings
- Need to have the ability to set the blade to blade gap to the proper tolerance, if this is wrong, there could be a catastrophic failure
Technical Specifications and Assembly Instructions
[edit | edit source]- The following three pictures are the manufactured parts before being assembled. The picture on the left is the pieces to the hopper and collection bin. The middle picture is the pieces to the body of the shredder, and the picture on the right is the returned blade mounts and flywheel from the manufacturer.


- The following as a picture of the 1.5 HP 120-240 AC motor we will be using.

- The following is a picture of the screen from the old granulator. The screen that we have ordered is very similar. Our screen will be narrower and slightly smaller in diameter due to the use of a lower powered motor for the purpose of downsizing to a 120 AC circuit.

- The following steps are required to manufacture the components before assembly:
(SAFETY GLASSES MUST BE WORN WHEN PERFORMING THE FOLLOWING TASKS, A FACE SHIELD SHOULD ALSO BE WORN OVER THE GLASSES WHEN USING THE CUT OFF WHEEL)
-Drilling:
Make sure to use a smaller bit first to make a pilot hole, then drill out with a 9/16 in bit for the square stock holes and a 1/2 in bit for the angle stock holes. Adding cutting oil or motor oil can help this process go more smoothly.


-Cutting:
Change the back stop to the correct angle according to the manufacturing drawings


Assembling the Granulator
- The frame should be the first step in starting to assemble the granulator. The parts needed to weld the frame are the two side plates, bracket 15, the motor plate, the slide plate, and three clamp plates. A model of the welded frame can be seen below:
- The next step in assembling the granulator is welding the blade supports to the shaft. this weld has to be done while the blade supports are in place inside the frame. The blades should be attached to the supports while welding. This is because during the welding process the supports could warp and the blades wont fit on properly after the weld. A picture of the blade supports welded in place can be found below:
- After the blade assembly is welded in place the legs supports can be bolted into their respective mounting holes, as seen below:
- Once the legs are attached the motor can be mounted to the motor plate as seen below:
- To assemble the hopper the edges for each side need to be bent at a 90 degree angle. Once all of the parts are bent holes can be drilled on the tabs and the hopper can then be bolted together. The detailed drawing files for each side of the hopper and final assembly drawings can be found below:
- Mount fuse, switch, and E-stop in junction box
- The bearing and flywheel can be assembled by bolting the bearings into the respective holes on the side plates. Then the bearings can be tightened down to the shaft to lock it in place. Then the flywheel can be attached using the key way on the shaft.
- After the bearings and flywheel have been attached, the hubs and pulleys can be attached to the blade shaft and motor shaft. Then make sure that the belt for the pulley has the proper tension applied to it.
- The collection bin can be made by bending the tabs shown in the pdf file. Then holes are drilled in the tabs to fasten all four sides to each other. To seal the four corners, caulk, or HVAC tape can be used.
- The last step in assembling the hopper is attaching the screen and blade bed. When doing this step the blade tolerances should be set as well. The easiest way to do this is to attach all of the bolts that will hold the screen and blade bed down and but have them loose enough to where the blade bed can be moved up and down. Then rotate the shaft and keep sliding the blade bed up until it almost touching the rotary blades as they spin around. Once this is done, tighten down the six bolts.
Work Instructions
- The first step is to make sure that the hopper is properly clamped down to the frame.
- Next is to plug in the granulator to a power outlet.
- Make sure the E-stop is not engaged.
- Then turn on the power switch and allow the granulator to warm-up for a few seconds.
- Once warmed-up, insert the recycled plastic into the top of the hopper and allow the hopper a few minutes to granulate the material before adding more.
- After all of the plastic is granulated power off the machine and unplug the granulator from the power source.
- Finally, remove the collection bin from the bottom of the granulator to gather the granulated plastic.
Common Problems and Solutions
[edit | edit source]- The one problem we ran into was once the granulator assembly was complete the tolerances were slightly off in some areas causing either some of the parts not fitting together quite right, or the cutting chamber is not completely air tight, so when the granulator was on the plastic parts were leaking out of some of the orifices. This problem is currently being fixed through a redesign. The redesigned parts will be uploaded to this page once proven to work.
Cost savings
[edit | edit source]- As soon as all of the pieces to the granulator are ordered and the final prototype is complete a cost savings page will be made.
References
[edit | edit source]See also
[edit | edit source]| Authors | |
|---|---|
| License | CC-BY-SA-3.0 |
| Cite as | Aschaub, Pjgoreck (2015–2025). "Open Source Hardware Enterprise Plastic Granulator". Appropedia. Retrieved July 28, 2026. |