The aim of wound excision is to remove contaminating debris and all devitalized tissue. This should reduce both the bacterial burden and available substrate for microbial colonization, resulting in fewer deep surgical site infections. In turn, this will lead to improved patient outcomes.
The aim of skeletal stabilization is to secure the limb so that no further soft tissue damage should ensue. By distracting the skeleton, the fragments line up into approximate anatomical configuration, by the principles of ligamentotaxis. External fixation is an excellent temporary measure to achieve this if the soft tissues are too damaged to permit internal fixation.
The aims of soft tissue coverage are to cover any exposed areas of tendon or bone. This therefore reduces the risk of chronic infection and assists the healing process.
In this module the principles and techniques of wound debridement, external fixation and fasciocutaneous flap surgery will be discussed. The user will be shown how to create a physical simulator for simple external fixator application and fasciocutaneous flap transposition.
Anatomy[edit | edit source]
Safe Zones
Tibia
- Remember away from zone of injury but not too far (working length)
- Proximal Tibia (above tubercle) - Anterior to Posterior. Either side of the patellar tendon.
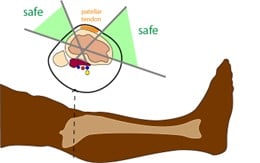
- Proximal 1/3 Tibia (at/below tubercle)
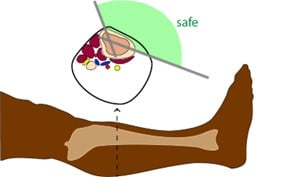
- Middle 1/3 Tibia
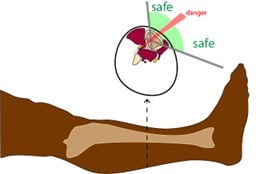
- Distal 1/3 Tibia- Antero-medial to Postero-lateral only
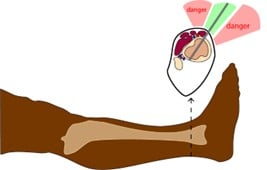
Os Calcis
- Locate medial heel
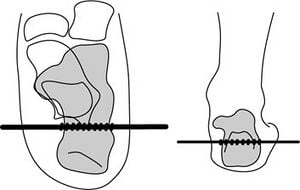
- The Steinman pin should be inserted from the medial side of the heel.
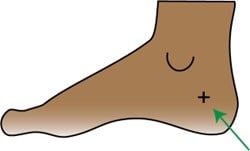
- Image Intensifier
- Use image intensifier to locate the body of the os calcis. Once located make a stab incision.
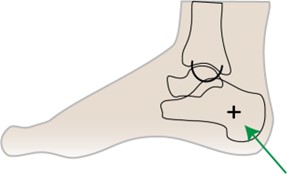
- Blunt Discretion
- Perform blunt dissection down to bone using an artery clip.
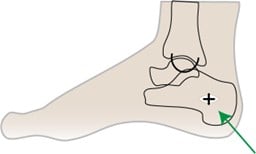
- NV Structures
- Avoid the posterior tibial NV structures by careful blunt dissection.
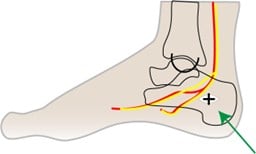
- Pin Placement
- Ensure the pin is inserted parallel to the floor and perpendicular to the body of the os calcis. (Check with the image intensifier)
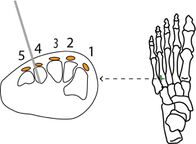
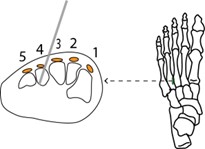
Base of 4th Metatarsal
- 3mm Schanz can be placed in the 4th MT Base to secure the ankle in neutral flexion.
- Pin Insertion
a. Standard Blunt-tip Pins
- Conventional non-self drilling threaded pins require drilling the cortices first.
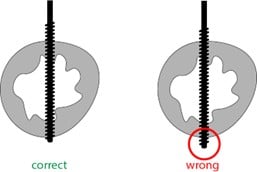
b. Self-Drilling Pins
- Self-drilling threaded pins have sharp tips that can potentially damage soft tissue.
Ex-Fix Design[edit | edit source]
- Configurations
- Uniplanar – ideal mid shaft fractures
- Bridging – across joints
- Delta Frame – ideal for distal tibia
- Box frame – alternative for tibia to aid subsequent intramedullary nail insertion
- Mechanical Stability Strain Test
- See the app to see how different configurations affect the strain on the external fixator construct.
Clinical[edit | edit source]
- Indications
- Damage control in polytrauma
- Patients who have suffered poly trauma and have deranged temperature, coagulation and pH are at risk of further demise. An important part of normalizing the patient's physiology is to stabilize the skeleton.
External Fixation offers a rapid form of stabilization without excessive 'second hit' trauma to the patient.
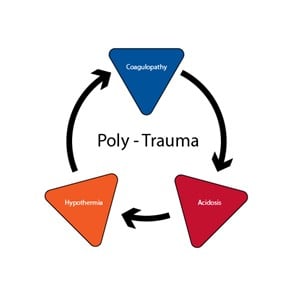
The External fixator is therefore applied temporarily until the patient's physiology normalizes and is optimized for definitive fixation.
- Excessive Soft Tissue Swelling
- In closed fractures,where plastic surgical reconstruction is not required, stabilizing high energy fractures with a temporary external fixator is the preferred.
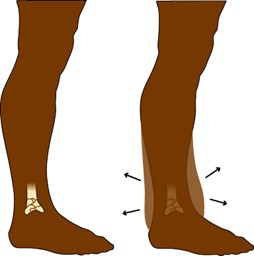
Failure to recognize swollen soft tissues before open reduction and internal fixation could result in the wounds not closing and a high risk of catastrophic infection. External fixator is applied and definitive fixation is planned after the skin swelling has reduced enough, so that it can be pinched over the zone of injury.
- Definitive treatment in some cases (particularly complex factures).
- Other forms of treatment may not be adequate in some fractures, particularly highly fragmented.
- External fixators used in this mode should be able to withstand the load over the period of fracture healing.
- The pin sites need to be maintained and regular follow up X-rays need to be booked to monitor the fixation.
- External fixators can be adjusted over time to convert from load-bearing to load-sharing constructs as the fracture heals.
- Open fractures requiring temporizing stability before transferring to Major trauma center.
- Ideally fractures should be fixed definitively with soft tissue covered. However, resources do not often permit complex plastic surgical coverage and fracture patterns or soft tissue injury may not permit internal fixation even with plastic surgical reconstructions.
- . External fixation, with pin sites far from the zone of injury provides good skeletal stability and buys the clinician time to provide definitive bone and soft tissue management when resources permit.
- Temporizing measure to provide stability for vascular grafting in cases with dislocations and high energy trauma.
- External Fixation provides skeletal stability and keeps the fixation outside the zone of vascular injury. Vascular grafts can hence by applied and kept protected.
2. External Fixator Contraindications
- Patient not fit for surgery
- Cases where early definitive internal fixation or POP is more applicable
3. Complications
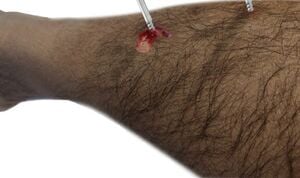
- Pin site infections
- Incidence: 0-14%
- Stages (Dahl):
- Stage 1. Seropurulent drainage
- Stage 2. Superficial cellulitis
- Stage 3. Deep infection
- Stage 4. Osteomyelitis
- Pin loosening/ breakage
- Cause
- Infection
- Using wrong starter drill
- Not preloading the pins
- Reversing conical Schanz Pins
- Prevention
- Radial Preloading: Ensure the correct drill bit is used (non-self drilling Schanz pins) so that there is good contact between the pin thread and the cortical bone.
- Bending Preloading: Squeeze the Schanz pins together when fixing them to the rod to add tension.
- Good pin-site hygiene to prevent infection.
- Pin loosening
- Cause
4. Latrogenic Pin Site Fractures
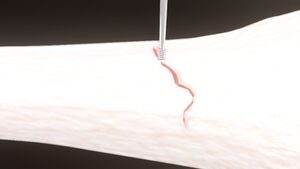
- Cause
- Failure to use correct drill bit diameter for the Schanz Pin
- Osteoporotic bone
- Incorrect Schanz pin size for the corresponding bone (see below)
- Ideal Pin Diameters
- Femur: 5 or 6 mm
- Tibia: 5 or 6 mm
- Humerus: 5mm
- Forearm: 4mm
- Hand: 2.5 or 3 mm
- Foot: 2.5 or 3 mm
5. Stiffness spanning external fixators)
- Prevention:
- Joints around the injury can become very stiff owing to prolonged disuse. It is important to keep the joints either moving if permitted or at least fixed in anatomic positions of comfort. For instance, an extra pin can be inserted into the 4th or 1st metatarsal to keep the foot in neutral flexion.
6. Compartment syndrome (rare- due to vascular injury or excessive post op bleeding)
Technique[edit | edit source]
Step-by-step
Instruments:
- Image Intensifier
- 10 or #11 scalpel
- Artery clip
- Threaded (Schanz) Pins (at least 4)
- Connecting Rods (at least 3)
- Rod to Pin connectors
- Rod to Rod connectors
- Hand drill and bit
- Jelonet dressings, gauze, wool and crepe bandage
Procedure:
- Consider the safe zones (see anatomy, safe zones chapter) and start outside the zone of injury. Begin proximal to the fracture).
- Start at the proximal end. Make a longitudinal stab incision in the skin. If necessary use the artery forceps for blunt dissection down to bone.
For non-self drilling (blunt-tip) threaded pins:
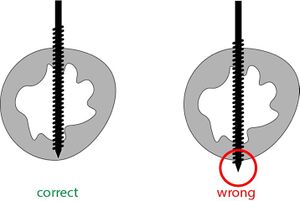
a. Predrill the near and far cortices perpendicular to the bone and in order to catch cortex-medulla-cortex. Be careful not to 'jolt' the drill bit forward as you penetrate the far cortex.
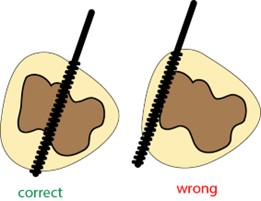
b. Insert threaded pin so that the tip lies just beyond the far cortex, ensuring the threads are in contact with both cortices (near and far)
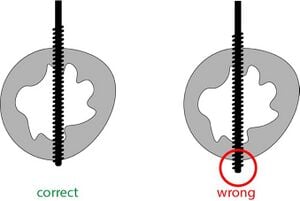
For self-drilling threaded pins:
a. No need to pre-Drill
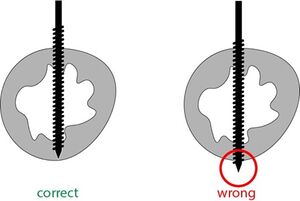
b. Using with a hand drill, drive the pins in using the hand drill until the pin tip 'parks' inside the far cortex. Do don't penetrate the far cortex as the sharp drill point can cause tissue damage.
- Repeat the above for the second pin in the area marked on the diagram below.
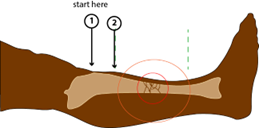
- Add pin-to-rod connectors to each pin and connect them together by a rod (as below).
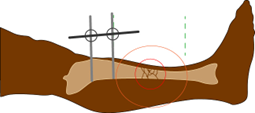
- Repeat the above for the third pin in the area marked on the diagram below.
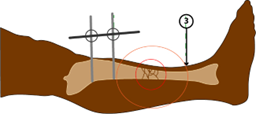
- Repeat the above for the second pin in the area marked on the diagram below.
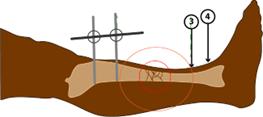
- Add pin-to-rod connectors to each pin and connect them together by a rod (as below).
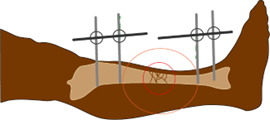
- Connect the two rods with another rod and connectors.
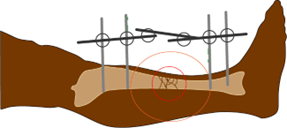
- Tighten all the pin/rod connectors and one of the rod-rod connectors, leaving one loose to facilitate manipulation.
10. Apply in-line traction holding on the rods of each segment (proximal and distal) and pulling them apart. The soft tissues will align the
11. Check the alignment on the image intensifier and when satisfactory, tighten the remaining rod-rod connector
12. Add more pins and rods, in different planes to increase the mechanical stability if needed.
13. Clean and dry the pin sites with antiseptic / alcohol solution
14. Apply jelonet dressing and gauze around the pin sites.
15. Once The flap has been transposed, apply the relevant dressing to it and then cover all with wool then crepe bandage.
Pin Site Care[edit | edit source]
- The patient should make a regular cleaning routine
- Remove any crusts from pin-sites
- Clean pins with alcohol or saline
- Showering is permitted with clean water
- If pin-tract infection is suspected, see below. Antibiotic ointmentys and creams are usually ineffective.
Pin Loosening or Infection[edit | edit source]
Removal of infected pins and repositioning in clean zones is necessary.
The tracts from the removed pins should be samples and sent for microscopy, culture and sensitivities.
The tracts should then be thoroughly debrided, curated and irrigated.