
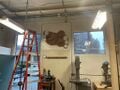
Humboldt Makerspace big clock

| Type | Clock |
|---|---|
| Authors | noah |
| Location | Arcata, California, United States |
| Status | Deployed |
| Years | 2023 |
| Made | Yes |
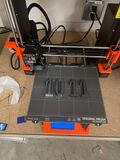
| Tools | Hammer, 3D printer, nails, scroll saw, table saw, hand saw, router, sander, screws, Dremel |
| Cost | USD 156.68 |
| Uses | education, science, design, art |
| Map | |
|---|---|
| Location | Arcata, United States |
| Coordinates |
The Makerspace Clock is a functional art piece designed by Team Big Clocks for the Engineering Makerspace on Cal Poly Humboldt campus in Arcata, California. The design was created during the Fall 2023 semester for ENGR205: Introduction to Design for Cal Poly Humboldt. This project was designed to offer inspiration to students using the space while also providing a functional clock for the Makerspace.
Background
[edit | edit source]The project was established by representative Makerspace clients Devin Ketchum and Nick Weiser. The Makerspace Clock was created intentionally to serve as a functioning clock that adds personality to the Makerspace and to provides an example of what the Makerspace is capable of creating.
Problem statement
[edit | edit source]The objective of this project is to provide a high-visibility clock for the Makerspace that represents the character of that space. The clock should also act as a centerpiece to the space that serves as a durable testament to the following semesters of what the Engineering Makerspace is capable of.
Criteria
[edit | edit source]During the design process, a set of criteria was developed by Team Big Clocks to determine the appropriate weights of each focused aspect for the project, based on importance. This set of criteria is based on the requests of the Makerspace clients and the objective of the project itself.
| Criteria | Description | Weight
(1-7) |
|---|---|---|
| Visibility | Range of visibility across the intended space. | 7 |
| WOW Factor | An impressive feature that draws attention. | 5 |
| Durability | Capacity to withstand daily environment of the Makerspace. | 5 |
| Maintainability | Ease of cleaning and changing parts/batteries. | 4 |
| Cost | Maximum budget allowed to complete the project. | 3 |
| Portability | Ability to be transported with minimal effort and difficulty in event of Makerspace relocation. | 1 |
Prototyping
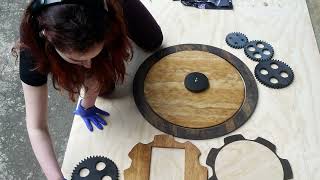
[edit | edit source]The prototyping process of the Makerspace Clock underwent a significant amount of design stages. The first prototype of the final clock design, a to-scale model of the clock and the clock’s respective 3D-printed gear chains, was constructed out of cardboard and developed based on the final blueprinted model of the project. The cardboard prototype featured a 20-inch cardboard analog clock to serve as the main attraction of the project, and an additional 4-inch ring around the circumference of the analog clock to act as the border the digits could be glued onto with the purpose of creating a 3D effect. Two similar cardboard gear-faces at 14-inch diameters each were also cut out and taped onto the backdrop, one designated as a digital clock face and the other as a vanity art-piece of the surrounding Humboldt environment. Additionally, six gears were cut out of cardboard at varying diameters per gear (8-inch, 6-inch, and 4-inch, respectively), and wrapped with aluminum foil to create a metallic look, then aligned into two trains. The backdrop itself was cut out of a few pieces of cardboard taped together and cut to an irregular shape within the frame of the desired 50-inch space that allowed all the components to be glued comfortably on. After completion, the cardboard prototype prompted discussion about if the proportion and flow of the layout of pieces were found aesthetically pleasing.

During the process of arranging the components of the cardboard clock, a few designing dilemmas became evident. Orientating the backdrop piece vertically, instead of horizontally, gave two different effects on the aesthetics of the Makerspace Clock itself. To test which was more visually appealing to a general audience, a survey was conducted of both orientations to a select number of students, in which the horizontal orientation prevailed as the preferred choice. The prototype being to-scale aided in the decision of if the numbers and clock hands were visible at varying distances. The prototype was also tested for desire by nailing it in the intended spot in the Makerspace, mainly to observe if it was visible to 70% of the room and if it fit well on the wall. The percentage of visibility was estimated by standing at all the possible corners of the Makerspace, as well as where students would be working, and testing if the clock was able to be read clearly from that point within the room. All the spots within the room tested successfully for full visibility of the clock. The prototype was also open to approval and edits from interviewing students and the clients on their individual critiques and suggestions for the final exhibit.
The prototyping process for the moving gear trains were developed from the errors of the original design, and these errors fueled the developments that made their way into the final design. An Arduino UNO was utilized to program a servo mini motor to power the 3D-printed gear train. The utilization of Solidworks was crucial to design a three-gear train and determine the pitch and gear ratio. One of the issues encountered was that the servos purchased did not have enough torque to move the gear train when it was vertically oriented, so the design was adapted to overcome this challenge. Higher torque servos were purchased, as well as edits within AutoCad to 3D print the gears with larger interior holes to make the gears lighter.
- Prototyping
-
 Cardboard prototype on wall.
 -
 Prototyping of large gear holes versus small gear holes.
 -
 Prototyping of 3D-print integers for analog clock.


Final product
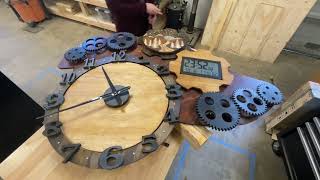
[edit | edit source]The final timepiece features an analog clock, a digital clock, decorative clock face, and two gear trains mounted onto an oblong 5’ backdrop. To meet the criteria of the project, Team Big Clocks assembled a timepiece system made of the following components: a wooden analog clock of 24” diameter, an LED clock mounted into a 14” diameter wooden clock face, a decorative 14” diameter clock face, two 8” diameter gears, two 6” diameter gears, two 4” diameter gears, a clock mechanism, and two servos. This final product was then mounted to its designated spot in the Makerspace using a French cleat.

Construction
[edit | edit source]The main clock consists of a 20” diameter piece of light-stained wood with an additional 4” of diameter from a dark-stained ring. The numbers are Arabic numerals. 3D-printed and mounted onto the clock using Gorilla glue. The clock hands are attached to the clock mechanism mounted onto the 20” face via hook attachment hammered into the face. The outer ring was mounted onto the backdrop with screws, and the inner circle was joined to the backdrop using wood glue.
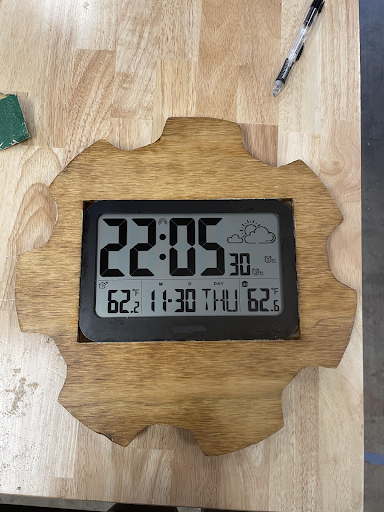
The LED clock, a10” x 6”, is mounted into a 14” wooden gear cut-out 3/8” thick. The clock displays time (hour, minute, second), predicted weather for the next couple hours, temperature, the date (month, day), and day of the week. The clock is mounted onto the backdrop via a notch in the back of the digital clock that is held in place with a screw. To gauge the temperature the digital clock receives a signal from a remote sensor that is mounted inside the room on a south-facing wall.
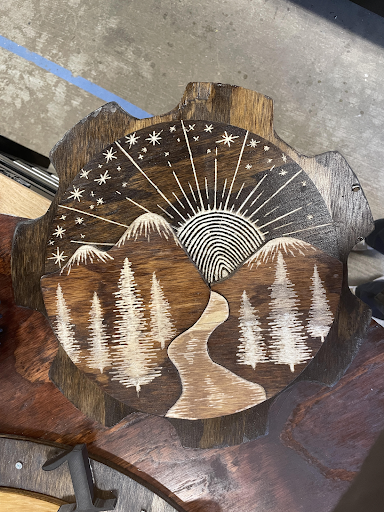
The decorative clock is a 14” wooden gear, 3/8” thick. The design features a river and forest in the foreground, a mountain range in the middle ground, and the sun and stars in the background. The foreground and middle ground were cut using a scroll saw and the background is a 11” circle cut using the CNC. The design was done by hand using a Dremel.
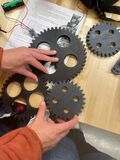
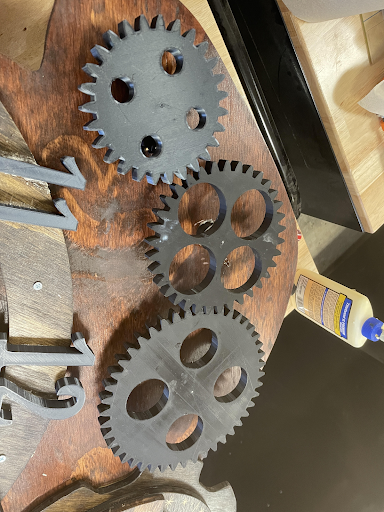
The two gear trains are powered by servo motors connected to programmed Arduinos. The two sets of gears include: an 8” gear, a 6” gear, and a 4” gear. The gears all have four holes to reduce their individual mass so that they can function vertically. The driving gear is glued directly to the servo motor which is inset into the board. The two driven gears are connected by skateboard gears that are inserted into 3D printed cylinders. A 3D printed shaft is inserted into the interior hole of the skateboard bearing which allows for a 360-degree range of motion.
- Construction of Makerspace Clock
-
 Gear train layout.
 -
 Dremel art for final clock design.
 -
 Final design with digital clock input.


Operation and Maintenance of Makerspace Clock
[edit | edit source]The operation of the Makerspace Clock is a simplistic process that follows battery setup and cleaning outlined in this video.
Bill of materials
[edit | edit source]All costs listed are prices paid and current prices of each mechanism needed for the final project.
| Item | Amount | Cost per unit | Total |
|---|---|---|---|
| High-torque Servo — Get on Amazon | 2 | USD 23.88 | USD 47.76 |
| Arduino UNO — Get on Amazon | 2 | USD 16.99 | USD 33.98 |
| Digital Clock Face — Get on Amazon | 1 | USD 28.99 | USD 28.99 |
| Clock Mechanism — Get on Amazon | 1 | USD 11.99 | USD 11.99 |
| Servos (Prototypes) — Get on Amazon | 4 | USD 8.49 | USD 33.96 |
| Grand total | USD 156.68EUR 134.74 <br />GBP 114.38 <br />CAD 194.28 <br />MXN 3,266.78 <br />INR 11,727.50 <br /> | ||
Maintenance
[edit | edit source]The Makerspace Clock was created with maintainability as a high-valued criteria, so it was an intention of the project for maintenance to be seldom-needed. Anyone in charge of the Makerspace that is capable of a few short tasks will be able to complete the chores needed to maintain the clock. Maintenance includes monthly cleaning of the clock face, biannual setting of the time in respect to daylight savings, and the occasional battery change. Wood re-staining is also required every 3-5 years to keep the clock in good condition.
Maintenance schedule
[edit | edit source]- Monthly
- Cleaning of clock face.
- Yearly
- Daylight savings.
- Battery change.
- Every 3-5 years
- Wood re-stain.
Conclusion
[edit | edit source]Testing results
[edit | edit source]The Makerspace Clock was successfully constructed, with fully functional timekeeping mechanisms and a polished final artistic design. The only unintended issue of the design that revealed itself after implementation was a servo motor going defunct after running the gear trains for an extended period of time.
Discussion
[edit | edit source]The artistic and aesthetic results of the project concluded perfectly as expected, the final product featuring the appropriate amount of artistic design that was planned for, and the gear cutouts performing sufficiently in correspondence with the visible aesthetics of the entire clock itself. The timekeeping mechanisms of the analog clocks and digital clocks also perform flawlessly as well, with no errors in their individual timekeeping abilities. The only set of results that are shown apparently to be flawed are the gear trains sourced from the servo motors. Shortly after running the gear trains for an extended period of time, one of the servo motors ceased to operate as intended, due to a hardware malfunction.
Lessons learned
[edit | edit source]Utilization of Makerspace resources, following a professional design process, and collaboration using brainstorm techniques were all lessons learned during the project's timeline. If this project were to be replicated, further designing and planning for physical implementation such as joining components together should be taken into consideration. Additionally, a stepper motor may be more advantageous than a servo motor due to a higher torque generation while having a simpler coding setup.
Next steps
[edit | edit source]The project can be expanded on into the future by being adapted for other spaces, as well as acting as a work for inspiring new projects for other makerspaces. The final Makerspace Clock itself can be added onto with lights for added visibility, more moving parts, and other mechanisms.
Troubleshooting
[edit | edit source]| Problem | Suggestion |
|---|---|
| Digital clock doesn't turn on | Change AAA battery |
| Analog clock doesn't function | Change AA battery |
| Arduino motors don't turn on | Contact Mikayla (@mbm99@humboldt.edu) |
Team
[edit | edit source]Introduce team and semester in the following format:
References
[edit | edit source]
| Authors | |
|---|---|
| License | CC-BY-SA-4.0 |
| Organizations | Cal Poly Humboldt |
| Cite as | Username, Lonny (2023–2026). "Humboldt Makerspace big clock". Appropedia. Retrieved July 28, 2026. |