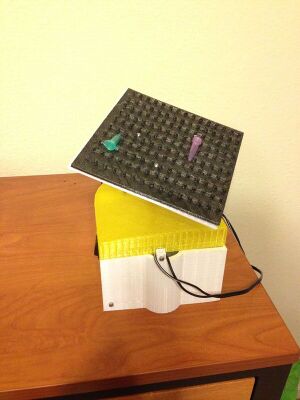
It is an ideal for mixing samples in blood and centrifuge tubes. The 3D printed mixer is a lot cheaper than that available in market. Its almost 95% cheaper than that available commercially.
Gyratory action provides gentle, thorough mixing
- Ideal for mixing samples in blood and centrifuge tubes
- Fixed speed and pitch
- Safe for cold room use
Materials Needed[edit | edit source]
- M3 16 mm screws and nuts: 10
- 12 V dc motor: 1
- Roller skateboard bearings: 2
- Eraser: 2
Items to 3D Print[edit | edit source]
All STL files are available here http://www.thingiverse.com/thing:1195550
- cover
- test tube bed
- motor
- gear with bearing
- gear base
- Motor mount
- rotating rod
- rubber pad(with ninjaflex not pla)
- X shape
Instructions[edit | edit source]
- Print all the parts mentioned above.
- After printing the gear with bearing, attach the bearings in the space available.(Snap fit should do)
- While printing the gear base, pause it at height of 43 mm, insert the gear with bearing print and resume your print. This way your gear is secured to a place and will not move.
- Attach the shaft of the motor with the motor gear and secure the assembly to the motor mount.
- Take the motor mount, and adjust it on the gear base, such that both the gears are meshing completely. Then fix the motor mount at that point with nuts and bolts, or epoxy.
- Print the rotating rod and fix it with the printed X shape using nut and bolt.
- Fix the assembly of X shape and rod with the test tube bed with nuts and bolt. You may have to dril the exact location with 3 mm drill.
- Print the rubber pad with ninjaflex filament and attach it with the testtube bed using glue or nuts and bolts. Any one would work well.
- Print the case in two parts and attach them together.Glue 2 Erasers at the point where the cover is open leaving 8mm gap between them
- Place a switch in the hole given and solder it to the motor and adapter all in series.
- Attach the printed case with the gear base and fix it with nuts and bolts.
- Pass the rotating rod assembly through the gap between the erasers and fix it on the gear with bearing assembly.
- You are good to go. just turn the switch on and off and see the mixer work.
Cost[edit | edit source]
- Nuts and bolts - Approx 5 $
- Filament - Approx 10$
- Bearings (Skateboard bearings): 2.5 $
- Motor: 12 $
- Batter or adapter: 6$
Total cost: 36 $
Notes[edit | edit source]
- You can print the cover as one print. just modify the design and join both the file to make it sturdy.
Due to time issues i printed it in 2 parts.