
CCAT remediation zone

| Type | Sustainable garden |
|---|---|
| Authors | Carolan Raleigh-Halsing Jghoul |
| Location | Arcata, California |
| Status | Deployed |
| Years | 2009 |
| Cost | USD 285 |
The Campus Center for Appropriate Technology (CCAT) at Cal Poly Humboldt in Arcata, California wants to incorporate an insect-a-garden on their grounds. This project focuses on CCAT's North-Eastern Slope (see figure below for location). The project includes researching and planting a combination of beneficial and aesthetic plants in order to stabilize the slope as well as attract helpful insects and beautify the area. A retaining wall will be designed and constructed in order to prevent further erosion. As an ENGR 305 project for Spring 2009, Jamila Ghoul and Carolan Raleigh-Halsing have decided to take on this project.

Introduction
[edit | edit source]CCAT is a non-profit which serves as a demonstration house and learning center for appropriate technologies on the Cal Poly Humboldt campus. Students and community members are encouraged to participate in the many learning opportunities offered at CCAT. People can gain hands-on experience in the fields of alternative energy, green construction, organic gardening, herbalism, permaculture, lost arts of living, sustainable technologies, and much more.
The purpose of this project is to create a stable slope for planting and attracting beneficial insects. The CCAT staff expressed interest in having plants that attract beneficial insects such lady bugs, bumble bees, praying mantises and butterflies. Beneficial insects are the best known form of biological pest control. Utilizing beneficial insects for natural pest control eliminates the need for chemical pesticides. It is safe for humans and other animals and contributes to a diverse garden habitat.
Slope stabilization is a crucial aspect of this project. The slope receives a significant amount of precipitation runoff and has eroded over time. In order to prevent further erosion we have planted various plants that have extensive roots structures and slope stabilization properties. These plants include Ceanothus impressus, Red Flowering Current, a variety of Fuchsia, Wild Strawberries, Western Bleeding Heart, Evergreen Huckleberry, Lavender, Rosemary, Stinging nettle, Yarrow, Calendula, Heliantheman, and Alchemilla Mollis.
Literature Review
[edit | edit source]Plants
[edit | edit source]Slope Stabilization
- Dutch white clover and perennial rye were used at the Faralline Institution to manage pathways between beds. Paths done in this manner proved to provide weed control and perennials helped control erosion. This could be used on the path which is above our slope to help control erosion by stabilizing the path, stabilizing the slope, preventing soil loss down the slope, slow the flow of water, and increase absorption.[1]
- "Slope Stabilization and Erosion Control Using Vegetation" has a great guide to determining what are key factors for your specific slope. It has a comprehensive method description of how to evaluate your slope: determining the slope angle and height, soil, micro-climate, drainage, existing vegetation, slope erosion, soil mass movement, and special needs areas. It describes the advantages and disadvantages of the different methods of planting the slope. We will be doing a variation of all of the methods – seeding with mixed species, contour wattling, and live staking. According to their research our proposed planting methods would work with the erosion problems the slope currently has. This book is the most helpful source I have found thus far! It would be even more applicable for someone who is working on a similar project near the ocean because that is what the source specialized in.[2] This reference is spoken about in greater detail later on in the literature review.
Beautification
- An important aspect of this project is aesthetics and to incorporate attractive, flowering and non-flowering plants. Rosebay rhododendrons are large shrubs that produce clusters of rose-purple flowers in the late spring. Evergreen huckleberry is a multi-branched evergreen shrub that produces white to pale pink, bell-shaped flowers from late winter to mid-spring. The Long-leaf barberry is a small evergreen shrub that produces clustered yellow flowers in late spring. Salal is a dense evergreen shrub that grows well with excess water and produces lines of white or pale pink, lantern shaped flowers in mid to late spring. Salal also produces edible berries. Various species of ferns were identified in this source and three would be appropriate for this project; Western sword fern, Spiny wood fern, and the Deer fern. All of these species stay green throughout the year. Wild ginger is an easy to establish ground cover plant that produces broad, heart-shaped leaves and maroon blossoms. Redwood sorrel is an evergreen plant with clover-like leaves and single white, pink or rose-purple blossoms appear in early to mid-spring. The Redwood violet is a ground-hugging, evergreen plant that has round, dark green leaves and produces single-stemmed yellow violets sporadically throughout the year. The Western bleeding heart is a winter-dormant ground cover plant that has pale-green fern-like leaves and small clusters of white or pale-pink heart-shaped flowers in the mid to late spring. Smith's fairy bells are wildflowers that have slender, white, bell-shaped flowers with bright orange berries appearing in the summer. They thrive on shady, sloped areas. False solomons seal produces thick, strong stems and tiny cream-colored flowers with a strong fragrance. All of these plants mentioned above are native to California redwood forests and are non-invasive.[3]
- The coast sagebrush is a woody-based perennial that has grayish leaves. This provides a nice contrast to deep-green colored plants. Eriophyllum is another wood-based perennial that produces numerous bright yellow flowers in the late spring and well into the summer. This plant is appropriate as a low border and would work well along paths and walkways. Beach strawberry is an easy to propagate and prolific groundcover plant that flourishes in coastal climates. It produces small, edible strawberries in the late spring and early summer. All of the plants listed above are native to the Northern California coasts and are non-invasive.[4]
Beneficial Insect Attractors
- Pollen and vector flowers such as dill and angelica attract lady beetles. "Weeds" such as dandelion, wild carrot, and yarrow also provide habitat for lady beetles.[5]
- Lacewings are commonly found in weeds.[5]
Hummingbird Attractors
- Hummingbirds are important pollinators for many plants. Plants and hummingbirds form a symbiotic relationship; hummingbirds land on flowers to drink the nectar and unknowingly cover their feathers in pollen and transport that pollen to other flowers effectively pollinating the plants. Hummingbirds are beneficial birds to have present in any garden. Hummingbirds like areas that have full sun exposure, partial sun exposure and shade, therefore it is important to create a habitat that has all three characteristics. Having a variety of levels of vegetation is attractive to hummingbirds as they prefer to have choices of where to feed and where to perch to rest or roost. Planting vegetation that has numerous flowers that bloom at different times is also very important. Bleeding hearts produce larger amounts of nectar that attract hummingbirds.[6]
Insects
[edit | edit source]Beneficial Insects
- One recent study concludes that between 60 and 80% of the world's 250,000 flowering plants require insect pollination to be most productive. Native bees significantly contribute to plant pollination and in some cases provide all of the pollination. Landscaped gardens often lack the abundance and diversity of forage and nesting sites required by native bees. By providing pollen and nectar, nesting sites, and protection from pesticides, one can ensure that a diverse community of native bee species will establish itself. Bees are one of the most skilled and efficient pollinators because they often transport pollen and visit flowers from a single plant species in each foraging trip. This ensures that matching pollen is transferred from plants of the same species. Native bees provide free and valuable pollination service, which is why it is beneficial to encourage their presence in a garden.[7]
- Lady bugs/ lady beetles – like to eat aphids and other small soft pests. and attracted by the presence of aphids and pollen flowers. Will disappear (die or migrate) if food in not available. Thus, since the CCAT garden does not currently have issues with aphids lady beetles will probably not be found there. However, creating the right conditions for them will not hurt. Rather, it will provide a place for them to be if an aphid problem arises – i.e. planting pollen and vector flowers. Lady beetles do well in this area.[8]
- Lacewings/"Aphid Lions" – eat aphid and insect eggs. The adult lacewings can be eaten by bids and dragonflies. The larvae can be eaten by lady beetles and larger lacewings. They are attracted by their food source (aphids) and weeds, corn.[8]
- Praying Mantis (Tenodera aridifolia sinensis) – general predator, but will eat both beneficial and detrimental insects. It could wipe out lady beetle populations if no other food source is available. So creating an environment for praying mantises might not be good for the project because there are no huge insect problems as is.[8]
Detrimental Insects
- Aphids/"plant lice" - natural predators include lady beetles, parasitic wasps, aphid midge larvae, crab spiders, lacewings, hoverfly larvae, and entomopathogenic fungi. Feed on the sap of phloem in plants. Ants are usually attracted to plants that are infested with aphids because they are attracted to the sweet sap. Aphids can transmit plant viruses.[8]
Erosion
[edit | edit source]- General
- Slope erosion is caused mainly by the effect of wind, ice and rain. In the Pacific Northwest, rainfall is the most important factor.[2]
- Erosion can be controlled by reducing the runoff water going over the slope and by modifying site conditions. Modifications can be made to the soil type, the steepness and the size of the slope, and the vegetation cover.[2]
Erosion Control Methods
[edit | edit source]Seeding
- Seeding is the easiest method and should be used in conjunction with other methods. After the seeds have been put in place, mulch should be put over the ground to protect the future seedlings from wind and water erosion. This technique is good for mild erosion. Grass is relatively fast to grow so it creates a shallow root layer which combats soil erosion by holding soil in place. A diverse mix of native plants ranging from grass to shrubs and trees should be used.[2]
Container Planting
- This method is faster than planting from seed. It is considered good practice to group different plants together so the root system can be diverse. Also, if some species are less adapted to the conditions of the hill, the dominant ones will take over. This method is the most expensive.[2]
Live Staking
- Cuttings from hardy woody plants can be used as live stakings. 2 to 3 feet long stakes are inserted in the soil and eventually roots will grow and help support the hill. Not all species are able to do this.[2]
Contour Wattling
- This technique uses live staking to support long wattles made of tree branches that are partially inserted in pre-excavated horizontal trenches following contour lines of the slope. This technique is efficient against high runoff water but is material and time consuming.[2]
Ground Cover
- Ground covers in the form of straw or mulch help to control erosion by reducing wind effects on soil particles the the ground. It also absorbs water during rainfall which helps reduce runoff and its effects on the soil.[2]
Swales
- Swales are small ditches or trenches that carries and slows runoff water, making it more likely to be absorbed into the soil. Swales work best when they are strategically placed with the natural drainage pattern in mind..[2]
Terracing
- A terrace is a leveled section of a hill cultivated area designed to prevent the rapid surface runoff of water from precipitation and/or irrigation..[2]
Retaining Walls
[edit | edit source]There are many different types of retaining walls. Broken concrete, logs, tires, gravity, sheet piling, cantilever and anchored are just some of the few that we encountered in our research. An important aspect to consider when choosing the material for your retaining wall is what materials are available. There are four basic types of retaining walls: gravity wall; cantilever wall; counterfort wall; and buttressed wall. The materials that we were able to find for free are pieces of broken up concrete, cinder blocks, bricks and rocks. With these materials the type of retaining wall that we built is considered to be a gravity wall. A gravity retaining wall is usually 3 to 4 feet in height. The wall depends on its own weight or mass to hold back the earth behind it. This goal is achieved by constructing the wall with a type of material so that when stacked together, the weight and friction of the interlocking material exceeds the forces of the earth behind it. The wall is thicker at the base than at the top..[9]
Mortar
[edit | edit source]The purpose of the mortar is to fill in the cracks between the pieces that make up the wall. This serves two purposes. The first is to connect the various of pieces of rock, brick and cement and the second is to eliminate any spaces for wasps to make nests..[9]
-
 Here is an example of a brick wall made with concrete mortar.

Plants Obtained
[edit | edit source]All plants in this table are native or non-invasive.
| Plant Name | Slope Stabilizers | Beneficial Animal Attractors | Size at Maturity | Other Planting Information | Sun Exposure | Quantity Obtained |
|---|---|---|---|---|---|---|
| (Heather) Golden lady | X | H 20"
W 12" |
Trim after flowering | Full sun to partial shade | 3 | |
| (Heather) Firefly | X | H 18"
W 20" |
Full sun to partial shade | 1 | ||
| (Heather) Fraser's Old Gold | X | H 12"
W 20" |
well-drained soil and trim after flowering | Full sun to partial shade | 1 | |
| (Heather) Kerstin | X | H 12"
W 18" |
Full sun to partial shade | 2 | ||
| (Heather) White Lawn | X | H 2"
W 16" |
Full sun to partial shade | 2 | ||
| (Heather) Golden Sprout | X | H 6"
W 12" |
well-drained soil | Full sun to partial shade | 1 | |
| (Heather) Guinea Gold | X | H 14"
W 24" |
Full sun to partial shade | 1 | ||
| (Heather) Orange Queen | X | H 16"
W 20" |
Full sun to partial shade | 1 | ||
| (Heather) Red Fred | X | H 14"
W 18" |
Full sun to partial shade | 1 | ||
| Rhododendron Capistrano primrose | X | H 4'
W 5' |
Cool, moist, well-drained soil | Part sun | 1 | |
| Salal | X[2] | H 3'
w 3'[2] |
Fibrous shallow roots[2] | Partial sun to full shade[2] | 2 | |
| Ceanothus impressus 'Victoria' | X[7] | X[7] | H 8'
W 8'[7] |
Hardy, will get big if not pruned back[7] | Full Sun[7] | 1 |
| Red Flowering Current | X[2] | X[2] | H 8'
W 6'[2] |
Full sun to partial shade[2] | 3 | |
| Fuchsia | X | X | H 36"
W |
Well-drained soil | Full sun | 5 |
| Wild Strawberries | X | X | Runners spread out for a good ground cover | Full sun to partial shade | 7 | |
| Western Bleeding Heart | X | X | Regular water and well-drained soil | Shade | 2 | |
| Evergreen Huckleberry | X[2] | X[2] | H 6'
W 3'[2] |
Partial shade to full shade[2] | 3 | |
| Lavender | X | X | 1 | |||
| Rosemary | X | X | H 2'
W 3' |
Full sun | 2 | |
| Stinging nettle | X | X | 1 | |||
| Yarrow | X | X | 4 | |||
| Calendula | X | X | Full sun | 2 | ||
| Sage | X | X | H 1-2'
W 2' |
Well-drained soil and little water | Full sun | 3 |
| Red Elder Berry | X[2] | X[2] | H 15'
W 10'[2] |
Full sun to full shade[2] | 1 | |
| Heliantheman | X | X | H 8"
W 3-4' |
Very well-drained soil, good for boarders and in rocky areas | Full Sun | 3 |
| Alchemilla Mollis | X | H 12-18"
W 18" |
Moist, well-drained soil | Full sun to partial shade | 2 | |
| Wild Grape | X | 3 |
- The information about the heathers was obtained through talking to the ladies who own the Glenmar Heather Nursery in Bayside.
- All information on plants that are not heathers and are not specifically cited in this table comes from Calflora.org.[10]
Project Requirements
[edit | edit source]Hoping to practice a permaculture ethic of care and respect, we made it a welcomed requirement that this project attempt to fulfill the needs of the CCAT co-directors, members, gardeners, and all others who are involved.
In order to fulfill these needs we had to do a variety of things. We found and implemented suitable ways to stabilize the slope, beautify the area, and attract beneficial insects and birds to help keep the garden healthy.
CCAT requires that no plants used in this project be invasive. A diversity of vegetation (different types, heights, and seasonality) is desired. CCAT would also like to see the final product require minimal upkeep. This would include perennials, self-seeding annuals, and a designed that minimizes the need for watering and weeding.
CCAT co-directors requested that the area be "natural looking" and thus obvious terracing and even-rowed-planting will not be incorporated into the design.
Criteria
[edit | edit source]| Criteria | Definition | Constraints | Wieght (0-10 highest) |
|---|---|---|---|
| Level of Slope Stabilization | This means reducing the erosion of the Northeastern hillside at CCAT. | We will use vegetation, structural amendments (ex: retaining wall and slight swales), and coffee sacs to hold slope in place and retain water. | 10 |
| Beautification | This means incorporating aesthetically pleasing aspects into the design and construction of the project. | Plant vegetation that is aesthetically pleasing (i.e. a diversity of flowering and evergreen plants). We will take the aesthetics of retaining wall into account as well. The budget and donations will also effect what vegetation will be available. | 10 |
| Attractive to Beneficial Insects and Birds | This means designing the area into an environment that will attract helpful insects and birds into the garden to keep it a healthy place. | We will plant vegetation that attracts beneficial insects and beneficial birds that are appropriate for the conditions and needs of this particular garden. | 10 |
| Appropriateness of Plants | This is the planting of native vegetation. | Native plants are highly desired, but there are exceptions (i.e. non native, non-invasive plants that are very good at attracting butterflies and stabilizing slopes). Plants must be non-invasive. The budget and donations will also effect what vegetation will be available. | 7 |
| Level of Vegetation Diversity | This means planting a variety of differing plants (different types, heights, and seasonality). | Again, non-invasive plants are a must and the budget and donations will effect what will be available. | 9 |
| Maintainability | This means the amount of work that is required to maintain the area. | Minimal upkeep is desired. Perennials and self-seeding annuals will be used, as well as plants that will not take over or require weeding. | 8 |
| Aesthetics | This means a "natural" aesthetic (wild, sporadic, etc.) regarding the planting of the slope. | The slope is suppose to look "natural". Heavy terracing and even-rowed planting will not be incorporated into the design. | 8 |
| Cost | This means the amount of money the components of the project will cost. | We will stay within the budget provided by CCAT and obtain most materials from donations. | 10 |
Initial Slope Conditions
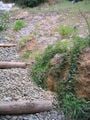
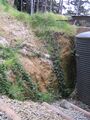
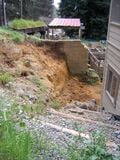
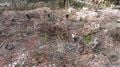
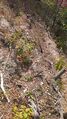
[edit | edit source]Initially the slope was almost completely bare soil with a high clay content. The majority of the slope has full sun exposure because it faces Southwest. However, since the area is shaped like a bowl and so close to the CCAT house there are a few places that receive partial shade. The following images are photos of the slope prior to the project.
-
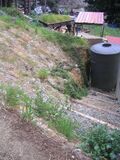 Note the convex/bowl shape of the slope. Note the steps running parallel with the CCAT house and the base of the slope.
 -
 View from the base of the slope, looking Northeast.
 -
 The steepest part of the slope is next to the water tank.


Budget
[edit | edit source]CCAT has a limited budget for this project. However many of the resources required for this project are on site already and we were able to acquire all of our plants and mulching material from donations. We were able to find broken pieces of concrete for free from someone on Craigslist and the bricks were available at CCAT. Thus, CCAT did not have to pay for any portion of this project. The following is a table illuminating the quantity, value, and source of the materials needed for the project.
| Quantity | Material Needed | Source | Value | Total Cost |
|---|---|---|---|---|
| Enough plants to eventually cover the slope | Native plants, plants that attract beneficial insects, slope stabilizing plants, and flowering plants. | Emerald Triangle Landscaping, Mad River Gardens, Freshwater Farms | $250 | Donated |
| 100 | Bricks and broken concrete | Craigslist and CCAT | Free | Donated |
| .75 Cubic Yard | Soil | Wes Green Landscaping | $32 | Donated |
| 2 | Straw bales | Three G's | $3 | Donated |
| Total | $285 | $0 | ||
Design
[edit | edit source]The CCAT Remediation Zone project design is broken up in two parts: the slope (including planting, wattles, baffles, and small terracing) and the retaining wall. The following table is a key that lists plants that correspond to the plant codes in the image of the landscaping design.

|
|
This following image is an drawing showing landscaping design used in the CCAT Remediation Zone project. It shows the vegetation at approximate mature size. See table for plant key and names.
The following image is the retaining wall design with dimensions. The retaining wall was built will broken concrete, cinder blocks, rocks, and bricks. All these materials were found at CCAT or on Craigslist.

Process
[edit | edit source]The following sections describe the process of our project. We begin with testing, go to preparing the slope, building the retaining wall, and finally planting the slope. This section ends with a description and photos of the finished project.
Testing
[edit | edit source]Simple Soil Analysis
[edit | edit source]To get an idea of what the soil composition of the project site was we did a soil analysis test. We used a simple soil analysis method provided to us by a professor at Cal Poly Humboldt. Although it was simple it gave us enough information about the soil to understand what would be ideal to use as mortar for the retaining wall. We could tell just by looking at the project site that the soil had a very high clay content. This test gave us a rough idea of how much clay was really in it. This was important because it gave further justification for acquiring good soil and soil amendments for planting the vegetation on the slope.
We decided to test three different soil samples for the project. From observing and studying the site we determined that the site has three main types of soil. There is a grayish-white soil (see jar 1 in fig. 6a), brownish-orange clay soil (see jar 2 in fig. 6b), and a soil high in sand (see jar 3 in fig. 6c). The following describes the method used to test the soil samples:
Materials needed
- Clean jar with secure lid
- Sample soil
- Stick to stir soil
- Water
- Timer/time-keeping device
- Pen to write on jar
- Ruler/measuring device
Method
- Put each soil sample in its own jar. Soil should take up about 1/3 of jar.
- Add another 1/3 jar of water, plus a pinch of salt.
- Stir with a stick, then screw on lid and shake thoroughly.
- Let jars sit for one hour.
- Shake jars again.
- Let sit one minute.
- Mark level of settled soil on the jar. Call this level T1. This layer is mostly sand and fine gravel.
- Wait 30 minutes.
- Mark this new level of settled soil. Call this level T2. This additional settled soil is silt.
- Let jars sit for 24 hours.
- Mark new level of settled soil. Call this layer T3. This additional settled soil is clay.
- Calculate actual soil composition:
- % clay= 100 X (T3-T2)/T3
- % silt= 100 X (T2-T1)/T3
- % sand & fine gravel= 100 X T1/T3
-
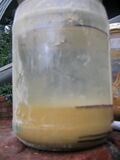 Fig. 6a: Jar 1 after test completed. Sharpe pen marks where each settled soil level is.
 -
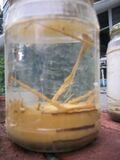 Fig. 6b: Jar 2 after test completed.
 -
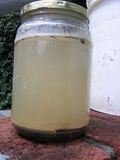 Fig. 6c: Jar 3 after test completed. Note that jar 3 has very minimal clay.


Results
| Jar # | T1 (cm) | T2 (cm) | T3 (cm) | Water level (cm) | % sand & fine gravel | % silt | % clay |
|---|---|---|---|---|---|---|---|
| Jar 1 | .7 | 1.1 | 3.4 | 10 | 20% | 11% | 67% |
| Jar 2 | 1.2 | 2 | 3.4 | 10 | 35% | 23% | 41% |
| Jar 3 | .9 | 1.2 | 1.2 | 10 | 75% | 25% | 0% |
Jar 1 had the highest % clay and the lowest % silt and % sand & fine gravel. Jar 2 was a middle ground between Jar 1 and Jar 3 because its ratios between sand, silt, and clay were much less drastic compared to the other jars. Jar 3 was basically all sand and silt. It had the highest % sand and % silt. It had very little to no clay in it.
Conclusion
Clay is an important ingredient for our homemade mortar because it binds the rest of the mortar together. Because the soil of Jar 3 did not have very much clay we decided to not use it in our test-wall for mortar testing. We used the soil samples from Jar 1 and 2 for our test-walls to see how they work as mortar. This simple soil analysis test helped us save time by eliminating an entire test-wall.
Mortar Testing
[edit | edit source]After doing the simple soil analysis, we tested the ability of the three different soil types as mortar for the retaining wall. We made small "walls" out of brick to test the drying, erosion, and workability of the three different soil types found on the project site.
Materials Needed
- Shovel
- Bricks/wall building material
- Water
- Gloves (optional)
- Buckets
- Tarp
- Sunshine
- Rags
- Trowel
- Hose
Method
- Lay out tarp to keep area clean if you like
- Use shovel to collect soil for mortar
- Put soil in bucket
- Add water and mix with until it is cookie-batter consistency (thick but moist). This is your homemade mortar.
- Take one brick, spread homemade mortar on the side of this brick with the trowel or your hands. The mortar should be about 1/3 inch thick.
- Set brick down on ground. Take second brick at push it up against first brick on the side with the mortar (making a mortar sandwich).
- Spread ~ 1/3 inch layer of mortar on the exposed end of one of these bricks and add another brick to make a new sandwich. (Now you should have three bricks laying end-to-end with mortar between them.)
- Spread ~ 1/3 mortar on top of these bricks
- Add a brick and mortar sandwich on top of the first layer of bricks.
- Spread mortar on top of the second layer of bricks.
- Add a final brick on top of the second layer. You should have a three layered brick wall. The first layer will have three bricks. The second will have two. The third will have one.
- Wipe off excess mortar.
- Repeat all these steps for each wall.
- Let wall dry in sun until mortar is no longer squishy.
- Once wall is dry, test for erosion by either waiting for rain or spraying with water from a hose for a specific amount of time.
- Note how each mortar reacts to water.
- Let walls dry in sun until the mortar is no longer squishy.
- Note how each mortar reacts to being re-dried.
- Note how sturdy bricks are now that mortar has been re-moistened and re-dried.
-
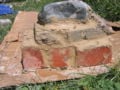 fig 7a: This image shows the gray clay from jar 1 used as mortar. We call this wall: test-wall 1
 -
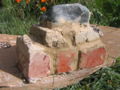 fig 7b: Test-wall 1 after mortar dried for two sunny days.
 -
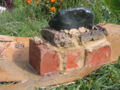 fig 7c: Test-wall 1 after having 4 gallons of water poured over it from about 1 foot above over 1 minute.
 -
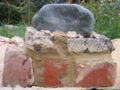 fig 7d: Test-wall 1, 36 hours after watering it.
 -
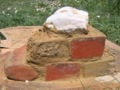 fig 7e: Brown clay from jar 2 used as mortar. We call this wall: test-wall 2
 -
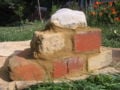 fig 7f: Test-wall 2 after mortar dried for two sunny days.
 -
 fig 7g: Test-wall 2 after having 4 gallons of water poured over it from about 1 foot above over 1 minute.
 -
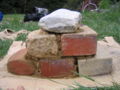 fig 7h: Test-wall 2, 36 hours after watering it.


Results
The clay from Jar 1 was used as mortar on Test-Wall 1. The clay from Jar 2 was used as mortar on Test-Wall 2. Mortar 1 was more sticky than Mortar 2 which made it messier to work with. Unlike Mortar 2, Mortar 1 cracked after drying for 2 days (see figures 7b & 7f). Test-wall 2 lost more of its mortar than Test-Wall 1 after pouring water on them (see figures 7c & 7g). Test-wall 1 continued to crack when it dried after the water test (see figure 7d). Test-Wall 2 did not crack when it dried after the water test (see figure 7h).
Conclusion
Both Mortar 1 and Mortar 2 show potential based on our testing. Mortar 1 sticks to bricks and stayed between the bricks through watering better than Mortar 2. However, Mortar 1 cracked when drying. Mortar 2 did not crack when drying. We decided that the best option based on our testing is to mix the two mortars together for our final product. This will hopefully create a mortar that has enough sand that it will not crack when drying and enough clay that it will not erode away when it rains. Mixing the two mortars together also saves time and energy because it uses more of the clay that has to be removed from the project site in order to plant.
Calculating Slope of Site
[edit | edit source]To get a general idea of the steepness of this hillside we split the slope into three sections and calculated the slope for each of these areas (see image to the right).

Results
Section A:
- Slope = 100 X Y/X
- Slope = 100 X 4.25'/18.33'
- Slope = 23%
Section B
- Slope = 100 X Y/X
- Slope = 100 X 2.25'/11.67'
- Slope = 19%
Section C
- Slope = 100 X Y/X
- Slope = 100 X 4.75'/11.75'
- Slope = 40%
Conclusion
Section B has the smallest slope of the project site. Because of this we decided that we would not put wattles, baffles, or terracing in this section. Section A and C are considerably steeper than Section B. We decided to implement baffles, wattles, and small terracing in these two sections to help slow erosion and water run-off.
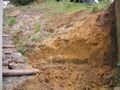
Preparing the Slope
[edit | edit source]After researching the sites needs, creating a general design solution, and testing our soil and mortar we began to prepare the slope for the project construction. First we excavated a large amount of clay from the site. We tried to keep the thin layer of good top soil from the excavated area on the slope while removing a large amount (4 wheelbarrows full) of clay. We decided to remove this portion of the slope because with it gone the slope was much more gradual and thus easier to work on and less likely to promote erosion. During this time we also created some small "steps" up the slope to make it easier to access the middle areas of the site. (These "steps" eventually got lost because they were too small and we ended up walking on a lot of the slope and further compacting it which does not help for erosion control.)
-
 Top view of slope after first excavation.

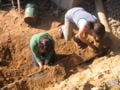
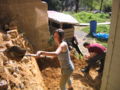
Retaining Wall Construction
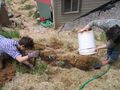
[edit | edit source]After we excavated some of the clay from the site and put in some small steps we began the construction of the retaining wall.
- First we inquired about what materials were available on site. We found that there was a huge pile of broken concrete, rocks, bricks, and cinder blocks at CCAT that we could use. We also acquired some broken concrete from craigslist.
- After obtaining the materials needed we dug a trench along the base of the slope where the foundation of the retaining wall would go.
- We put the clay that we dug from this trench into buckets and added water. This turned into our homemade mortar which we set aside for later.
- After the trench was dug we used sledgehammers to compact the clay at the base of the trench.
- We laid down the biggest pieces of broken concrete side by side and spread mortar between each to fill in the cracks.
- We then spread mortar on top of this first layer and added the second layer on top. We continued this until the retaining wall reached the desired height. We occasionally put wild strawberry starts between the bricks and concrete. We later found that many of these starts died. We suspect this happened because although we added good soil to the placed we planted them, the soil and clay were too moist and the roots suffocated or the plant was too shocked.
- Once this was done we realized that the base of the retaining wall should have started from a lower point. So, we dug away more clay from the base of the retaining wall and constructed another smaller retaining wall using the same method as the first one. This retaining wall is right up against the first and stops 1.5 passed the base of the first retaining wall.
- Because a lot of strawberries we planted in the gaps between bricks died we replanted some. We did this by scraping out mortar with a trowel and refilling it with better soil.
-
 Some clay was taken from top of slope and put at base to create a more gradual incline.
 -
 Jamila and Carolan lathering the wall with mortary-mucky-clay!
 -
 Carolan digging trench at the base of first retaining wall to at lower foundation.
 -
 Jamila's shoe disappeared into a massive pile of dirt excavated for the retaining wall. She uncovered it a few weeks later. Good as new!
 -
 Completed retaining wall looking South.
 -
 Completed retaining wall looking East. Note strawberries plugged into the wall.


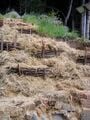
Planting Slope
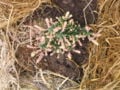
[edit | edit source]After the retaining wall was built we began to plant vegetation and do further erosion control on the slope
- First we planted the upper most section of the slope so as to prevent damage to lower areas of the slope from anything that might tumble down. Once this section was planted we worked our way down.
- We planted many plants above small baffles that we constructed out of wood.
- The baffles were made by driving wooden stakes into the ground with a sledgehammer and weaving sticks around the stakes to create a wall to hold back and slow the movement of debris down the slope.
- We had to bring in good soil to plant the vegetation in.
- When planting vegetation we dug small trenches for the plants to go it. We made sure that the trenches sloped slightly downhill (they did not go parallel with contour lines of the slope) so that excess water would be able to drain away from the roots of the plant. This was an important step because the slope has so much clay in it that it would have created a lot of little pools for water to collect and many of the plants would have died because of too much water.
- After we planted the slope we put straw on the slope for mulch.
-
 We planted many different types of heathers that flower at different times.
 -
 Jamila and Anna planting heathers on the upper section of the slope.
 -
 This shows the checkerboard pattern of baffles on the slope. This will help slow the flow of water down the slope while preventing it from pooling up.
 -
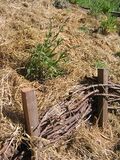 This shows an example of a baffle with sage planted above it.
 -
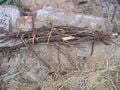 This is a small wattle. To make these we bundle up sticks and tie them off (here with cordage from bark). Then we lay them in shallow trenches, stake them in, and fill trench with earth. Wattles and baffles work similarly by trapping soil in their "net" of branches.


End Results
[edit | edit source]The images below show the finished slope. We are quite happy with the results. The retaining wall has endured a few days of rain so far, we will see how it holds up during a Humboldt winter. There are a few more plants that we need to plant on the slope. The main goal of this project is to stabilize the slope to prevent further erosion so future observation will be necessary to ensure that further steps do not need to be taken.
-
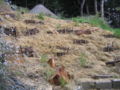 The finished slope with plants and baffles. We still have more plants that we can plant but we want to decide on ideal placement for them.
 -
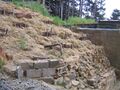 The finished slope with the finished retaining wall.


What We Would Do Differently
[edit | edit source]Overall, this project went very smoothly. However, there are a few "mistakes" that we have learned from during the process. We ended up using a lot of energy moving dirt around from one place to another. Another mistake we had was using mortar that was too wet. It was very messy and didn't dry fast enough so the mortar in the gaps between the bricks and rocks would flow out before it could dry. We also ended up covering part of CCAT's french drain with dirt because we did not know it was there. We created a lot more erosion by crawling all over the slope while planting and constructing the retaining wall. We also compressed and compacted the soil on the slope by working on it so much and that created more water run-off.
From these mistakes we have come up with things that could be done differently in order to prevent these problems.
We have learned the importance of observing the project site before actually working on the site; particularly, taking note of things that need to be kept clean, where water tends to flow, and where good soil is found and is needed. When initially preparing the site, we took off a lot of good top soil from the slope because we were unable to stop it from rolling down the slope. Because the slope was so steep and had no paths on it, it was very hard to control where the soil and clay that we were excavating would go. If we were able to excavate that soil and clay without loosing control of it down the slope we would have been able to put it to use other places on the slope without having to hall it back up to the top of the slope again. This would save on back-muscle intensive work and time. It would have also helped keep the area surrounding the project site clean. One way that all of this could have been prevented was if we studied the conditions and grade of the slope more before we put our shovels in it. If we had done this we could have possibly seen the importance of moving that soil and clay to a different location on the slope instead of removing it completely and then bringing it back. Another thing we could have done that would have helped us control where the soil and clay were going is if we made more pronounced steps and paths on the slope. This would have made it easier to move around on the slope and thus easier to move the soil and clay from one place on the slope to another. Another thing we could have done is to lay a tarp out and utilize wheelbarrows. This would have made transporting and containing the soil easier than just shoveling into piles as we did.
Creating pathways or steps on the slope could help prevent further erosion.
When working on the slope we could have stood on boards so as to displace our weight and not compact the soil beneath us.
We could have done more testing of different mortar consistencies to prevent using our actual project retaining wall as testing ground. But there was little harm done here because a mistake such as too wet mortar is easily fixed.
Next Steps
[edit | edit source]Testing and Observation
[edit | edit source]- The next steps include observing how well the plants stabilize the slope by holding down soil and taking up water.
- Observe how well the retaining wall holds up through wet and dry seasons.
- Observe the new path of water down the slope
Maintenance
[edit | edit source]- For the first Summer that the plants are in the ground (Summer of 2009) plants should be watered in mornings when needed. Most plants except for sages will enjoy this.
- It is not necessary, but pruning back old growth of heathers, lavender, and sages would help keep the plants at their healthiest.
- In late Summer/early Fall eat up some tasty huckleberries and currents from the evergreen huckleberries and red flowering currents we planted on the slope.
Recommended Improvements
[edit | edit source]- We have plants that we will have planted on the lower portion of the slope by mid-June 2009.
- The pathways that boarder the project site should be maintained and improved. This could be done by putting in steps at a slight angle so that water will slow down when going over the path but not pool up. This will help decrease excess runoff and make sure the slope is not having to cope with all the water.
- Perhaps plant one more Ceanothus in the lower section of the slope to ensure that the slope will be covered.
- If CCAT decides it would like to be able to get on to the slope then secure paths or stepping stones should be put in.
- Any wildflower seeds would be good to add to the slope. Toss them in there next Spring.
- Perhaps make more water catchment and water uses above the slope that can either carry the some of the water down a different path or use some of the water before it travels down the project site. Planting the project site will improve the water runoff but it would be even better to put in solutions that are above the slope as well. These solutions could be such things as a small pond with wetland habitat to catch the water and create more habitat edges in the garden, or french-drains of some sort that could divert the water to an alternative path down the hillside.
- Perhaps put in another small garden bed at the base of the retaining wall so as to create more ground that can soak up water and create habitat for plants that will also use the water.
- Clean up ground at the base of the retaining wall so that french drain is not partially covered. Add more gravel to this area to help water percolate down into drain.
- Stake down coffee sacs (as done on the slope above this one) because straw will be getting dry during the summer and likely blow away in high winds, leaving the slope exposed.
Proposed Time Line
[edit | edit source]- Note: Appropedia work will be ongoing throughout the semester and planting times may vary depending on the weather.
| Action | Time Frame |
|---|---|
| Research | Week 4,5 |
| Design | Week 6,7 |
| Obtain materials | Week 7,8 |
| Soil & mortar testing | Week 8 |
| Preparation of slope | Week 8 |
| Construction of retaining wall | Week 9-11 |
| Planting & inner-slope erosion control | Week 12-15 |
| Hug CCAT | Week 15 |
Thank You
[edit | edit source]Thank you CCAT for helping us work through this project and allowing us to get involved with their wonderful community. Thank you CCAT project coordinator Chhimi Dorji for all your guidance. Thank you to Freshwater Farms, Wes Green Landscape Materials, Mad River Nursery, and Emerald Triangle Landscaping for the generous donations of plants, soil, advice, and money to go toward our project expenses. Thank you Lonny Grafman for your support and guidance. Thank you to all the volunteers who helped us work through the project.
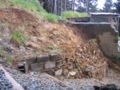
Re-terracing in March 2013
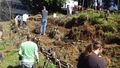
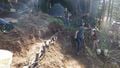
[edit | edit source]The Remediation Zone that had been built had turned back into a hill side and had lost its terracing. In March of 2013, CCAT re-terraced the remediation zone with the help of the Natural Resources Club on campus. They pulled out the invasive plants that had grown such as English Ivy and Holly, and planted many native plant species including Woodland Strawberry, Canyon Gooseberry, and Evergreen Huckleberry, amongst others. The project took about 4-6 hours work for the terracing, and then CCAT members planted more native plant species later. Re-terracing involved digging out the weeds, invasive, and grasses that had grown in, loosening up soil, straightening the horizontal spots, strategically placing stakes into the ground for stabilization, and weaving long branches between the stakes to hold the terracing in place. The process used was very similar to the one that had been used during the last terracing phase. Previously removed invasive acacia branches were used for structure stability and for their long term decomposition which will release nitrogen back into the soil as it decomposes. In addition, water drainage was taken into account, and the terracing slopes were structured so that water can drain off the slope in an organized fashion so as not to cause excess damage due to unintended erosion.
-
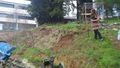 View of Remediation Hillside in March 2013 prior to re-terracing.
 -
 Sharpening the ends of acacia logs to stick them into the ground for support.
 -
 In progress view of re-terracing. You can see the acacia branches that were used for slope stabilization.
 -
 View across the zone of re-terracing after completion.
 -
 Side view of Remediation Zone after re-terracing


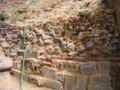
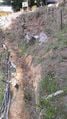
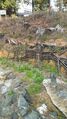
Update October 2013
[edit | edit source]The re-terracing project seems to have upheld well. It is still in good shape and erosion has not taken away any of the transformation that was made to the remediation zone. The heavy rain season has yet to come so it is unclear how that will affect the wall in the coming months. No maintenance has been made to the slope since the re-terracing project in March. While visiting it, one can see the huckleberry and strawberry growing in amongst other grasses and weeds. There have been no real studies done to see if the intended beneficial insects are moving in, but the area seems to be in good condition. The terracing appeared stable and held firmly while walking on it. There are no immediate plans to work on the remediation zone, but some weed pulling may happen in the near future.
-
 Side view of Remediation Zone in October 2013.
 -
 Front view of Remediation Zone.
 -
 Straight down view of Remediation Zone from above center.
 -
 View downward from above the Remediation Zone next to the informative sign at the top.
 -
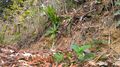 View of strawberry plant growing in.
 -
 Informative Sign at top corner of Remediation Zone.


Contact Information
[edit | edit source]- Carolan Raleigh-Halsing
- cr37@humboldt.edu
- Jamila Ghoul
- jghoul@gmail.com
References
[edit | edit source]- ↑ Gosling, Doug (1989). "Organic Gardening: Paths of Green." Vol. 36, Issue 6. p 64.
- ↑ 2.00 2.01 2.02 2.03 2.04 2.05 2.06 2.07 2.08 2.09 2.10 2.11 2.12 2.13 2.14 2.15 2.16 2.17 2.18 2.19 2.20 2.21 2.22 2.23 2.24 2.25 Myers, Rian (1993). "Slope Stabilization and Erosion Control Using Vegetation: a manual of practice for coastal property owners", Washington State Department of Ecology, Olympia, WA., 4-41.
- ↑ Keator, G., Middlebrook, A. (2007). "Redwood Forest: Gardening Under Cool Giants." Designing California Native Gardens, University of California Press, Berekely, California., 68-79.
- ↑ Lenz, L.W. (1956). "Perennials." Native Plants for California Gardens, Rancho Santa Ana Botanic Garden, Claremont, California., 47-51.
- ↑ 5.0 5.1 Swan, Lester (1964). "Insect Predators and Parasites." Beneficial Insects, Harper and Rowe, New York 16 NY., 22-53.
- ↑ Stokes, D. and L. (1989). "Creating a Hummingbird Habitat." The Hummingbird Book, Little, Brown and Company, Boston, Mass., 18-19.
- ↑ 7.0 7.1 7.2 7.3 7.4 7.5 Hall, Carol, Hall, Norman (2008). Timber Press Guide to Gardening in the Pacific Norhtwest, Timber Press Portland, OR.
- ↑ 8.0 8.1 8.2 8.3 Debach, Paul, Rosen, David (1991). "The Natural Enemies." Biological Control by Natural Enemies 2nd ed., Cambridge University Press New York, NY., 35-84.
- ↑ 9.0 9.1 Skinner, Tina (2003). "Retaining Walls: A Building Guide and Design Gallery."Schiffer Books, PA
- ↑ Calflora.org (2009) "Calflora" Berkeley, CA
| Authors | |
|---|---|
| License | CC-BY-SA-3.0 |
| Organizations | Campus Center for Appropriate Technology (CCAT), Cal Poly Humboldt Students, Engr305 Appropriate Technology |
| Cite as | Carolan, Jghoul, APenny6, Humantrout (2009–2026). "CCAT remediation zone". Appropedia. Retrieved July 25, 2026. |