This chapter tells how to build several different kinds of houses using building members of the kind described. Typical, practical models that have already been successfully built in various countries were selected.
They include: one in-situ pumice-concrete house, three pumice-brick/block houses, two simple panel-wall houses and two houses made of wall-height hollow-core planks. All of them have approximately 5 × 6 m (= 30 m) floor space and are suitable for self-help construction.
House with In-situ Pumice-concrete Walls[edit | edit source]
Technical description:
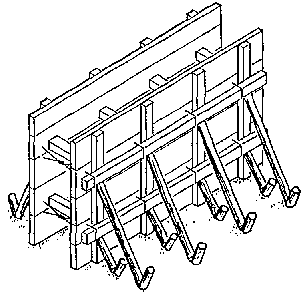
This house has load-bearing walls made of in-situ cast pumice concrete. It rests on a reinforced concrete strip footing (normal -weight concrete, not pumice concrete) or on a natural-stone masonry foundation. The in-situ pumice-concrete walls are erected directly on the foundation. They are 15 to 25 cm thick and, to the extent necessary, reinforced with steel to provide protection against earthquakes. The massive walls can be rendered/plastered or smoothed with several coats of paint. The door and window openings are simply left free, and the door -and window cases are embedded in the concrete. In-situ concrete walls have the advantage of not requiring prefabrication (like bricks or panels). On the other hand, they do require the installation of wooden form work to contain the concrete - which in turn involves extra expense, work and prior knowledge (Fig. 50). The roof substructure consists of lattice steel or wooden beams. The roof skin can be made of galvanized corrugated sheeting screwed down on wooden laths, although any other kind of roofing would also be suitable, e.g. clay roofing tiles, straw and reed, etc. The solid walls are strong enough to accommodate a ceiling for the possible subsequent addition of a second story. The floor is made of thin concrete screed on a layer of sand and gravel. Wooden or steel frames hinged to the concrete - embedded cases are recommended for the windows and doors.
Figure 50: Wooden formwork for in-situ pumice-concrete walls
This type of construction is most suitable for building new homes. Since it requires a substantial amount of formwork, it is appropriate for countries with adequate supplies of wood. Putting up formwork is no job for beginners, so the aid of specialists should be enlisted.
This type of house lends itself well to the construction of sizable housing developments by self-help cooperatives. The use of prefabricated forms that can be used repeatedly, together with the aid of trained specialists, can help maximize the effectiveness of the building effort.
The following list is a rough bill of quantities for the subject type of house. Local prices can be entered in the "price" column, thus allowing comparison with other house -building systems.
|
Quantities |
4.1 House with pumice concrete walls |
Walls |
Prices |
|
ca. 50 m² wall area |
walls comprising 7.5 m³ pumice concrete for a wall thickness of 15 cm. A concrete mixing ratio of 1:4 will yield about 7.5 m³ pumice concrete for 1000 kg cement (20 bags weighing 50 kg each). |
... | |
|
70 m |
reinforcing rods (approx. 10 mm diameter) for a peripheral tie beam, if the house is located in an earthquake area. |
||
|
30 m |
reinforcing rods for around the doors, windows and corners. |
||
|
ca. 50 m² |
wooden formwork, at least 2 cm thick for casting the walls. Suggestion: prepare forms with height of roughly 1.10 m and cast the formwork and pour the upper part. Wood for forms can often be borrowed, not necessarily bought. |
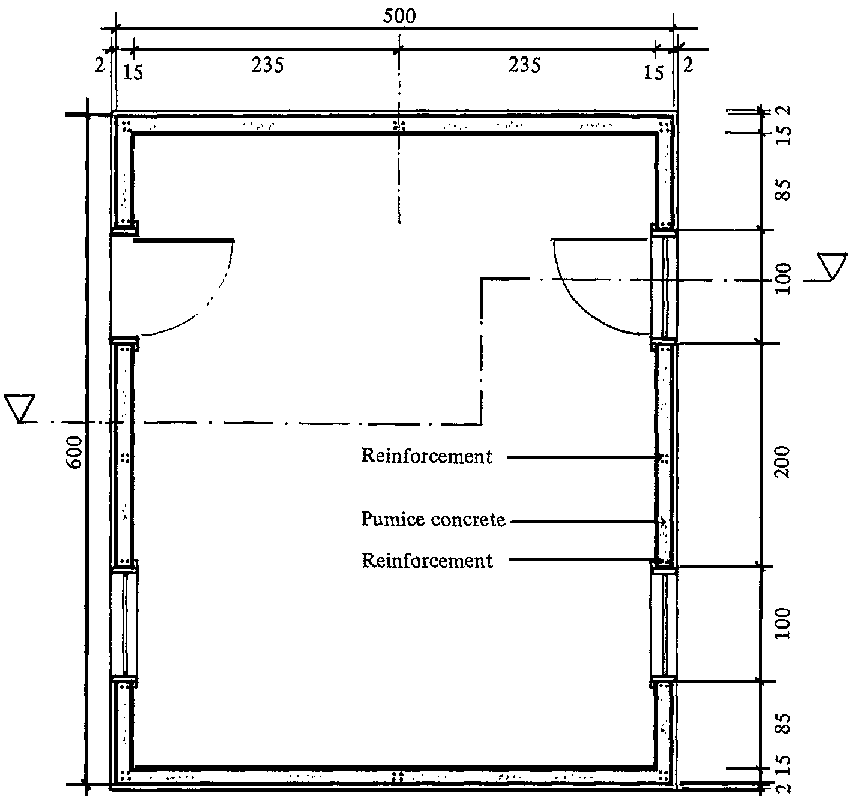
Figure 51 and 52
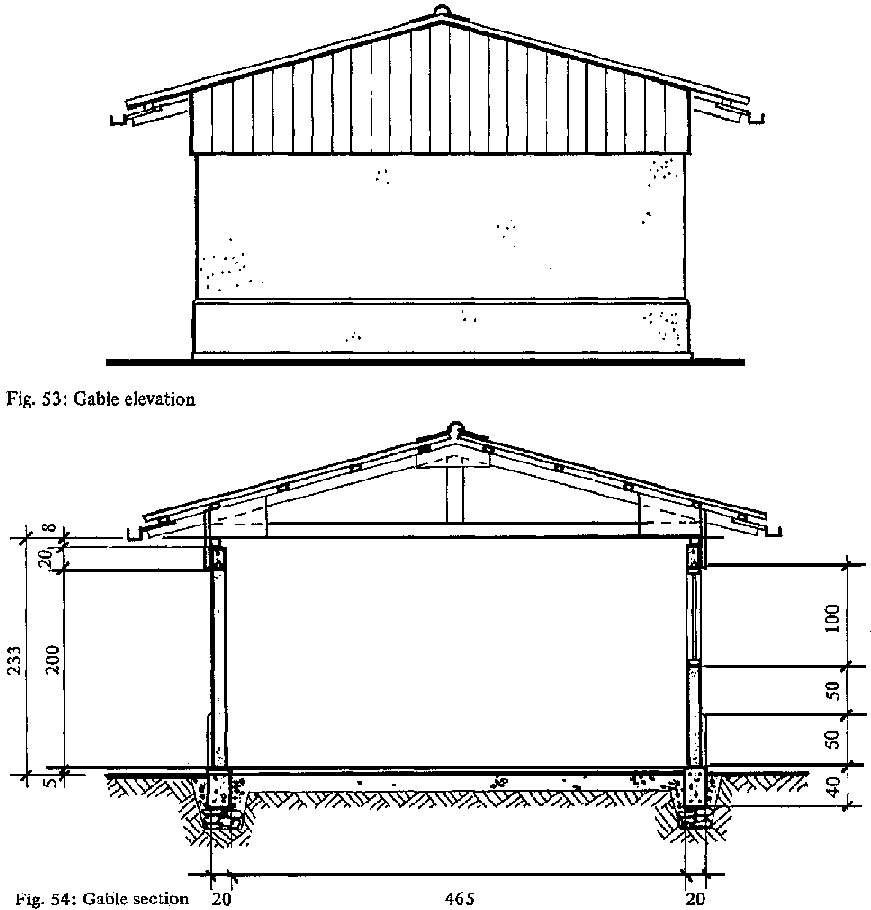
Figure 53 and 54
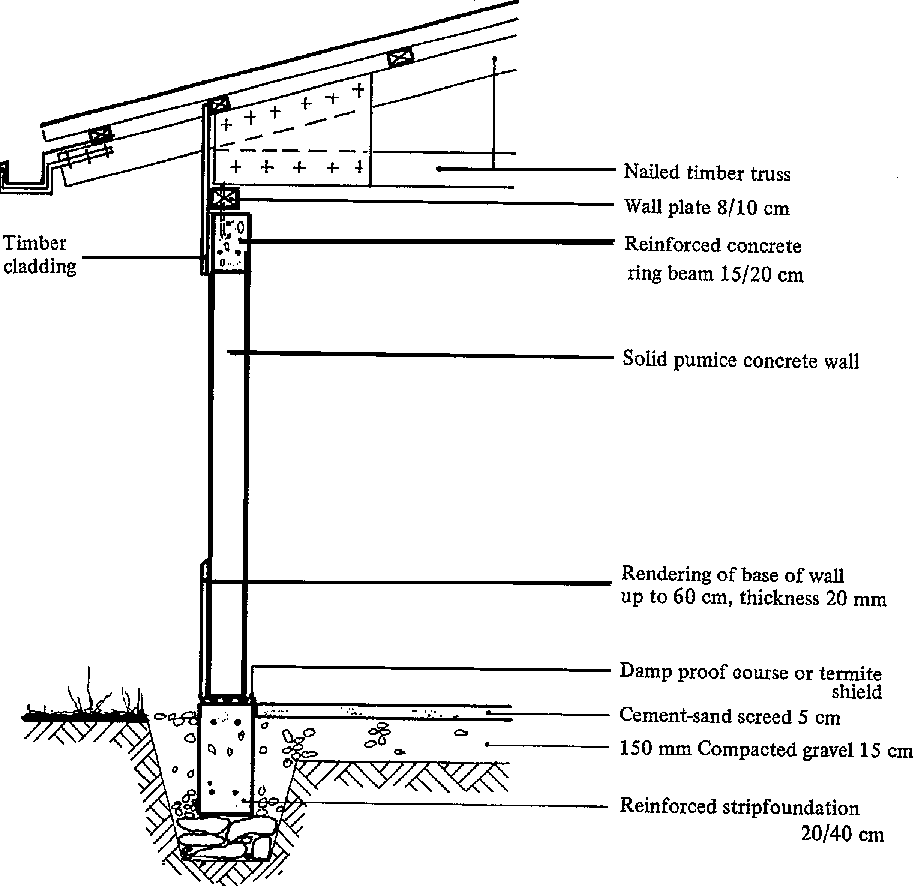
Figure 55: Section
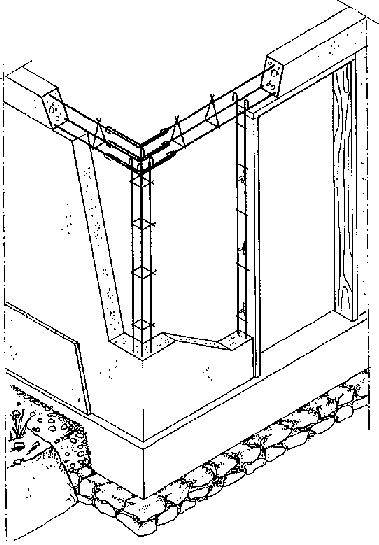
Figure 56: Isometric view
House with Pumice-concrete Solid-block/brick Walls[edit | edit source]
Technical description:
In this case, the walls are made of masonry consisting of prefabricated pumice-concrete solid blocks/bricks. They can range in thickness between 10 and 25 cm, depending on the size of the blocks/bricks.
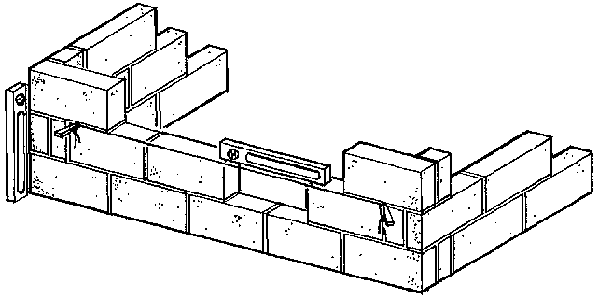
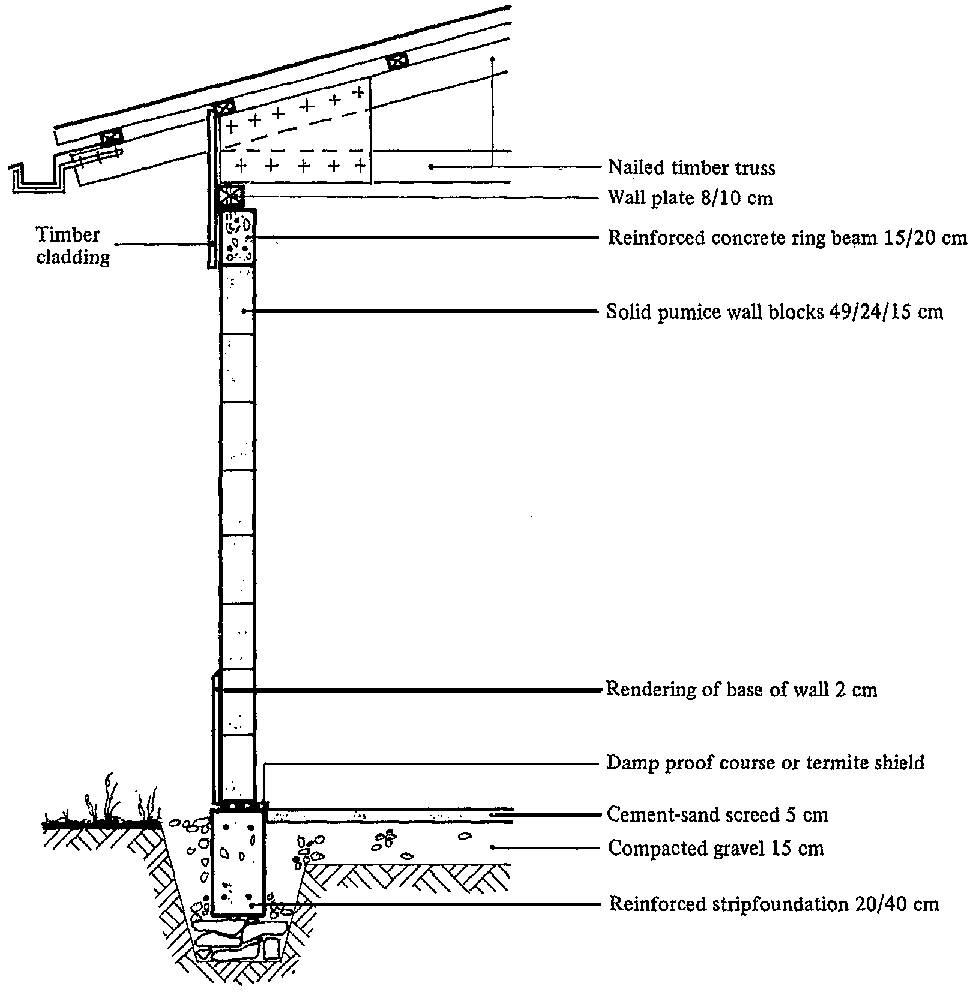
The strip footing can be made of in-situ normal-weight concrete or of natural stone masonry, as long as it is strong enough to carry the weight of the walls. First of all, the blocks/bricks for the walls have to be made. Fifty bricks measuring 25 × 11.5 × 7 cm will produce one square meter of wall with a thickness of 11.5 cm. Only 7 blocks measuring 49 × 30 × 11.5 cm are needed per square meter wall area with a thickness of 11.5 cm. The pumice-concrete bricks are very light and therefore quick and easy to place. Care must be taken to ensure that the walls have the proper masonry bond and are exactly vertical (Fig. 57). It is important to remember that pumice bricks have to be dipped in water prior to use to keep them from absorbing the gauging water and setting too quickly, which would result in very unstable joints. The walls of the house can be rendered/plastered, and plinth rendering to a height of 30 -50 cm is recommended in any case.
Figure 57: Setting up brick walls
The top row of bricks should carry a peripheral tie beam of reinforced concrete or wood, so that a second story can be added to the house at will. Walls with a thickness of about 15 cm will suffice for a single-story house, but the wall thickness should be increased to approx. 25 cm for the first floor of a two -story house (10 - 15 cm for the upper story). The roof can be made of clay roofing tiles, corrugated asbestos, corrugated metal, wood, reed or palm fronds. The walls are sturdy enough to carry heavy roofing. The doors and windows can be made of wood or metal, and their cases should be . tied into the masonry.
The house is very well-suited for self-help construction. One person alone can easily make the bricks/blocks, since all that is needed is a wooden mold, pumice, cement and water. After making just a "few" bricks, the same person can build the walls little by little. This type of construction involves no heavy work at all, since more bricks can be made and placed whenever the builder has a few extra hours or days.
|
Quantities |
|
Walls |
Prices |
|
ca. 50 m² wall area |
for bricks measuring 24 × 7 cm and a wall thickness of 11.5 cm, 2500 bricks and about 700 kg cement (14 bags) will be needed to put up the walls. |
... | |
|
ca. 2 m³ |
masonry mortar, i.e. approx. 6 bags of lime/cement and approx. 2 m³ sand |
... |
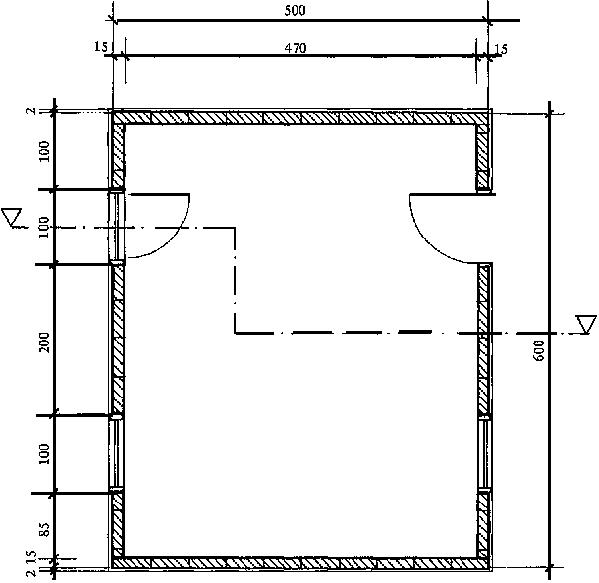
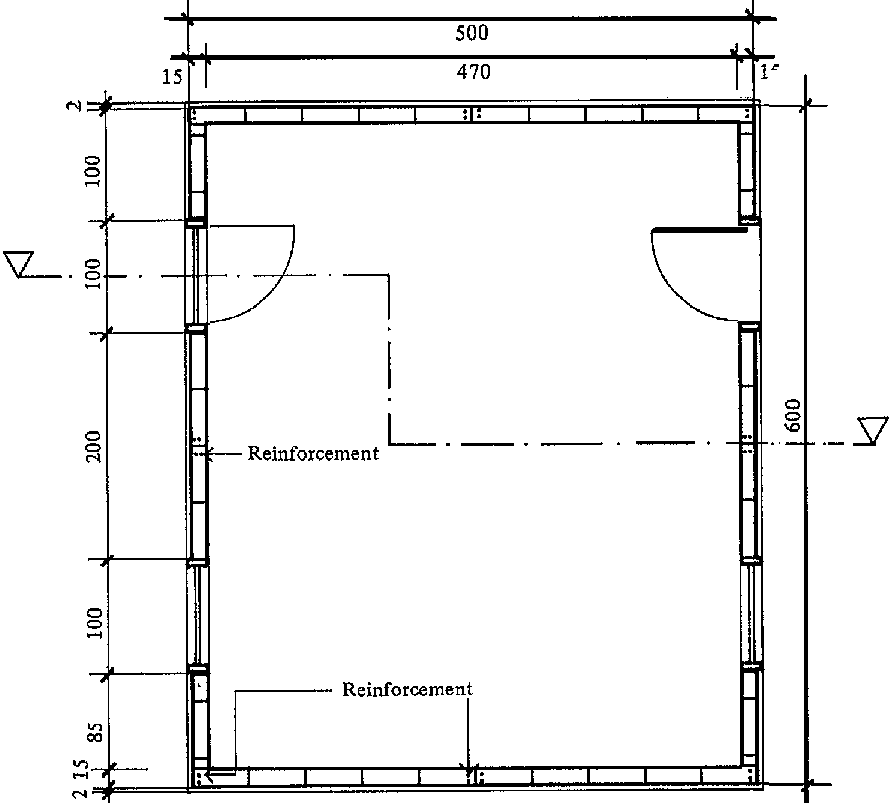
Figure 58: Plan
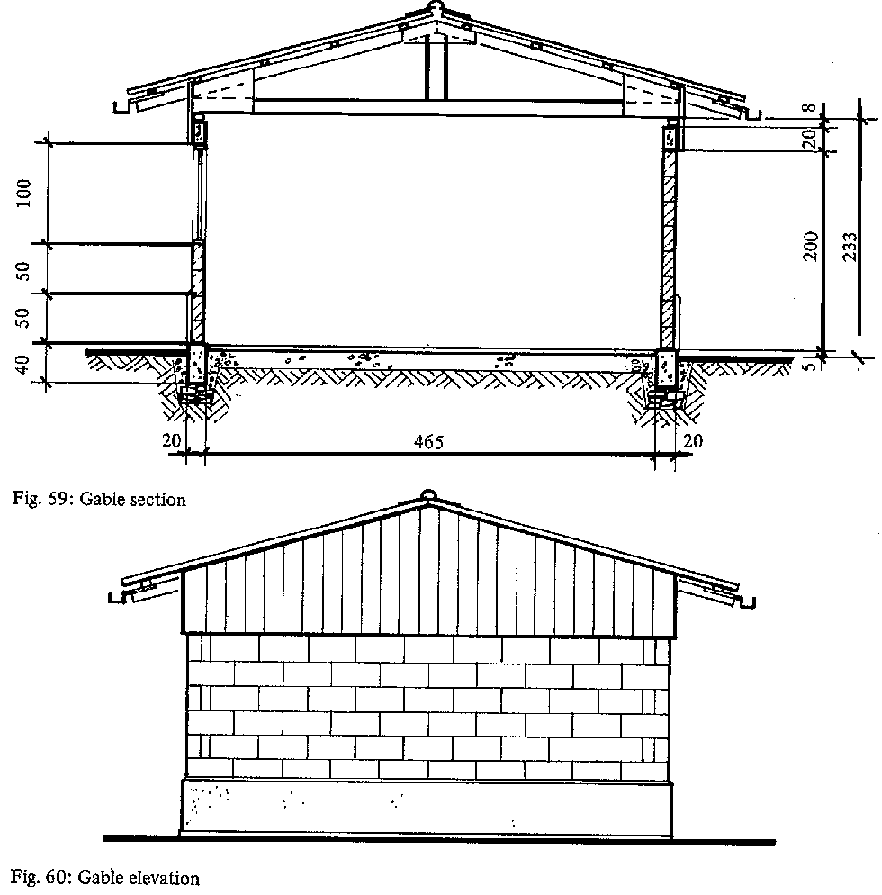
Figure 59 and 60
Figure 61: Section
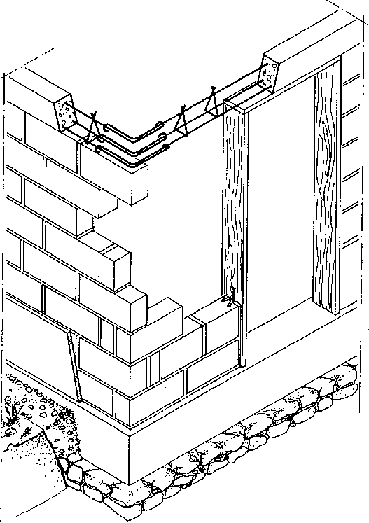
Figure 62: Isometric view
House with Pumice-concrete Cavity-block Walls[edit | edit source]
Masonry construction
Technical description:
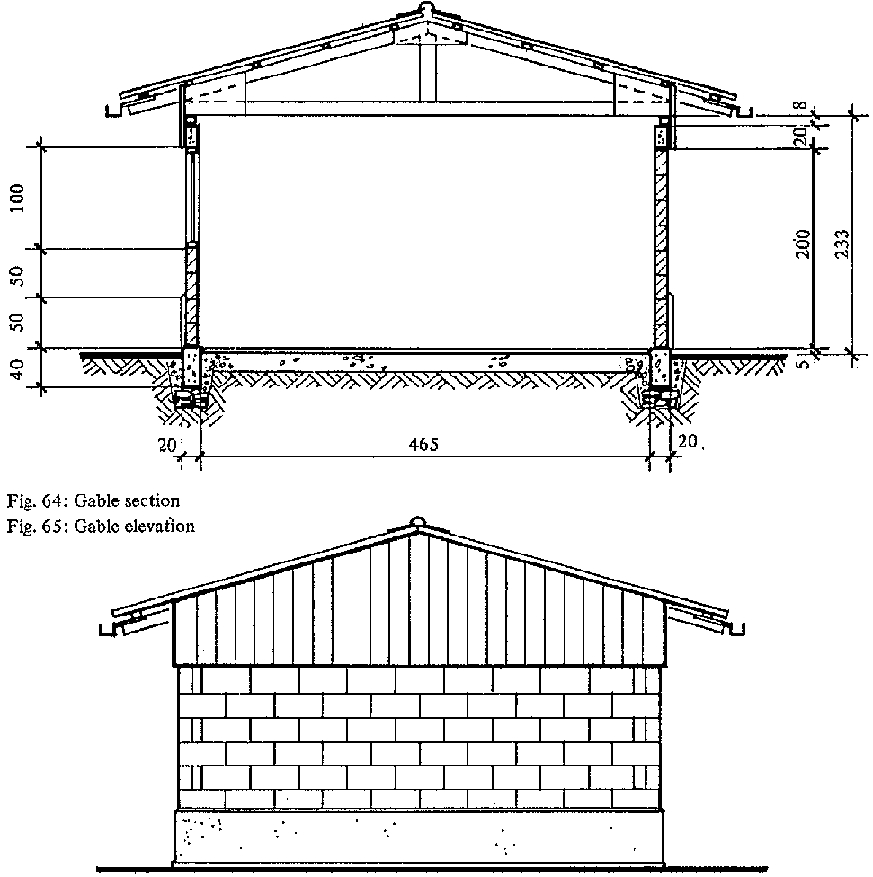
The walls of this house are made of so-called two-cavity pumice-concrete blocks, which have the advantage of forming a strong and sturdy wall with less material than would be needed for a wall made of solid blocks. Additionally, the cavities have a good insulating effect in both cold and hot climates.
The foundation should be made of in-situ concrete or natural stone masonry and be 5 to 10 cm wider than the walls.
The first step in putting up the walls, of course, is to prefabricate the cavity blocks as described in section 3.2.3. The blocks are placed with the closed end up, i.e. such that the cavity openings are pointing downward. That way, it is easier to spread the mortar around the edges of the last course before setting the blocks of the next row (Fig 32; cf. Chap. 3.2.3).
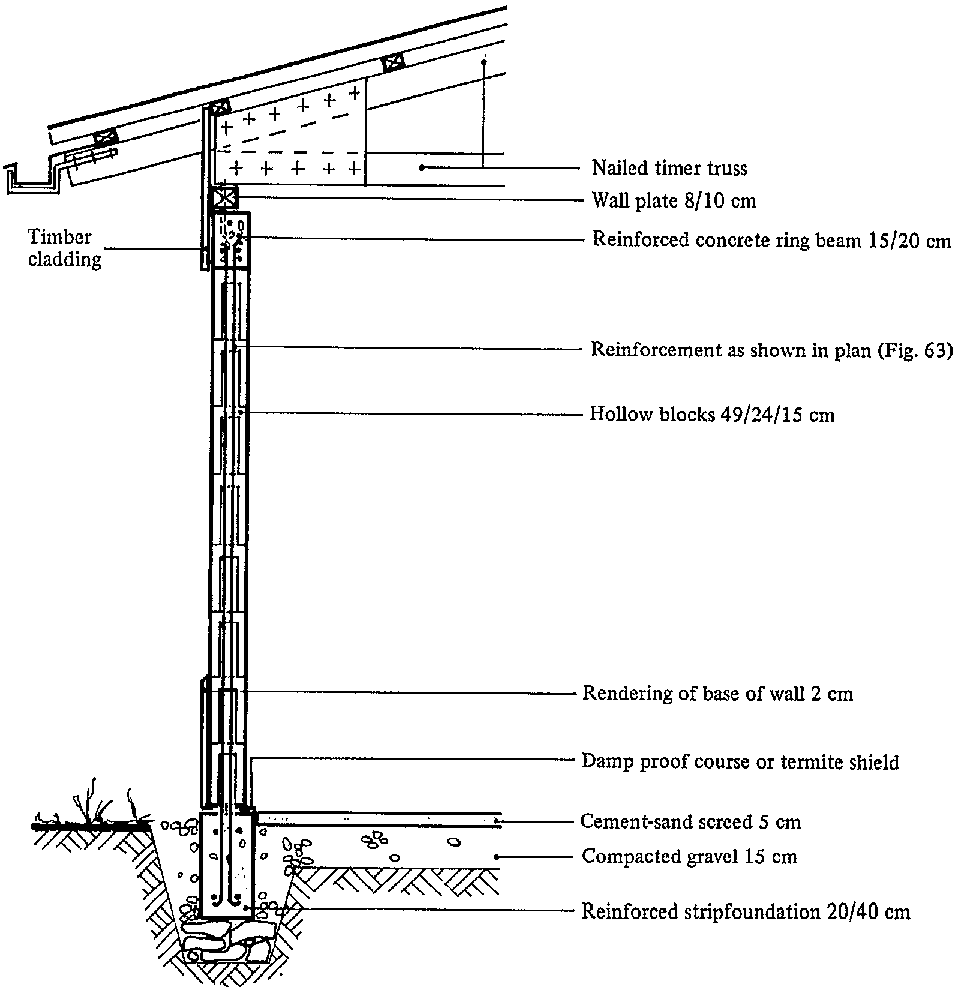
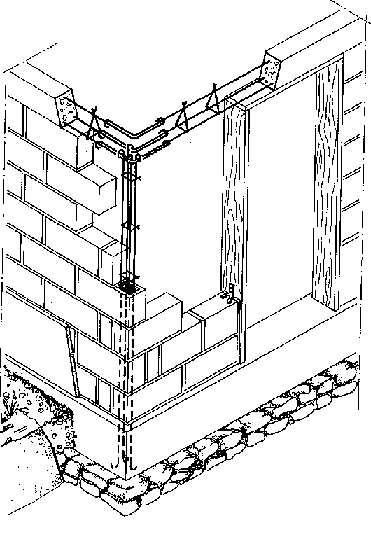
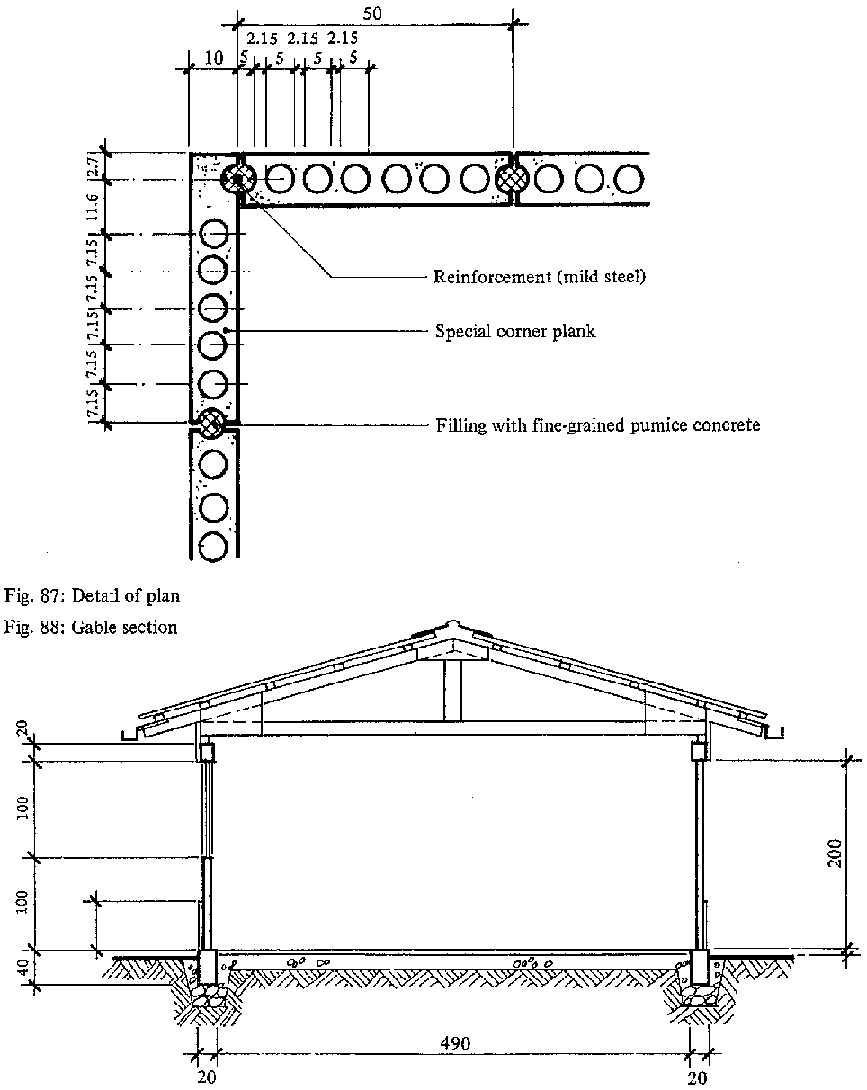
In earthquake areas, it is a good idea to fill the corner cavities with reinforced concrete.
Figure 63: Plan
The reinforcing bars should be embedded in the foundation at the corners. Then only the "tops" of the cavity blocks have to be neatly opened (Fig. 37, cf. Chap. 3.2.3), the blocks threaded onto the rods, and the cavities filled with (well-compacted) pumice concrete all the way up to the top of the wall. There, the reinforcing rods should be attached to a peripheral tie beam, which can be placed in special pumice channel blocks that are subsequently filled with pumice concrete (Fig. 43; cf. Chap. 3.2.6).
The door and window cases should preferably be prefabricated and built in as the walls sistance and can accept a second story.
Figure 64 and 65
The roof can be covered with clay roofing tiles, corrugated asbestos, corrugated metal, reed or palm fronds.
The door and window cases should preferably be prefabricated and built in as the walls go up in order to achieve a more stable connection between them and the masonry. If that is not possible, a few pieces of wood, screws or the like can be embedded in the masonry joints at strategic locations to provide anchorage for the subsequently placed door and window frames. The floor can be executed in any desired fashion, although the installation of a layer of gravel covered by a thin layer of concrete screed or a bed of sand followed by ceramic floor tiles is recommended.
Figure 66: Section
Figure 67: Isometric view
Fair-faced concrete-column skeleton structure
Technical description:
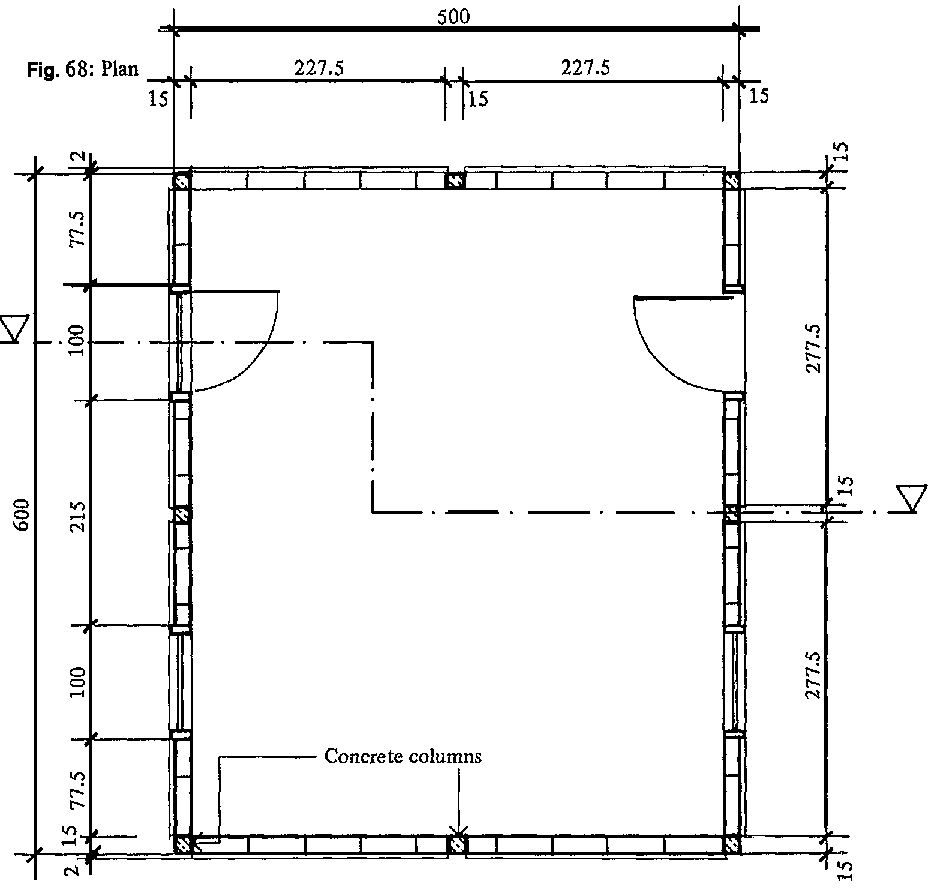
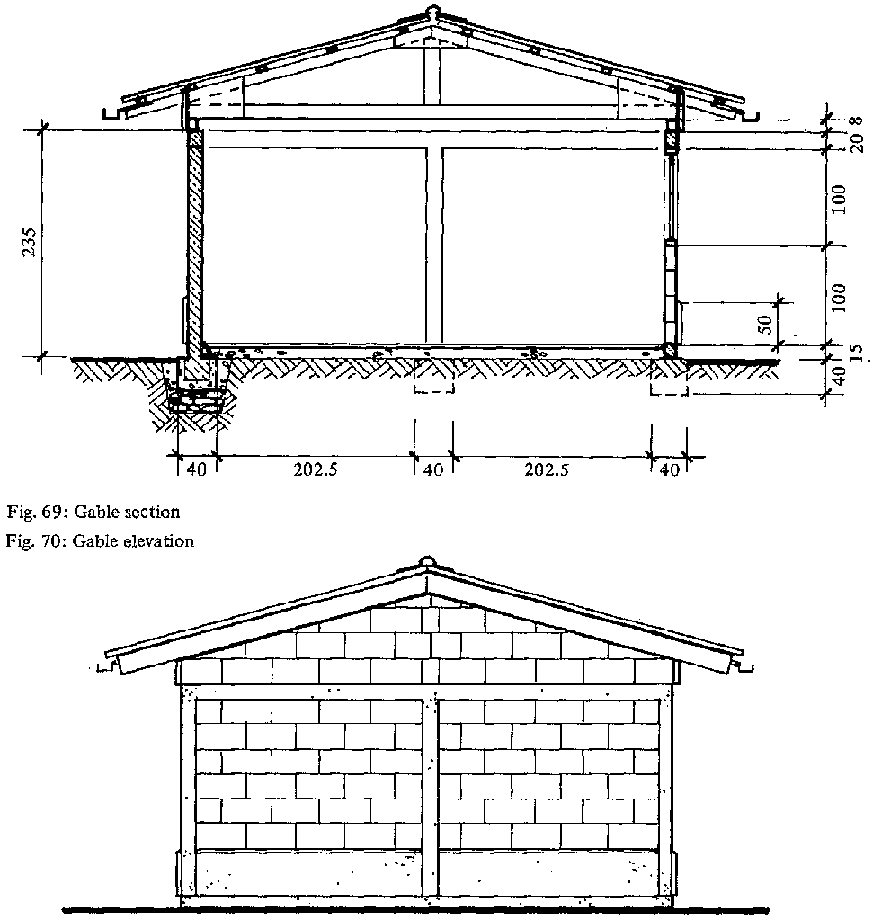
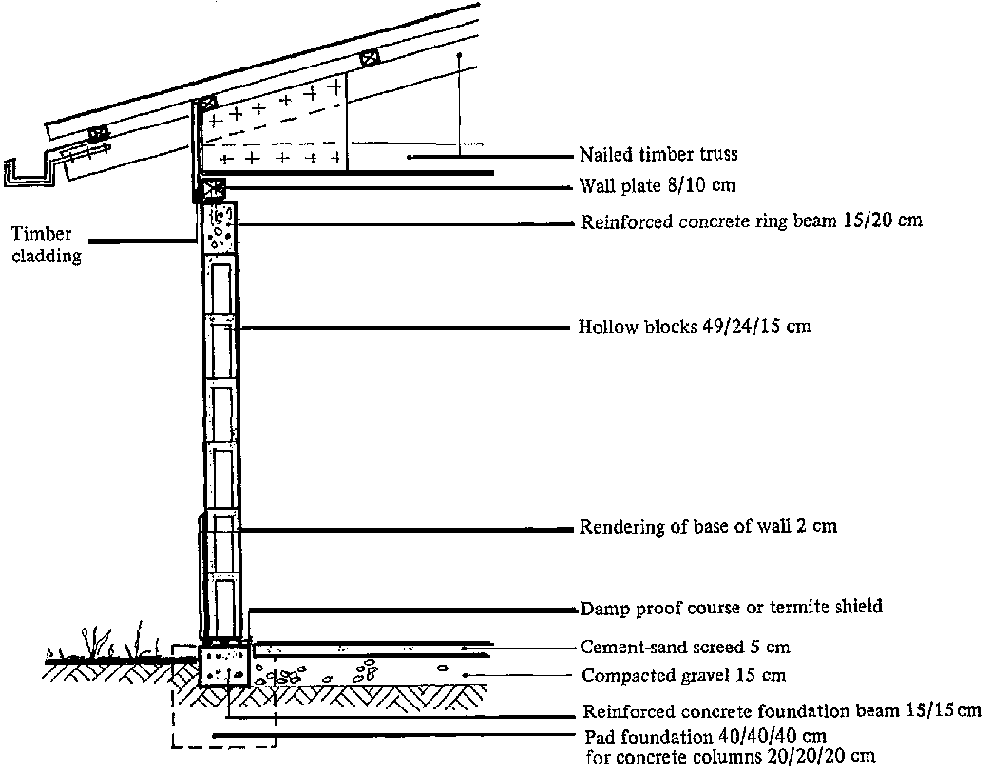
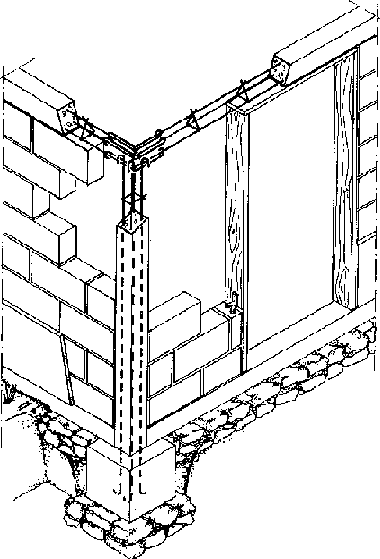
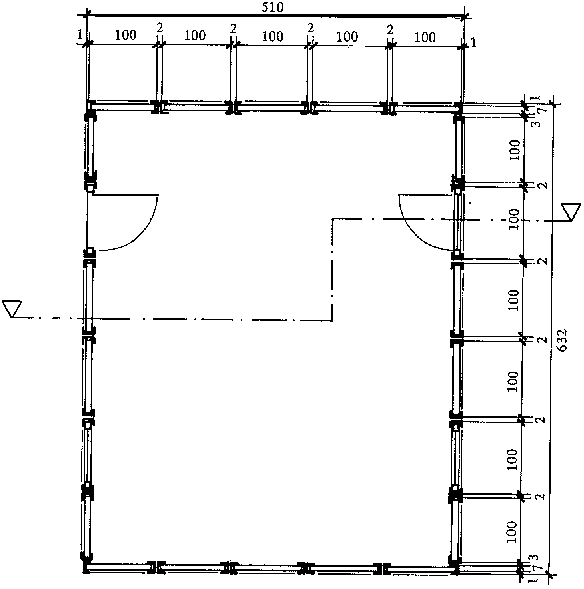
This type of structure consists of a load-bearing concrete-column skeleton filled out with pumice-concrete cavity blocks.
The house rests on reinforced-concrete isolated or strip foundations with encastre concrete columns. The pumice-concrete cavity blocks fill out the spaces between the columns. The floor of the model house consists of a layer of sand and gravel topped with a thin layer of concrete screed. The roof substructure is made of lattice steel or wooden beams. The covering may consist of roofing tiles' sheet zinc or corrugated asbestos sheet on wooden laths. The window and door openings have built-in cases made of square timbers or steel. The door leafs and window sashes are hinged to the case frames.
This model house is of very sturdy, durable design and can be added onto or altered at will, since any infill wall can be torn down and moved with no special effort. It is relatively complicated to build, however, and therefore less appropriate for individual doit-yourself builders than for joint-effort projects of rural communities or building cooperatives.
Figure 68: Plan
GATE has already sponsored the construction of such model houses in El Salvador and Nicaragua. This type of pumice-concrete block house is nearly identical to GATE's "concrete column house", for which detailed self-help instructions are available.
Figures 69 and 70
|
Quantities |
4.3 b) House with pumice-concrete cavity-block walls; fair-faced concrete-column skeleton |
Walls |
Prices |
|
ca. 2 m³ |
reinforced concrete for the concrete skeleton with 15 × 15 cm columns |
... | |
|
ca. 50 m² |
pumice-concrete block walls consisting of approx. 400 pumice-concrete cavity blocks measuring 49 × 24 × 15 cm (wall thickness: 15 cm) |
... | |
|
ca. 1 m³ |
masonry mortar for the joints, consisting of approx. 3 bags of lime/cement and 1 m³ sand |
Figure 71: Section
Figure 72: Isometric view
House with Pumice-panel Walls[edit | edit source]
Sectional steel load-bearing system'
Technical description:
This structure essentially consists of steel channel sections with pumice panels in between.
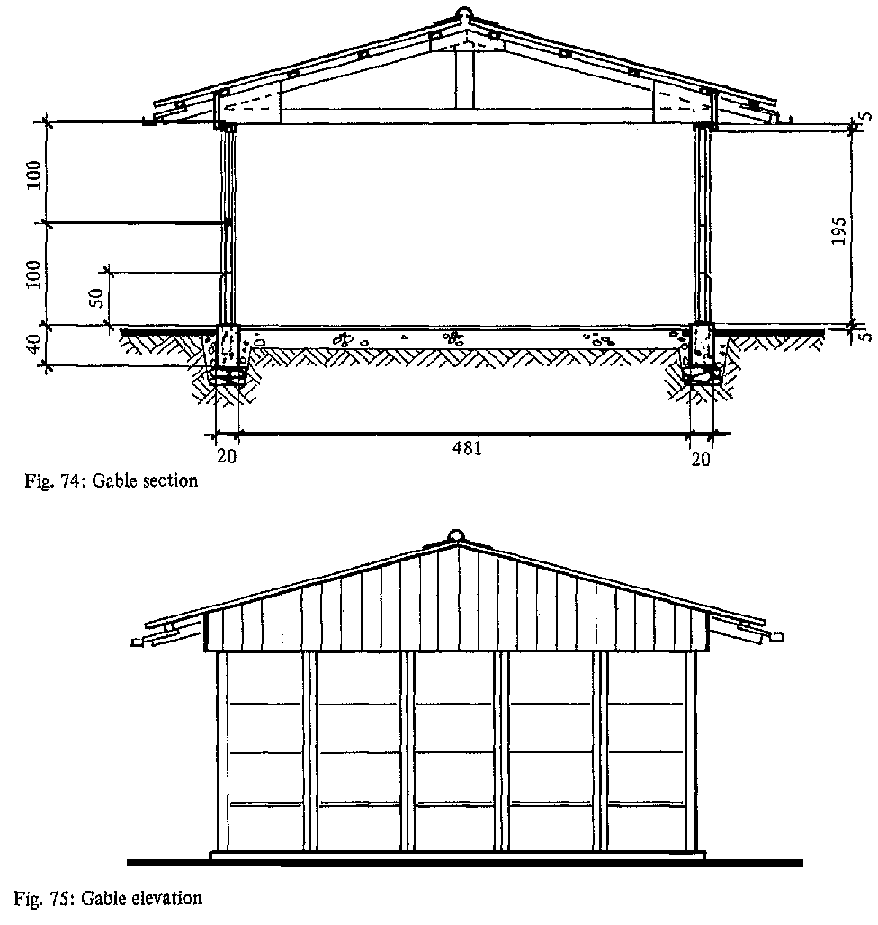
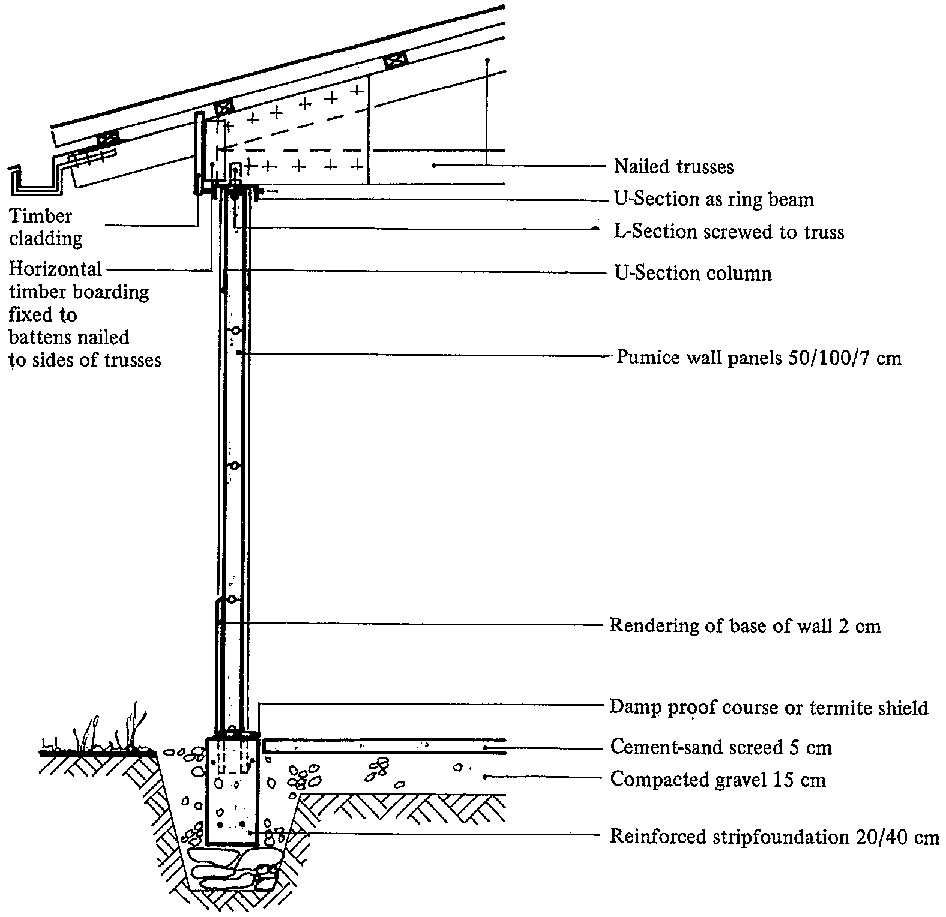
The house rests on a reinforced-concrete strip foundation with cutouts for the steel channel sections (or profiles made of galvanized sheeting). The cutouts are filled with concrete after" the walls are properly squared.
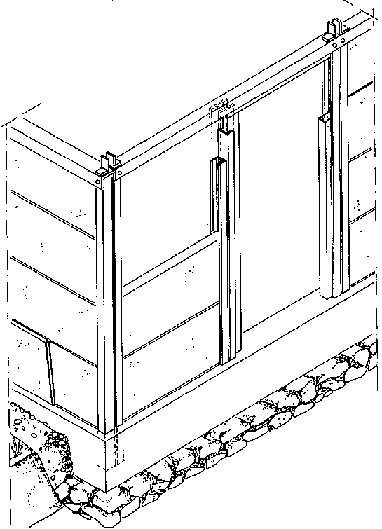
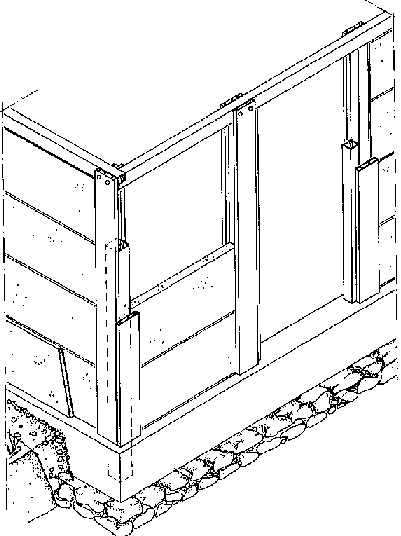
Four wall panels of the kind described in Chapter 3.2.4 are stacked on edge between each two uprights, producing a rigid wall element measuring 2 m in height and 1 m in width (cf. relevant isometric drawing).
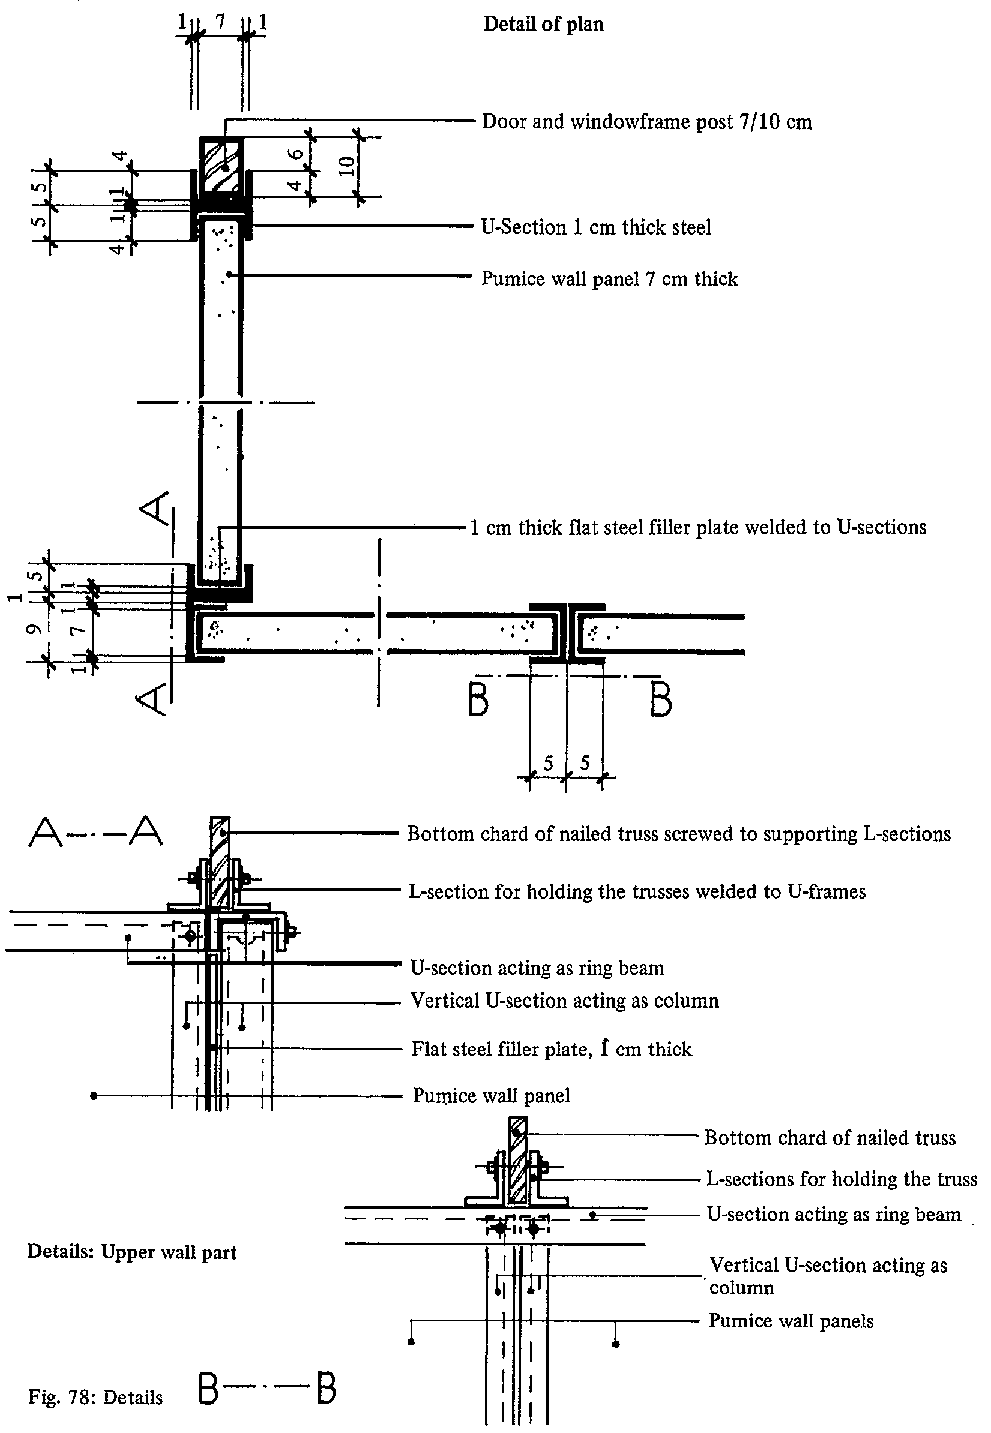
The wall structure gets its stability from the strip foundation at the bottom and a continuous tie beam in the form of a steel channel track at the top (cf. details in the relevant technical drawings).
The steel tracks are joined at the corners by riveting or welding (cf. 1:10 details in the relevant technical drawings).
Openings for windows and doors can be placed as desired simply by leaving out the appropriate pumice-concrete panels. The window and door cases are made of simple square timbers of the same thickness as the panels set in the channel sections.
The floor comprises a layer of coarse gravel, a layer of sand, and a layer of smooth concrete screed.
The roof consists of zinc sheeting nailed onto a wooden substructure, although any other suitable material could also be used.
GATE has also published instructions for building this house (under the name "concrete panel house"); the instructions are available from GATE on request.
Bill of quantities:
|
Quantities |
4.4 a) House with pumice-panel walls; sectional steel load-bearing system |
Walls |
Prices |
|
ca. 3 m³ |
concrete for strip foundations |
||
|
ca. 4 |
reinforcing cages appropriate to the foundation |
||
|
ca. 44 |
steel channel sections with a length of about 2.40 m and a profile thickness of about 3 mm for wall construction |
||
|
ca. 76 |
lattice-reinforced pumice-concrete panels (100 × 50 5 cm) as wall elements |
||
|
ca. 4 |
wooden, concrete or steel tie beams with cutouts for steel channel sections |
||
|
ca. 30 m |
boards for gable formwork |
||
|
ca. 0.4 m³ |
wood for the roof substructure and lathing |
||
|
ca. 30 m² |
corrugated metal sheet roofing or equivalent material |
Figure 73: Plan
Figures 74 and 75
Figure 76: Section
Figure 77: Isometric view
Figure 78: Details
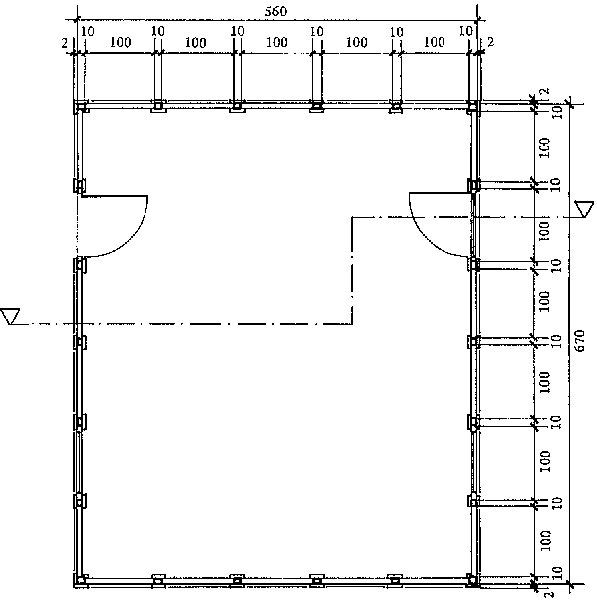
Wooden post and beam system
Technical description:
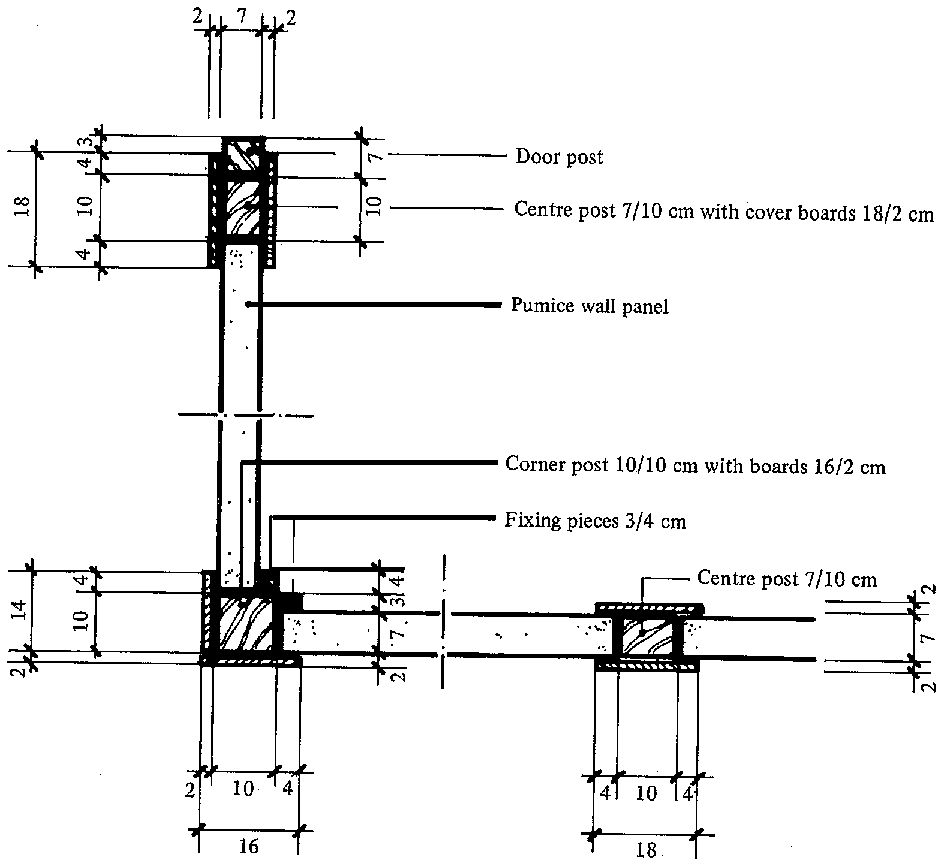
This house is built according to the same basic system as the preceding house, except that the frequently very expensive steel channel sections are replaced by relatively inexpensive wooden posts and beams. While the model house has corner posts measuring 10 × 10 cm and intermediate/interior posts and tie beams measuring 7 × 10 cm, the wooden-post cross sections ultimately depend on the thickness of the pumice-concrete panels. The posts should consist of sawn wood that has been treated against pests with chemical agents, tar, used oil, lime, saltwater, etc.
Cutouts of adequate size are left for the wooden posts in the natural-stone or concrete strip foundations. The posts are inserted into the cutouts and wedged in place. Later, the cutouts are filled with concrete. Thin laths nailed onto the wooden posts hold the panels in place. One lath can be left out at first to allow easier stacking of the panels. Only when all of the panels are in place and properly aligned should the last lath be nailed on. The horizontal joints between the panels can be closed with mortar (= grout).
Figure 79: Plan
This structural system is particularly well-suited for use in areas with easy access to cheap wood. The wood in question does not have to be straight lumber. If the wood is a little crooked, the pumice-concrete panels can be made to conform, and any residual openings can be sealed off with pumice mortar.
It is important that the wooden posts be rigidly anchored at top and bottom.
Since pumice-concrete panels are very easy to make, and since the wood and pumice-concrete are both easy to work with and mutually adaptable, the house can be built as a family-scale self-help project.
Figure 80: Detail of plan
|
Quantities |
4.4 b) House with pumice-panel walls; wooden |
Walls |
Prices |
|
ca. 22 |
wooden posts, approx. 10 × 10 cm, 7 × 10 cm |
||
|
180 m |
wooden laths, approx. 2 × 3 cm or 2 × 4 cm, as "guide rails" |
||
|
ca. 64 |
pumice-concrete wall panels, 100 × 50 × 5-8 cm, requiring: 2.50 m³ pumice concrete, i.e. 350 kg or 7 bags of cement |
||
|
ca. 0.20 m³ |
mortar for horizontal joints between the panels |
||
|
ca. 26 m |
wood for the continuous tie beam, approx. 7 × 10 cm or 12 × 12 cm |
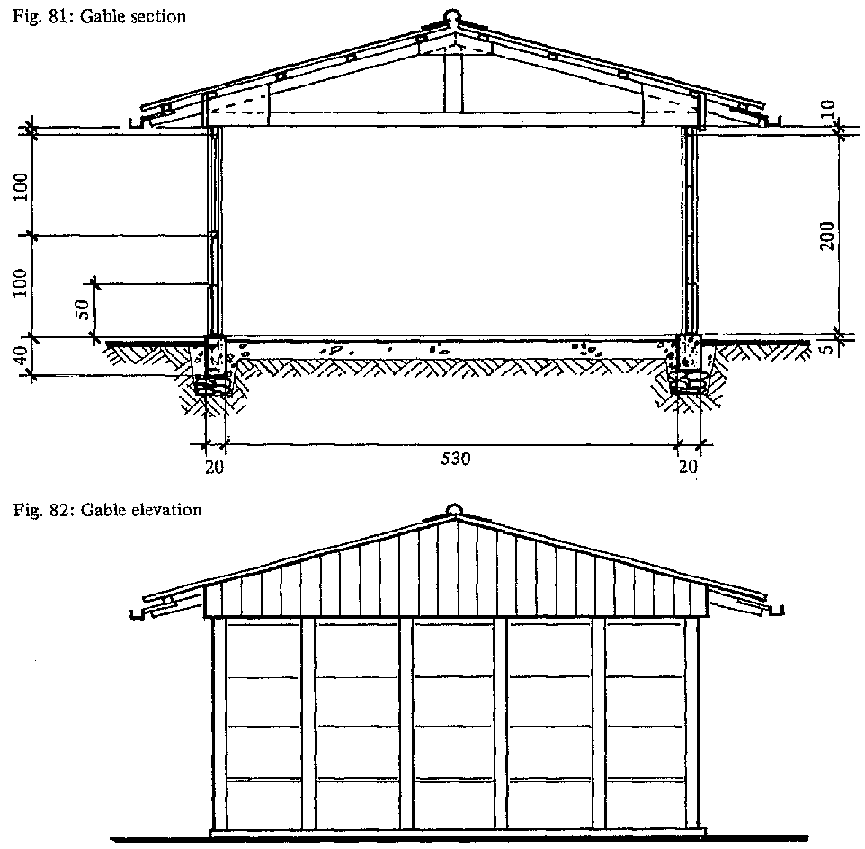
Figures 81 and 82
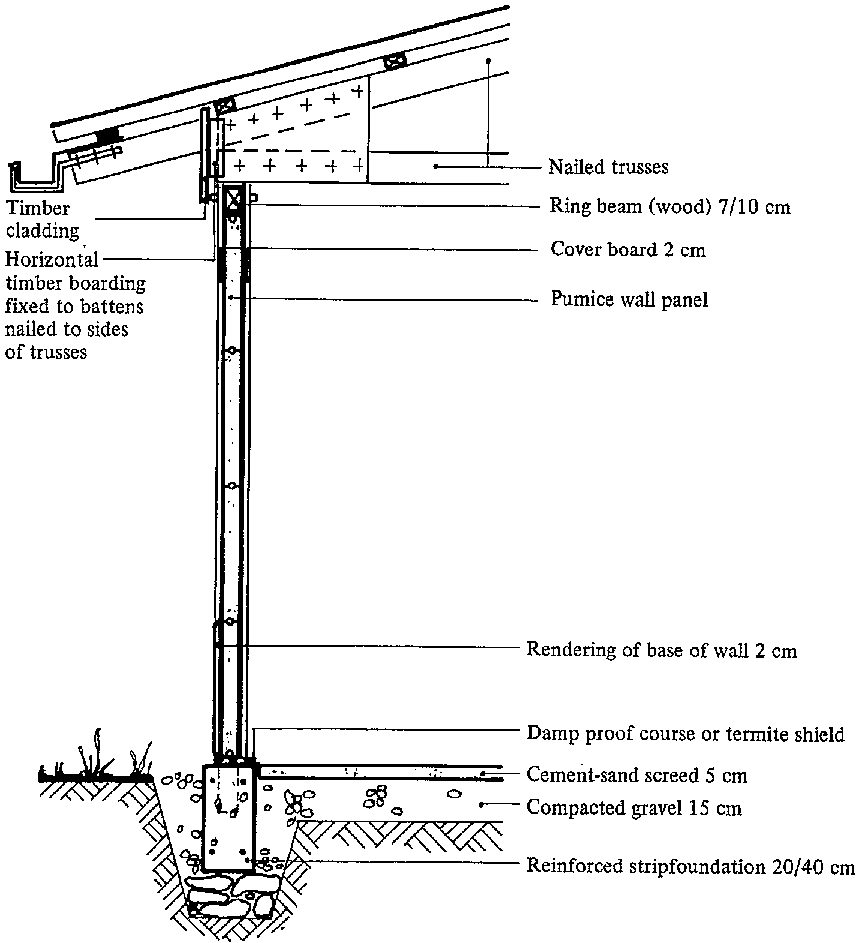
Figure 83: Section
Figure 84: Isometric view
House with Wall-length Reinforced Pumice-concrete Hollow-core Planks as Self-supporting Wall Members[edit | edit source]
Technical description:
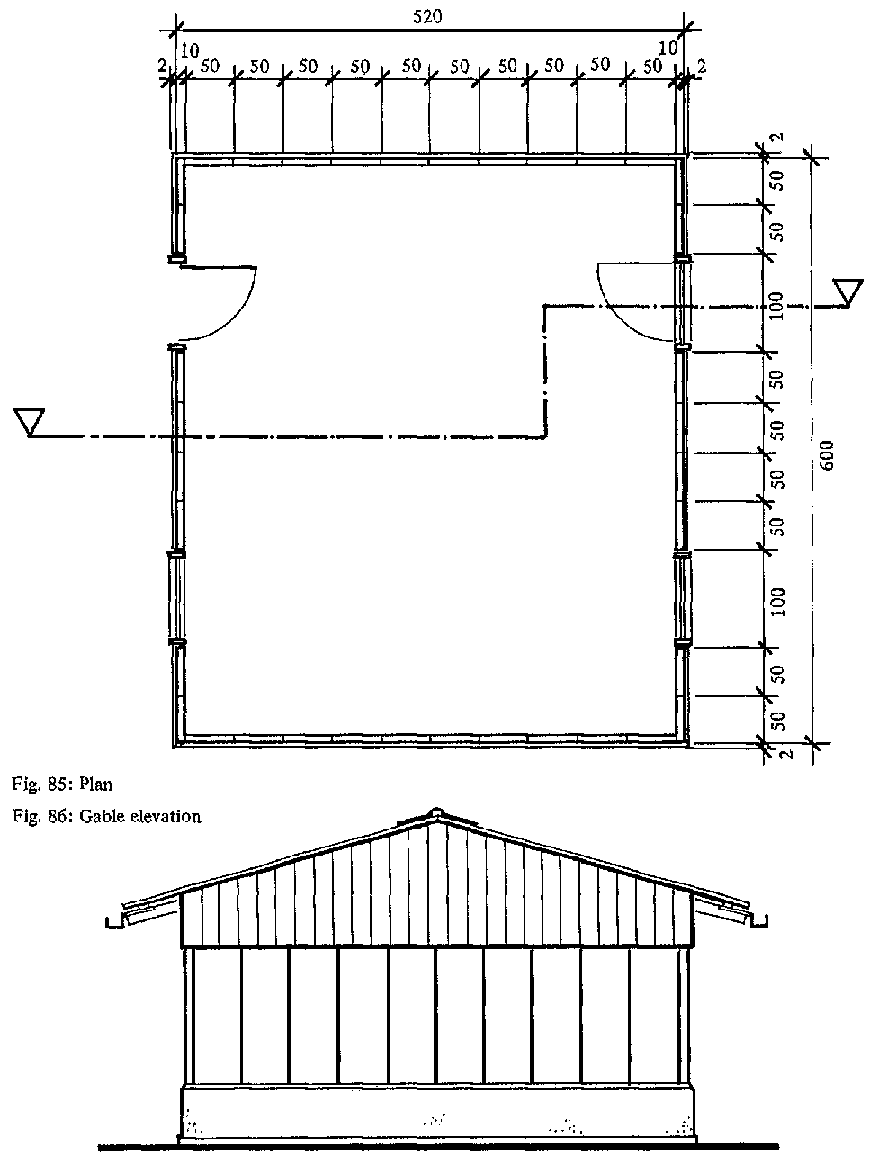
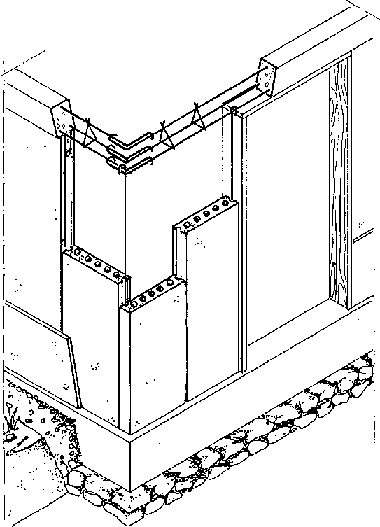
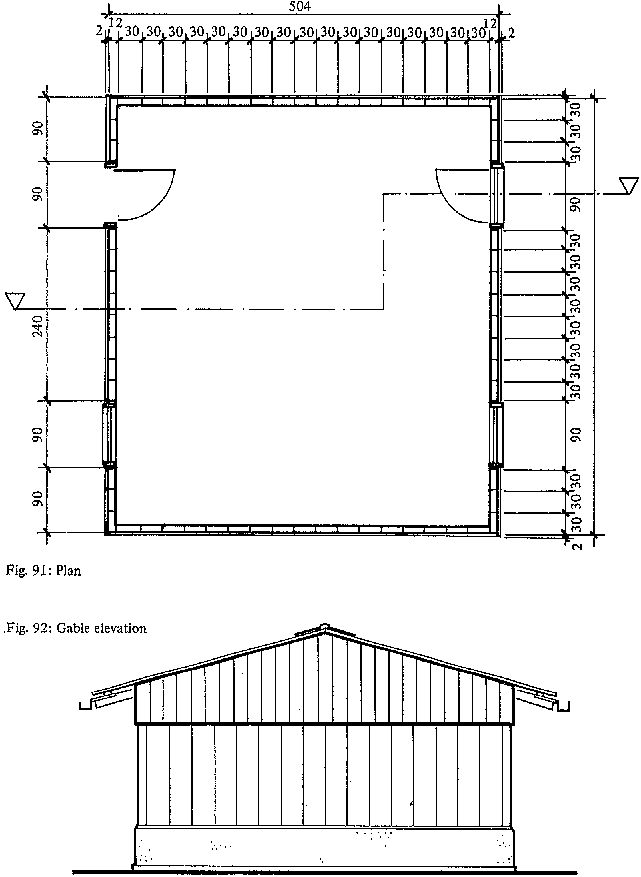
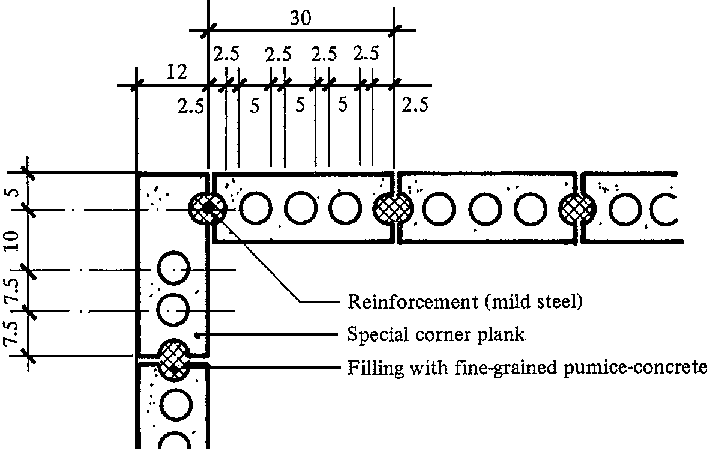
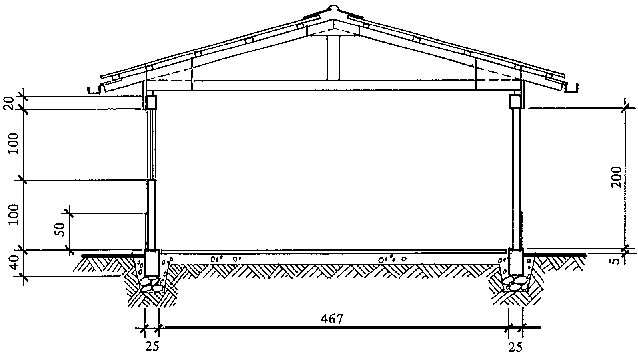
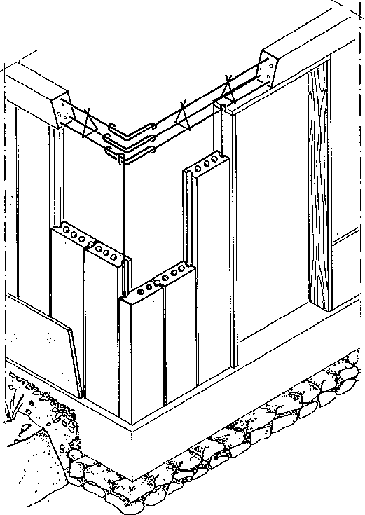
This house has no load-bearing skeleton structure. The thick, wall-length self-supporting, hollow-core planks suffice to yield a stable house (as long as the planks are at least 7-15 cm thick). Such planks are rather heavy, requiring several people or special-purpose tools for handling and placing them. Consequently, this house is most suitable for housing projects involving several appropriately equipped professionals.
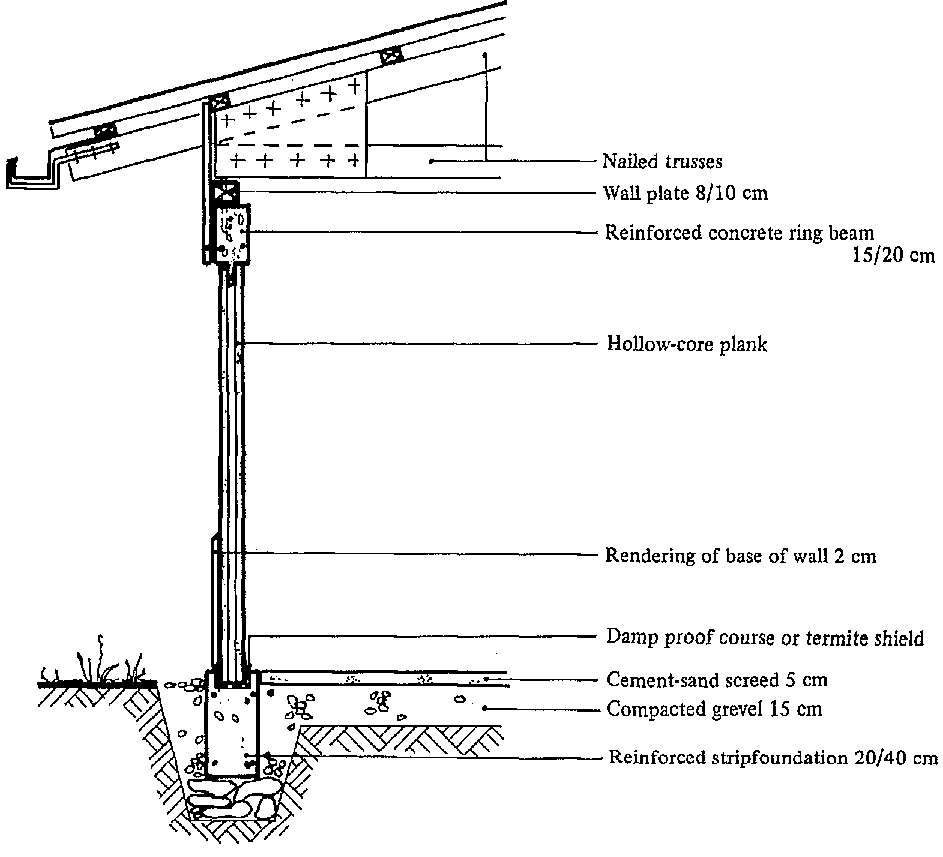
The house needs a solid natural-stone or reinforced-concrete foundation. The planks are easy to make, once a good set of molds has been prepared (cf. Chap. 3.2.5). It is important that the planks be cast properly and true-to-size, otherwise they may not fit together. Placing consists of erecting one plank after another, beginning at a corner of the house and propping each plank with wooden stays. As soon as one side of the house and its two corners are standing, the joints between the planks can be grouted with thin pumice-concrete containing only very small aggregates. Care must be taken to ensure that the entire joint is properly filled and compacted from top to bottom. A continuous tie beam made of normal-weightconcrete must always be installed around the top of the walls to help hold the planks together. The roofing can consist of any preferred material.
If all planks are. properly joined and plumb, and if the foundation is strong enough, this type of construction can accommodate a second story.
Bill of quantities:
|
Quantities |
4.5 House with wall-length reinforced pumice-concrete holow-core planks as self-supporting wall members |
Walls |
Prices |
|
ca. 50 m² |
hollow-core plank walls, 10 cm thick, i.e. 38 hollow-core planks measuring 220 × 50 × 10 cm and comprising 3.42 m³ pumice concrete (approx. 500 kg or ten 50-kg bags of cement) |
... | |
|
ca. 1 m³ |
fine-grain pumice concrete for grouting the joints and casting the continuous tie beam |
... | |
|
ca. 150 m |
reinforcing rods, 3/8" diameter for tie beam and joints |
... |
Hollow-core planks 50 × 205 × 10 cm
Figures 85 and 86
Figures 87 and 88
Figure 89: Section
Figure 90: Isometric view
Hollow-core planks 30 × 205 × 12 cm
Figures 91 and 92
Figures 93
Figures 94
Figure 95: Isometric view
