
The project outlined in this page is a small and manageable worm bin designed so that kids ages eight to twelve can recreate it, without the help of their parents, following the instructions. Giving a child the opportunity to build a worm bin enables them to get hands-on experience with composting and sustainable living, and allows them to see waste transformed into something useful!
After the projects have been finished and released, material regarding the details of the various projects will be compiled and published tentatively due out Fall 2011. The design outlined below is a product of Onycophora, a group of the Introduction to Design Engr205 students.
Background[edit | edit source]
Locally Delicious is an organization based in Humboldt County with a commitment to raising awareness of the importance of community and sustainable living. Locally Delicious and Cal Poly Humboldt's Engr205 Introduction to Design class collaborated on a series of projects in the Spring of 2011. These projects are geared to help raise awareness of the importance of living and eating healthy, especially among children, and will be published in Locally Delicious' upcoming book, "Lunch box Envy." The worm bin described in this page was engineered by the Engineering 215 design team Onycophora.
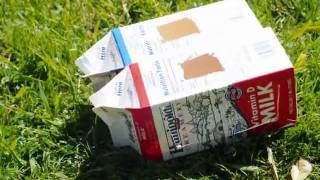
The "Wormland" worm bin is specifically designed for children ages eight to twelve, and therefore follows a unique set of considerations. In the design of this bin size, cost, and the ability of the child were all taken into account. The final design consists of various materials found in every home and drugstore. Old milk cartons and tape make up the design, and scissors and a pencil are the only tools required for assembly. The finished design will be able to process roughly a handful of organic material per week with proper maintenance, as described in our building instructions.
Problem Statement and Criteria[edit | edit source]
The problem statement addressed by the "Wormland" bin project was to engineer a small and manageable worm bin that can be recreated and used by children between the ages of 8 and 12 years old based on the criteria of Locally Delicious. A table further discussing our criteria is outlined below.
| Criteria | Weights | Description |
| Cost | 10 | The cost of the project was geared towards being very minimal to fit the budget of kids. Most of the material to be used can be acquired at little to no cost to the child. |
| Maintenance | 4 | The amount of time related to upkeep of the worm bin will be minimal and sustainable for an estimated time of six to twelve months. |
| Efficiency | 9 | Efficiency is defined as the amount of worm castings produced within a certain amount of area in the worm bin. |
| Build Time | 8 | The time it takes to build and implement the worm bin. |
| Educational Value | 5 | The worm bin design will enable kids ages 8-12 years old to both learn about the general design of a worm bin and to help them understand the concepts of waste and consumption. |
| Durability | 8 | The worm bin design will be able to withstand the effects of child contact and weather for six to twelve months provided that the worm bin is being properly maintained. |
| Safety | 10 | The materials and construction methods used in the design of the worm bin will not be harmful to the kids ages 8-12 years old age group's health or well being. |
| Reproducibility | 10 | The ability of children, age 8-12 years old, to reproduce the worm bin. |
Description of final project[edit | edit source]
The design is composed of empty half gallon milk or juice cartons. Inside of the cartons is a migration hole that allows worms the access to both cartons. Worms are fed on one side of the bin while castings can be removed from the other carton. This process will be repeated as the worms will migrate towards the food and leave castings behind. Each time the food is digested new bedding is inserted. In addition, this modular design allows for expansion of the worm bin to meet the needs for digestion of larger quantities of food.
Costs[edit | edit source]
-
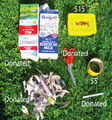
Breakdown of the materials needed and associated costs.

Our cost was very minimal because most the materials were reused materials, the table to the right shows of our costs and total for the project. The worms are the highest expense for the project. The total cost of the project was free. The project had worms donated from another worm bin. The total cost of the project without donations is less than twenty dollars.
Testing Results[edit | edit source]
To test the cardboard milk carton worm bin, we placed a cut off strip of the carton in a glass of water. This test was meant to determine how well the material of the carton would react to extreme weather conditions over a period of time when cut. We also placed a cut up strip of the carton which we had taped back together in the glass of water to determine how well the tape would hold up. After leaving both tests in the glass of water for two weeks, the strips of carton and tape have little to no damage. Because of these promising results, we have determined that cardboard milk cartons are a good material to use for the Kids Worm Bin design.
When testing with children at Alice Birney School in Eureka, California, the results were positive. Three nine year old children constructed the bins with the help of two Onycophora team members, and appeared to enjoy the process. The most difficult steps for the children were those involving poking holes. It was found that not only do pencils work better than pens, but milk cartons are easier to penetrate than the provided Dole brand juice cartons. In addition, the cartons became structurally unsound after the cutting of the migration holes, making it more difficult to poke holes for aeration and for the top flaps.The favorite part of the project for the children we tested with was filling the bins with bedding. They enjoyed shredding the newspaper and picking grass and leaves to make a comfortable "home" for their worms.
Instructions for Making The Worm Bin[edit | edit source]
Materials needed[edit | edit source]
Two half-gallon waxed cardboard juice or milk cartons, duct tape, scissors, and several sharp pencils/pencil sharpeners.
How to build your Wormland Wormbin[edit | edit source]
- Obtain two half-gallon waxed cardboard cartons. Make sure they are rinsed out and dry before beginning to construct the worm bin.
- To make the migration hole for the worms between the two cartons, a 2" by 3" hole is cut into the side of each container but in the exact same location along one of the sides, so that when the two cartons are lined up the holes match exactly. To make the hole, poke four holes in the shape of a rectangle in the same location on both cartons with a sharp pencil. This makes it easier to then cut out the holes with scissors.
- Poke holes for ventilation and drainage along the sides and bottoms of both cartons. Three holes along the middle and five along the bottom is sufficient.
- Flaps are then cut into the topside of each carton, i.e. the side with the largest surface area and with the label saying "Humboldt Creamery", etc. The same method is used as for cutting the migrations holes. Poke one hole in each corner of the top side of the carton, but cut along only three of the four connecting holes to make a flap instead of a rectangular hole.
- The two cartons can now be connected with duct tape. Tape the top and bottom of the cartons together lengthwise on both sides. If using cartons with flap dispensers instead of screw top spouts tape those shut as well.
- Finally, use more duct tape to make tabs for the worm bin's flaps

How to use your Wormland Wormbin[edit | edit source]
- Start by putting a small amount of damp shredded newspaper, a handful of dirt or dead leaves, and a rough handful of food scraps (see: what to feed your worms) on both sides of your bin. Make sure to only put food scraps on one side, however. This forces the worms to migrate from one side to the other in search of food after digesting the given material.
- Initially leave your worm bin for about a week or so without worms in it so that the contents of the bin can begin the decomposition process.
- You may now add 100 to 250 worms(a rough handful) to the side of your bin that contains the newspaper mixture.
- Once a week, use a spoon to mix up ("aerate") the side of the bin that contains worms to keep harmful gases from building up. Also once a week, be sure to add a small amount (about a half a handful) of food to the bin.
- Make sure that the worm bin is sprayed and moistened so the bedding does not dry out.
- After 2-3 months, the bin will start to accumulate castings (worm poop). When this starts to happen, prepare a new batch of bedding and food on the empty side of the bin. The worms will then migrate via the migration hole to where more food is provided.
- After the worms have migrated to the fresh side of the bin, you may remove the castings from the other side and use them in your gardening to produce bigger, healthier plants.
| What to feed your worms | What not to feed your worms |
|---|---|
| Vegetable Scraps | Meat |
| Coffee grounds and filters | Fish |
| Tea bags and filters | Dairy products |
| Old bread | Greasy or oily foods |
| Fruit peels or pulp | Pet wastes |
The projected lifetime of the bin is six months to a year. Due to the simple design,however, it is also easy to make another worm bin to replace the old one!
Modular Design[edit | edit source]
A modular design means that you can expand your Wormland Worm Bin to the size you want.
- Get another juice or milk carton and place it next to your 2-carton bin.
- Follow steps 2-4 of How to build your Wormland Wormbin with the new carton
- Cut an extra migration hole into your existing wormbin
- Make sure the migration holes line up then tape new bin in place
- Repeat as necessary until you reach your desired worm bin size.
How-To Video[edit | edit source]
Discussion and next steps[edit | edit source]
-

Team Onychophora

The overall design of the kid's worm bin is such a simple one that it allows for various small changes of material and location. The "bin" itself could be constructed of any waterproof, easily accessible material, not just milk or juice cartons. The design works well both inside and outside, and can be easily placed in any area due to its small size. Though working for a variety of ages, testing results led us to believe that children eight to twelve years of age will be fully capable of building a "Wormland" bin if provided with adequate instruction.
Once implemented, it would therefore be important to take into account not only age and ability but adult supervision and help. Though this is a kid's project, it is recommended an adult assists with implementation and instructions to ensure proper building and safety.
The next steps of the project will be the publishing of the designs and findings in the book compiled by the organization Locally Delicious, and its implementation by students. We hope that anyone who attempts this project is satisfied with their results and learns something about red worms and waste in the process.