Manual Centrifuge Apparatus
Project developed by Salil Sule Shaunak Mhatre
Template:Statusboxtop Template:Status-design Template:Status-prototype You can help Appropedia by contributing to the next step in this OSAT's status. Template:Boxbottom
Abstract
- Manual Centrifuge Apparatus is a scientific equipment which is widely used in chemical and clinical labs all around the world. This apparatus is used to separate two fluids with different densities when rotated at very high speeds. This apparatus uses the physical phenomenon of centrifugal force acted outward from the centre of rotation. Due to this outward acting force, fluid with higher density tends to move away from the centre and thus forming the bottom layer between the two fluids.
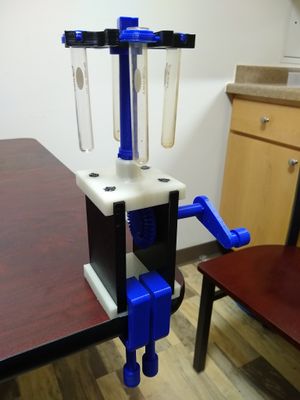
- Picture of Manual Centrifuge Apparatus

Bill of Materials
1. Bevel gears 2. Clips 3. Frames 4. Handle 5. Top plate 6. Test tubes
- All parts required for the assembly of the apparatus available at https://www.thingiverse.com/thing:3283227
Tools needed for fabrication of the Centrifuge Apparatus
- MOST Delta RepRap or similar RepRap 3-D printer
- Test tubes
Skills and Knowledge Necessary to Make the Centrifuge Apparatus
- 3D Modelling software - FreeCAD
- CURA(Matter control software)
Technical Specifications and Assembly Instructions
- Download all the .stl files from the link mentioned above.
- Print all the parts keeping equal scale(x=100% y=100% z=100%) for all parts except for the clips(x=75% y=75% z=150%) on CURA.
- Slide the small bevel gear into the top plate and the big bevel gear into the right plate.
- Attach left side plate and bottom support plate to the previous assembly.
- Weld the 4 top and 4 bottom joints to the top and bottom plates to make the frame rigid.
- Attach handle to the big bevel gear.
- Slide the small disc into the vertical small bevel gear. Attach the test tube plate on the small bevel gear.
- Fix the box between the end of the small bevel gear and test tube plate.
- Put the 4 rings on the top test tube plate and make welded joints to prevent the rings from snapping out of the apparatus while rotating.
- Fix the four test tubes into the rings.
- Fix the complete apparatus to the C-Clamps.
- The apparatus is now ready to work.
- The print time for the complete assembly must be around 22-24 hours with 30% Infill.
- The assembly time for the complete assembly is around 1 hour.
Cost savings
- The estimated cost of the manual centrifuge apparatus is approximately $8-10 for the basic PLA filament.
- Commercial equivalent costs approximately $80-100. Check the commercial version here -> [1]
- Savings of $90 is easily possible for our apparatus.