This Improved Fuel Stove, or Rocket Stove, is the final project for Engr305 at Humboldt State University. The project goal is to construct a demonstration rocket stove for the Campus Center for Appropriate Technology on the campus of Humboldt State University. The rocket stove will serve as an example of improved fuel stove technology and development; students and public touring the center will learn about the design, function and need for improved fuel stoves around the world. The rocket stove will also enable the residents of the center to cook with traditional biomass, reducing their dependence on petroleum based energy sources. It is important to note that rocket stoves are designed for populations around the world who depend on biomass for their cooking fuel. The use of rocket stoves in developed nations is not necessary. Developed nations using modern cooking methods are not faced with health and environmental issues related with traditional cooking methods. The improved fuel stove was designed, built and tested by Daniel Moyer and Tyler Jones.
Populations increasingly rely on biomass for cooking fuel, thus hindering the next step toward modern cooking methods. Populations in developing nations want the same modern, self cleaning, convection, downdraft stove found in American suburbs. Many people argue that modern cooking methods are more appropriate. Modern cooking methods are efficient at fuel conversion and produce less atmospheric particulates, however the dependence on petroleum hinders the appropriateness of modern cooking methods.
Improved cook stoves are an attempt to address the negative environmental and social effects of the three rock fire. Improved Stoves increase efficiency of fuel consumption and reduce the amount of pollution released into indoor cooking environments. Improved fuel stoves designs are constructed with metal housing and insulating materials enclosing the fire. Improved fuel stoves improve heat transfer and fuel combustion, resulting in an efficient clean burning wood stove.
Design
Materials
The materials used in the construction of a rocket stoves main body are made from recycled metal barrels. An old lemon oil can was trimmed to the proper dimensions, becoming our pot skirt. The insulated combustion chamber is comprised of ceramic insulated bricks purchased at a local pottery supply store. The chamber is held together with eighteen gauge stainless steel metal plating fastened with 3/8 inch hardware. The hardware used to construct the rocket stove includes machine screws, nuts, washers and sheet metal screws; all of our hardware utilized was purchased from a local hardware store.
Budget
| Item | Cost |
|---|---|
| Insulated ceramic bricks | $29.60 |
| 8 Quart Stock Pot | $19.99 |
| Ceramic brick cement | $3.95 |
| 2 square feet Sheet Metal | $19.99 |
| Misc. Nuts, Bolts and Fasteners | $20.00 |
| 8 Quart Stock Pot | $8.49 |
| 16 Gallon Drum | Free |
| Total | $84.02 |


Construction Steps
- The square combustion chamber was constructed out of insulative bricks. Bricks were cut and shaped using a hack saw. Heat resistant putty was used as sealant.
- A metal bracket supports a sheet metal case that holds the combustion chamber in place. The metal was cut out with tin snips and fastened with screws at the edges.
- Drill and tin snips are used to cut a square out of the barrel corresponding to the dimensions of the metal casing. The casing for the combustion chamber fits into the hole, protruding on both sides.
- The casing is firmly secured to a metal beam that stretches across the barrel. This beam is secured on both sides with L brackets.
- Vermiculite is poured into the barrel in order to insulate the combustion chamber. This insulation fills the space between the chamber and the barrel and is filled as high as the top of the chamber.
- At the top opening of the combustion chamber we constructed a metal shelf. This shelf is circular and perfectly fits inside of the barrel. It has a square cut in it corresponding to the top opening of the combustion chamber. This allows for gasses to pass through, but seals them off from the bottom half of the barrel. The shelf is secured firmly to the outside of the barrel with L brackets and screws.
- In the top half of the barrel, we constructed a skirt. This skirt surrounds the cooking pot, leaving a small gap on the bottom and the sides. The skirt was constructed out of a can. We used tin snips to cut a square opening in the bottom to channel the hot gasses. The top of the can was cut completely open with a Sawzall. The skirt is fastened to the shelf with screws and washers.
- The pot is inserted into an opening in the top of the barrel. Here we have cut out a circle with tin snips and then carefully bent the metal down at a right angle using square pliers and a mallet. This way the pot is extra sealed and the opening for it is not jagged or sharp.
- We cut a hole out of the upper side of the barrel and fastened a circular metal chimney over the hole using screws.
- To use our rocket stove, burn fuel inside the combustion chamber and set the pot inside the skirt.
Design Principles
- A well constructed rocket stove will allow for air to circulate. With this in mind, it is important to provide an even pathway for the air. The chimney, the combustion chamber and the skirt gap should all have the same cross-sectional area.
- Unless oxygen is being circulated, the fire will smother. When building the combustion chamber it is necessary to provide a shelf for the fuel. This way, fresh air will be pulled underneath the burning fuel.
- The chimney should be short, reaching just above the cookpot. This allows for hot gasses to flow more rapidly through the system.
- Heat will radiate from the combustion chamber. For improved efficiency, insulate around the chamber.
Testing
Testing is essential to rocket stove projects. Testing should happen throughout the entire life of a stove project. The evaluation of improved stoves helps determine if the model is marketable, whether production costs are as low as possible, and if improvements are needed. "Careful testing of stoves has resulted in a more accurate understanding of how to make a better stove. Without experimentation and testing, the development of a stove is based on conjecture". Technical advances in energy efficiency alone will not ensure success. Stove programs must be complemented by appropriate project design, implementation and proper institutional support. Without proper testing, stove programs will have unrealistic expectation of the efficiency of improved stoves. Stove programs can overestimate the efficiency of improved stoves when tested in a controlled lab setting. Improved stoves never do as well in real households. "The fuel savings that can be attained in a laboratory often have little relationship to savings possible under field conditions" [1] . Many stove programs in controlled lab settings achieved a 75% reduction in fuel consumption. After examination of early stove programs, fuel efficiency expectations of improved stoves have been substantially reduced. "Most people in the stove community now agree that a 50% decrease in fuel consumption should be considered a major achievement and that should be content with a savings of 25% or even less" [1]. Laboratory settings can be valuable with designing and initial testing of improved stoves; testing in field conditions can ensure the final product is built and designed correctly. Producing a stove design that adheres and conforms to local culture is vital in ensuring a successful stove program.
Types of Testing
In testing our stove, we wanted to find out how long it would take to boil water and how much wood was being used. We also inspected the ashes to determine if the wood was fully combusted. Ultimately we did three types of tests.
- We boiled water from a cold start and from hot start. Hot start means that we started the test when there was already wood burning. The starting temperature for the water was sixty three degrees.
- We maintained a boil for 30 minutes. We did not start the clock until all of the wood that initially brought the water to a boil had burned out. This gave us more accurate results.
Results
- It took 13 minutes and .36 pounds of wood to heat four liters of water 108 oF. This was done from a cold start (nothing burning initially). The starting temperature was 62oF and the final temperature was 170oF.
- From a hot start, it took 10 minutes and .56 pounds of wood to heat the same volume of water 149 oF. The starting temperature was 63 oF and the final temperature was 212 oF.
- From a hot start, it took 11 minutes and .72 pounds of wood to heat six liters of water 146 oF. The starting temperature was 64 oF and the final temperature was 210 oF.
- To keep six liters of water boiling for half of an hour it took .18 pounds of wood. The starting temperature was 212 oF and the final temperature was 210 oF.
Conclusion
The results of our testing demonstrated that the project was a success. The first thing that we noticed was that the air circulation is excellent. We never had a problem getting enough air into the fire or with having smoke back out of the combustion chamber. This makes starting a fire very easy. Also, we were happy to see that there were hardly any ashes left over. The wood burned hot and combusted completely. Although the top of the stove gets hot when the fire is burning fast, the vermiculite does a very good job of insulating the bottom part. The lower half of the stove never got too hot to touch and the very base never even got warm. Once a fire is going, it must be tended regularly. As well as adding new wood as the fire burns, it is important to constantly push burning pieces all the way into the chamber. Our stove is very efficient. To cook spaghetti in our stove would require roughly one pound of wood and would take only a few minutes longer than a regular stove. By using a lot of wood and creating a big flame, it is possible to boil water quickly. With less wood, the same amount of water can be boiled but it takes longer. It takes a lot of wood to heat water initially, but to keep it boiling requires very little wood. One pound of wood would keep six liters of water boiling for about two and a half hours. When our stove is burning, the pot and the skirt get a lot of soot. Periodically, it will be necessary to clean this soot out.
In building a rocket stove, we learned some important things. First, it would be possible to construct this type of stove using only recycled materials. The hardware would be the most difficult to find. It would also be possible to construct our rocket stove with out the use of power tools. We could have used a hammer and spike instead of a drill. We also could have used a hacksaw instead of a Sawzall. We only used this tool once, to cut the skirt out. As we anticipated, the top of the stove got hot. If our stove was placed inside of another barrel and insulated, it would be more user-friendly. Personally, I would rather deal with the hot surface than to put more work into the stove. In a situation where there were children using the stove, the hot metal could be dangerous. The one thing that our stove lacks is a shelf for extra long pieces of wood to rest on while they are combusting.
Populations around the world are going to continue to use biomass fuel for the indefinite future. The use of improved stoves can help control the external costs to both the environment and human society. "It seems inevitable that an increasing amount of biomass fuel will be bought and burned in purchased stoves" [1]. Fuel savings may not be the driving factor in the adaptation of improved stoves. Improved stoves work because they make cooking quicker, safer, and cleaner. Improved stoves protect children from the dangers of burns from the open fire, reduce respiratory diseases, and burn clean and free of soot.
Update
Logan Ward and Erik Rasmussen
In September 11, we visited the rocket stove at CCAT to check on how it's doing and update the page a little. The stove is in decent condition but there are a few areas that the stove could be improved. The rocket stove has gone through a few very minor changes since its creation. Recently, it received a fresh paint job. Also, the chimney has been lengthened considerably. As you can see from previous pictures, the original chimney was rather short. The new chimney is much taller and has a cap on the top. We also left a laminated informational piece to hang around the chimney and let people know what the rocket stove is and information about rocket stoves in general.
Updated Testing
We met up with Dan and tested the stove. It appeared as if the stove hadn’t been used in quite a few years.
-The first step in the testing was to wash the cookpot
-Next, we gathered pieces of kindling 1’ to 1.5’ long, weighing a total of .44 lbs
-After that, we filled the pot with water and placed it in the skirt
-Next, we started burning the pieces of wood in the combustion chamber. We also used some dead grass in addition to the kindling.
-After a short while the water began to boil and was brought to a rapid boil within 7 minutes and 25 seconds.
-The waters temperature was measured at 150 degrees Fahrenheit.
There is a few problem areas we observed. The vermiculite used to insulate the combustion chamber is old and could be replaced. Also, there are small gaps around where the combustion chamber and metal case meet with the barrel, which may have led to less concentration of the heat around the pot and the low temperature of the boiling water. These gaps could easily be filled in by some kind of heat resistant sealant. Also it was unclear if the addition of the longer chimney improved the flow of gasses or not. As noted earlier the chimney should be short, reaching just above the cookpot so the lengthened chimney might have actually hindered the flow of gasses. Also the bricks in the combustion chamber may need some replacing as well. If this stove was being consistently used, it would probably be a good idea to address these concerns as you would want your stove in prime running condition.
-
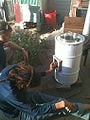
Fig 1: Erik and Dan feeding the stove
-
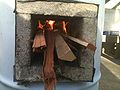
Fig 1a: View inside the beast
-
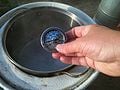
Fig 1b: Temperature reading
-
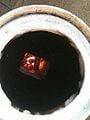
Fig 1c: View from above without the cookpot
-
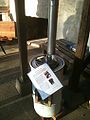
Fig 1d: Laminated information hanging from the stove


See also
References
[1] Barnes, Douglas F. "What Makes People Cook With Improved Biomass Stoves." Worldbank.org. World Bank. Web. 03 Oct. 2011. <http://www-wds.worldbank.org/external/default/WDSContentServer/WDSP/IB/1999/08/15/000009265_3970311122727/Rendered/INDEX/multi_page.txt>.