
Zane Middle School snowboard benches
Our team, Team T.A.L.K., made a bench with recycled snowboards for the "Rectangle of Doom" at Zane Middle School (Eureka, Ca). It was designed and built from February 2021 to April 2021. Our motivation to solve the problem was to create something that looks good and is useful that could sit in front of the school. The intended users of our snowboard bench are the students at the school, as well as the teachers, faculty, and even parents.
Background
[edit | edit source]Catherine L. Zane Middle School located in Eureka, California, caters to a large and diverse population of students. Humboldt State's Environmental Resources Engineering Department and Zane Middle School have worked together to tackle different projects on Zane's campus. As of Spring 2021, the "Rectangle of Doom" is a large space located in front of the gym and other academic buildings, where students get dropped off and picked up before and after school. The students will walk through the space and track mud and dirt throughout the rest of the campus. Zane Middle School wants this space to become an aesthetic and safe place for their students. Trevor Hammons is a counselor at Zane Middle School with an interest in solving this problem. He has worked with a number of teams who have tried to come up with solutions but few have been successful so far. Previous teams tried using planters and benches, but students continued to walk through the plants and the benches had sharp edges, so both were deemed unaesthetic or unsafe, and removed. Only a few previous projects worked out, the Human Sundial being one of them. It is still present in the "Rectangle of Doom" today. The other projects that succeeded only take up a small portion of the Rectangle, so there is still a lot of space to fill. The Rectangle has recently been paved.
Problem statement
[edit | edit source]The objective of this project is to make a bench out of recycled and up-cycled materials that will be safe for students and adults to sit on. It is also to change the aesthetic of the "Rectangle of Doom" and to make it nicer and prettier.
The criteria listed in the table below provides the standards Team T.A.L.K. needed to meet in order for the project to be considered a success. These criterion were talked about with the client. Some criterion are more important than others, like safety and aesthetics. Team T.A.L.K. worked to incorporate all of the criterion, but some had more weight than others. These criterion helped steer the team in the right direction to make something that will last a long time at Zane Middle School.
Criteria:
| Criteria | Description | Weight (1-10) |
|---|---|---|
| Safety | How unlikely it would be for students to be injured by the project, use the project as a weapon, or block the line of sight of staff members. | 10 |
| Aesthetics | How appealing the project is to look at. | 10 |
| Durability | The amount the project resists destruction and the length of time the project retains its original quality. | 10 |
| Low maintnence | The amount of time and energy spent by maintenance staff on the upkeep of the project for the lifetime of the project. | 10 |
| Cost | The total amount of money spent on the building and implementation of the project at the middle school. | 9 |
| Ease of implementation | The level of skill required to build the project, the cost of shipping or otherwise transporting the components, and the number of people needed on site to implement the project. | 9 |
| Not difficult to remove | How much time, energy, and money would need to be spent to remove the project from Zane in the case of project failure. | 7 |
Prototyping
[edit | edit source]Our first round of prototyping included many different ideas for what could be put into the "Rectangle of Doom," but that was before we knew our objective on what we were building changed. Our prototypes for benches are the following images. Before we started prototyping, we drew up what we thought a backless bench could look like (shown in the image below). We learned from this drawing that we didn't quite like the slabs in the middle. We would have rather had them on top, or not there at all.

In this first-round prototype, we learned that a bench looked good in the "Rectangle of Doom."

The image below is from our second-round of prototyping. One of Team T.A.L.K.'s members made a life size bench to test out function. We learned that we liked a backless bench.

The image below shows another of our second-round prototyping. A cardboard model of a backless bench was made to test function as well. We learned that we had to proportion everything right, otherwise the bench wouldn't look good.

After building these prototypes, we honed in on what we wanted our bench to look like. We hadn't exactly designed the bench with snowboards until this point, but we were still able to mess with the position of them. The image below shows our AutoCAD drawing for the front view design of our bench. The curve at the top represents the snowboards. We learned that the snowboards look good upside down.

Final product
[edit | edit source]The final bench was named The Not A Bench Bench. It is a simple wooden bench with two upside down snowboards bolted on top. We used a total of 13 wood pieces to build it: 4 legs, 4 planks for a top structure, 3 planks for a bottom structure, and 2 small boards for in between the top structure. The two snowboards used are old reused snowboards. The snowboards were spray painted the school colors of red and gold. We also spray painted a falcon design on one of the snowboards by using a stencil.
An image of the final product is below. It shows the bench at Zane Middle School sitting on the "Rectangle of Doom."

The image below shows the underside of the bench. It can be used to identify which planks are being referred to in the Instructions.

The spray painted falcon design stencil was made by one of Team T.A.L.K.'s members, Alice de Lescure. Zane's school mascot is a falcon, so we wanted to include that in our final product. We spray painted this stencil onto the gold snowboard because we thought it gave a nice contrast to the solid colors.

Construction
[edit | edit source]This section consists of the tools and materials we used, as well as, instructions on how to make the bench.
Tools:
- Tape measure
- Marker and or pencil
- Sander
- Jointer
- Planer
- Table saw
- Miter saw
- Router
- Drill with small drill bit and Phillips head
- Brush for applying glue
- Combination square
- Nail puller and hammer
- Level
- 2 squares
- Vice grips
- Bench grinder
- Multi-tool saw
- Clamps
- Kreg pocket hole machine
Materials:
- 1 64in snowboard
- 1 60in snowboard
- 8 M6-25 machine screws (plus 4 extra)
- 36 Kreg pocket hole screws
- 1 can spray primer
- 1 can of yellow spray paint
- 1 can or red spray paint
- A falcon design stencil
- 1 can clear coat
- 2 cans wood sealant
- Wood glue
Lumber (lengths may vary slightly) a photo showing a picture of the bench frame with all pieces labeled is included in Final product:
- 4 4x4x18in posts (C: legs)
- 2 1.5x4x40.125in boards (E: long connectors)
- 2 1.5x4x12in boards (F: short connectors)
- 2 1.5x3x12in boards (B: short I pieces)
- 2 2x3.375x16in boards (D: middle cross-pieces)
- 1 1.875x3x45.875in board (A: long I piece)
Instructions
[edit | edit source]
Remove any nails from lumber. Joint and plane enough donated lumber to create four 4x4 posts each 18in long. This should shave off all the damaged wood and create flat sides and sharp 90 degree angles. Cut the posts to the correct length. Bevel the four long edges of each post to using a router. This will dull the sharp edges.

Lay the snowboards side by side on a level surface with the curved ends pointing up, their centers aligned, and the sides touching. The boards will only touch at two points and there will be a small gap between the two snowboards at their centers. Measure the width across the two boards at the center and subtract one inch. This will be the total width of the wood frame. Subtracting 8 inches from this total width will give the length of the short connectors and the short I pieces (given that the posts are exactly 4x4 inches each).

Measure the length of the shortest snowboard excluding the curved ends. Press down on the center of the board to take out as much bend as possible to get the most accurate measurement. This will be the total length of the wood frame. Subtract 8 inches to get the length of the long connectors.
Remove any nails from donated lumber. Joint and plane boards to 1.5 inches thick. This should remove damaged wood and create flat sides and sharp 90 degree angles. Use a table saw to cut the boards to 4 inches wide. Cut these now 1.5x4in boards into two long connectors and two short connectors (lengths found above).

Remove nails and plane and joint lumber into 1.5 inch thick boards, as in step 5. Use a table saw to cut the boards 3 inches wide. Cut the now 1.5x3in boards into two short I pieces (length found in step 3).

Beveling removes the sharp edges created through jointing wood. Bevel all edges of the connectors and short I pieces that will not be touching other wood or snowboards when the bench is complete. This will end up being all four long sides of the short I pieces and two long sides of all connectors.
Drill two pocket holes in both ends of all boards (excluding the four posts). To drill the pocket holes, place a board into the Kreg pocket hole jig. Drill two holes. Flip the board and insert the opposite end into the jig so that the holes will be on the same side and repeat the process.
Place a post sideways at the edge of a workbench. Use a combination square to measure 1/2 inch from an edge of the post. Put glue on one end of a short connector and a short I piece as well as where the ends will attach to the post. Place the ends of the boards on the post with a 1/2 inch relief from the edge. Position the boards so that the pocket holes face away from the edge that was measured from. The one side of the short connector will be flush with the end of the post. The short I piece should be 2 in? from the opposite end of the post. Use clamps to hold the boards together. Use Kreg pocket hole screws and a drill to screw boards together. Repeat this process to attach a post to the other side of these boards. Do all this again to attach the other short connector and short I piece to the two remaining posts.
Place one side of the frame on a workbench with the pocket holes facing up. Repeat the process of attaching the short connectors to the post with the long connectors. Repeat the process to attach the long connectors to the other side of the frame.
Measure the distance from the inside of one long connector to the inside of the other long connector. This will be the length of the middle crosspieces. Measure the distance from the inside of one short I piece to the inside of the other short I piece. This will be the length of the long I piece.
Follow the same process as cutting the other boards to create a 2x3.375 inch board. Cut this board into the two center crosspieces. Follow this same process to create the 1.873x3 inch board. Cut this into the long I piece. Bevel all long edges of the long I piece and two long edges of the center crosspieces.
Follow the same process as drilling the other pocket holes to drill 2 holes in both ends of each new board.
Attach the long I piece to the center of the two short I pieces using wood glue and screws.
Make sure the bench structure is sturdy by setting it on level ground and sitting on it. After testing the structure, get ready to attach the snowboards.
Sand the wax off of the snowboards. Spray primer on the snowboards and let dry. Spray paint in desired pattern on the snowboards. This may take several coats. Let dry. Spray a clear coat on the snowboards and let dry.
Each snowboard will have holes to receive metric 6 x 25 screws where the foot holds would be attached. These will be used to attach the snowboards to the wood frame. By doing this the screw holes and screws are hidden from public view. This also prevents excess water from getting into the snowboard and messing with it. Lay the two snowboards with the holes facing up and center on the wood frame. Choose holes on each snowboard closest to their ends that still roughly line up with holes on the other snowboard. Using a straightedge and a square, mark on the long connectors where the holes are located. Attach the center crosspieces at these marks using wood glue and screws so that their surfaces are flush with the top of the bench frame.
Take four M6 screws and hold one firmly by the end with vice grips. Use a multitool to cut off the head of the screw. Sharpen this end to a point using a tool grinder. Repeat for the three other screws. Screw the screws into the four chosen holes on one snowboard with the pointy end sticking up. Put the snowboard on the bench frame where it will be attached and gently hammer over the center crosspieces. This should cause the sharpened screws to leave marks on the center crosspieces. Remove the snowboard, unscrew the screws, and repeat the process for the other snowboard.
Sand the wood frame. Apply wood stain if desired. Spray on wood sealant.
Drill a pilot hole at each of the 8 indents from the sharpened screws. Place the snowboards face-down on the wood frame. Screw the snowboards to the center crosspieces from the underside of the frame using the intact machine screws.
Bill of Materials
[edit | edit source]Below is a table of the bill of materials which includes the items used, amount, cost per unit, and total cost for the project.
| Item | Amount | Cost per unit | Total |
|---|---|---|---|
| Snowboard — Used | 2 | USD 20.00 | USD 40.00 |
| Lumber - 4' x 4' Leg — Recycled | 4 | USD 0.00 | USD 0.00 |
| Lumber - 2' x 4' Side Plank — Recycled | 2 | USD 0.00 | USD 0.00 |
| Lumber - 2' x 3' Side Plank — Recycled | 2 | USD 0.00 | USD 0.00 |
| Lumber - 2' x 4' Front Plank — Recycled | 2 | USD 0.00 | USD 0.00 |
| Lumber - 2' x 3' "I" Plank — Recycled | 1 | USD 0.00 | USD 0.00 |
| Lumber - 2' x 3' Seat Support Plank — Recycled | 2 | USD 0.00 | USD 0.00 |
| Wood Glue | 1 | USD 11.60 | USD 11.60 |
| Spray Paint (Red, Yellow, and Clear) | 2 | USD 11.60 | USD 23.20 |
| Wood Sealant | 2 | USD 18.00 | USD 36.00 |
| Mask for spray point | 1 | USD 7.97 | USD 7.97 |
| Painting Gloves | 1 | USD 3.49 | USD 3.49 |
| Machine Screws | 25 | USD 1.69 | USD 42.25 |
| Kreg Pocket Hole Screws | 16 | USD 0.00 | USD 0.00 |
| Sanding Block | 1 | USD 4.97 | USD 4.97 |
| L-bracket | 1 | USD 13.98 | USD 13.98 |
| Grand total | USD 183.46EUR 157.78 <br />GBP 133.93 <br />CAD 227.49 <br />MXN 3,825.14 <br />INR 13,731.98 <br /> | ||
Video
[edit | edit source]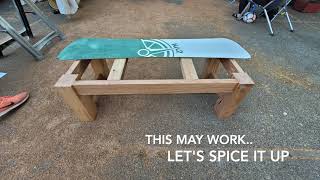
Operation
[edit | edit source]This project is very simple to operate, there is really only one thing to do. Sit! See Troubleshooting for any quick questions about the state of the bench.
As shown in the image below, the place to sit on the bench is on top of the two snowboards.

In the image below, Mr. Hammons, the client, is showing what to do with the bench by sitting on the bench.

In the image below, two of Team T.A.L.K.'s members are showing what not to do with the bench by standing on the wood structure.

Maintenance
[edit | edit source]The only maintenance for this snowboard bench would be to reapply Spar Urethane finish to the wood every 2-3 years and possibly remove stickers or other forms of defacing every year.
Schedule
[edit | edit source]When and how to maintain the bench.
- Yearly
- Taking time to remove stickers or other forms of defacing.
- Every 2-3 years
- Reapply Helmsman Spar Urethane Clear Satin finish to the wood structure of the bench.
Instructions for Maintenance
[edit | edit source]This is a plan to maintain the project. The brief step by step instructions and images detail how to take care of the wood structure of the bench:
Use this Helmsman Spar Urethane Clear Satin finish to protect the bench from sun, rain, and temperature changes.
These are the instructions for use. Make note of spraying 12-inches away, waiting 1.5 hours before the next coat, and apply at least 3 coats.
This is an example of what it would look like to be applying the Spar Urethane finish.
This is what the bench should look like after (re)applying the Spar Urethane finish.
Conclusion
[edit | edit source]Testing results
[edit | edit source]After testing the bench by standing, sitting, and even jumping on it, Team T.A.L.K. is pleased with how the bench came out. By standing on the bench structure, the team proved the bench is sturdy. We were worried about how the gap between the snowboards would feel, but after sitting on the bench, we found the bench is very comfortable.
Discussion
[edit | edit source]Team T.A.L.K. is confident that the bench is safe for middle school students to use. Even though we don't want them standing on or jumping off the bench, the bench is sturdy and strong enough that it will not fall along with the students.
Lessons learned
[edit | edit source]Some lessons that were learned were that snowboards have funky shapes. Next time we would plan for a gap between the snowboards when they were joined at the ends. We would also consider getting two different sized boards, or offsetting the snowboards so there are no gaps.
We also learned that we need to take more pictures. Next time we make an Appropedia page we want to be prepared with photos.
Next steps
[edit | edit source]The next step for this project is to wait for the concrete to be poured into the "Rectangle of Doom." Once the concrete has cured, the bench will be installed atop it. Some of Team T.A.L.K.'s members have discussed visiting the bench once it has been put in to see if it looks good and meets certain criteria.
Troubleshooting
[edit | edit source]Below is a table depicting some of the troubleshooting that may occur and possible ways to fix them.
| Problem | Suggestion |
|---|---|
| Wood starts to chip or splinter? | Get a 120 grit sanding block to buff it out. |
| Snowboards loosen from bench frame? (very unlikely) | Tighten the eight screws that attach the snowboards to the two middle wood cross-pieces underneath the bench. These screws will be found in pairs in circular depressions on the underside of the seat area. |
| The spray paint chips? | Let it be. It will make it look more like a recycled snowboard.
Could also get Rust-oleum Painter's Touch 2x Ultra Cover Clear Gloss to protect the remaining paint. |
| Whole bench falls apart? | Call a cleaning crew to get it removed from the premises. |
Team
[edit | edit source]Team T.A.L.K., Spring 2021
References
[edit | edit source]
| Authors | |
|---|---|
| License | CC-BY-SA-3.0 |
| Cite as | LaceyH, Lonny, KatieBla, Ad327 (2021–2026). "Zane Middle School snowboard benches". Appropedia. Retrieved July 9, 2026. |