Tibial Fracture Fixation Team Logo.jpg
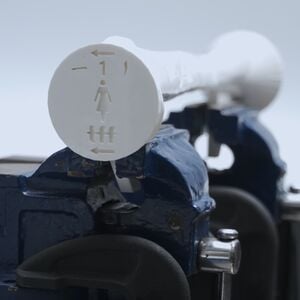
The 3D printed bone models of the Tibial Shaft Transverse Fracture Simulator feature a semi-engraved model number, gender symbol, and two drilling direction arrows on the base of each model to assist with model identification and proper orientation of the simulator.

Caption underneath

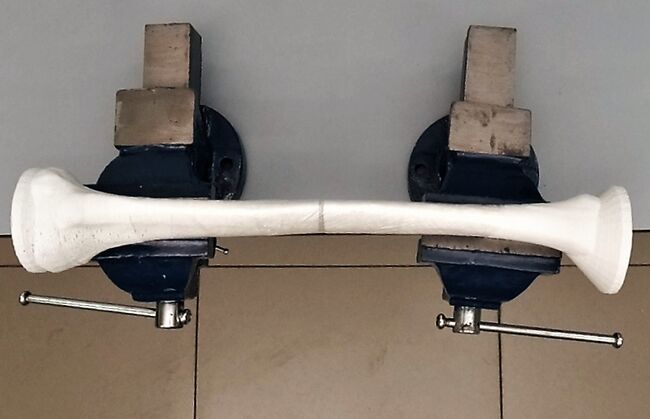
This data-driven, gender-specific, easy to print, environmentally friendly, hygienic, and cruelty-free simulator can be locally made to provide the highest fidelity orthopedic surgical simulation training at the lowest cost in resource-constrained settings. Clear cellophane is wrapped around the slightly distracted 3D printed proximal and distal fracture fragments to simulate the soft tissue envelope and permit visual inspection for targeted self-assessment by the learner. The vise clamps are positioned so the fracture ends are distracted by 2.0 - 3.0 mm but are otherwise properly aligned to simulate a fracture with restored angulation, and rotation.

Materials and Equipment[edit | edit source]
1
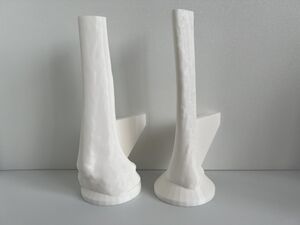
For the Tibial Shaft Transverse Fracture Simulator, the 3D Printed Adult Tibial Bone Model 1 (left) is the proximal fragment, and the 3D Printed Adult Tibial Bone Model 2 (right) is the distal fragment.
3D Printed Adult Tibial Bone Models 1 and 2

Click on the links below for instructions on how to obtain 3D Printed Adult Tibial Bone Models.

2
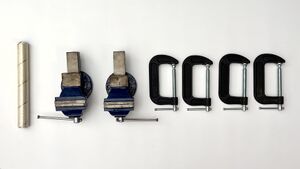
Roll of clear cellophane wrap to simulate the soft tissue envelope overlying the proximal and distal fragments (left), 2 blue vise clamps to secure the Tibial Shaft Transverse Fracture Simulator (middle), and 4 black G-clamps to secure the blue vise clamps to a table (right).
Miscellaneous Supplies
  • Clear cellophane
  • Vise clamps (minimum 2)
Based on user feedback, we are now recommending learners obtain two 2-in-1 vise clamps instead of two table clamps and four G-clamps to secure the bone models. These 2-in-1 vise clamps are easier to use, cheaper overall ($17 USD/clamp) and can be obtained locally but the delivery times are longer (2 weeks) because they are imported. We will be updating our simulator build video to showcase these 2-in-1 vise clamps soon.
3
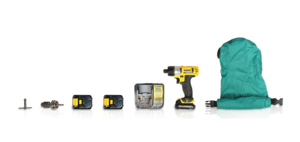
Any powered orthopedic surgical drill that is compatible with 5.0 mm diameter self-drilling Schanz screws can be used.
Powered Surgical Drill and Accessories
  • 5.0 mm diameter self-drilling Schanz screw
  • Chuck key
  • Powered surgical drill
The Arbutus Medical HEX Drill Kit uses autoclavable drill covers to permit faster turnaround on reprocessing orthopedic surgical drills in resource-constrained settings.[1]

Set Up of the Tibial Shaft Transverse Fracture Simulator[edit | edit source]

mqdefault.jpgYouTube_icon.svg
Annotations:
  • 00:06: Step 1 - Position two vise clamps on a table approximately 25 cm apart and open the jaws of each vise clamp.
  • 00:16: Step 2 - Wrap clear cellophane around the 3D Printed Adult Tibial Bone Models 1 and 2 held by an assistant.
  • 00:29: Step 3 - Distract the proximal and distal fragments of the wrapped Tibial Shaft Transverse Fracture Simulator by 2 - 3 mm.
  • 00:38: Step 4 - Place Model 1 (the proximal fragment) into the left vise clamp and Model 2 (the distal fragment) into the right vise clamp. Each vise attachment should be centered on the platform overlying the threaded screw (or exposed threaded screw) that connects the jaws of a vise clamp.
  • 01:02: Step 5 - Use the two vise attachments of the simulator to gauge the distance between the left and right vise clamps. Adjust the position of the vise clamps and then secure each vise clamp to the table.
  • 01:18: Step 6 - Turn each vise handle until the jaws are clamping each model securely. Confirm that the proximal and distal fragments of the simulator are distracted by 2 - 3 mm but are otherwise properly aligned to simulate a fracture with restored angulation, and rotation.
  • 01:39: Step 7 - The Tibial Shaft Transverse Fracture Simulator simulates the left tibia. Confirm that the simulator is properly oriented by looking at the two semi-engraved drilling direction arrows on the base of each model. The drilling direction arrows of both models should be pointing in a medial-to-lateral direction.
  • 02:04: Step 8 - Push on each model near the fracture line in a medial-to-lateral and anterior-to-posterior direction to verify stability before drilling. If the model moves, re-tighten all the handles of each vise clamp for a stronger grip.

Assemble and Test Powered Surgical Drill[edit | edit source]

Any powered orthopedic surgical drill that is compatible with 5.0 mm diameter self-drilling Schanz screws can be used for this skills training module.
1
Arbutus Medical HEX Drill Kit
Collect Supplies

Obtain the following supplies:

2
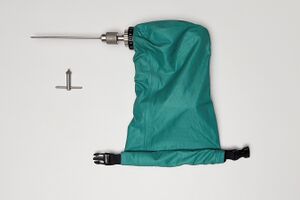
Arbutus Medical HEX Drill with 5.0 mm diameter Schanz Screw and Chuck Key
Assemble Drill and Insert Schanz Screw
  • Follow the surgical drill manufacturer's instructions on how to assemble the surgical drill and insert a 5.0 mm diameter self-drilling Schanz screw using the chuck key.
  • If using the Arbutus Medical HEX Drill Kit, follow the video instructions to assemble the Arbutus Medical HEX Drill and insert a 5.0 mm diameter self-drilling Schanz screw.
A sterile person is NOT required to assemble the Arbutus Medical HEX Drill for simulation training.
3
Test Drill to Confirm Drilling Direction
  • If using the Arbutus Medical HEX Drill Kit, push on the forward drilling direction switch on the right side of the drill for clockwise rotation. NOTE: Different drills have different locations for the switch that controls forward drilling direction.
  • Test the surgical drill by squeezing the on/off trigger to confirm that the drill is ready for use. The Schanz screw tip should be rotating in a clockwise direction when the Schanz screw tip is pointing away from you.

Acknowledgements[edit | edit source]

This work is funded by a grant from the Intuitive Foundation. Any research, findings, conclusions, or recommendations expressed in this work are those of the author(s), and not of the Intuitive Foundation.

References[edit | edit source]

  1. Arbutus Medical. Hex Drill Kit - Orthopedic Surgical Drill [Internet]. Arbutus Medical. Arbutus Medical; 2021 [cited 2021 Nov 28]. Available from: https://arbutusmedical.com/drillcover-hex/.
FA info icon.svg Angle down icon.svg Page data
Part of Tibial Fracture Fixation
Keywords orthopedic surgery, simulation training, modular external fixation, schanz screws, open tibial fracture, 3d printing, artificial bones
SDG SDG03 Good health and well-being
Authors Medical Makers
License CC-BY-SA-4.0
Language English (en)
Related 0 subpages, 19 pages link here
Impact 1,272 page views
Created October 7, 2021 by Medical Makers
Modified October 23, 2023 by StandardWikitext bot
Cookies help us deliver our services. By using our services, you agree to our use of cookies.