
StartUp Humboldt Titan Level Sponsorship Plaques 2025

| Type | |
|---|---|
| Authors | Dante Cross Sean Harwood Eduardo Mendoza Andrew Swinney |
| Location | Arcata, California |
| Status | Prototyped |
| Years | |
| Made | Yes |
| Replicated | No |
| Uses | Display, Recognition |
| Map | |
|---|---|
| Location | Arcata, United States |
| Coordinates |
The StartUp Humboldt Titan Level Sponsorship Plaques project was given to Lost Coast Redworks, a student design team enrolled in Engineering 205 in the Fall of 2025. The purpose of this project was to create a way to show recognition to sponsors to the StartUp Humboldt Competition that provided substantial financial support.
Background
[edit | edit source]- The semester long design project that Lost Coast Redworks took on was a way to provide recognition to "Titan Level Sponsors" which are sponsors who donate over $25,000 to the StartUp Humboldt Competition.
- The suggested method to do this was to create sponsorship plaques with almost total creative control for the whole project.
- Lost Coast Redworks settled on the method of creating a Polyptych design as they believed that would be the best way to provide recognition to sponsors, collaborate all of their ideas, and utilize the tools that the Engineering Department could provide for them.
- The goal was to create plaques that made the sponsors feel more rewarded for their donations, just past the feeling of supporting the growth of Humboldt County, and make the recipients feel as if they were receiving a worthwhile product.
Problem statement
[edit | edit source]The objective of this project was to create a physical representation of gratitude to the Titan Level Sponsors of the StartUp Humboldt Competition.
Criteria
[edit | edit source]The list of criteria was created during the team's meetings, with and without the client, as the client provided little in the sense of given requirements.
| Criteria | Description | Weight (1-10) |
|---|---|---|
| Cost | It was a goal of theirs to make each plaque less than $51 to stick to a fairly strict total project budget of $200. | 2 |
| Percent Wood | The goal was to make the plaques greater than 50% wood as they believed that having a majority wooden product would provide the best end product. | 7 |
| Aesthetic | The final design of the plaques had to represent the surrounding flora and fauna of Humboldt County and fit the area well. | 10 |
| Mass | To provide a product that would be easily moved and mounted, a set maximum weight of five pounds was put in place to prevent a product that was too heavy. | 8 |
| Text | The actual text of the plaque was set to be big enough to read from inside the same room the plaque was displayed inside of so those viewing it would not have to read it from directly in front of it. | 7 |
| Size | For the connivence of the recipient, the total surface area was set to 240 in2 at the largest and 88 in2 at the smallest. This set surface area range ensured a plaque that was not too small, to the point it feels unsubstantial, and not too large, to the point it is unable to be displayed comfortably. | 8 |
| Time | A final design was chosen that could be completed at the highest quality before the deadline was hit. | 10 |
Prototyping
[edit | edit source]The initial prototype that was produced was a testing of the laser on a scrap piece of wood.

The following prototype was 3D Print of a topographical map of the Eureka Bay as this was a shape that would be used on one of the plaques.

Continuing, the next prototype was the use of Keyhole Router Bits to cut out tracks for a designed folding mechanism that would allow the plaques to sit on a desk and mount on a wall.

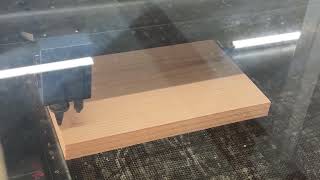
The final prototype that Lost Coast Redworks produced was a full mock-up of one of the plaque designs. A piece of 3/4" redwood was used and it was laser engraved as well as using a router to bevel the edge around the whole plaque.

Final product
[edit | edit source]Describe your final product here with image and labels. Start with the biggest overview first.
Construction
[edit | edit source]A very complete description of how the final project is built. This large section should have lots of pictures. Use the Help:Images#Galleries and probably Template:Steps (e.g. Barrel O' Fun Worm Bin Instructions).
Continuing after the cutting of the wood to length, the first two plaques were laser engraved with the designs created by Lost Coast Redworks.
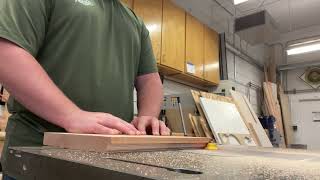
After Lost Coast Redworks Laser Engraved the designs, they used a router table to bevel the edges of the plaques.
Following the beveled edges, the backs of the plaques were routed out to fit the folding mechanisms and the keyholes for wall mounting were routed.

Video instructions
[edit | edit source]A good way to display a process is by making a video explaining your process. See Template:Video for information on how to add and annotate videos.
Bill of materials
[edit | edit source]Description of costs, donations, the fact that this is just proposed, etc. For a simple cost table, see Help:Table examples#Cost Table and Template:Bill of materials for two nice formats.
| Item | Amount | Cost per unit | Total |
|---|---|---|---|
| Brass Plate — 4 x 6 plates of Brass for engraving, 2mm thick | 4 | USD 19.47 | USD 77.88 |
| Redwood (Prototype) — 3/4" thick...8" wide...4' long | 1 | USD 20.00 | USD 20.00 |
| Redwood (Final) — 1" thick...12" wide...5' long | 1 | USD 37.95 | USD 37.95 |
| Brass Hinges — 1" Brass hinges for folding mechanism on the back | 4 | USD 2.00 | USD 8.00 |
| Wood Screws — Pack of screws for screwing into 1/2" inch folding wood for back | 100 | USD 0.08 | USD 8.00 |
| Cedar Wood — 3 boards used for folding back mechanism for plaques | 3 | USD 10.00 | USD 30.00 |
| Epoxy — Epoxy part A and part B from Michaels | 1 | USD 20.00 | USD 20.00 |
| Epoxy Dyes — Dyes for the epoxy from Michaels | 1 | USD 8.00 | USD 8.00 |
| Grand total | USD 209.83EUR 180.45 <br />GBP 153.18 <br />CAD 260.19 <br />MXN 4,374.96 <br />INR 15,705.78 <br /> | ||
Operation
[edit | edit source]This is how to operate. It should have a brief introduction. You might want to show images or videos with step-by-step instructions when needed.

Remove the alligator clips from the red and black wires that attach to the solar panels by using the wire cutter

Strip about 3/8 inch of insulation off the solar panel wires by using the 10 or 12-gauge wire stripper (whichever fits better)
Maintenance
[edit | edit source]For the Sponsorship Plaques there is not much maintenance required. You may ask...
- Are there any needed actions for maintenance?
- How often?
- Who should perform maintenance?
Maintenance schedule
[edit | edit source]This sections shows when to maintain what. Please keep the format the same as it populates the kiosk in CCAT.
- Daily
- No daily maintenance needed.
- Weekly
- If displayed in a dusty place, dust wood and brass weekly.
- Bi - Monthly
- Every two months, the usual dusting as well as polishing should be done to the brass.
- Yearly
- No yearly maintenance.
Who can Perform the Maintenance?
[edit | edit source]Anybody can do it as long as the directions are followed on dusting and polishing materials.
Conclusion
[edit | edit source]Testing results
[edit | edit source]- From testing the keyhole bits as tracks there was a determination that the original folding design for the backs was not feasible.
- After testing different laser settings and going with/against the grain they determined that going with the grain on a specific setting would work the best.
Discussion
[edit | edit source]- For the tracks, the testing lead them to learn what to cut out and what not to cut out of their design and helped them streamline a simpler product.
- The testing conducted with the laser led them to create the best looking engraving on the wood, taking into account the behaviors that redwood has.
Lessons learned
[edit | edit source]Discuss lessons were learned during this project and what you would do different next time.
Next steps
[edit | edit source]Discuss any next steps for the project as it goes on into the future.
Troubleshooting
[edit | edit source]This is only how to troubleshoot basic operation. For complex issues, the solution might just say something like contact ________. It should be a table in this format:
| Problem | Suggestion |
|---|---|
| Example issue | Example solution or suggestion |
| Does not turn on | Make sure it is plugged in |
| Another issue | Etc. |
Team
[edit | edit source]Introduce team and semester in the following format:
- Lonny Grafman
- Dante Cross
- Sean Harwood
- Eduardo Mendoza
- Andrew Swinney
References
[edit | edit source]
| Authors | |
|---|---|
| License | CC-BY-SA-4.0 |
| Organizations | Cal Poly Humboldt, StartUp Humboldt |
| Cite as | AndrewSwinney35 (2025). "StartUp Humboldt Titan Level Sponsorship Plaques 2025". Appropedia. Retrieved July 13, 2026. |