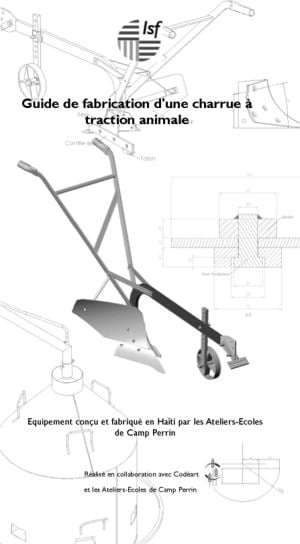
Construction manual of an animal-driven plough[1] Equipment designed and manufactured in Haiti by the Camp Perrin Workshops-schools
Developed in cooperation with Codéart Workshops and schools of Camp Perrin
Philippe Carlier Project engineer of ISF
Guide to manufacture a animal-driven plough
Equipment designed and manufactured in Haiti by the Camp Perrin Workshops schools
Collection "Technical manuals" Manual directed by ISF with the support of the Directorate General for International Cooperation (DGCI) Ingénieurs Assistance Internationale - Ingénieurs sans Frontières 2002 http://www.isf-iai.be mail@isf-iai.be Avenue du Marly, 48, 1120 Brussels - Belgium
We thank all the people without whom this book could have not seen the light of day, and in particular: Jean Sprumont and Fanco Gattigo (AECP), Roger Loozen (Codéart), Didier Beaufort (COTA) and Michel Taquet.
Technical sheet Soil type: any type of soil but ideal for heavy soil medium, which is not too stony Traction: a pair of oxen Stability: longitudinal Coulter: duck beak-type, width 8 " Versoir: cylindrical type Use: for small sized holdings (<4 ha) or in addition to more heavy machinery in larger establishments Features:: locally produced, low manufacturing cost, simple manufacturing techniques.
Introduction[edit | edit source]
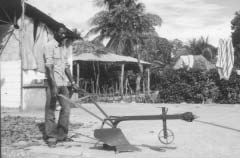
This guide is intended for all workshops that wish to commence the manufacturing of an animal-drawn plough, adapted to the needs of small sized holdings (<4 hectares) in non-industrialized countries. The plough described in this guide, has been developed in Haiti by the workshops-schools of Camp Perrin (AECP), which assures that it is well adapted to most countries where there is a lack of technical skills and materials, both on regards to the manufacturing and the use of- technical materials. Indeed, several thousands of ploughs were produced and sold at the Camp Perrin workshops during the past twenty years, first by Camp Perrin itself, and later by a independent craftsman. The plough has thus hereby been able to evolve, following to the requirements of the farmers.
As the ploughs are produced locally, the chances that a farmer can easily find spare parts for his plough are higher compared to an imported plough. The manufacturing of this model of plough is the result of a long process of trials and errors. This manual has as its objectif to help others workshops of putting up production of this plough and avoid going through the same mistakes that AECP too has made. This manual includes not only detailed drawings of each piece of the plough but also drawings of some specific tools that are useful to aid in their manufacturing. These tools are the same as those used at Camp Perrin, but may be adapted depending on the materials and machines available in your workshop.
History[edit | edit source]
The AECP plough is inspired, both in the design as well as manufacturing proces, on the small model of plough also used in Western Europe before the Second World War. Through the course of time, the plough has evolved until it finally became the model which is presented here. The main improvements done have been increasing the ease of manufacturing and maintenance, the durability of components, and an increase in ease of use and the altering of settings. The main difference with this plough is its adjusting device: the Workshops-schools have found that the classic devices were often misunderstood by farmers. The adopted system is simpler to use and easier to make, while providing an aduquate setting of depth and width of the trench.
From the 90's onwards, the production of this model of plough has decreased in Camp Perrin, not because of a motorisation of agriculture or another technical solution, but because of an overall decline in agricultural production in Haiti: goods from neighboring countries which practiced extensive agriculture (USA, Dominican Republic) were too cheap for the Haitian farmers to allow them to remain competitive. Nevertheless, in most non-industrialized countries, this phenomenon is not witnessed: across sub-Saharan Africa and in many areas in Latin America and Asia, animal-driven equipment still experiences strong growth.
Contact: Workshops-Schools of Camp Perrin BP 14 Les Cayes Haiti - aecp@starband.net or Codéart: info@codeart.org Animal-driven equipment... a schematic. United Nations Food and Agriculture Organisation - Division of Support Systems to agriculture, Sub-division of agricultural engineering.
Manufacturing[edit | edit source]
Identification of the different elements[edit | edit source]
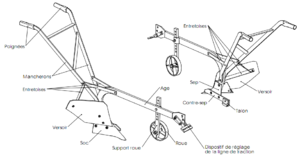
Spacers Contre sep Ploughshare Hilt
Plough-beam Wheel Wheel support moldboard coulter Adjusting device for the line of traction
Materials Flat iron 90 x 8 LGR 305 mm Flat iron 30 x 8 mm LGR 2300 Flat iron 38 x 8 LGR 600 mm Flat iron 40 x 8 mm LGR 2275 Flat iron 50 x 8 LGR 390 mm Flat iron 38 x 5 LGR 300 mm Tube Ø40 Ep 2 Lgr 320 mm Plat 60 x 20 Lgr 1280 mm Plat 40 x 20 Lgr 400 mm Sheet 510 x 240 Ep. 6 mm Sheet 315 x 215 Ep. 6 mm Sheet 200 x 150 Ep. 10 mm Sheet 110 x 60 Ep. 2 mm
7 screws DIN 605 or DIN 608 M10 x 30 2 screws DIN 605 or DIN 608 M10 x 50 2 screws H M5 x 30 1 screw H M10 x 50 2 screws H M10 x 40 3 screws H M12 x 60 1 screw H M16 x 100 3 nuts DIN 934 M5 12 nuts M10 3 nuts M12 2 nuts M16 3 flat washers M16
Materials Pliers for the ploughshare (drawings attached) Pliers for the moldboard (drawings attached) Bender for the plough-beam (drawings attached) Bender for the wheel (drawings attached) Press (+square punch) Drill Welder Anvil Furnace (drawings attached)
The coulter[edit | edit source]
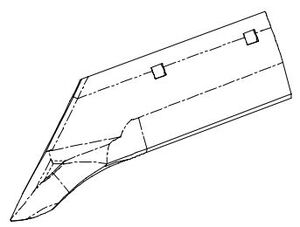
General The function of the coulter is to "cut" the soil, it is this element of the plough that clears the path. It is an element that is highly subjected to wear. Many types of coulters exist, the one incorporated here is the "duck beak"-type. This kind of coulter allows effective labour in light or medium soils. The duck beak-shape also allows an increase in the longitudinal stability of the plough. Given its relative high cost, we prefer a simple straight coulter (easier to make) for very stony soil, which subjects the coulters to become worn early. The coulter, once worn, may be reforged to give it a form close to the original.
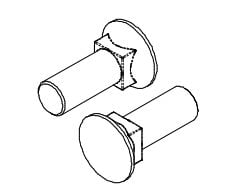
Material Spring steel mangano-silica (C 0,47/0,55 Si 1,5/1,8 Mn 0,5/0,8) Re: 70/90 kg/mm2 It is recommended to soak the working parts in quench oil at 830-860° C. Manufacturing The coulter is forged hot by a hammer and anvil. The fixation holes have a special form: they are roundly perforated, milled, and then the milled part is forged on the anvil with a square punch (preferably hotforged). These holes with particular forms are meant to accompany a screw plate and square-type collar of the type DIN 605 or DIN 608 (see Figure 4). During the assembly the heads of the screws should flush. Everything exceeding the head creates a piling up of soil below and increases the efforts the animals must provide.
The moldboard[edit | edit source]
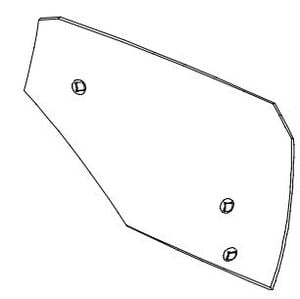
(See detailed drawing in Appendix 3) General The moldboard is the piece of the plough which pushes aside the soil, turned over by the coulter. On this type of plough, we may retrieve three major types of versoir: cylindrical, helical, and hélicocylindrical moldboard. The cylindrical moldboard has been chosen for its simplicity of design because it offers good performance on all types of terrain while not requiring too much effort of the animal. Moreover, the reaction force of the soil exercises itself almost longitudally in a cylindrical moldboard, where on a helical moldboard it exercices itself oblique, which makes the plough difficult to stabilize. Note however, that a helical moldboard dislocates less soil and also reduces the risk of erosion.
Material Ideally the moldboard is made of triplex steel (a soft layer of steel interposed between two layers of solid steel) which offers strong resistance to shocks and works fine. In practice, this steel is difficult to obtain, so one can use an ordinary sheet steel, or a slight carbon-enriched steel if the local market permits it.
Manufacturing The device used at Camp Perrin for bending the moldboard is detailed in Annex 10. The tightening is done using the jack of a truck. The bending is done hot. The fixation holes used in the moldboard have an identical profile to those in the coulter (see Section 3.2.). However if the sheet is too fine for square-punching a hole, you can make a round milled hole and weld a washer to the rear of the sheet metal in which we have made a square hole. The type of moldboard on which it has been inspired had rounded edges: we have chosen to make edges of the metal lines to power cut moldboard to easily shear.
The plough-beam[edit | edit source]
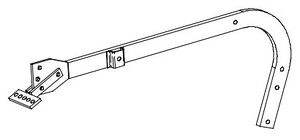
(See detailed drawing in Appendix 4) General The plough-beam is the part that connects the rest of the plough with the animal. Its shape and length influences the depth of the furrow dug and to a lesser extent its width. It is thus on the end before the plough-beam that the settings for the width and depth of the trench are determined (See Annex 15: The influence of the traction).
Many models of ploughs use, instead of the system presented here to alter the settings, a system of rod-traction. In practice it is difficult to work with, and it is more difficult to manufacture. Initially, at Camp Perrin the horizontal part of the plough-beam was made of wood. The strength of the wood was sufficient and flexibility gave the whole an elasticity, which by absorbing the shocks, offered some comfort to both the farmer as well as the animal. However, models with a plough-beam of wood sold much less well because they looked more "ancient".
Material The steel used is a medium hardened steel C 0.42/0.50 Re: 65/75 kg/mm2. This steel is a little more expensive than soft steel and on the thousands of ploughs produced at Camp Perrin never did any plough-beam open during the ploughing, while certain imported ploughs built with soft steel have opened on heavy terrain. Caution: this material makes welding difficult. The welding must be done to the basic wand and must be cooled slowly.
Manufacturing
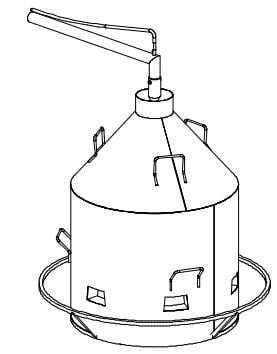
Furnace: To bend the plough-beam we first need to heat it. The furnace used at Camp Perrin is described in Annex 12. This furnace is mounted on a car axle to be able to turn it and also facilitate handling of the plough-beams. The system is designed to able to operate one the usage of virtually any liquid fuel. The interior of the furnace is covered with a refractorious material: Either the refractory mud coating of the furnace (used in foundries with cupola furnaces) or refractory clay (which has been strongly mixed with gravel) Before starting, we must begin by firing up the furnace through means of a small wood fire, lit on in the central part, in order to heat the burner head and the atmosphere of the furnace.
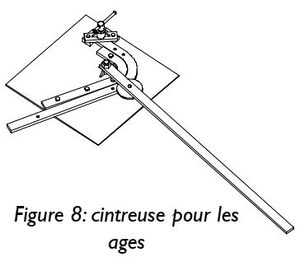
Pliers: The device used at Camp Perrin is illustrated in Annex 11. The bending of the extension is slightly overdone to compensate for the remission due to the elasticity of the metal. The lever should preferably be removable to reduce cluttering of the machine when it is not being used.
The wheel[edit | edit source]
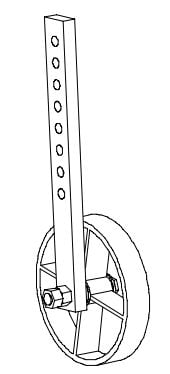
(See detailed drawing in Annex 5) General The most simple ploughs do not have any wheel attached. This element eliminates much effort for the peasant by absorbing a lot of oscillations due to non-homogeneity of the soil, which makes the plough easier to drive. The wheel is a stabilization element, and not a supporting element: too often, we see farmers that set their plough at such settings that the wheel sinks into the ground because of the labour. The energy wasted by the animal because of important friction losses of the wheel to the ground will be lost for ploughingwork. We will therefore set up the plough in such fashion that the wheel does not exercices too much power to the soil (to verify this, check that it only slightly touches the soil). The height of the wheel is set through practical holes drilled in the foot of the wheel.
Material The foot of a wheel in medium-hard steel (CK45 - SAE 1040) allows to reduce the section, and therefore the weight. The axis of the wheel will be hard steel (60 kg/mm2). The tread is made of soft steel, to facilitate its bending and welding
Manufacturing The wheel itself (tread) is created by means of simple bending device illustrated in Annex 13. The radius of the fixture is lower than that of the wheel to compensate the elasticity of the metal. Once closed the tread is welded on itself. The rayons are welded. The axis of the wheel is created either through a fully perforated bar throughout the diameter of the screw, or a thickened pipe. The wheel is fixed to the support by an M16 screw. We will place one or several flat washers between the wheel and its support to facilitate smooth running.
The screw is pressed through a nut -against-nut -, which allows to avoids the jamming of the by wheel by serrage.
[edit | edit source]
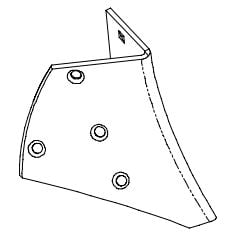
(See detailed drawing in Annex 6) General The plough-share is the central part of the plow, on which the other major parts are fixed (plough-beam, moldboard, coulter, contresep).
Material The ploughshare can be created with any ordinary steel.
Manufacturing The ploughshare was designed to fold at the knifepoint. It is folded (hot) by means of a special utility described in Annex 14. It is actually more of a forging than a folding: the fold is slightly curved. The fixation holes are milled to avoid interfering with the collars of the square collar-nuts.
The contre-sep[edit | edit source]
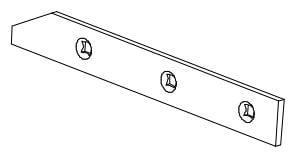
(See detailed drawing in Annex 7) General The contre-sep allows the stabilization of the plough while supporting the hilt.
Material Any standard steel can be used.
Manufacturing This piece is made from a simple flat piece of steel, cut to length. The holes are designed to accommodate the square-collared screws and are made by the same process than the one used in the coulter (see above).
The hilt[edit | edit source]
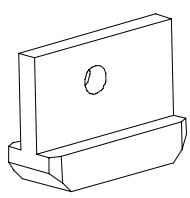
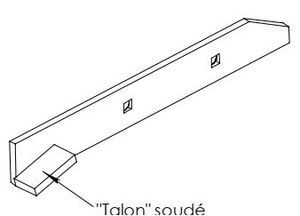
(See detailed drawing in the annex 8) General The hilt, permits the longitudinal stabilization of the plough, gliding on the bottom of the trench. Longitudinal stability is ensured by reaction between the groundsupports on the soil, the supportpoints on the front and the rear of the plow, and by the wheel and the hilt.
Material Preferably cast iron, because of resistance to wear.
Manufacturing To create this piece, variable methods can be used, depending on the equipment available in the workshop. It may be cast, or the piece may be mechanically knit. On some models built in Haiti, the hilt has been replaced by a sheet directly welded on the contre-sep to simplify manufacturing, without degrading the performance of the plough (see Figure 13).
The plough-tail and spacers[edit | edit source]
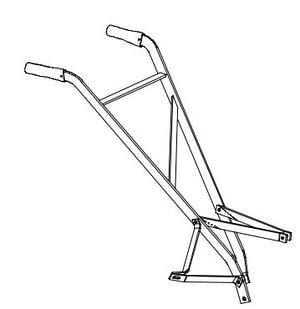
(See detailed drawing in Annex 9) General The plough-tail allows the farmer to maintain the plough to ensure stability. The spacers allow to ensure the rigidity of the whole of the plough. Initially, the plough-tail and spacers mounted in Camp Perrin were screwed on the plough. On the latest constructed models, they are welded to reduce the time of manufacturing, although it complicates the replacement of damaged parts.
Material These parts are not subjected to heavy stress or wear, and can therefore be manufactured from standard steel. If you choose to weld on the plough-tail and spacers, use easy solderable steel.
Manufacturing The drawing of the plough-tail and spacers can be found at Annex 9. These drawings were those also used at Camp Perrin, but there is no counter-indication stating you may not use any materials and tools locally available. The plough-tail is hot forged.
Using the plough[edit | edit source]
The purpose of this manual does not include explaining the techniques of soil preparation: the reader can refer for this to one of the many books written on the topic (see bibliography (6)). Nevertheless, it should be noted that while in most cases, the ploughing will have a beneficial effect on the quality of the soil, it can sometimes also have an adverse action on the water balance and the soil fertility, while not forgetting wind erosion. "The work of loosening and turning the plow could lead to an increased evaporation and greater speed of mineralization of humus, and its use is not always appropriate in arid or semi-arid areas"[2] It is essential that the used harness for the traction is of good quality and is well suited to the morphology of the animal so that it does not hurt him. In virtually all parts of the world, we find craftsmen capable of making harnesses of satisfying quality.
Maintenance[edit | edit source]
The plough presented here does not require particular maintenance. However, any plough is subjected to significant wear, and it is not uncommon that some parts must be replaced. The coulter is a piece highly subjected to wear. Farmers should ensure that the coulter remains sufficiently edged so as to avoid an unnecessary hard effort for the animal. If it is worn, it may be refunded or simply replaced.
Transport of the plough[edit | edit source]
To transport the plough between farm and field, instead of dragging the plough on the floor (which wears the moldboard and the handles) or place it on a yoke between 2 horses (fatigues animals), we can place the coulter in the interior of a trucktire. The plough is then dragged by animals and supported by the farmer.
Bibliography[edit | edit source]
- La traction animale en Afrique, by Peter Munzinger, Eschborn 1982, Publisher: Deutsche Gesellschaft für Technische Zusammenarbeit (GTZ), ISBN 3-88085-148-4
- Agriculture africaine et traction animale, by Gérard Le Thiec, CIRAD 1996 Coll. "Technic", Centre for International Cooperation and Agricultural Research for Development., ISBN 2-87614-240-6
- Machines modernes à traction animale, by Jean Nolle, Edition l'Harmattan 1986, ISBN 2-85802-606-5
- Les harnais pour la traction animale, GRET 1984, Coll. "Le point sur"
Appendixes[edit | edit source]
APPENDIX 1: DRAWING OF THE COMPOSITION OF THE PLOUGH..11 APPENDIX 2: DRAWING OF THE COULTER....................13 APPENDIX 3: DRAWING OF THE MOLDBOARD..................14 APPENDIX 4: DRAWING OF THE PLOUGH-BEAM....................15 APPENDIX 5: DRAWING OF THE WHEEL..................16 APPENDIX 6: DRAWING OF THE PLOUGHSHARE.............18 APPENDIX 7: DRAWING OF THE CONTRE-SEP.....................19 APPENDIX 8: DRAWING OF THE HILT......................20 APPENDIX 9: DRAWING OF THE PLOUGH-TAIL AND SPACERS........21 APPENDIX 10: DRAWING OF THE PLIERS FOR THE MOLDBOARD..22 APPENDIX 11: DRAWING OF THE PLIERS FOR THE PLOUGH-BEAM..24 APPENDIX 12: DRAWING OF THE FURNACE FOR THE PLOUGH-BEAM.........29 APPENDIX 13: DRAWING OF THE PLIERS FOR THE THE WHEEL..........33 APPENDIX 14: DRAWING OF THE PLIERS FOR THE PLOUGH-SHARE........40 APPENDIX 15: INFLUENCE OF THE LINE OF TRACTION....41
Construction manual of an animal-driven plough
This construction manual is intended for all workshops in the South who wish to put up production of simple, durable and cheap ploughs. Indeed, the plough described in this guide was developed in Haiti by the workshops-schools of Camp Perrin which assures that they are adapted to the constraints of most of the countries where the technical expertise is limited, both regarding the manufacturing as its use. Before reaching this model, many tests were conducted on different types of plows, and many different technical solutions were looked into: this manual will enable other workshops to avoid following the same route and making the same mistakes.
Already published in this series: Construction manual of a bucketpump Soon available in this series: Construction manual of a palm oil press Manual on the artisan production of soap
Ingénieurs Assistance Internationale - Ingénieurs sans Frontières asbl is a Belgian NGO offering its services to NGOs in the North and the South, which encounter problems in their development projects. Isf groups hundreds of volunteers, engineers from all backgrounds, and students wishing to put their knowledge to good use in development projects. Through numerous connections in the professional, humanitarian world, Isf can ask engineers and technicians about specific problems in all sectors of technology.
The manual was created by ISF with the support of the Directorate General for International Cooperation (DGCI)
Ingénieurs Assistance Internationale - Ingénieurs sans Frontières http://www.isf-iai.be mail@isf-iai.be Marly Avenue du 48 1120 Brussels - Belgium
References[edit | edit source]
- ↑ Original document
- ↑ The animal traction in Africa, by Peter Munzinger, Eschborn 1982, Editor: Deutsche Gesellschaft fur Technische Zusammenarbeit (GTZ), ISBN 3-88085-148-4