
NOAA pinniped tags by Tag Masters

| Type | |
|---|---|
| Authors | Teagan Farrell Lightningwing Jt 1286 Arely Palafox |
| Status | Prototyped |
| Years | |
| Made | Yes |
| Replicated | No |
| Uses | education, science |
| Map | |
|---|---|
| Location | Arcata, United States |
| Coordinates |
This is project showcases the final outcome of the Tag Masters in Fall 2025. We designed a premium seal tag for NOAA (The National Oceanic and Atmospheric Administration) that addresses all the challenges they were experiencing, while using tags for livestock on seals. We designed this tag with our client and made the necessary adjustments so that it is more appropriate for the seals' fins' anatomy. The motivation behind this project is to create a tagging solution that allows NOAA to comfortably rely on the tag for their research.
Background
[edit | edit source]Currently pinnipeds/marine mammals (animals such as seals and sea lions) are being tracked using livestock tags designed for cows, sheep, and goats. These tags have evolved to be more suitable for livestock, consequently these tags have become less suitable for pinnipeds. Throughout the 2025 Fall Semester and working with the National Oceanic Atmospheric Administration, as well as the HSU Marine Mammal Education and Research Program, Tag Masters will work to create tags specifically for marine mammals that cost over $1.50 to fabricate and will be made locally to be shipped. These tags will be built to last at least 15 years (the average lifespan of a pinniped), built to accommodate the shape of the mammals' fins, and identify the mammal through the use of the tags.
Problem statement
[edit | edit source]The objective of this project is to design, build, and test an identification tag for pinnipeds at the price of $1.50 or more that can be made locally and shipped. The tag should be easily reproduced in a variety of colors, customized with letters and numbers that are easily legible, and work for a prolonged period of time of at least 15 years without maintenance.
Criteria
[edit | edit source]In order to create the best possible tag, Tag Masters needed to identify essential parameters, or criteria that the tag must fall under. Each criterion was weighted on a scale from 1-10, with 1 being not very important, and 10 being of upmost importance.
| Criterion | Description | Weight (1-10) |
|---|---|---|
| Cost | Working with a budget of $500, each tag must cost at least $1.50 to produce | 6 |
| Flexibility | Must be more flexible than the previously used y-flex tag. The post of the tag must be stiff, but the flag of the tag must be able to move and bend with the pinniped. | 7 |
| Lasting Color | Must be able to identify the color of the tag after facing the elements (sand, sun bleaching, salt water). Must be able to separate individual colors from each other. | 8 |
| Lasting Lettering | Lettering dissolves in no less than 10 years. Must be long lasting, best if black and embedded into the tag. | 8 |
| Durability | Must resist corrosion and degradation in the elements (sand, UV, salt water, etc). Must last at least 15 years. | 10 |
| Connection Piercing | Must be able to pierce cleanly and quickly. Must have a stainless piercing tip, a longer post, with the top of the post being more flexible than the bottom of the post. | 9 |
Prototyping
[edit | edit source]- Streamline Tag: Prototyping
-
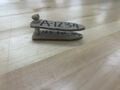 "Cardboard Prototype" This initial prototype of the "Streamline Tag" is constructed of cardboard, with the lettering and identification markers being drawn on with permanent marker. This prototype is meant to display the desired dimensions and features of the Streamline Tag.
 -
 "First PLA Prototype" This first PLA prototype was created with the intention of trying to 3D print a tag. The team tried to replicate all parts desired of "Streamline Tag", including the post, collar, and the embedded lettering. The shape and size of the tag needed to be adjusted, as well as the lettering itself.
 -
 "First PLA Prototype with Marker" This prototype is the first PLA prototype, however the identification lettering and numbering is filled in with permanent marker, to show the desired coloring of the identification lettering.
 -
 "PLA Prototype #2" This second PLA prototype tested out different dimensions and features from the original PLA prototype. This rendition has a slight reduction in width, as well as different lettering, and a different collar from the original PLA prototype.
 -
 "PLA Prototype #2 with Epoxy Lettering" This prototype is an extension of PLA Prototype #2; however, the lettering is filled with a black epoxy filling. This prototype was a failure, because of the hardness of the epoxy once dried, and the toxic nature of the epoxy filling.
 -
 "2-Tone PLA Prototype" This prototype was constructed of PLA; however, it uses 2 different colors of PLA to differentiate the lettering from the rest of the tag. This was achieved by programming the 3D printer to stop, and switching the different colors of filament, and then continuing the print.
 -
 "TPU Prototype #1" This initial TPU prototype was created to test how TPU filament will print the desired tag. The team found that they liked the flexibility of the filament, and also how the TPU will hold the shape of the tag. The tag needed improvements, such as changing the print settings to make the tag a bit firmer.
 -
 "First Two-Tone TPU Print" This is the first print of the tag using two different colors of TPU. This print uses 92A grade TPU, and the colors of the filament are switched at different points of the printing process. This accomplished having black, embedded identification lettering, without having to go back and make the identification lettering black after the tag finished printing.
 -
 "Initial TPU prototype with Post" This prototype was trying out the TPU printed tag with a PLA printed post. The PLA printed post was provided to Tag Masters courtesy of SEAL Tag 6. This prototype showed the desire outcome of the tag with a post and solidified to Tag Masters that they should fabricate the post as a third component of the tag.


Final product
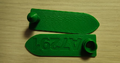
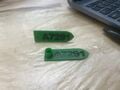
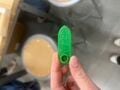
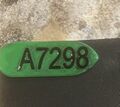
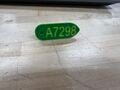
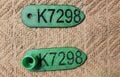
[edit | edit source]The final solution for the project is to implement the “Streamline Tag” design. This tag is a 3-piece solution, composed of two flags (one female and one flat) and one post. The flags of the tag are made of 92A TPU, in the color “Luminous Green.” The identification number is embedded into the tag by changing the color of the filament to a black TPU. The contrast of the black TPU with the “Luminous Green.” The post is a machined aluminum post designed by SEAL Team 6.

The Female Flag
[edit | edit source]The female flag of the tag is constructed of 3D printed 92A grade TPU. TPU is characterized by its flexible and resilient nature. The female flag has a hole where the spike and the post can be inserted through the tag. The female flag also has a collar to protect the pinniped from the metal spike used to pierce the fin. Before printing, reference section 5.4 Instructions for Implementation and Use to understand the 3D printing settings. The flag is printed with the base color (in this case, “Luminous Green”) to create the color of the tag. Halfway through the print, the printing is paused, and the filament is changed from the base color of 92A TPU, to a black 92A TPU to create the embedded identification lettering and the recovery email. Finally, after the embedded lettering is finished printing, the filament is again changed to the base color of the tag. The last piece of the female flag that will be printed is the collar. Once the collar is complete, the female flag is finished.

The Flat Flag
[edit | edit source]The flat flag component of the tag is also constructed of 3D Printed 92A TPU. The flat tag has a hole where the spike and the post can be inserted through the tag. Before printing, reference section 5.4 Instructions for Implementation and Use to understand the 3D printing settings. The flat flag is printed with the base color (in this case “Luminous Green”) to create the color of the tag. Halfway through the print, the printing is paused, and the filament is changed from the base color of 92A TPU, to a black 92A TPU to create the embedded identification lettering and the recovery phone number. After the embedded lettering is finished printing, the filament is again changed to the base color of the tag.

The Post
[edit | edit source]The post is a machined aluminum post designed and tested by SEAL Team 6 (see Figure 5-???). The post will be inserted through the flat flag of the tag and used to pierce the fin of the pinniped before being inserted through the female flag of the tag. For more information on the post, reference SEAL Team 6’s Section 5.

Construction
[edit | edit source]3D Printer Settings
[edit | edit source]Before the fabrication of the tag can start, the user must adjust the settings of the 3D printer used. The printer used to print the flags of the tag is a Prusa Research 3d mk3s printer. The settings used to get the best possible outcome of the tag were as follows:
- Printer Settings
- Nozzle temperature: 215°C
- Bed temperature: 50°C
- Speed: 30 mm/s
The 3D model was sliced for printing using a Prusa Slicer. In order to create the best possible outcome of the print, the slicer was set to the following settings:
- Slicer Settings
- Infill: 30%
- Quality: 0.15 mm
- Retraction speed: 1 mm
- Retraction length: 1 mm
Printing the Flags
[edit | edit source]Before printing the flags, first preheat the nozzle of the printer to 215°C, and the bed of the printer to 50°C. Then set the printer to a speed of 30 mm/s. Next, load the printer with the base color of the tag. In this instance, the color “Luminous Green” was used. Allow the printer to print the flags until the recovery email/phone number are printed (the code will pause the printing on its own), then remove the filament and replace it with the black 92A TPU until the identification lettering is printed (again, the code will pause the printing on its own). Finally, remove the black filament and replace it with the base color of the tag. When the flags are finished printing, the fabrication of the tags is complete.
- Construction of the Tag

Printing The Tag (Source: Jaden Thomas) 
Printing the Tag (Source: Jaden Thomas)


Video instructions
[edit | edit source]Bill of materials
[edit | edit source]With the parameters of the tag being that it must cost at least $1.50 or more to create, the team was given much flexibility when it came to implementation cost. The team purchased materials that were not used for the final fabrication of the product. The first table (Costs of Materials) outlines the amount Tag Masters spent on the project throughout the entire prototyping process. Not all of these materials were purchased by the team. Many were donated, and many were materials that the Makerspace at Cal Poly Humboldt already had. The second table (Projected Replication Cost 600 Units) shows the projected replication cost of the tag based on the calculation that one spool of 92A TPU filament can produce 600 tags. These materials were purchased using a budget of $200 of client money, as well as $75 from each team member of Tag Masters, making the project's budget $500 total.


Operation
[edit | edit source]Operating the tag is extremely easy. Follow these steps below to use and apply the tag.
Place the flat tag ID numbering down into the clip of the universal tagger
Place the tip of the tagger inside the hole of the post. Use the tagger to push the post through the hole of the tag.
When tagging the pinniped, use the tagger to allow the post to go through the animal's flipper, into the female flag of the tag.
Maintenance
[edit | edit source]These tags are designed to have a one-time application, with no maintenance required. Because the tags are designed to last the entire lifespan of a pinniped, there is no need for maintenance after the initial application.
Maintenance schedule
[edit | edit source]- Every 15 years
- Apply tag to the pinniped
Conclusion
[edit | edit source]Testing results
[edit | edit source]Unfortunately, there were no tests done on the tags themselves.
Discussion
[edit | edit source]The result of creating the Streamline Tag is the creation of a tag suited specifically for pinnipeds. The design produces an easy, relatively low effort and inexpensive way to create pinniped tags. The labor and processes of creating Streamline Tag are capable of being fabricated locally to the client, and a much cheaper alternative to the previously used livestock tags. Testing was not done on these tags, and these tags were not mass produced. At least five of the Streamline Tag will be delivered to the client, and the team will work with the client to continue the endeavor of the Streamline Tag moving forward.
Lessons learned
[edit | edit source]The next time Tag Masters would do this project, we would find a way to design and machine the post ourselves, as well as find a way to mass produce the tags in a timely manner. We would also find a way to make sure that the tags are mass produced on campus.
Next steps
[edit | edit source]The next step of the Streamline Tag is finding a place where the tag can be mass produced. The location of production must be local and must be able to handle the production of roughly 30,000 tags per year. The location of production must be able to 3D print the tags, machine the aluminum posts, and ship the tags off to the needed sites.
Troubleshooting
[edit | edit source]In case you encounter any problems during the fabrication of the tag, reference this table:
| Problem | Suggestion |
|---|---|
| Misprint of Tag | Stop the print, remove the print from the bed, and restart the print |
| Tag is coming out too stringy | Check printer and slicer settings, reprint |
| Incorrect Identification Lettering | Update the lettering in the Fusion file |
Team
[edit | edit source]Tag Master Team, Fall 2025:
References
[edit | edit source]
| Authors | |
|---|---|
| License | CC-BY-SA-4.0 |
| Organizations | Cal Poly Humboldt |
| Cite as | Teaganfarrell, Lonny (2025–2026). "NOAA pinniped tags by Tag Masters". Appropedia. Retrieved July 9, 2026. |