
Load Carrier for labour

| Manufacturing files | https://www.thingiverse.com/thing:1184910 |
|---|---|
| Hardware license | CERN-OHL-S |
| Certifications | Start OSHWA certification |
| Type | |
|---|---|
| Authors | Dhwani Trivedi |
| Status | |
| Years | 2015 |
| Made | Yes |
| Replicated | No |
| Cost | USD 13.5 |
In the undeveloped countries, there are large number in people who are engaged in labour work. They carry tonnes of weight everyday for wages. This project, has been designed to help such people. The load carrier is designed in such a way that the weight of is evenly distributed and the laborer would not get tired. It is 3 Way load carrier which functions as a trolley, as a overhead load carrier and also as a backpack.
-
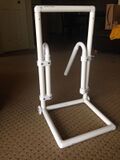 Load carrier for labour
 -
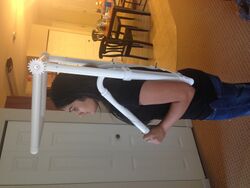 Overhead Load carrier
 -
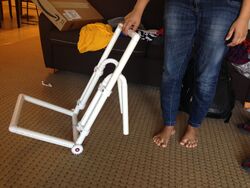 Load Carrier as a Trolley
 -
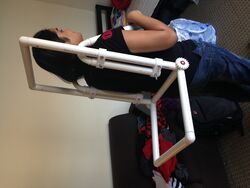 Load carrier as a Backpack


the STL files are available on " http://www.thingiverse.com/thing:1184910 "
Bill of Materials
[edit | edit source]- 8 "1 inch "PVC pipes(1 feet each): 0.5*8=4 $
- 2 "1 inch "PVC pipes(2 feet each):0.5*4=2 $
- 8 bolts: 1/4 inch diameter with approx 5 cm length: 30 cents x 3 = 0.9 $
- 8 Nuts that fit into those bolts: 17 cents x 3 = USD 0.51
- bearings(skate board bearings would work):2*1.25=2.5 USD
- PLA filament: Approx 260 grams = 5.72 USD
The STL files and FreeCAD files for the parts can be found here: http://www.thingiverse.com/thing:1184910
Tools needed
[edit | edit source]- MOST Delta RepRap or similar RepRap 3-D printer
Skills and knowledge needed
[edit | edit source]- Knowledge of FreeCAD, Opensscad and Cura
Technical Specifications and Assembly Instructions
[edit | edit source]To Assemble:
- Download the part files provided above in the bill of materials
- Convert stl files to gcode using software like Cura
- Print all of the Parts
- Attach the bearings on the gear shaped parts. Then attach the gears to the connectors which have 8mm rods(there are only 2 of them).
- Connect the interlocking parts as seen in picture. Connect all L shaped parts at the joints.
- Connect the 4 Clamps with two holes and use nut and bolts to fit them.
- Connect the U shaped printed parts to the clamped portion.
Time:
- Total print time estimate: 10 hours
- Total assembly time estimate: 30 minutes
Common Problems and Solutions
[edit | edit source]- One must be careful of your printer radius and calibration as a couple of those parts only just fit into my Delta: check how thw first couple of layers print and shrink the models if needed (all be same amount)
- Sticking to the bed could be a common problem in case of such large prints: Use high quantities of washable glue on bed before printing
- Please use high infill for printed parts or they may not carry the required load
Cost savings
[edit | edit source]- Cost Estimate: USD 13.5$
- Equivalent products in market cost:Not available in market.
- Net savings achieved:
References
[edit | edit source]- For the inspiration of this design see: Quora " simplest yet amazing innovations page"
| Authors | |
|---|---|
| License | CC-BY-SA-3.0 |
| Organizations | Michigan_Tech's_Open_Sustainability_Technology_Lab, MY4777, MTU |
| Cite as | Dhwani (2015–2024). "Load Carrier for labour". Appropedia. Retrieved July 28, 2026. |