
NREMT Paramedic Skillset/IV Placement and Management
Intravenous (IV) catheter placement is an important skill for any paramedic to master. Many medications may only be given IV or will have a much faster/stronger effect when administered intravenously instead of by another route. Paramedics are generally only trained to place peripheral catheters while central catheters are generally the domain of the doctors in-hospital due to the increased risks associated with central line placement.
Anatomy
[edit | edit source]Veins carry blood towards the heart and are structurally very different than arteries. Both arteries and veins are tubular, but veins lack the muscular tunica media that arteries possess. Instead, veins are often large and easily collapsible. Additionally, veins possess one-way valves which prevent retrograde flow of blood. Veins move blood through a slow buildup of pressure or gravity, a slow process that can be sped up by rhythmic contraction of the muscles surrounding the veins, essentially "squeezing" the blood from a one-way valve past another until the blood reaches the heart again.
There are two different types of veins: superficial and deep veins. Paramedics are focused primarily on the superficial veins as the IV catheters provided by most EMS agencies are not long enough to reach a deep vein. Additionally, superficial venous cannulation carries significantly less risk of vascular or nervous damage than deep venous cannulation as the veins are closer to the face of the skin.
Preparation
[edit | edit source]Some patients will have easily visible veins in easy to access locations, but a large majority of patients in the emergency setting will have less than ideal vasculature, be it from dehydration, exsanguination, age, obesity, or any of the multitude of complications found in the field. Therefore, proper selection and preparation of an IV site and catheter is paramount to a successful IV cannulation attempt. Preparation begins with the gathering of all supplies needed for cannulation and application of the IV tourniquet and ends with the disinfection of the area just prior to the cannulation attempt.
Tourniquet placement
[edit | edit source]The IV tourniquet is placed proximally to the intended cannulation site and has the main function of impeding venous return to distend the veins distal to the tourniquet. Because venous pressures are so low (generally less than 10-15 mmHg) it does not take much pressure to collapse veins while allowing arteries to continue providing more blood past the tourniquet. This causes blood to become "trapped" in the arm and expand the low pressure veins, distending them and potentially making them more visible. Tourniquets should be placed in a way that they can be released with one hand as the other will be stabilizing the catheter following cannulation and holding the sharp. Multiple tourniquets may be placed and some veins may not become visible until more than one tourniquet has been placed. Similarly, it is not absolutely necessary to utilize a tourniquet, but a tourniquet will drastically increase chances of successful cannulation.
Site selection
[edit | edit source]While peripheral venous access can be performed anywhere a vein is visible or palpable (or in some situations, supposed to be in the area anatomically), the most common intravenous access sites for paramedics are on the patient's arms. Other access sites include the legs and feet, external jugular vein, chest veins, and scalp veins but these sites are much less common and will not be discussed in this page. The following entries will speak of the common IV sites on the arm and some of their relative pros and cons. The figure below shows the basic venous structure of the upper extremity. Unless there is a justification for choosing one access location over another, the general rule of thumb is to start distally and work proximally if your initial attempt fails.

The antecubital space
[edit | edit source]Among the veins of the arm, the median cubital, basilic, and cephalic veins found in and around the antecubital region (in front of the elbow) are often easily accessed and are larger than some of the more distal veins. This makes these veins ideal for the larger IV catheters that may be required by situation (large, fast volume replacement) or medication (viscous medications). Unfortunately, the veins of the AC are much more susceptible to being positional, meaning that their flow rates may be positively or negatively affected by the position of the patient's arm.
The forearm
[edit | edit source]The forearm of the patient is a great spot for and IV but placement can be difficult. Unlike the AC or dorsum of the hand, forearm veins are often deeper (more painful) to access and can be very mobile, meaning that additional traction may be needed. That being said, the forearm does not produce positional IVs as there is no anatomy to "kink" the catheter. The forearm, especially the medial aspect (basilic vein) is an incredibly useful IV access site in patients who are contracted or suffer from seizures.
The dorsum of the hand and wrist
[edit | edit source]The dorsum of the hand and the wrist are common IV locations, especially in-hospital. The general lack of adipose tissue and excess muscle on the hand along with thin skin make for easily visible and palpable veins. The veins in these locations can be very mobile, especially if the patient has loose skin and are often much smaller than the veins of the AC, making these sites less suited to rapid fluid administration or viscous medication administration. Despite this, there is a large positive to cannulation of a hand or wrist vein: it allows for additional attempts at cannulation proximally if the attempt is unsuccessful. "Blowing" a vein means that you have left a hole in the venous structure that is leaking into the surrounding tissues; if medications or contrast is injected distally to the "blown" vein, they could potentially infiltrate or extravasate and cause tissue damage or swelling.
Catheter selection and sizing
[edit | edit source]
IV catheters are identified by length and gauge. Length is generally given in millimeters (mm) or inches (in) while gauge is an inverse measure of the diameter of the catheter (i.e. a smaller gauge is a larger needle/catheter). Catheter selection should be based upon two main criteria: (1) which catheter will fit in the vein chosen for cannulation and (2) which catheter is appropriate for the interventions necessary for patient care. If either criteria is unable to be met by either the catheter or vein chosen, a different catheter or cannulation site should be used (ex. a patient needing rapid fluid replacement should not have a 24 gauge IV catheter placed in their AC).
IV catheter size is important as it affects the flow rate of medications and fluids through the IV significantly. The true calculation of flow rate is complicated (Poiseuille's Law) and involves variables such as the viscosity of the fluid being pushed, the amount of pressure on the fluid, the length of both the catheter and any needleless connectors, the height the medication from the IV site, and the cross-sectional area of the catheter and tubing. This calculation is much too complicated for use in the prehospital setting but the general truth that larger bore catheters will allow for more rapid administration of fluids and medication stands. Refer to the chart provided for an estimation of the flow rate of water through different IV catheters. Remember that the flow rates provided are in an ideal scenario and do not account for positional IVs or patient movement.
Sometimes patients will have large veins but will not need rapid fluid administration, in these cases it is appropriate to use a catheter size that fits with the treatments you will be providing; placing a 14 gauge catheter when you plan on only administering fentanyl and ondansetron is unnecessary and increases the possibility of failure when attempting cannulation. Use catheters sizes and locations that increase your chances at first-pass success.
Site preparation
[edit | edit source]After gathering the necessary materials, applying a tourniquet, identifying the access attempt location and choosing an appropriate IV catheter, the cannulation site must be appropriately prepared for venipuncture. Improperly prepared sites are at high risk for infection (such as phlebitis) and should be avoided at all costs. Three of the most common cleaning agents used for prehospital IVs will be discussed in this section.
- Isopropyl alcohol wipes: Isopropyl alcohol wipes are arguably the most common cleaning agent used for prehospital IVs. Despite the fact that isopropyl alcohol wipes did not reduce the chance of intraluminal infection according to a 1985 study[1], many EMS systems still use them due to their low cost and high availability. When used properly, isopropyl alcohol wipes are more of a mechanical disinfection than a chemical disinfection (i.e. they wipe away bacteria rather than kill them chemically). Ideally, isopropyl alcohol wipes should be used in conjunction with other methods of disinfection. Isopropyl alcohol should be left to dry on the skin for at least 30 seconds after application for maximum effectiveness.
- Povidone-iodine solution: Povidon-Iodine solution, or Betadine as it is commonly known, is a dark brown solution commonly found in the prehospital environment in small application ampules. This solution is significantly more useful than generic alcohol wipes in killing off bacteria, but does not provide the mechanical disinfection that alcohol swabs do because of its method of application. Betadine should be used after the skin has been cleaned.
- Chlorhexidine-alcohol: Chlorhexidine-alcohol solution is more effective than povidone-iodine at preventing infection from a breach of the skin barrier, such as one would find with venipuncture[2]. Chlorhexidine is similar to povidone-iodine in that it must have the skin cleaned before use. Despite this, chlorhexidine is the best skin antiseptic commonly available in the prehospital setting, but is significantly more expensive than simple alcohol wipes.
In order to obtain the lowest possible infection chance when performing venipuncture, first perform mechanical disinfection with alcohol wipes and allow the alcohol to dry before utilizing either a povidone-iodine solution or chlorhexidine-alcohol swab to provide chemical disinfection and antisepsis of the venipuncture site. Always start at the site of venipuncture and clean outwards in increasingly larger circles. Once the site is clean, do not touch the site, except with sterile gloves or the IV catheter. If a non-sterile object touches enters the field, the site could become contaminated and should be cleaned again (note that normal procedure gloves are NON-sterile).
Placing the IV
[edit | edit source]Traction
[edit | edit source]Traction, or the addition of tension to the overlying skin, allows the provider to secure a vein in place in order to allow for cannulation and can occasionally be used to straighten a twisted vein to allow for access to be obtained. Providing adequate traction is incredibly important as most, if not all, of the veins we cannulate are not found in the epidermis. This fact, along with the anatomic structure of the muscular, skin, and subcutaneous layers means that oftentimes there are several mobile layers of tissue between the insertion point of the IV catheter and the vein selected for cannulation. This is especially evident in the extremely young, elderly, or obese patients who either have an excess of adipose tissue or "loose skin". These patients either have an increased amount of "stuff" between the outer skin layer and the vein (babies, obesity) or have an increased ratio of skin to body surface area (wrinkles) which allows the skin to "slide" around above a vein.
Traction can be provided in a variety of manners that change depending on the area of the body where cannulation is being attempted. In general, attempt to secure a vein along a up/down and side/side axis to prevent movement. One common technique to provide traction is to use the thumb on the hand that is not holding the IV catheter to pull the skin below the site of attempted cannulation in the opposite direction of cannulation. This technique works well for many different body areas but can be insufficient if the patient has excessively loose skin. In such cases, additional traction can be provided by pulling the skin laterally on both sides of the cannulation site.
When pulling traction, make sure that your hand is not in the expected path of the IV catheter; this is a common mistake and is often performed because a provider elected to perform traction too close to the site of the attempt. Another common mistake found while providing traction is providing too much traction which will cause the vein to collapse as the tissue pressure being exerted by the traction exceeds the vein's internal pressure.
Cannulation
[edit | edit source]Intravenous access is obtained by placing a flexible plastic catheter into the lumen of a patient's vein. This catheter acts as a port from the exterior to the interior of the patient's body. Cannulation of a vein follows several common steps that begin with the selection of a site and proceed to disinfection/cleaning of the site and ends with the cannulation of the vein. Steps to obtain venous access using a catheter over needle with no one-way valve (i.e. you must tamponade the vein to prevent backflow) are as follows:
- Wear the proper PPE for the procedure.
- Prepare yourself for the cannulation attempt by selecting your materials and site and thoroughly cleaning the site prior to the attempt. Be sure to know where your nearest sharps container can be found.
- If using a tourniquet, apply the tourniquet above the site of the attempt, high enough that it will not get in the way. When applying the tourniquet, tie it so that it can be released easily with one hand.
- Secure the vein in place by providing adequate traction to the skin.
- Holding the IV needle appropriately (may be different for each manufacturer), use a 15-30° angle to introduce the needle into the skin (Fig. 1). Continue advancing the needle until you see flashback (normally in a flash chamber or along the catheter) (Fig. 2).
- Once flashback has been visualized, you may lessen the angle of approach and advance the needle a few millimeters forward so the catheter enters the vein along with the bezel (Fig. 3a, 3b). The length you need to advance the needle changes with the gauge of the catheter due to the longer bezel length in larger IVs.
- Keeping the needle in place, advance the catheter into the vein (Fig. 4). Once the catheter has fully entered the vein, the needle may be retracted. Remove the tourniquet.
- Apply tamponade to the vein just proximal to the tip of the catheter, this prevents backflow from the hub. You may now remove the needle system from the hub and connect either a primed IV line or primed IV lock.
- Test your IV line for patency before securing.
- Document the gauge, time, and placement location in the PCR.
-
 Fig. 1: Catheter over needle approaching the skin.
 -
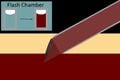 Fig. 2: As the tip of the bevel enters the vein's lumen, blood flows up the needle to fill the flash chamber.
 -
 Fig 3a: Not advancing the needle past the bezel can cause the catheter to sit outside the vein when the needle is withdrawn.
 -
 Fig 3b: Correctly advancing the needle past the bezel will allow the tip of the catheter to pass into the lumen of the vein.
 -
 Fig 4: Once the needle/catheter has entered the vein, the catheter can be advanced over the needle and the needle may be retracted.


Securing the IV
[edit | edit source]Intravenous access is an important part of advanced care for many patients, but most IVs are easy to dislodge with unexpected movement or tension on the line. Losing an access site in the field means that patient care will be delayed at the least while the provider obtains new access and could result in tissue necrosis or negative patient outcomes at the worst if the catheter dislodges and delivers medication to the wrong place (or not to the patient at all). For this reason, securing an IV is an important skill all paramedics must master.
There are many different methods of securing an intravenous access port. Each has its own benefits and negatives, but in the field the general rule is use what you have to secure the IV line in as expedient a way as possible while still keeping the line sterile and safe. For this reason, most EMS agencies provide some sort of transparent adhesive dressing (e.g. Tegaderm) that allows for continued visualization of the IV hub while also securing the hub and lock to the patient. There are many different types of these dressings, familiarize yourself with the dressing used by your EMS system prior to attempting an IV.
When securing an IV think of the expected forces that could be placed on the IV; will the IV be in a highly mobile location (e.g. the wrist) where it could be caught on something and dislodged? Is the patient overly diaphoretic and the adhesive is unlikely to adequately adhere to their skin? Does the patient have an increased chance of pulling the IV spontaneously (e.g. children, psychiatric conditions, dementia)? Is the patient overly obese to the point at which the catheter is only slightly in the vein? If the answers to any of the previous questions is a yes or you are unsure of the efficacy of the already used securing devices, additional techniques to secure the IV should be utilized.
If the initial dressing is insufficient in securing the IV, you may place a chevron by tearing a piece of 1 inch IV tape down the middle and sliding one of the halves sticky side UP under the IV until there is an equal amount of tape on either side of the line. Fold one side of the tape over the IV at an angle in the direction the IV travels, do the same for the other side of the tape. Use the second half of the tape to further secure the IV in whichever method you would like.
If the patient is overly diaphoretic and the tape will not stick to them or if the patient is likely to pull the IV, you may additionally use something like roller gauze or Kerlix to wrap the site of the IV. When securing the IV this way, make sure to leave any ports open for use and double back with the line between passes of the dressing. The doubling back will provide additional insurance against a dislodged IV should the line have force applied to it.
Common Issues with Intravenous Lines
[edit | edit source]"Blowing" the vein
[edit | edit source]Sometimes your attempt will only graze the vein or the patient will have incredibly fragile veins. These situations often lead to the vein "blowing". A blown vein is one where there is blood leaking out of the vein into the surrounding tissue for one reason or another. Blown veins should never be used to administer medications due to the high possibility for extravasation or infiltration. If you have blown a vein it makes all veins distal to that location unable to be used for intravenous catheterization attempts (those smaller distal veins could connect to the blown vein and any medication administered could "leak"). If the vein blows, remove the catheter and needle and apply pressure before attempting the access at a different location. Patients on blood thinners oftentimes have veins that "blow" easily. You may or may not visualize flashback if the vein blows.
"Back-walling" or "Through and through"
[edit | edit source]If your initial angle of approach was too steep or you advanced the needle too far without lessening the IV angle you may puncture the vein's posterior wall. Back-walling a vein is a specific way of blowing a vein where the catheter may be able to be withdrawn slightly and rethreaded into the vein (note that this increases risk to the patient).
Extravasation vs. Infiltration
[edit | edit source]Extravasation and infiltration refer to a medication or fluid being delivered to the surrounding tissues instead of the vein. These complications can be caused by an incorrectly placed catheter (Fig. 3a) or by blowing or back-walling a vein. Dislodged catheters are also a common source of infiltration or extravasation. The difference between infiltration and extravasation lies in the fluid or medication that was incorrectly delivered. If the medication/fluid was a vesicant (i.e. something that can cause localized ischemia or necrosis), the incorrect delivery is classified as an extravasation whereas if the medication/fluid was a non-vesicant, the incorrect delivery is classified as an infiltration. Vesicants have a pH of less than 5 or greater than 9, are hyperosmolar, or are vasoconstrictive.
Documentation
[edit | edit source]- "18 gauge IV placed in the right AC".
- If you have the gauge of the catheter and location found elsewhere in your PCR, you can simply state "IV access obtained".
Self-Assessment
[edit | edit source]Tips and Tricks
[edit | edit source]- When attempting intravenous cannulation on the dorsum of the patient's hand, do not attempt to pull traction normally as your hand will likely get in the way of the cannulation attempt. Instead, grab the patient's fingers with your non-catheter holding hand and curl them down. This will allow you to stabilize their hand and will also provide a significant amount of traction.
- When performing IV cannulation on very young children, it may be advantageous to secure their arm/leg to a splinting device as you would with a traumatic injury (though in this case the "injury" is the IV). Secure the limb above and below the site before attempting cannulation to reduce the reflexive movements tht come with the pain of IV insertion.
- Unless the patient has a long, uninterrupted vein, do your best to not enter the skin directly next to or above the visible vein. Instead, enter the skin slightly distally; this helps avoid potential issues where the vein turns or dives deeper into the tissue in a way that you cannot see. Remember, only the end of the catheter must be in the vein to deliver medications. Any additional length of catheter in the vein helps prevent extravasation/infiltration and dislodgement due to movement.
- If you have performed a successful introduction of the catheter into the lumen of the vein but are unable to fully advance the catheter, you may have been unlucky enough to place the IV close to a valve. If this happens, you may be able to float the catheter past the valve by retracting the needle and connecting the flush normally and then flushing the IV as you slowly advance the catheter. This creates a positive flow of fluid which will keep the valve open and may allow for you to advance the catheter past the valve.
Additional Resources
[edit | edit source]References
[edit | edit source]- ↑ Grabe, N., Jakobsen, C. J., & Damm, M. D. (1985). Skin disinfection before intravenous cannulation. Intraluminal contamination after disinfection with 70% isopropyl alcohol. Acta anaesthesiologica Scandinavica, 29(8), 764–766. https://doi.org/10.1111/j.1399-6576.1985.tb02297.x
- ↑ Darouiche, R. O., Wall, M. J., Jr, Itani, K. M., Otterson, M. F., Webb, A. L., Carrick, M. M., Miller, H. J., Awad, S. S., Crosby, C. T., Mosier, M. C., Alsharif, A., & Berger, D. H. (2010). Chlorhexidine-Alcohol versus Povidone-Iodine for Surgical-Site Antisepsis. The New England journal of medicine, 362(1), 18–26. https://doi.org/10.1056/NEJMoa0810988
| Authors | JHantke |
|---|---|
| License | CC-BY-SA-4.0 |
| Cite as | JHantke (2022–2025). "NREMT Paramedic Skillset/IV Placement and Management". Appropedia. Retrieved July 11, 2026. |