
Fume Extractor

| Type | Fume extractor |
|---|---|
| Authors | Bharath Sadashivaiah |
| Status | |
| Years | 2018 |
| Made | Yes |
| Replicated | No |
| Cost | USD 12.6 |
This is a Fume extractor for laboratories to extract fumes of soldering. Below, i present a cheap and reliable alternative to $150-$300 commercial solutions.
Introduction
[edit | edit source]Fume extractor is used in laboratories to extract harmful chemical fumes. When I was working in an electronics lab, I had a lot of soldering to do and we had these fume extractors that cost upwards of $200. All these fume extractors were a fan and filter that sucked the soldering fumes. It surely was overpriced and I thought to myself that in developing countries, these expensive equipments won't be used leading to harmful working environments. A low cost solution would change this. So, I designed this shell that holds a filter and fan. The choice of filter is left to the user. The user can select carbon activated filters(like I did) or HEPA filters or formaldehyde filters, etc. The manufacturers that made these equipment made their filters in odd shapes. So, this meant that the consumer had to buy the filters from the manufacturer at a high price. This is clearly unfair. With a 3d printed shell, we can design the filter holder for filters that are readily available in the market. This comes at a great advantage. So, lets get into the stuff required for the fume extractor
The equipment needed are:
- A large diameter Fan
- 2 wire to DC pin
- 3 D printed parts
The scad, stl files can be downloaded here
Parts
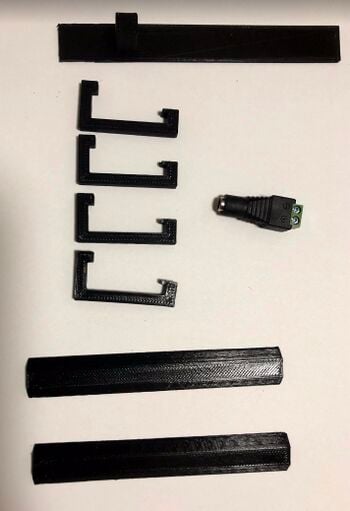
[edit | edit source]Here's a snapshot of all the parts laid out
Look at Links to buy electronics online.


Assembly
[edit | edit source]Steps to assemble the Fume extractor
- insert the filter of choice in the filter window

- insert the wire in the hole separating circuitry and fan module

- insert the fan in the fan module snuggly as shown. pull on wire such that wire stays in the bottom module.

- MIND THE POLARITY!!!!! DO not reverse the polarity. The fan will burn out.

- push the DC pin in the bottom hole and sort the wires out.

- Push the back plate such that the notch in the holds the dc pin in place

- snap the quick clips for the fan. latch on to fan and then press it into place.

- push the legs into their respective slots

- Final assembly
-
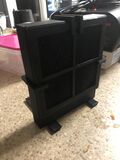 Front
Front -
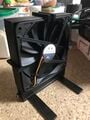 Back
Back

Costs
[edit | edit source]The costs are listed below
| SL No | Part | Cost |
|---|---|---|
| 1 | Fan | $7 |
| 2 | DC pin | $0.6 |
| 3 | Filter | $4 |
| 4 | 3D printed parts | $1 |
| Total | $12.60 |
Links
[edit | edit source]3D printed parts
[edit | edit source]Electronics
[edit | edit source]Contact details
[edit | edit source]If you are facing any issues or have any doubts regarding this project, contact me. with the email below. email: bharath95@hotmail.com
| Authors | |
|---|---|
| License | CC-BY-SA-3.0 |
| Organizations | MTU, Michigan_Tech's_Open_Sustainability_Technology_Lab, MY4777 |
| Cite as | Bsadashi (2018–2024). "Fume Extractor". Appropedia. Retrieved July 31, 2026. |