by Jenny Kelso Drawing by Jana Low Interview by Jenny Kelso and Gina Hilton
(From BITTERSWEET, Volume I, No. 3, Spring 1974)
Photography by Stephen Hough
In the early days all the bedding used in Ozark homes from the wooden bedstead to the fancy intricate quilt or comforter on top was homemade. Growing ducks and picking feathers was only the beginning in providing comfortable sleeping for the family. The women then made pillows and beds from the feathers. They made the sheets and pillow cases and made the firmer straw foundation for the feather beds for every member of the family.
Once the feathers are picked and aired well, making the pillow is fairly easy. For one pillow you need about thirty inches of eight ounce feather ticking which usually comes in blue and white stripe patterns. An average measurement for the finished pillow is 18 inches by 30 inches, but pillows are made various sizes according to personal preference. Some like small pillows loosely stuffed and others like large firm ones.
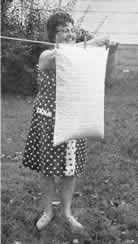
Hazel Cravens airing a homemade feather pillow
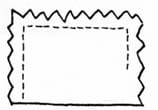
Fold the material and on the wrong side stitch around three sides, leaving an opening for turning and later stuffing. Double stitch for reinforcement. (Diagram # 1) Turn right side out. It is possible to buy pillow tubing. All you need do is to cut the desired length and sew across one end.
Diagram # 1
You are ready now to transfer the feathers from the cotton bag they were put in when picked to the pillow tick. An easy way to transfer feathers so you do not lose any is to baste the opening in the bag to the opening in the tick. Shake or ease the desired amount of feathers into the ticking. It is usually better to do this outside to save having to clean up the elusive feathers and down that will escape in spite of your care. If you do get feathers on the floor, dampen them slightly and the broom will catch them.
The amount of feathers to put in a bed pillow varies with individual taste. The usual amount is about two to four pounds.
Now remove the bastings from the sack, and sew up the opening in the pillow tick. The final step is airing. Pin the finished pillow on the line. Airing blows the down off the outside and makes the pillow fluffier. For best results select a cloudy day with a good breeze.
To care for the pillow simply air it occasionally. This airing separates the feathers and makes them like new. The ticking will last longer if it has a muslin cover to protect it. When the ticking gets soiled, you can wash the pillow in a tumble type washing machine, but you need to be very careful about it. You can dry them with care in a dryer using low heat, or you can hang them in the sun. Use the heat or direct sun only when the feathers are wet, but not long enough to draw out the oil.
Unless the feathers themselves are soiled, it is better to make a new ticking. Tickings eventually wear out, but the feathers will be in good condition. Rip an opening in the top seam of the old ticking, stick the end of the old pillow in the empty tick and vigorously shake the feathers into the new tick.
Feathers last for years. Hazel Cravens has some that are at least fifty years old that are still in good use. She said, "The feathers will wear down some. It will be just like the down. If you notice the feathers, there's a little vein right down the center and it's real fine, almost like hair, you would say, That will wear off. But the rest will last forever and ever."
Many Ozark families fortunate enough to have old feather beds they no longer use, make the feathers up into usable pillows. The feathers from a feather bed will make three or four pairs of pillows.
Another use of feathers was making feather beds. The height of luxury available to all was to crawl into a well-made, fluffed up feather bed. In the winter the softness would fit all the curves of your body, keeping you warm.
Fluffiness of the feathers in the pillow
Some people still prefer the feather bed. Hazel said, "My mother and dad would always sleep on the feather bed, even after they slept on a cotton mattress and springs because they liked a feather bed. My husband's mother and father sleep on a feather bed in the wintertime because it's very warm to sleep on."
Approximately twenty pounds of feathers is needed to make a bed. Use the same kind of eight ounce ticking as for the pillows. It takes eight yards of ticking.
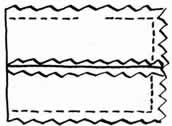
Since the ticking is not wide enough, sew two widths together twice the length of the bed. Then fold it crosswise, right sides together to form the top and bottom. Sew around three sides leaving a large enough hole to turn. (Diagram # 2)
Diagram # 2
Probably the hardest part in making the feather bed is forming the corners. They are squared to give the bed the shape of a mattress with square ends. At each corner fold the material so that the side and end seams are together. Sew a diagonal seam across the corner six inches long. (Diagram # 3) This will make the bed six inches deep when turned.
(Diagram # 4) Turn the bed right side out, fill the tick with feathers, close the opening and air outside.
Diagram # 3 & Diagram # 4
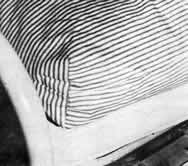
Corner of a feather bed.
You care for the bed like you would care for the pillows. Airing livens up the feathers almost like new. Air the feather bed in the spring, three or four times a year or when there is sickness in the family. If the ticking of feather beds gets soiled do not wash it. Just make a new tick.
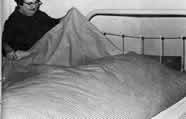
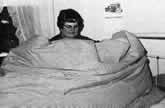
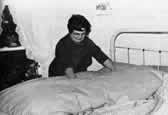
Making up the feather bed is another trick, because it is so soft every imprint shows up easily. When you get up in the morning, it is all crumpled down. First you shake all the feathers to one side, then turn the tick over. Push and smooth the feathers with your hand so it will be smooth. Also another way of making it look nice and smooth is to take a broomstick handle and run it across the tick. People were not allowed to sit on the feather bed during the day, nor could children play on it or they would spoil the smooth finished appearance.
Making a feather bed was no simple task. You needed to put the bedding on very carefully. Throw the sheet on the bed, then walk around it straightening the sheet out carefully so you do not mash down the feathers. Repeat with blankets and bedspread.
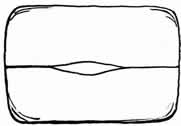
Underneath the feather bed were sometimes box springs with heavy padding or a mattress. In times gone by straw ticks were often used. The tick for the straw was made just like the feather tick except the opening was left in the center top seam of the tick for about a third of its length. This was left open so you could put in your hand to stir up the straw or put in new straw after threshing. (Diagram # 5) Straw ticks were also made from muslin.
Diagram # 5
In the early 1900's many women bought domestic or muslin, either bleached or unbleached for sheets. Some of it was 36 inches wide necessitating a seam down the center, though it was possible to purchase sheeting wide enough for a double bed. Domestic cost about twenty-five cents a yard. Most women bought it in ten to twenty yard lengths. Unbleached muslin cost less and would last longer. After repeated washings in lye soap and hanging in the sun, it would soon bleach out anyway.
After feed manufacturers began putting chicken and hog feed in white muslin sacks, beginning about 1928, many women economized by making their sheets from the material of these sturdy bags. It would take four sacks sewn together and hemmed all around to make one sheet. These sheets lasted well; some families still have some of them in use even though feed companies have stopped using cloth sacks for several years.
Underneath to support all this bedding would be wooden slats or earlier, woven rope supports fastened to the wooden bedstead.
From the wooden bedstead and rope slats to the straw tick and feather bed and pillows encased in fancy embroderied pillow cases, covered with comforters, and all topped with beautiful hand pieced quilts, housewives saw to it that their families slept comfortably in hand crafted elegance.
To make a feather bed, first push all the feathers to one side of the bed.
Turn the bed over
Smooth out the feathers
