
Devan's vertical axis wind turbine

| Type | Wind turbine |
|---|---|
| Authors | Devan Hemmings |
| Status | |
| Years | 2009 |
| Made | Yes |
| Hardware license | CERN-OHL-S |
|---|---|
| Certifications | Start OSHWA certification |

This is a project designed and built by a student in ENGR 305 at Cal Poly Humboldt. The student, Devan Hemmings, with the help of his father Rick, designed and built a Vertical Axis sing Turbine. The turbine uses principles of lift generated by three rotating airfoils and is similar to a design called the "gyro mill," but is unique in some ways as well.
Background
[edit | edit source]My experience and interest in alternative energy and appropriate technology have been growing steadily for the last few years, but I have just recently begun to really dive into it. I believe that taking ENGR 114 last semester and ENGR 305 this semester significantly supported that process. Lonny, who teaches these courses, is great at inspiring students to pursue their interests in this field.
For many years I have been interested in alternative energy sources. When you say "alternative energy," many people will respond, "like solar?" And I say, "Well...kinda." While solar does have its uses, I have always found the more alternative alternatives most compelling. Biomass, geothermal, micro hydro, wave energy, and wind energy are just a few. Of these, I find wind to be easiest to comprehend. I also see the most potential here. Growing up in a family that sails, ridge soars, land sails, flies kites, and builds and designs all the equipment to do so, I feel like I have a solid background in this field and the support of people who are very well versed in engineering, i.e., my Dad. That is why I have chosen to have my Dad, Rick Hemmings, help me with this project.

Rick has been doing home based engineering projects since I can remember and long before that. I hope to not just learn from him, but to collaborate on the concepts of design. He will help me with project design and implementation, but I will remain at the center of the project, participating in each step.
Opportunity Definition
[edit | edit source]During spring semester of 2009 at Cal Poly Humboldt in a course taught by Lonny Grafman called ENGR 305, or "appropriate technology," each student was assigned to build a semester-long project related to the field of appropriate technology. A list of possible projects at CCAT and project ideas was provided to assist students in selecting a focus. Although choosing a predefined project from the list may have been easier, I felt compelled this semester to pioneer a project of my own choosing. I wanted to design and build my own concepts of appropriate technology while also learning about the steps of the engineering process. Energy was certainly an interest, but wind energy seemed to captivate me the most. I just wasn't sure what type of energy production I could possibly innovate with the amount of knowledge I already had. That is where my mentor and father stepped in and began to help. He had some very interesting links to wind projects people have been doing and a few Ideas of his own. Since then we have had many conversations about some of our design concepts and thoughts about wind energy.
This project is an opportunity for me to become well versed in wind harnessing technology and to learn about the design process.
Criteria
[edit | edit source]Although there may be many more criteria than what has been listed here, these are the most heavily weighted. I will weigh these from 1-10, depending on how important they are, 10 being the most important.
- Originality: This could range anywhere between a completely new concept of design never seen before to same old same old. I weigh this with an 10, as it is very important to me to have at least some originality.
- Feasibility: Although I would like my project to be many things, unfortunately I am constrained by time. It must be done within a semester. I weigh this with a 10.
- Efficiency: The generator must be efficient at what it is doing. I would like it to be at least as efficient as a standard wind turbine, but that may or may not be feasible. I weigh this with an 8
- Affordability: It must be inexpensive. I would like it to be less expensive than conventional wind turbines to produce. I weight this at a 7.
- Harmlessness: The less harmful to animals, the better. We don't need to kill the birds and bees to have energy. I weight this at 6.
- Aesthetics: I feel that is important for wind structures to look nice as well as produce electricity. I weight this at an 8.
- Uses natural settings: This means that in some way, the system uses its surroundings to its advantage. I weight this at a 4.
- Ease of implementation: It is nice to be able to transport and set up easily. I weight this at 5.
- Simplicity in mechanisms: The simpler, the better. I weight this at 4.
- Durability: This thing should last for while with little maintenance. I weight this at 7.
- Innovation: Closely related to originality, yet distinguishable. Innovation will be something that I can prove works better and pass on to others learning about wind. This means that I am taking a principle and separating from other variables. I weigh this with a 5.
Literature Review
[edit | edit source]Wind Energy Basics
This is a review of the available literature pertinent to the design and engineering of wind energy.
Wind energy is not a new technology. However, this innovative industry is still growing actively. Ranging from small residential-sized wind turbines which produce about 10 kW of power to experimental behemoths that are over 500 feet tall and produce 3 MW of power, wind harnessing technology has many forms and applications.
The wind turbine is the most common form of wind technology seen today. It typically has three aerodynamic blades which rotate to turn a shaft and produce electricity through a generator (or turbine). These turbines can be either of the Horizontal Axis type, which is most common, or they can be of the Vertical Axis type (VAWTs). Horizontal Axis types are the most common because they are proven to work efficiently and are fairly easy to assemble. VAWTs, on the other hand, have the advantage of being able to use wind from every direction, and they fit in urban environments better.
Another distinguishing factor is whether the turbine is designed to use "lift" or "drag." Drag turbines have more torque and less speed and can only go as fast as the wind is blowing. In contrast, lift turbines use vectored currents to produce forces that can accelerate to 2-3 times the speed of the wind.
Wind Power Concerns
Although wind energy has many benefits, including the lack of waste and pollution, there are also some challenges which should continue to be addressed as the technology develops. One concern is that wind turbines tend to kill birds. This is particularly serious when rare birds of prey are affected. However, house cats kill many more birds in a year than wind turbines do. In addition, turbines may encumber residential and city views and be aesthetically displeasing when installed in large numbers. In addition, they are expensive and sometimes loud, making it difficult or undesirable for most residences or businesses to attain them. To address these issues, it is crucial to continue pursuing designs which are less harmful to the natural environment and strike a balance with financial concerns and social expectations for the built environment.
Types of Wind Energy
There are many types of wind energy. A chart can be seen at this link: Energy from the wind
References
Gipe, Paul. Wind Energy Basics: A Guide to Small and Micro Wind Systems. Vermont: Chelsea Green Publishing Company, 1999.
Gipe, Paul. Wind Power. White River Junction, Vermont: Chelsea Green Publishing Company, 2004.
- This book has 17 chapters and a range of helpful information. Each chapter goes into detail about a different aspect of wind power. The book definitely focuses on more conventional wind turbine systems but has some helpful topics about the wind in general. Some of these topics include:
- Applications of wind energy and how to use the wind.
- Measuring the wind. This includes wind speed units, the Beaufort scale, wind speed notation, a logarithmic model of wind shear, calculating the wind shear exponent and more.
- Estimating Output and how much to expect.
- Evaluating the technology. What works and what doesn't.
- Safety.
- Other general wind energy information.
Jenkins, Nicholas, and John F. Walker. Wind Energy Technology. Hoboken, New Jersey: John Wiley & Sons Inc, 1997.
Manwell, James F., Jon G. Mcgowan, and Anthony L. Rogers. Wind Energy Explained. New York, NY: Wiley, 2002.
Torrey, Volta. Wind-Catchers: American Windmills of Yesterday and Tomorrow. New York: E P Dutton, 1976.
- A nice historical perspective on windmills and other wind catching devices. Inspirational reading.
Tentative Timeline
[edit | edit source]Week of
- March 1-7
- Complete and update all project assignments by Thursday.
- Generate a list of possible parts needed and a budget.
- Gain a firm understanding in the principles of wind by reading the books in the literature review.
- March 8-14
- Decide on a basic design. This will be the "big idea" that needs refining.
- Have a working diagram of design including all aspects ready to show to Rick for editing.
- March 15-21
- Review and edit concepts of design.
- Begin building a prototype.
- Order parts as necessary.
- March 22-28
- Complete a working prototype.
- March 29- April 4
- Test prototype and make adjustments or new prototype.
- April 5-11
- Test prototype and make final adjustments.
- April 12-18
- Submit final project report draft.
- April 19-25
- Conduct energy output tests.
- April 26- may 2
- Install on site (still undecided).
- Complete final revisions on project report.
- May 3
- Submit final project report.
Evolution of Ideas
[edit | edit source]
Many hours were spent trying to develop Ideas. The process started with several concepts for "drag" turbines, but as I became more educated about aerodynamics and what works in the wind turbine world, the ideas started leaning more and more towards the use of airfoils and lift. Some of the first prototypes I built were drag turbines.
I found much of my inspiration in scientific research, but I found it more beneficial to see how other people were creating homemade turbines. There are several interesting videos available, most of which I found on youtube. I eventually came across one homemade turbine design on which I decided to base my project. Here is a link to what inspired me:
http://www.youtube.com/watch?v=fNudnI5tzf8
The "windspire" above belongs to a broader category called "gyro mills."
Other examples can also be found on youtube:
http://www.youtube.com/watch?v=5yTGf1xL_LY
What I ended up building is another version of a gyro mill. I like this design because it is attractive, does not kill birds, and can fit in urban environments, as can be seen in this video:
http://www.youtube.com/watch?v=AnhpeJAS9gY
Design and Construction
[edit | edit source]Spring Break
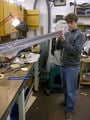
[edit | edit source]Over spring break, I had an entire free week to build the wind catcher. I needed to use this time well, for it was the only time I would have access to the machine shop that my dad owns and to collaborate with him and receive his expert advice. It was difficult to get started because we were still unsure about exactly what we were building. After messing with a few Ideas, it was time to commit to the gyro mill we designed and build it. It was going to take some serious dedication to get it done in a week. What we decided to build is described in the following gallery using pictures.
-
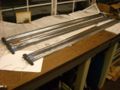 Fig: symmetrical airfoils are used to create lift. Three wings are the optimum number for this type of turbine.
 -
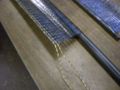 Fig: these were constructed of carbon tubing, reinforced Mylar, and Kevlar fiber string. The Mylar is attached to the carbon using a strong adhesive tape.
 -
 Making sure they are straight
 -
 The three wings will attach to the two rotors that will spin around a center axis.
 -
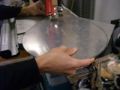
 We cut out holes to reduce weight and because it looks cool.
 -
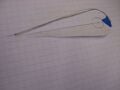 Fig: template used to cut sail brackets
 -
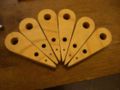 Fig: these are used to connect the three sails to the two aluminum rotors.
 -
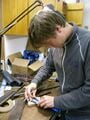 Fig: used a flexible ruler to try different shapes for mounting brackets
 -
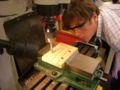 Fig: cutting out the six mounting brackets
 -
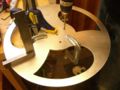
 Fig: tapping out plugs for wing ends to bolt into rotors
 -
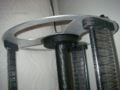 Fig: this is all of the above parts (the rotor the wings, the wing end brackets), the center shaft and the center shaft bracket (not shown above) all attached and assembled.
 -
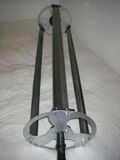 Completed airfoils. See videos in "testing" section at bottom of the page for a full view of the system.


This is as far as we got before I had to come back from spring break. At this point, the wind catching part of the turbine was done. Although no bearings were attached, we were eager to test it. Here is a video from a trip to the bluffs to see if the air foils would function. The wind was gusting at 30-40 mph.

Building the Base
[edit | edit source]After building the wind catcher, I still needed to attach it to a generator and support it somehow using bearings and PVC. That part actually turned out to be the most challenging. I built this entire thing without knowing what I was doing. I found PVC fittings to be very useful.
-
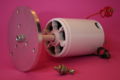 The generator I used is a permanent magnet dc motor rated at 12 V at 1000 rpm and 24v at 2000 rpm. It is rated at 12-120v and 600w. I got it from ebay.
 -
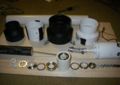 Fig: these are the many parts I used to create a system which would support the turbine and interface it to the generator.
 -
 I was lucky enough to find an old bottom bracket second-hand and a PVC fitting that fit the bearings perfectly.
 -

-
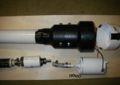
 The motor shaft attaches to the turbine with a rubber tube interface to minimize side loading on the generator.
 -
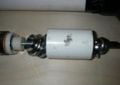
 Bottom: the bearing assembly and generator. Top: bearing sleeve and generator case. The bottom assembly goes inside the top asssembly.
 -
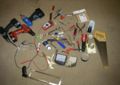 These are some of the tools I used to assemble the pieces.


Building Drag Starter
[edit | edit source]A problem with this particular style of turbine is that it does not self-start in the wind. Some people have tried incorporating savonius or other drag systems into their design to solve this problem. The difficulty with having a drag turbine inside a lift turbine is that it may slow the whole thing down. After thinking about this for a while, I came to the conclusion that if the drag system was attached by a unidirectional axis, or a ratcheting device, it could start the system without slowing it down. So, using a bike wheel and some PVC half-rounds I constructed just such a device to be mounted at the top of my lift turbine. At the last minute I threw this together using duct tape, but it does function.

Appropriateness
[edit | edit source]The appropriateness of this project is difficult to measure because we have not yet tested the power output. However, it is easy to see where some of the materials used could be inappropriate. For example, the carbon tubing used for this project would have cost about $200-$300 and is very toxic to cut or manufacture. The epoxy and spray paint used are also rather toxic. There was not much material wasted, but there were a few things such as a leaf blower that I tried to take the motor out of which ended up being trash.
-
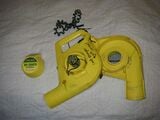 sacrificed for the greater good

The fact that I used some expensive materials makes it hard to imagine a use for this turbine in developing countries, however its light weight, portable, and cylindrical shape allows for some interesting uses. It could be used for travel or nomadic lifestyles. It could be shipped for rapid use in areas that need quick aid. Or, it could be easily carried to remote locations that need power.
If I could do it all again, I would try to make it cheaper and try to use recycled materials.
Testing
[edit | edit source]On May 15th, the winds in Trinidad, California were blowing at approximately 15 knots. This wind speed may have been amplified due to ridge lift at the location where we were testing. During the testing process, we made three discoveries. First, we found that the top-mounted drag turbine greatly slowed down the whole contraption. Then we found that the turbine actually starts on its own and does not need aid from such a device. So basically, the drag turbine on top is both inefficient and obsolete. The third discovery we made was that the turbine, when hooked into the generator, does in fact work and can produce about 4 volts at 2.4 amps in wind speeds of about 15 knots. While these tests could have proven more effective with the right equipment, it was enough to verify that the turbine actually works. In future tests, I plan to bring an anemometer and an attached rpm indicator so that I can compare wind speed, rpm, and voltage output. Contrasting these three variables will allow for improvement of design and will help to maximize efficiency. Below I have posted videos that show our test results. The first video shows the system with the drag turbine attached to the top. The second video is without the drag turbine and with slightly better wind.
Testing Video with Drag Starter

Testing Video without Drag Starter

Conclusions
[edit | edit source]Although there are still tests to do and many improvements to be made, I feel that I have accomplished the creation of a working product. I have fulfilled my opportunity to learn about wind turbines and the designing and building process of an engineering project. Not all of the criteria have been fulfilled, but most of them have. It has been enjoyable and educational working on this project, and I hope to continue to improve the design.
Acknowledgments
[edit | edit source]Many thanks to Rick Hemmings, my dad, for providing his shop and many of the materials for this project as well as for helping build it. Thank you to Erin Hemmings, my brother, for providing his expertise in machining and helping assemble the turbine. Thank you to Lonny Grafman, my teacher, for teaching 305 and providing an educationally stimulating environment. Thank you to Joe Rosenbury, my roommate, for lending me his tools and his thoughts about the project. And thank you to the IT department at HSU for helping machine some of the parts. Also, thank you to all of my colleagues who provided support and inspiration.
| Authors | |
|---|---|
| License | CC-BY-SA-3.0 |
| Organizations | Engr305 Appropriate Technology, Cal Poly Humboldt |
| Cite as | Dhhemmings (2009–2025). "Devan's vertical axis wind turbine". Appropedia. Retrieved July 29, 2026. |