
Cosmos in the Stacks wind tunnel

| Type | |
|---|---|
| Authors | Hector Maldonado Nomar Urena Jonah Orndorff |
| Location | Arcata, California |
| Status | Deployed |
| Years | |
| Made | Yes |
| Replicated | No |
| Uses | Education, Science, Inspiration, Interactivity |
| Map | |
|---|---|
| Location | Cal Poly Humboldt, Arcata, United States |
| Coordinates |
The Wind Tunnel was created for the purpose of inspiring other individuals who visit the Cal Poly Humboldt Library through interactive learning about topics related to STEM. This project targets aerodynamic and flight principles, displaying the effects of wind on a wing and how different angles of attack affect the airflow. Team Nacho Average Engineers were introduced to this project on February 12, 2025. Ever since, we have been dedicated to ensuring a complete and interactive project for younger generations, to inspire and gain their interest in STEM. Through many weeks of research, designing, prototyping, and fabricating, we concluded the Wind Tunnel project on May 15, 2025. The Wind Tunnel consists of a Rectangular chamber where the simulation occurs, a Lasko Box Fan that has been choked down to increase airspeed, as well as a Honeycomb filter to benefit the laminar airflow.
Background
[edit | edit source]The Cal Poly Humboldt Library Dean, Cyril Oberlander, had many ideas for different areas of the library to inspire the younger generations who visit the library for tours, as well as the general public. Students in the Engineering 205 - Intro to Design class, were tasked with designing, creating, and bringing these ideas to life, for different areas of the Library including the Simulation Hall and the Special Collections section. The Wind Tunnel was constructed using the tools and resources from the Swetman Makerspace on CPH's campus. We worked with the Aviation Club as well as the Student Docent for the Simulation Hall for extra insight on our project.
The Design and Construction of this project will occur in the Spring, 2025 semester as a semester long group project. The team, Nacho Average Engineers, consisting of team members, Nomar Urena, Hector Maldonado, and Jonah Orndorff, will be in charge of completing this interactive Wind Tunnel for the Simulation Hall of the Cal Poly Humboldt Library.
The Problem statement
[edit | edit source]The objective of this project is to successfully design and create a Wind Tunnel for the Cal Poly Humboldt Library, as an interactive project which will entertain and teach individuals about STEM related topics. This project had to leave an impact on the individuals curious enough to interact with it, with the goal of inspiring them to pursue education.
Criteria
[edit | edit source]The Wind Tunnel had to meet certain criteria that was carefully thought-out and discussed with our client to ensure they were sufficient. Each criterion was weighted based on their level of importance from 1-10, with 10 being the highest. This served useful as a rubric for our final design. The final design for the Wind Tunnel had to meet each criterion as they all had important reasoning for their weights.
| Criteria | Constraints | Importance
(1-10) 10 is the most important. |
|---|---|---|
| Durability and Resistance | The Wind Tunnel must reach 5-10 years of life. | 10 |
| Interactivity | The Wind Tunnel requires interactivity that will keep individuals interested as well as educate them in the process. | 10 |
| Low Noise Pollution | The fan will need to be under 70 decibles. | 9 |
| Cost | Our Client has provided a budget of $250. | 7 |
| Portability | The Wind Tunnel must be secure enough to be transported for different purposes | 6 |
| Appeal | The Wind Tunnel must be visually appealing, increasing the curiosity of visitors and enticing them to interact. | 8 |
The Prototyping Stage
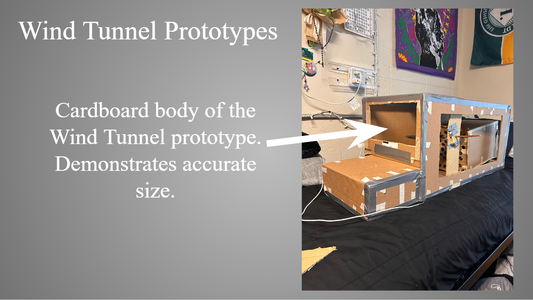
[edit | edit source]The first prototype made was a cardboard version of what the final product was meant to be. It was a rough design of the main chamber/body of the Wind Tunnel. This prototype helped scale and solidified the final dimensions for the Wind Tunnel, and demonstrated the location of a window in the final design, which was a big factor in the interactivity of the Wind Tunnel.
It became clear during testing that any fan that generated sufficient air speed could accurately demonstrate the effects on the wing's angle of attack. The fan utilized could not produce an excessive amount of noise to meet the given criteria. It was also found that a larger fan would produce the same air speed, but at a much louder noise level compared to that speed. This led to the prototype cardboard “Choke”. The choke allows a larger fan to be attached to the smaller wind tunnel chamber, and helps to meet the wind speed needs, as well as the noise criteria by damping the sound of the fan.
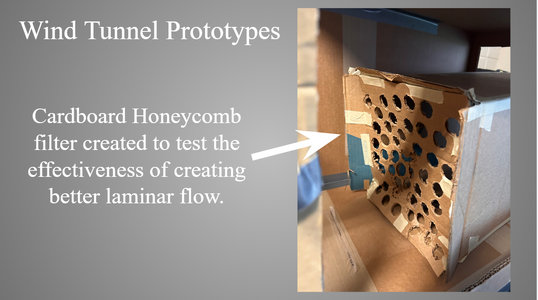
The purpose of the “Honeycomb" filter is to create better laminar flow from the air generated by the fan. This is important because the circular rotation of the blades in the fan causes turbulence in the air, which is detrimental to the demonstration of the angle of attack effect. Having steady laminar flow improves the effects of wind when in contact with the wing. The honeycomb prototype was created from a cardboard sheet with holes drilled into it, to simulate the effect. Through testing, this proved that a honeycomb would be effective in producing better laminar flow.
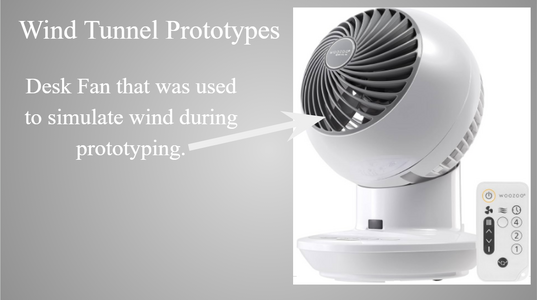
The fan is a great factor for the Wind tunnel as a whole and it was very importance to ensure a proper fan which produces sufficient wind speed is chosen. In prototyping, a small personal desk fan was chosen to test the amount of air speed needed. This showed that a larger fan with a lower RPM would be sufficient in providing wind speed to demonstrate the angle of attack effect
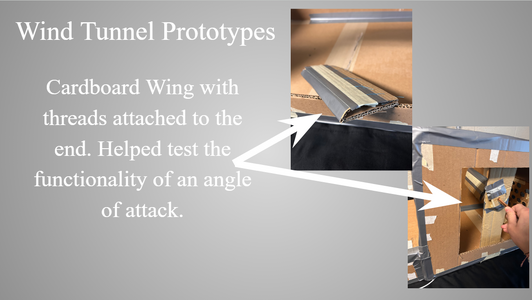
The wing for the project replicated a typical aircraft's airfoil, having an eloped but slimmed shape. This allowed wind to smoothly flow over the wing, as well as under which simulated the effects when flying. The adjustable angle of attack helps show how wind makes contact on the wing, and what is also called the critical angle of attack which is the highest a wing can face until it stalls. The Wind Tunnel prototype tested this idea and it's functionality using small threads attached to the end of the wing. These threads would help show the wind, as well as the stall which causes the threads to stand up.
- Wind Tunnel Prototypes
-
-
-
-


The Final product
[edit | edit source]Wind Tunnel Main Chamber
[edit | edit source]
The simulation for this project occurs in the Wind Tunnel's main chamber. The chamber has a rectangular shape with clear acrylic panels in the front and on top, so individuals can view the wing on the inside. On the end of the Wind Tunnel there is a square plywood board with an array of holes for the purpose of acting like an exhaust so that the wind being generated from the fan does not get trapped inside. The Wind Tunnel was then stained a dark ebony color creating an appealing design with the grain of the wood. The inside of the chamber was painted to resemble a sky with clouds to help provide the effect of being in the air. To get an idea of what the Wind Tunnel would look like, a 3D model was created in Fusion360 with accurate dimensions.
Wind Tunnel Choke
[edit | edit source]
The main chamber is then met with a choke, which was created to dampen the noise being generated from the fan and to also increase the speed of the air. The fan for the Wind Tunnel is bigger than the chamber, which allowed Nacho Average Engineers to design and fabricate this choke to benefit the project. The angles for the choke were calculated from a hand sketch, and were then cut out from plywood boards using a miter saw to ensure we received the correct angles. The fan resides within the choke and the orientation of it, allows individuals to change the airspeed with a knob on the front of the Wind Tunnel.
Wind Tunnel Honeycomb Filter
[edit | edit source]
The Wind Tunnel includes a Honeycomb filter in the cross-section where the main chamber and the choke meet. The purpose of the Honeycomb filter is to create better laminar flow into the chamber, by evenly dispersing the air being generated from the fan. Having a better flow of air helps a provide an effective demonstration of wind in contact with a wing, removing any uncertainties that may be created from turbulent flow.
Wind Tunnel 3D Printed Wing
[edit | edit source]The wing for this project was designed and created in Fusion360. This allowed us to model the size and shape of the airfoil accurately, and 3D print it. The wing features a 1/4 Inch hole that stretches through the body of the wing, where a wooden dowel is placed to serve as the twisting mechanism. There are thin threads attached to the top of the wing, which help demonstrate when the critical angle of attack occurs.
.png)
Bill of materials
[edit | edit source]Description of costs, donations, the fact that this is just proposed, etc. For a simple cost table, see Help:Table examples#Cost Table and Template:Bill of materials for two nice formats.
The materials for this project came out to a total cost of $246 and were acquired from many different locations.
| Item: | Cost: $ |
| 1x1 square pine dowel | $50.10 |
| PVC Pipe | $34.24 |
| Box Fan | $46.49 |
| 3/8'' thick plywood | $45.60 |
| Clear Acrylic | $38.58 |
| Paint | $35.00 |
| Total: | $250.01 |
| Item | Amount | Cost per unit | Total |
|---|---|---|---|
| Square Pine Wooden Dowels — Available through Ace Hardware, https://www.acehardware.com/departments/building-supplies/lumber-and-trim/dowels/5202304?store=07917&gad_source=1&gad_campaignid=20155429886&gbraid=0AAAAADtqLJGyovtBmoxiDd8-Fs1fSVKr2&gclid=CjwKCAjw24vBBhABEiwANFG7y1rErShms18cXtdq0H5pGiaC6lb04DOW0Q-5Q8DyeZfZ1j2A597eyBoCs50QAvD_BwE&gclsrc=aw.ds | 1 | USD 50.10 | USD 50.10 |
| PVC piping — PVC piping for the Honeycomb filter, purchased from Home Depot. https://www.homedepot.com/p/Charlotte-Pipe-1-in-x-10-ft-Plastic-Plain-End-Pipe-PVC200100600/100348483?gQT=1 | 4 | USD 34.24 | USD 136.96 |
| Grand total | USD 187.06EUR 160.87 <br />GBP 136.55 <br />CAD 231.95 <br />MXN 3,900.20 <br />INR 14,001.44 <br /> | ||
Maintenance
[edit | edit source]Introduce this maintenance section. Help ask the questions:
- Maintenance should be preformed by library members.
Maintenance schedule
[edit | edit source]- Daily
- No daily tasks.
- Weekly
- Check for dirt on see through acrylic, and if dirty, please use a wipe to clean it.
- Monthly
- Check on fan as it may be dusty.
- Check on string count and make sure there are still a proper amount.
- Yearly
- Check on wood to make sure there's no safety hazards.
Conclusion
[edit | edit source]Testing results
[edit | edit source]Project came out working in a fashion we wanted. It shows the angle of attack and allows the people to find the "critical angle," which correlates to a stalling plane. Could maybe have more wind speed to show critical angle better.
Discussion
[edit | edit source]Results showed well. We as a team got what our client wanted. To show aspects of flying to students and make it interactive for people to enjoy.
Lessons learned
[edit | edit source]We as a team learned that more wind speed would show the critical angle better. Also longer strings would help with showing off the critical angle.
Next steps
[edit | edit source]If there was anything that could be changed for this project moving forward, it would be to find a way to add more wind speed. This would give the project a better way of showing the critical angle.
Troubleshooting
[edit | edit source]This is only how to troubleshoot basic operation. For complex issues, the solution might just say something like contact ________. It should be a table in this format:
| Problem | Suggestion |
|---|---|
| Wing stops turning | Check to make sure wood spinner isn't broken. |
| Does not turn on | Make sure it is plugged in |
| Another issue | Etc. |
Team
[edit | edit source]Nacho Average Engineers was a team comprised of first-year Mechanical Engineering students at Cal Poly Humboldt. These individuals have dedicated many hours and much hard work to this semester-long project.
- Nomar Urena
- Hector Maldonado
- Jonah Orndorff
References
[edit | edit source]
| Authors | Nomar Urena, Hector Maldonado, Jonah Orndorff, Lonny Grafman |
|---|---|
| License | CC-BY-SA-4.0 |
| Organizations | Cal Poly Humboldt |
| Cite as | Nomar Urena, Hector Maldonado, Jonah Orndorff, Lonny Grafman (2025–2026). "Cosmos in the Stacks wind tunnel". Appropedia. Retrieved July 10, 2026. |