
Carding Wool
Bittersweet, Volume II, No. 4, Summer 1975
by Alexa Hoke and Terry Brandt
Photographs by Stephen Hough
Drawings by Alexa Hoke
Shearing the sheep is only the first step in preparing wool yarn. The next step is carding. However, before she gets that far, a meticulous handspinner will have selected only the best fleeces with the longest fibers available.
Also she will choose with care certain parts of the fleece which are best for spinning. The parts with the most desirable fibers are the shoulders, sides and forward part of the back. The shoulders usually have the best wool. (see diagram # 1)
PREPARING THE FLEECE
Before beginning carding many spinners wash the fleece while others prefer a fleece with all its natural waxes. using wool this way is called spinning "in the grease." Many people wash theirs if it is not as clean as they think it should be.
Washing a fleece should be done with care to preserve the lanolin and not tangle up the wool any more than necessary. It can be washed in lukewarm water once or twice depending on how dirty it is. If the wool is extremely greasy, a de-greaser could be added to the water. However, when washing the fleece one should be careful not to wash out all of the lanolin because the lanolin makes the wool spin more easily. The lanolin helps hold the fibers together as they are twisted to from the thread.
After washing, dry the fleece carefully. To dry the wool lay it on a towel or on a raised screen so that air can get under it. Choose a sunny warm day and dry in the open air, for if the wool does not dry properly, it may get a sour or mildewy smell. After the fleece has been washed and dried, it is ready to be carded.

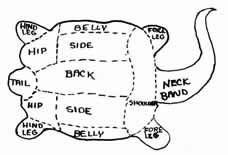

Diagram # 1 - This shows the different sections of the sheep's fleece. At right the fleece is spread out ready for folding. The shoulders usually have the finest wool.
CARDING
Carding is the process of combing or straightening out the fibers and removing the trash and tangles so that the spinner can get a yarn of consistent thickness.

Diagram # 2 - Different styles of hand carding cars, Most common cards have twelve teeth to the inch.
You will need two cards, one for the left hand and one for the right. They can be of many different sizes and styles. Cards have other uses than for carding wool. They could be the same cards you comb your sheep with when preparing them for a show. These are called blocking cards. Or you can use cards that were made especially for carding.
The most common cards are made of metal or wood with wire teeth. Early carding cloth was made of leather or heavy material inset with fine wire hooks. The cloth was mounted on a pair of wooden bats with handles. Present day cards come in different widths and lengths along with the variations of the sizes and spacings of the metal teeth. (see diagram # 2) The teeth make a lot of difference as to how fine and straight the fibers will be when it is time to spin. A favorite of many is twelve teeth to an inch. This spacing produces a long fine fiber.
Before cards were made, wool was sometimes carded using the dried heads of teasel. Teasel is a common plant of England which has naturalized in America. It has a dandelion-like bloom. When the bloom turned brown, it was hung upside down to dry, forming a stiff pod. The pod was held in one hand and the wool pulled over it as in combing hair. (see diagram # 3)

Diagram # 3 - Teasel, a wild plant naturalized in the U.S. was used by early settlers to card their wool.
A good idea before beginning to card is to spread some type of protecting cloth across your lap. This will help to prevent any holes or tears you may acquire from the teeth of the cards pulling across your clothes. The cloth will also catch the dirt you comb out of the wool. Also when carding be careful especially when learning, not to get reckless with the cards and pull too hard as the wire teeth are very sharp and may cut your arms or hands.
Begin by placing a small piece of wool on the left card that should be lying on your lap with the teeth facing upward, the handle away from you. (see photo # 1)

Begin carding by pulling off a small piece of wool. (Photo No. 1)
Pull toward you little pieces of wool over the teeth beginning at the side near the handle. Position the wool even with this edge, pull across the teeth and let the wool hang off the end of the card. Continue filling up the teeth of the card. (see photo # 2)
Try to spread the wool as evenly as possible. Pulling the wool across the teeth in this manner has already started the straightening process, making the whole process shorter. The care with which you fill the card pays off in easier carding.
Now with the card in the same position on your lap, grasp it with the left hand and hold it stationary. Hold the right card in the right hand with the handle toward you and teeth down. Place the right card over the left and pull it in a diagonal stroke across the bottom card toward you, combing through the fibers. Repeat this motion until practically all the chaff and burrs are out or the wool has transferred to the right card. (see photos # 4 & 5) At first combing through the wool will seem difficult, but as you continue, the card will begin to slip through and become easier. This means the fibers are straightening. Once the cards are slipping over the wool easily, it is time to transfer the wool which has collected on the right card back on to the left.

Pull the wool over teeth of left card. (Photo No. 2)
Transfer the wool by turning the left card on your lap so that the handle is toward you, the teeth still up. Holding the right card in the right hand as you did before, interlock the teeth in those of the left card and push the card across the left card. (see photo # 6) It may help to hold the overhanging wool with your left hand. Push the right card until all wool is again on the left card. (see photo # 7).

Hold filled card tightly in the left hand. Put right card over left and pull toward you interlocking the teeth. (Photo No. 3)

Pull clear across combing through the wool. Notice that Carol has mixed in some black wool to get variety in her yarn color. (Photo No. 4)

Allow the excess wool to hang over the card. Notice that the fibers are becoming straightened and most of the impurities are carded out. (Photo No.5)
When the transfer is complete (see photo #8), repeat the combing process until there are no longer impurities or tangles in the wool. As a rule you should transfer and comb at least three times.
FORMING THE ROLAG
Once you have straightened and transferred until the wool is carded sufficiently, You are ready to roll the wool into rolags for spinning. Transfer all the wool to the left card and position the card in your lap with the handle toward you. By placing your finger tips on the outer most edge of the card, roll the fibers gently toward you until the wool is in a roll. (see photo # 9) The teeth on the card are slanted so the wool will roll off easily in that position. Lift the wool off the card and gently stretch it out about twice its length. This makes the finished rolag. (see photo # 10) If the rolag has been properly carded, the fibers should be evenly distributed with no impurities or hard places and the rolag translucent so you can see your fingers through it.
This carding process is a rather long and tiresome job. One rolag will spin only about three to four yards of yarn. In old times it would take seven good carders working to keep one spinner busy. Therefore, today some spinners buy mechanically made rolags called rolags. Some spinners having good fleeces and treadle spinning wheels do not card at all, but many still prefer home carded wool.

Steps for removing wool from right card and returning it to the left.

(Photo No. 7)

(Photo No. 8)

Forming rolag (Photo No. 9)

Finished rolag (Photo No. 10)
| Authors | |
|---|---|
| License | CC-BY-SA-3.0 |
| Cite as | Ericblazek (2006–2025). "Carding Wool". Appropedia. Retrieved July 30, 2026. |