The scope of this project was to investigate past work on the CCAT earthbag garden terrace at CCAT, identify the best cobb recipe for a project in Arcata, CA, and to begin repairs of the terraces themselves.
Abstract[edit | edit source]
The Pacific Northwest climate is humid year round with long seasons of rain. Due to this earthen building projects must be properly prepared for and carried out in order to last for multiple years. Certain Earthbag terraces located at CCAT had been degraded to a level which required repair. Students from a Cal Poly Humboldt appropriate technology class were tasked to initiate a repair process and to discover why past attempts had failed. The initial project plan was to both cobb and plaster the bottom two CCAT terraces that had disintegrated over the past few semesters. However, after some time and weather related setbacks, the project scope was moved to the top terrace above the CCAT driveway, where it was our job to apply chicken wire and cobb as much of the crumbling terrace that we could. A thorough research of the literature as well as listening to opinions from qualified natural builders provided great insight as to why previous attempts to use cobb for this project have been unsuccessful. In addition to solidifying a recipe for cobb that will be appropriate for Humboldt County, a section of repairs has begun and will be completed by future CCAT volunteers and others.
Background[edit | edit source]
The Campus Center for Appropriate Technology (CCAT) is an organization at Cal Poly Humboldt. This group is focused on finding old and creating new solutions to common problems. Appropriate technology means they are small-scale applications that have communal knowledge of how to solve a problem. Our project focuses on the continued work at CCAT to create a durable cobb mix made from up-cycled materials for use on a group of garden terraces. The scope of this project is to find a new cobb mixture that will focus on one section of the terrace to find its overall durability. This project will be carried out by Wes Ponting and Sarah Cooper in association with Lonny Grafman for Engr305 Appropriate Technology during the spring 2017 academic year.
Problem statement[edit | edit source]
The objective of this project is to find a new cobb mix that will focus on one section of the terrace to find its overall durability. Our project focuses on this continued work at CCAT to create a durable cobb made from locally available materials for use on a group of garden terraces. An attempt will be made to limit cement concentration to the lowest amount necessary for our final cobb mix to decrease our overall carbon footprint.
Criteria[edit | edit source]
Below is a list of the criteria for this project. Compiled from interviews with CCAT co-directors Kelsy, Austin Anderson and with the help of project leader Connor Kennedy. This list should reflect the criteria from these sources along with suggestions from other interested parties.
| Criteria | Constraints | Weight |
|---|---|---|
| Longevity | Withstand the Arcata Climate. Last more than a few months and be able to last through the winter. | 10 |
| Life Cycle Analysis | Embedded energy of the materials used. Which approach will be the most sustainable within our given parameters. | 9 |
| Functionality | Holds up dirt within garden beds. Succeeds in covering the Earthbags & providing for compressive strength in an attractive and appropriate manner. | 8 |
| Educational Aspect | Materials used must go through testing process to find strength and physical properties. This data will be used to select the final cob mix to be used for terrace's. | 7 |
| Aesthetic | Must be visually pleasing – terraces should be all relatively the same look. | 6 |
Literature Review[edit | edit source]
Below is a review of relevant information for the cobb terrace project at CCAT.
Cobb Basics[edit | edit source]
Cobb is a very simple and ancient building style. The general recipe needed is clay, sand and straw, or a similar dry, grasslike material. The course sand aids as an agregate in the cobb, as well as providing strength and shrinkage control. The straw aids in knitting the mixture together, as well as providing tensile strength within the wall and provides resistance to cracking..[1] The clay is the key ingredient that binds all of these together.[2] To get an adequate cobb mixture, the ingredients are blended together in a large pile after which small chunks are taken off and formed into smaller balls of cobb. Theses can then be placed at the foot of a structure and get molded together to form a full covering of the surface.
Cobb also has a lot of external benefits, including its easily locally sourced materials, its high thermal mass, its non-toxicity, and its low-tech design and application. It is also important to note that cobb is an incredibly labor intensive material to work with however, and lots of patience is required for a successful outcome.
Cob Recipe[edit | edit source]
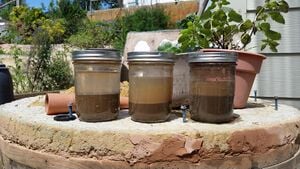
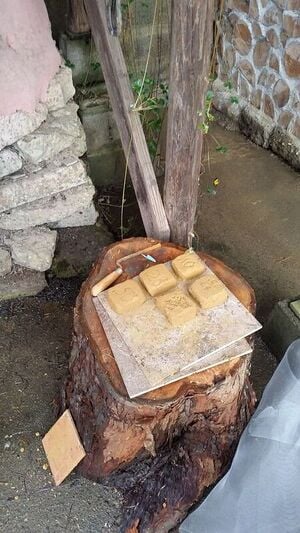
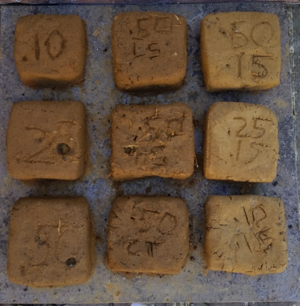
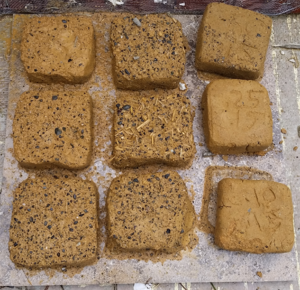
After trial and error from nine different cob recipes, our team discovered one that showed much greater strength and durability resulting from the weathering tests. Since Arcata has a wet climate, our team along with the client CCAT, decided to incorporate cement into our cob recipe. Alternatives to this could be a temporary covering of the cob surface, however given that these were gardening terraces on a sloped hillside there were practical considerations that eliminated this as a possibility. Even though cement was used it was done so in a way that utilized the lowest overall cement concentration that would be acceptable for the durability of the project.
Our final mixture was a volumetric ratio:
3 parts filtered clay + 1 part coarse sand + 1/4 part cement + straw (pieces should be touching)
The mixing and application of cob will be covered in the section: Construction
Plaster Basics[edit | edit source]
Plaster is a mixture of powders and crushed materials that are then mixed into a slurry and applied to a surface. Once the surface hardens the the plaster will go through a chemical process and begin to harden.[3] There are many different types and mixtures of various plasters used - some are better for interior use, some for exterior use, some most apt for humid weather and some that last the longest in dry weather. Strength, permeability, resistance to weathering, and embodied energy are all aspects to consider when deciding the right mixture for a plaster project.
Types of Plaster[edit | edit source]
Gypsum[edit | edit source]
Gypsum plaster is a unique type of plaster because of it's fast setting time as well as its ability to expand rather than shrink as it cures. In turn, it can reduce the amount of cracking as well as be used without the addition of sand or fiber. It's also one of the most ecological plasters, as it can be heated as low as 350 degrees Farenheit to create a binder.[4] Gypsum plaster, also known as "plaster of Paris" was used as a widespread building material in Europe after large deposits of gypsum were discovered around Paris. Gypsum is a plaster that can be shaped and molded fairly easily, as well as being a natural fire retardant. Because of this, many Europeans began coating the interiors of buildings with the material.[5]
One of the main issues with gypsum plaster, however, is that it's not very breathable and thus not usually recommended for external uses in damp places.[6] It is also very weak in terms of strength, and thus must be used with stronger plasters such as lime to increase its longevity.
Lime[edit | edit source]
Lime plaster is praised for its strength, flexibility, permeability, and weather resistance. It is obtained from the sedimentary stone lime stone, which is composed of coral, shells, and nodules of "kunkar".[7] Lime is an incredibly well balanced binder, it is relatively strong, but still flexible enough to move with natural buildings. It also has a low rate of cracking.[8] Lime plaster is very breathable - meaning it "allows air-borne moisture to travel freely through - it does not trap moisture inside a wall system. Without moisture buildup, biodegradable materials, such as wood or straw, are protected from decomposing."[9] Fat limes, or lime that does not slake easily, set slowly in air, and not at all underwater, is the most common type of lime used for lime washes and plaster projects. However, it is most effective if mixed with a proportion of Portland cement.
However one downside is that it can be relatively hard to work with. It is difficult to apply evenly, and must be used in thin coats and is not recommended for filling in big gaps. It can also burn your skin if not using gloves.[10]
Cement[edit | edit source]
The main benefit in using cement are its waterproofing components that lead to a longer lifetime before maintenance. Cement plaster is also easily accessible, durable, and offered at a relatively low cost in abundance..[10]
The biggest issue with cement plaster is large carbon footprint, however. It has an incredibly high embodied energy thus making it not the most green option when thinking in terms of sustainability.[11] Although it is a very strong binder, it can also be very brittle and is prone to cracking, especially in environments where there may be shifting of the structure.[10]
Additives to Plaster[edit | edit source]
In addition to making adding cement to the mix, other ways to strengthen the plaster is through the use of material additives. the are many different materials that can be used, as well as the size and overall consistency. Materials such as plant fluff, hair and especially manure have been used to create very strong plaster[12]
Climate Concerns in Humboldt[edit | edit source]
One of the main concerns for this project is the harsh weather that often occurs in Humboldt County, "Because of the moisture and moderate temperature the average relative humidity is high."[13]The main reasons previous attempts at updating the plaster and cobb terraces went awry was because of the excessive rains and flooding occurring in the area. With this in mind, our main goal is to try to find the perfect cobb mixture that can live through the long days of wet and humid weather.
Performance Testing[edit | edit source]
Earthen materials being used for buildings has been occurring for thousands of years. Adobe construction can be traced back to 8300 B.C., used for constructing the walls of Jericho.[14] During this time building standards, methods of design and testing of those materials progressed. In 2010, the American Society for Testing and Materials published a comprehensive list of standards as well as testing methods for earthen materials.[15] Another source for testing methods is Earth Construction: A Comprehensive Guide,[16] this resource will aid in both types of test that can be performed as well as information on other plaster types and their durability in different climates. According to an article in the Appropriate Technology magazine, "Simulation test in the laboratory, such as the spray erosion test, can only be indicative because factors such as changes in scale, influence of true climatic conditions, building usage and maintenance practices are not easily replicated. One of the most realistic simulation methods is to expose small test-walls to natural conditions.".[17] In addition to testing current plaster mixes, Long term data on old plaster and cobb quality will be gathered to attempt to capture this temporal aspect.
Existing Terrace at CCAT[edit | edit source]
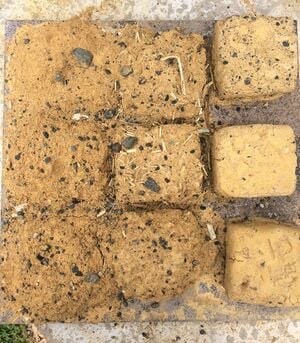
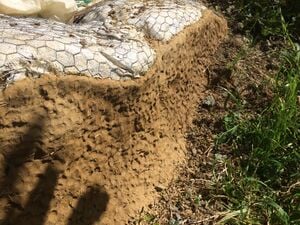
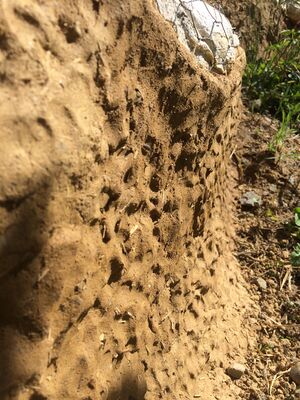
The current terraces at CCAT have had many coats of different plaster mix applied to them including wool, corn cobs, straw mixed with various ratios of sand, clay, gravel and cement. The only plasters that can last in a wet and humid environment are shown to be those mixed with some amount of cement. In addition the Woolcrete that was used has also held up to the climate. The terraces also have various mixtures of cobb - some of which have weathered pretty well, and others that have (or soon will) completely fall apart (see Fig 1 of straw and sand mixture). Like the plaster mixes, the only cobb recipes that have seemed to actually withstand Arcata's climate are those mixed with cement along with their normal clay and sand mixture.
Gallery[edit | edit source]
-
Fig 1: Previous attempt at a straw and sand mixture that degraded during the winter.
-
Fig 2: Exposed Earthbags on middle terrace.
-
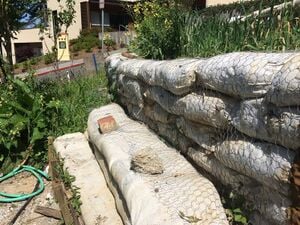
Fig 3: The current state of the terrace walls at CCAT.
-
Fig 4: Current repair of bottom terrace wall with plaster and cement mix.
-
Fig 5: Section of upper earth terrace scheduled for repairs
-
Fig 6: Upper Earthbag terraces above driveway with chicken wire
Examples of Other Systems[edit | edit source]
One example of an existing plaster and earth bag system that we stumbled upon was this Hermit's Dome done by James Fox, an emergency shelter dome aimed at protecting individuals from tornadoes and other natural disasters. The system had similar components to the CCAT earth bag garden terrace - it's shaped and insulation was made up entirely of sandbags. It was then wrapped around in chicken wire and then plastered with a 3 parts earth 1 part Portland cement mix. After the application process, Fox watered it every four hours for the next week, since such a large amount of plastic cement was prone to cracking during the curing process.[18]
Another example we found was an eco-building group creating a earth bag building in Pyrenees. For the external part of the building, they chose to use a lime-sand plaster since the walls would be affected by bad weather and needed to be incredibly durable. They made their plaster using this recipe:
1 bucket sieved earth + 2 buckets sand + 1 bucket lime + ½ bucket flax fibre (to prevent cracking) + Water
The group also noted that the lime-drying process was a slow one, and during that time it needs to be protected from direct sun and drying wind during and after plastering.[19]
Client Criteria[edit | edit source]
According to our clients at CCAT, one of those most important aspects of the terrace plasters is longevity. The plaster must last longer than the previous attempts to update the terraces. Another critical component of the plaster is that it withstand Humboldt climate. That means that through all the rain and floods and humidity, the plaster will still be durable enough to last through anything Humboldt County may throw it's way. Another aspect that we will try to accommodate is making all the plaster the same color, or matching it up with the existing terraces that are already in good condition.[20]
Prototyping[edit | edit source]
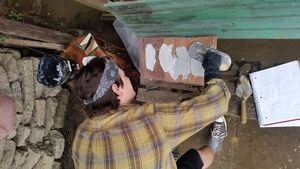
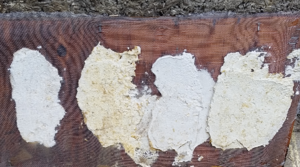
Wes Ponting spreading our 4 plaster mixtures
Construction[edit | edit source]
Mixing & Application of Cob[edit | edit source]
Mixing Process: Similar to kneading dough.
| Step | Action |
|---|---|
| 1 | Spread sand down on flat plastic or tarp |
| 2 | Layer clay on top of sand |
| 3 | Mix sand and clay together by stomping or kneading it together |
| 4 | Test the mixture: form small ball squeeze in had - mixture should barely squish through fingers |
| 5 | Mix in cement if necessary (Careful! Cement dust is harmful if inhaled and will dry out skin) |
| 6 | Flatten out cob and cover with layer of straw, mix in until well blended |
| 7 | Test the mixture: form small ball and drop from hip height - should only deform slightly |
Application Process
Timeline[edit | edit source]
| Dates | Task |
|---|---|
| Feb 1 - March 1 | Planned out testing strategy and goals. Gather materials and mixed test cob & plaster batches to begin general weathering test. |
| March 2 - April 1 | Gather data on different test plaster batches, decide on appropriate mix. |
| April 2 - May 1 | Carry out terrace repair with chosen recipe. |
| May 2 - May 15 | Project follow up with client; assessing completion according to client criteria. |
Overall, we were successful in reaching our goals in the time frame that we had scheduled!
Materials and Equipment Budget[edit | edit source]
This project is being financed by CCAT through specific funds given to them by Cal Poly Humboldt's ENGR 305 class. The cost of this project does not exceed the budget set aside for the class and does this by using donations from CCAT, as well as selecting base materials that would be affordable to those who would attempt to re-create the project on their own.
At the beginning of the semester, we proposed that our budget would be approximately $500.00. Throughout our design and construction process, however, we were able to drastically decrease that number. Almost all of the materials we found for the project was lying around CCAT (chicken wire, clay, sand, straw, multiple cement bags, tools & gloves) The only thing we ended up buying were garden staples to lay down the chicken wire (~$20)
| Quantity | Material | Source | Cost ($) | Total ($) |
|---|---|---|---|---|
| < 1 Gallon | River Sand (coarse) | CCAT | 0.00 | 0.00 |
| < 10 Gallons | Clay (sourced on site) | CCAT | 0.00 | 0.00 |
| < 1 Gallon | Hay | CCAT | 0.00 | 0.00 |
| < 1/4 Bag | Quikrete Cement Mix | CCAT | 0.00 | 0.00 |
| 20 ct. | Metal Stakes | ACE Hardware | 20.00 | 20.00 |
| Misc. Items | Tools & Gloves | Provided by CCAT | 0.00 | 0.00 |
| Total Cost | $20.00 | |||
Conclusion[edit | edit source]
Testing Results[edit | edit source]
After leaving our 9 different cobb test mixes outside for a number of weeks, it was clear which batches were withstanding the harsh Arcata rains and which had completely withered away. The ones containing strictly earthen materials had basically decayed away to a pile of wet mud. The mixtures containing portions of cement on the other hand had maintained their brick shape and were strong and firm to the touch. Our plaster mixes on the other hand were a little bit harder to differentiate. All 4 of our batches had not weathered ideally. They had not completely hardened and thus were quite soft and fragile to the touch.
Lessons Learned[edit | edit source]
One of the main lessons we learned during this project was the level of appropriateness for cobb in Arcata. Cobb is a rather fragile mixture that does not withstand intense weather conditions that Arcata often goes through. The dirt, sand, and hay contained in the mixture are not durable enough to last through the longstanding rains and winds - it basically just becomes a muddy mess. Adding cement to the cobb mixture definitely strengthens the material, however it is still not a guarantee for longevity. It is also detrimental that the right amount of cement be added. As we saw with our test bricks, too little cement can cause the mixture to crumble to pieces, but too much can cause cracks in the cobb, so taking into account the exact volume of cement added is incredibly important.
Another thing we learned was just how labor intensive cobb building really is. We spent over 20 hours on about 1/3 of the section of the terrace we were working on. We definitely didn't factor in just how long it would take to complete the project, so next time it would be beneficial to start much earlier (although the frequent rains in Arcata didn't help us out much with that). Because of the labor extensive scope of our project, we also didn't get a chance to begin the plaster process to cover our cobb walls, which is why in the end, we changed our project name to "Stabilized Earthen Terrace" Instead of "Plaster Terraces".
Next Steps[edit | edit source]
The next steps for the project, specifically the terrace we were working on, is to add a woolcrete (or just plain concrete) cap to the top of it. The previous terrace cobb and plaster groups had added woolcrete tops to many of the bottom terraces which have held stable and intact since they were completed. After that, a plaster mixture to protect our cobbing is needed. We believe using a variation of our already made test mixtures would provide a secure top plaster coat to the terraces.
Team[edit | edit source]
Spring Semester 2017
Environmental Science Major
Environmental Studies Major
References[edit | edit source]
- ↑ http://www.earthbench.org/how-to-cob.html
- ↑ http://web.archive.org/web/20181012005536/http://www.buildnaturally.com:80/EDucate/Articles/Cob.htm
- ↑ https://en.wikipedia.org/wiki/Plaster
- ↑ Henry, Mike. "Binders Part 2: Gypsum and Lime." The Sustainable Home, 20 Feb. 2015. Web. 31 Jan. 2017. http://thesustainablehome.net/category/natural_building_techniques/natural_plasters/
- ↑ "Gypsum Plaster." Minnesota Lath & Plaster Bureau. N.p., n.d. Web. 30 Jan. 2017.http://web.archive.org/web/20181023222726/http://www.mnlath-plaster.com:80/products/gypsum_plaster.htm
- ↑ Kessem, Amira, and Scott Howard. "DIY Plaster: Eco-plaster and Traditional Waterproofing Open Source Hub." One Community, n.d. Web. 30 Jan. 2017. http://www.onecommunityglobal.org/plaster/
- ↑ Stern, Peter. "Limes, Mortars, and Plasters." Field Engineering: A Guide to Construction and Development Work in Rural Areas. N.p.: n.p., n.d. 55-60. Print.
- ↑ http://thesustainablehome.net/binders-part-2-gypsum-and-lime/
- ↑ Koko, Sigi. "Lime Plaster." Down to Earth Design, n.d. Web. 30 Jan. 2017.http://web.archive.org/web/20181012000749/http://www.buildnaturally.com:80/EDucate/Articles/Lime.htm
- ↑ 10.0 10.1 10.2 http://www.onecommunityglobal.org/plaster/
- ↑ Henry, Mike. "Binders for Natural Plasters (Part 1)."The Sustainable Home" N.p., 25 June 2014. Web. 31 Jan. 2017.http://thesustainablehome.net/binders-for-natural-plasters-part-1/
- ↑ 2017. Ecocosas.Com. Accessed February 1 2017. http://ecocosas.com/wp-content/uploads/Biblioteca/Arquitectura/cob_builders_handbook.pdf.
- ↑ http://www.humboldtgov.org/1217/Climate
- ↑ ASTM E2392 / E2392M-10, Standard Guide for Design of Earthen Wall Building Systems, ASTM International, West Conshohocken, PA, 2010, www.astm.org
- ↑ ASTM E2392 / E2392M-10, Standard Guide for Design of Earthen Wall Building Systems, ASTM International, West Conshohocken, PA, 2010, www.astm.org
- ↑ Houben, Hugo, and Hubert Guillaud. Earth construction: a comprehensive guide. London: Intermediate Technology Publications, 1994.
- ↑ Levrat, Maison. "MUD PLASTERS AND RENDERS." Appropriate Technology, June 1, 1999, 1-4.
- ↑ Fox, James. "The Hermit's Dome." Earth Bag Building. N.p., n.d. Web. 31 Jan. 2017. http://www.earthbagbuilding.com/projects/hermit.htm
- ↑ "Eco-building in the Pyrenees, from Earth Bag Foundations to Plastering." Making Sense of Things. N.p., 04 Nov. 2011. Web. 30 Jan. 2017. http://makingsenseofthings.info/2011/07/week-8-–-eco-building-in-the-pyrenees-from-earth-bag-foundations-to-plastering
- ↑ Summers, Kelsey "CCAT Terrace Plasters" Interveiw by author. January 31, 2017


