
CCAT Natural Plasters
Introduction
Mention CCAT and stuff, make sure you make references and links to my page CCAT natural wall construction. Have fun with this page and keep the help page open in another tab to refer to, it works great to just copy and paste format things from the help page into your page.
Costs
[edit | edit source]Ok this is the most difficult part of Appropedia formatting to visualize so i just put in my table. It helps to click 'show preview' so you can see the finished product as well as the formatting at the same time. Just fill in your cost information for the table below. And just delete any extra boxes left but remember to leave the '|}' at the end of the whole table format.
| Qty | Material Needed | Source | Cost | Total Cost |
|---|---|---|---|---|
| ~60 | Thin Wood Lath | Salvage from local lumber mill | $0 | $0 |
| 3 94lb bags | Portland Cement | Do-it-yourself-Hardware | $12 | $36 |
| lots | Paper | Shredded office pack from HSU Student Services Building | $0 | $0 |
| 1 | Straw Bales | Local seller | ~$6 | ~$8 |
| 3 Flats | Cedar Shingle | Salvaged and Donated by Pierson Building Center | ~$0 | ~$0 |
| ~300 | Nails for Shingles | CCAT Shed | $0 | $0 |
| ~100 | Screws | CCAT Shed | $0 | $0 |
| ~150 | Recycled Bricks | CCAT Recycled Brick Pile | $0 | $0 |
| 2 | Natural Log Posts | Beach Salvage | $0 | $0 |
| ~12 ft | 4x4 Lumber | CCAT Lumber Rack | $0 | $0 |
| ~20 sqft | Plywood | CCAT Lumber Rack | $0 | $0 |
| Total | $44 | |||
Testing
[edit | edit source]Purposed Timeline
[edit | edit source]Here is a format for a time line that seems to work well in appropedia, just fill in your data, notice that the '!' marks match the titles of the columns, so all you have to remember is that for each 'align="center"' box, the first line is the item, second is date, third is whether or not you met that date.
| ITEM | PROPOSED DATE | DATE MET? | |
|---|---|---|---|
| -Design and site measurements complete | 3/4/09 | Yes | |
| -Dig foundation and set posts | 3/23/09 | Yes | |
| -Construct Roof frame and lay gravel foundation | 3/24/09 | Yes | |
| -Make test paper-crete bricks and forms | 3/24/09 | Yes | |
| -Lay Brick with sand mortar | 3/25/09 | Yes | |
| -Finish roof with cedar shingles | 3/28/09 | Yes | |
| -Nail up wood lath | 3/29/09 | Yes | |
| -Finish making bricks | 4/2/09 | two weeks late due to rain! | |
| -Make large batch of paper-crete for work day | 3/14/09 | yep | |
| -Class work day on wall | 4/15/09 | Yes | ! |
| -Touch-ups and finishing touches to prepare for plaster | 5/1/09 | Yes |
Project in Construction
[edit | edit source]Below i have included what i did for many of my pictures. I put them in a gallery, the format is below, all that you need to do is fill in the space after 'image:' with your picture files you have uploaded 'see the upload a file on the left sidebar to learn how. After the '|' line you can add a caption to the photos, just delete it if you do not want a caption, but it helps.
-
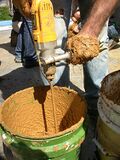 Mixing clay found on-site for the clay-slip-straw using a power drill with a paint mixing paddle
 -
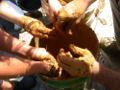 The drill couldn't breakup all the small chunks so we did it by hand
 -
 The straw was mixed and turned till all just covered by the clay slip
 -
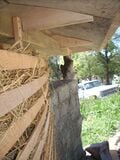 The clay is then stuffed into the wood lath frame and ends up drying and looking like this ready to plaster.
 -
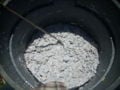 It takes about 5 minutes of mixing with a power drill with a paint mixing paddle for wet shredded paper to pulp like this before adding cement
 -
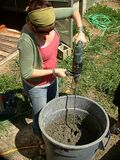 Blending paper shreds with Portland cement
 -
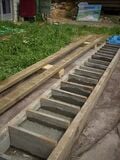 This is the form we used to make the bricks used in the wall. When the bricks dry, they shrink, making the form easy to lift off
 -
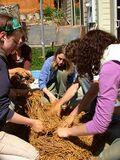
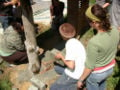
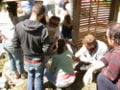 Here I am showing the class how to lay paper-crete bricks on the wall...
 -
 ...And again.


Conclusions and Reflections
[edit | edit source]Links
[edit | edit source]Making links is pretty easy. the help page tells you more about it, check it out.
References
[edit | edit source]| Authors | |
|---|---|
| License | CC-BY-SA-3.0 |
| Cite as | Myles (2009–2025). "CCAT Natural Plasters". Appropedia. Retrieved July 19, 2026. |