This chapter offers some practical self-help information on how to make and use simple pumice building components and members.
The following activities are explained:
- making simple pumice-concrete solid bricks,
- making simple pumice-concrete cavity blocks,
- making simple pumice-concrete wall panels,
- making wall-length reinforced pumice concrete hollow-core planks.
Such building members can be made using elementary do-it-yourself techniques without complicated tools and implements -and may then be used for building a simple home.
The essential raw material is, of course, pumice. Consequently, the first step should be to find out where the raw material can be obtained, either by quarrying it or buying it from an inexpensive source. Then comes the decision as to how well the Chapter 2.3 conditions are met, and whether or not one's own handicraft skills and available time will suffice for making the pumice concrete needed for the prefabrication work (solid or cavity bricks, planks or panels).
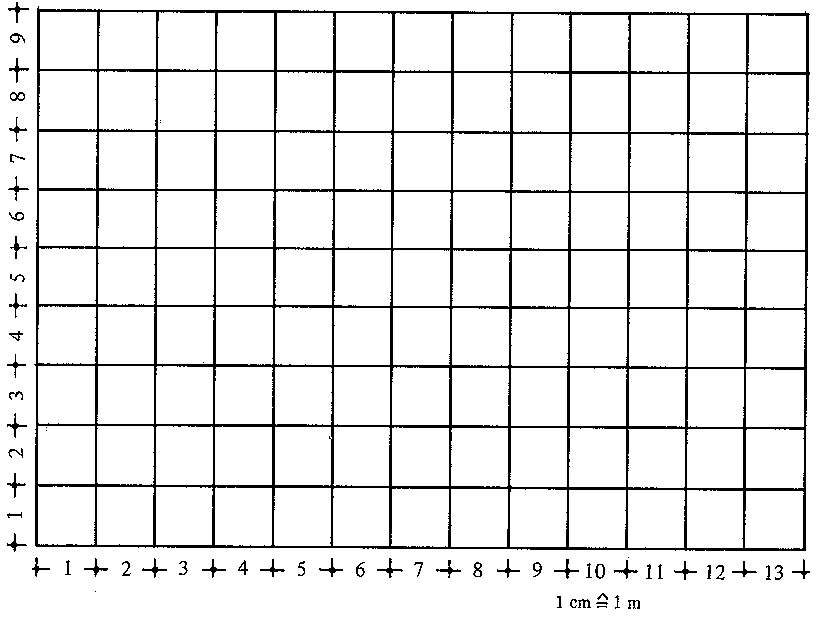
Figure 17: Pattern for sketching out a self-help builderÂ's home.
In preparing one's own pumice-concrete homebuilding project, the following checklist could be valuable:
My property has an area of ... m².
Pumice is available within a radius of ... km. I have the means to buy and haul cement and lime! 1 bag costs US ..
There is an adequate supply of water located ... km away.
I either own or can borrow the following tools:
- shovel
- pick
- hammer
- bucket(s)
- wheelbarrow
- trowel
- nails
- boards
- saw
I have either made concrete before or know a mason and one or two friends who would be willing to help me make the building members and erect my house.
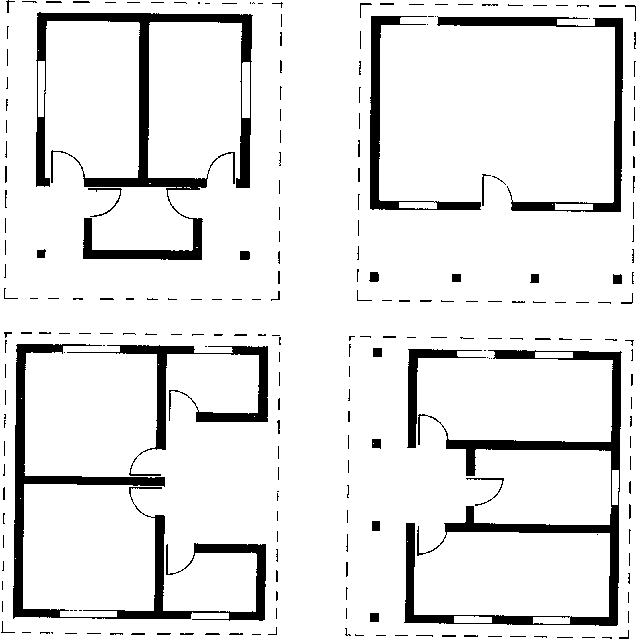
Enter your own ideas for a house in Figure 17. There are many ways to design a floor plan, depending mainly on the nature of the property upon which the house is to be built. Figure 18 shows several examples of common floor plans as a guideline. Fill in the following list as a basis for calculating the cost of construction:
The house I am planning to build has :
..... m² floor space,
..... m² wall area,
..... windows measuring ..... cm by ..... cm,
..... doors measuring ..... cm by ..... cm, a floor made of ..... .
..... m² roof made of ..... other important characteristics:
The property for the house will cost an estimated US
In order to calculate the quantities of building material needed for the house as planned, the following technical data must be known:
- 1 m³ pumice concrete contains:
3 bags of cement (= 150 kg)
600 kg pumice material,
250 litres of water. - The same cubic meter of pumice concrete will yield:
approx. 500 solid bricks (24 × 11.5 × 7 cm), approx. 120 cavity
blocks (40 × 15 × 20 cm with 2 cavities),
approx. 25 pumice panels (100 × 50 × 7 cm), 12 wall planks (200 × 50 × 10 cm, with cavities),
or, in other words:
- One bag of cement (50 kg), 200 kg pumice and 80 litres of water are needed to make 0.33 m³ pumice concrete.
- Thus, 1 bag of cement is enough for making:
165 solid bricks (24 × 11.5 × 7 cm),
40 cavity blocks (40 × 15 × 20 cm with 2 cavities),
8 pumice panels (100 × 50 × 7 cm),
4 wall planks (200 × 50 × 10 cm with cavities).
For a house with 30 m³ floor space, the following quantities are needed:
2500 solid bricks (24 × 11.5 × 7 cm) or
500 hollow blocks (40 × 15 × 20 cm with 2 cavities) or
64 pumice panels (100 × 50 × 7 cm) or
36 wall planks (200 × 50 × 10 cm with cavities).
Figure 18: Selection of four 30 m² plans
How is Pumice Processed?[edit | edit source]
The pumice gravel is screened to separate the coarse and fine fractions and remove soil contamination. Then, the pumice is mixed with carefully measured amounts of cement and water to produce a batch of lightweight concrete. Careful mixing is very important for ensuring that the pumice concrete will be of uniform quality.
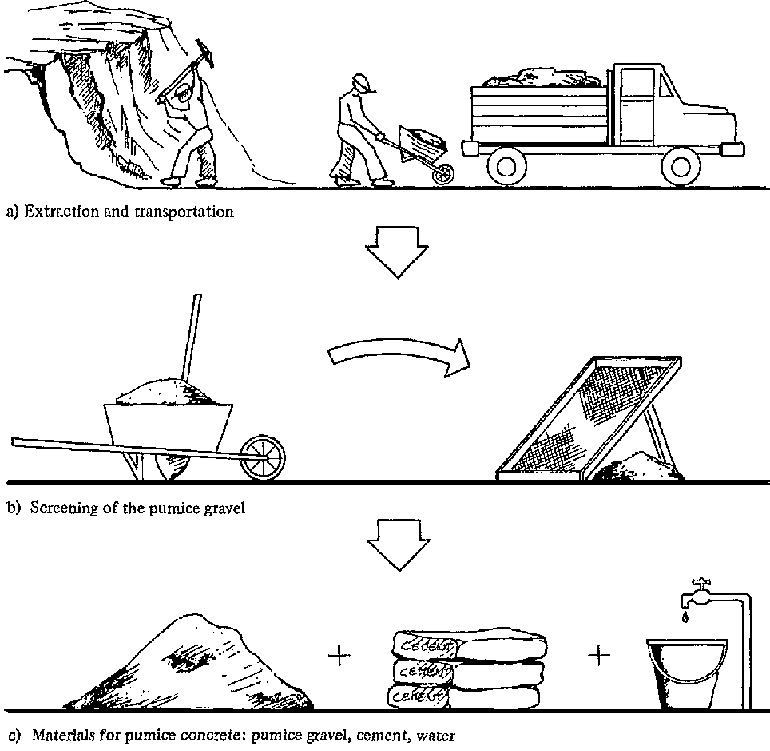
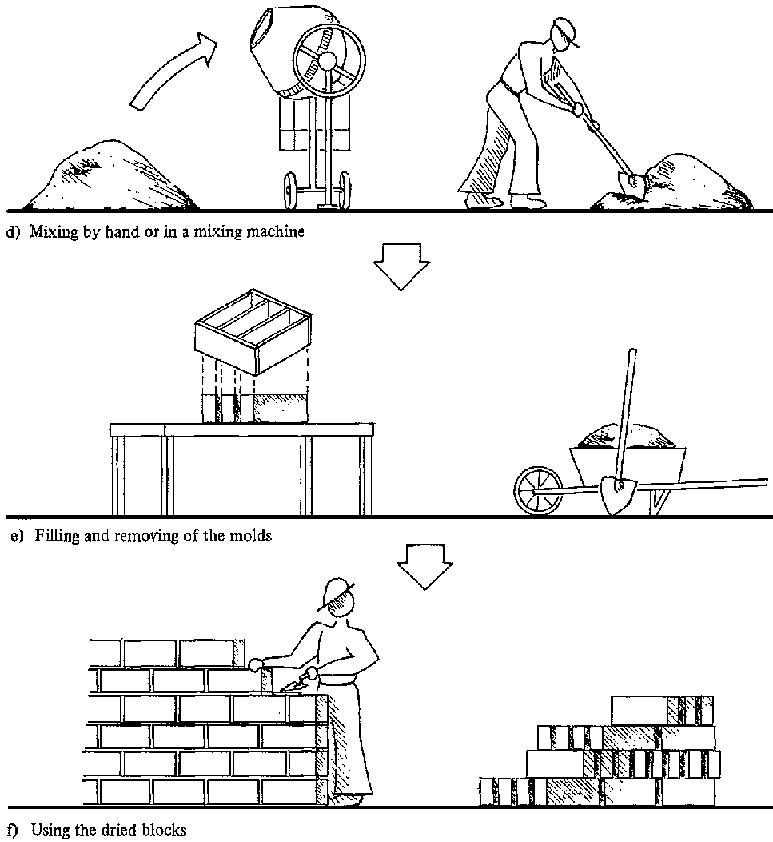
The mixture is filled into molds (the dimensions of which vary, of course, depending on what kind of building member is being made) and then compacted by shaking and tamping. Then, the molds are carefully removed, and the block (or plank, panel, brick, etc.) is laid out to dry. After four or five days, the individual pieces can be stacked and left to cure and dry for at least another four days. After another 20 days, they are sufficiently transportable and can be used any time after that. Walls made of pumice members should be rendered/stuccoed to obtain a smooth finish and keep water out of the masonry. (The processing of pumice building members is shown schematically in Figures 19 and 20.)
Figure 19: Production process for pumice building members (part 1)
The proper mixing ratio is achieved as follows: first, put together a suitable particle. size blend. The heavier the end product should be, the more fine material and cement you will need.
Figure 20: Production process for pumice building members (part 2)
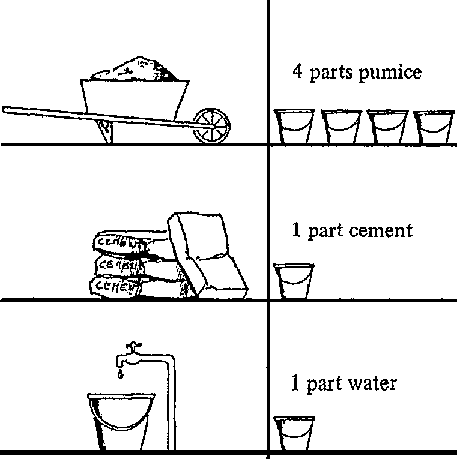
The consistency of the mixture should always be such that the large particles touch each other, providing mutual support, while the fine aggregate materials more or less fill in the spaces in between. Good pumice cement usually consists of four parts mixed pumice, one part Portland cement and one part clean water. Mix the parts by hand or in a mixing machine until the material takes on the appearance of soil-moist light weight concrete of uniform colon
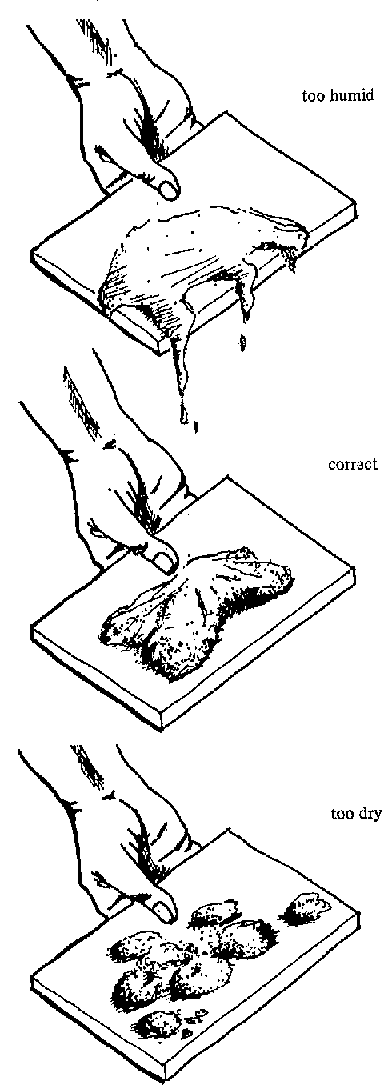
Use the mixture as quickly as possible (within 30 minutes at the most) and do not let it even begin to dry out beforehand. In most cases, the described mixing ratio will be just right. If, however, the pumice is already moist and/or has a less-than-optimal particle-size composition, add more pumice, sand, cement or water as necessary (cf. Fig. 21).
Figure 21: Proper moisture content of pumice-concrete
Heed the following points in preparing your pumice concrete:
- Use only clean pumice.
- Saturate the pumice with water prior to mixing.
- Use only new cement.
- First mix the presaturated (soil-moist) pumice with cement; then add water and mix thoroughly to obtain a moldable mix.
- Compact the mixture well, but not excessively.
- Keep precast building members out of the sun and cover them with, say, wet cement bags to keep them from cracking.
- Keep building members out of the rain.
- Let pumice bricks, blocks, planks and panels dry for at least 28 days, or one month, prior to use.
- Stack building members on a level base.
- Handle them carefully to avoid breaking off their edges.
- Remember that pumice building materials can also be made with lime instead of cement.
3.1.1 Making building blocks from pumice and lime
Building blocks can be made of natural pumice and lime. Indeed, such blocks used to be quite common. However, careful consideration must be given to the characteristics of the lime.
In the first place, use only hydraulic -or better -eminently hydraulic lime. Dolomitic or magnesium lime, i.e. lime with a somewhat grey color, is preferable to fat lime, i.e. chalk-colored lime, for making good pumice. lime blocks, thanks mainly to the fact that the grey types, as the name implies, contain more magnesium, which reacts with the silica fraction to give the finished product superior strength properties. On the other hand, whatever lime is used should contain as little salt as possible, particularly in the form of sulfuric acid, because salt causes efflorescence and detracts from the blocks' mechanical strength.
To obtain pumice-lime blocks with strength values exceeding 20 kg/cm²:
- the exact chemical composition of the lime and all pumice materials under consideration should be ascertained by way of careful chemical analysis, and
- sample blocks and compression strength test specimens should be prepared.
In general, the following mixing ratios are recommended:
1 m³ pumice (slightly moist, but not dripping wet)
150 kg hydraulic lime gauging water as necessary or
3 m³ pumice (slightly moist, but not drip. ping wet)
250 kg hydraulic lime
100 kg Portland cement gauging water as necessary
The latter batch should yield about 1000 pumice-concrete solid bricks measuring 25 × 12 × 10 cm and displaying a compression strength of roughly 25 kg/cm² after approximately 3 months' curing time.
It is extremely important to realize and act on the fact that pumice-lime bricks need a much longer curing time than do pumice-cement bricks. They should be allowed to cure a good three to six months to develop adequate stability and compressive strength prior to transportation and use.
Accordingly, it is better to make solid bricks than cavity blocks out of pumice-lime mixes, since the thin walls of the latter are much more susceptible to breaking and therefore require more caution in their manufacture and use.
What Can You Make with Pumice?[edit | edit source]
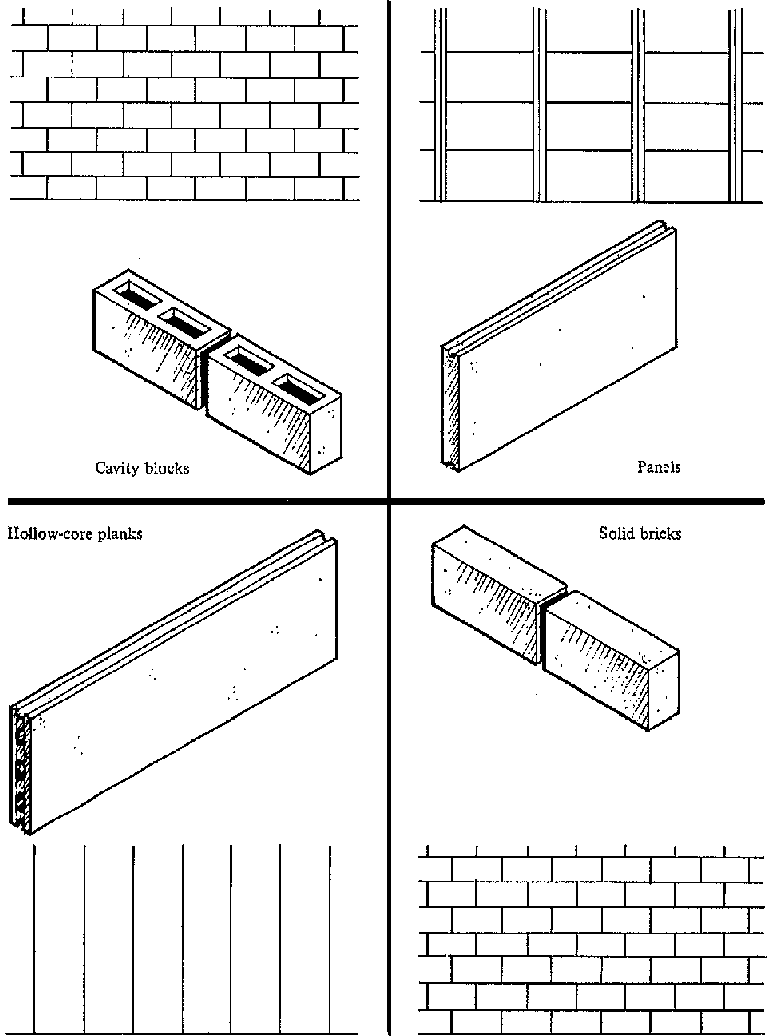
Once the pumice-concrete mixture consisting of pumice, cement and water has been properly prepared, it can be poured into various molds to produce different kinds of wall members, e.g. pumice-concrete tiles/ panels and reinforced pumice-concrete hollow-core planks (cf. Fig. 22).
Pumice concrete should not be used for making building members that will be exposed to heavy wear and tear, e.g. stairs, nor is it suitable for building members that are liable to have constant contact with moisture.
3.2.1 Pumice concrete
Lightweight pumice concrete is made in the same manner as normal-weight concrete, except that natural pumice takes the place of sand and gravel. To make pumice concrete from the basic materials pumice, cement and water, follow these steps;
- The first step after the raw pumice is delivered to the intended production site is to remove any humus and other impurities by screening or desilting as necessary.
- The second step is to establish the particle-size spectrum of the pumice material. To obtain a good pumice concrete, the particle -size distribution should be about 1-16 mm, i.e. the pumice should have roughly 40% particles measuring 1 - 3 mm in diameter, 25% particles measuring 3 -7 mm in diameter, and 35% particles measuring 7-16 mm in diameter.
Figure 22: Four pumice-concrete building members
If the particle-size distribution of the raw material does not approximately correspond to the above, it will have to be screened as shown in Figure 23.
Frequently, it will suffice to screen off the particles that are larger than 16 mm, perhaps replacing them with sand.
Figure 23: Screening the raw material
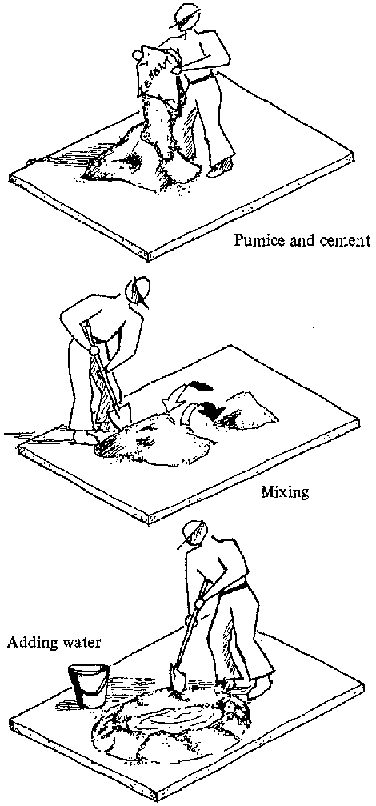
- The third step is to add cement and water to the pumice gravel to produce pumice concrete, preferably with the aid of an electric or diesel-powered mixer. If none is available, the concrete can be mixed just as well with a shovel on a clean base or in some kind of big tub (Fig. 24).
Figure 24: Hand-mixing system
How much cement and water are needed depends greatly on the physical condition of the pumice material, especially its inherent moisture and particle-size distribution. As a rule of thumb though, four parts pumice to one part cement and one part water is about right (Fig. 25).
Figure 25: Volume indication of quantities
Pumice concrete should be soil-moist, i.e. it should have no excess water. The moisture level is right if the mold surrounding the concrete can be removed immediately after compacting without having the shaped piece fall apart (Fig. 26).
Figure 26: Immediate removal of forms possible
3.2.2 Pumice concrete solid bricks/blocks
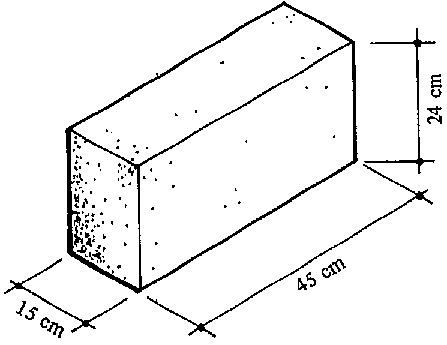
The least complicated kind of wall member for dolt-your-self production by people with little or no handicraft experience is the simple solid pumice brick (Fig. 27). The dimensions can be chosen at will, but adhering to a standard commercial brick format is recommended. If the bricks are to be used for repairing existing walls, they naturally should be of the same size as the bricks or blocks in the old masonry.
Figure 27: Pumice-concrete solid brick.
Elementary-type pumice-concrete bricks are best suited for use in filling out concrete skeleton structures, but are also good for putting up self-supporting walls. Particularly in areas where no loam or clay is found, pumice bricks serve well as alternative wall-building members -assuming, of course, that natural pumice is available (Fig. 28).
The production of pumice concrete solid blocks measuring 49 × 24 × 15 cm is described below. Such blocks are easy to make in a self-help situation.
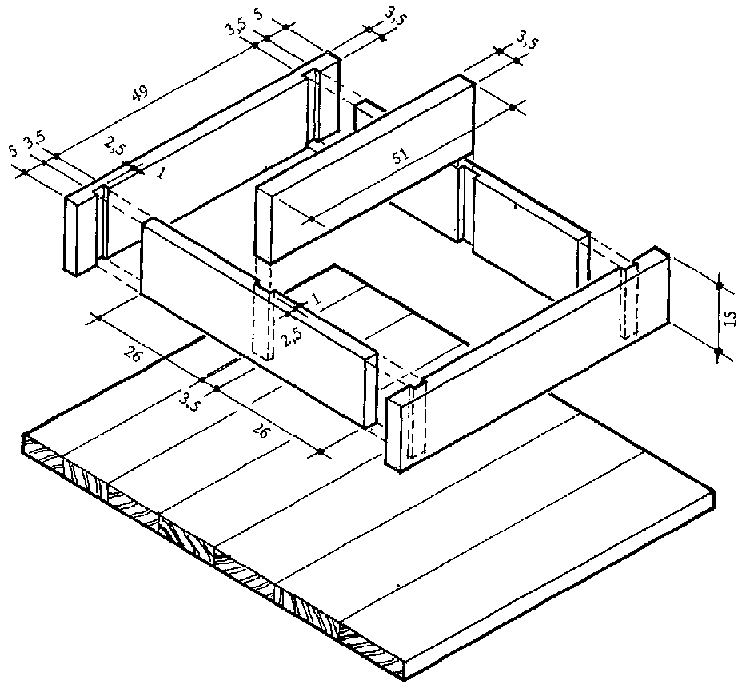
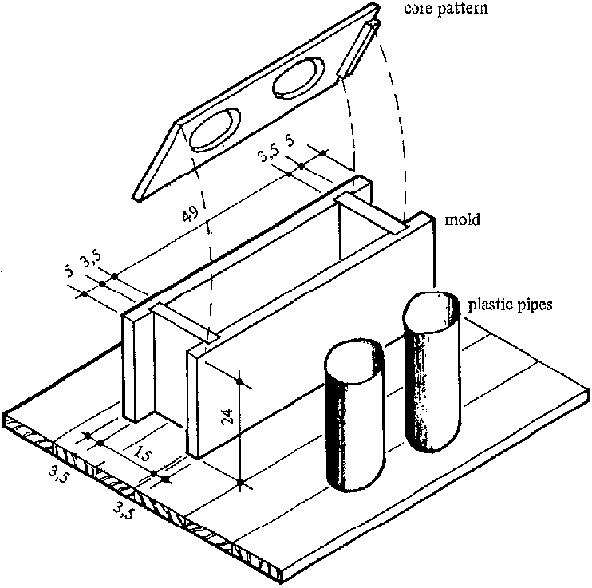
First, make a simple wooden mold with inside dimensions corresponding to the desired block format (Fig. 29). Normal, smoothly planed boards or square timbers make good box-mold building material. In making the box mold, be sure that it will be easy to remove from the freshly compacted block, i.e. that it is either easy to take apart and put back together or has such smooth inside faces that the block slips out easily.
Figure 29: Wooden mold for pumice-concrete solid brick, including board
Place the box mold on a smooth, level base, or better yet on a smooth backing board. Try to have a large number of such boards on hand, depending on how many blocks are to be produced in a certain length of time.
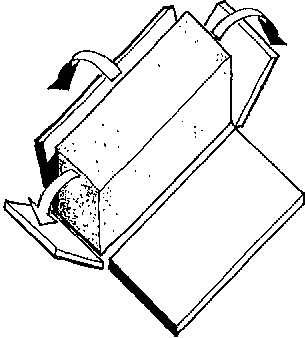
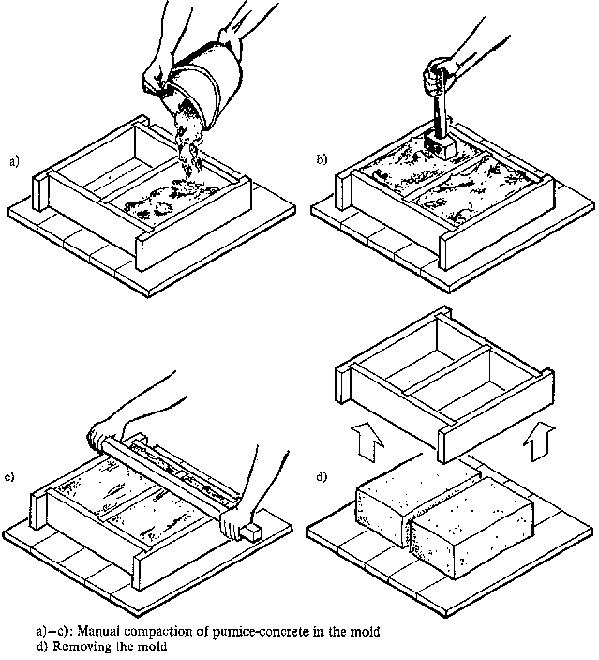
Pour the pumice concrete into the mold(s) and compact it by tamping with a wooden or iron compactor (Figs. 30a and 30b). Smooth off the top with a lath (strike board). If the concrete is soil-moist, the box mold can be removed immediately after the concrete has been compacted (Figs. 30c and 30d). Clean it with water for immediate reuse. If the pumice concrete mixture is right, the freshly compacted block -the so-called "green compact" will not lose its shape, i.e. crumble or sag.
Figure 30: Forming pumice-concrete solid bricks
Give the green blocks four or five days to harden before stacking or otherwise handling them. Subsequently, they will require another four days of hardening before they can be transported. All in all, a curing time of 28 days, i.e. one month, is required before they can be placed.
The dimensions 50 × 25 × 12 cm and 30 × 24 × 11.5 cm make a good choice for commercial-scale production of handstruck blocks/bricks, because one and the same kind of block/brick can be used for putting up a 30 cm thick wall, a 24 cm thick wall or an 11.5 cm thick wall.
3.2.3 Pumice concrete cavity blocks
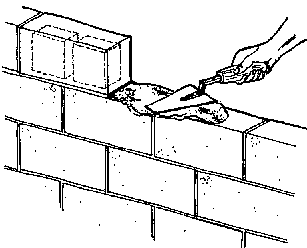
With a little practice and skill, pumice concrete cavity blocks are also easy to make in small quantities. The size of the wooden mold is more or less a question of personal preference, but a 49 × 24 × 15 cm format with two cavities is recommended (Fig. 31). With a view to facilitating placement of the blocks, it is advisable to leave the cavities open at one end only. That way, the mortar is easier to distribute around the supporting surface without having it fall into the cavities (Fig. 32). Since the blocks are supposed to be removed from the molds immediately after they are compacted (so that the wooden molds are immediately available for reuse), the inside of the molds should be made as smooth as possible. Some sort of sheet metal lining serves exceptionally well. Considering the hand-made nature of the finished blocks, either round plastic tubing or blocks of wood would be the best choice for use as cores for forming the cavities, since both are easy to twist out of the green product without damaging the cavities.
Figure 31: Wooden mold for two-cavity blocks
The production of concrete cavity blocks requires careful work to avoid damaging the corners and edges of the blocks when the molds are removed. The main things to watch for are that the pumice concrete is neither too dry nor too wet and that it is carefully compacted.
Figure 32: Spreading mortar on a cavity block
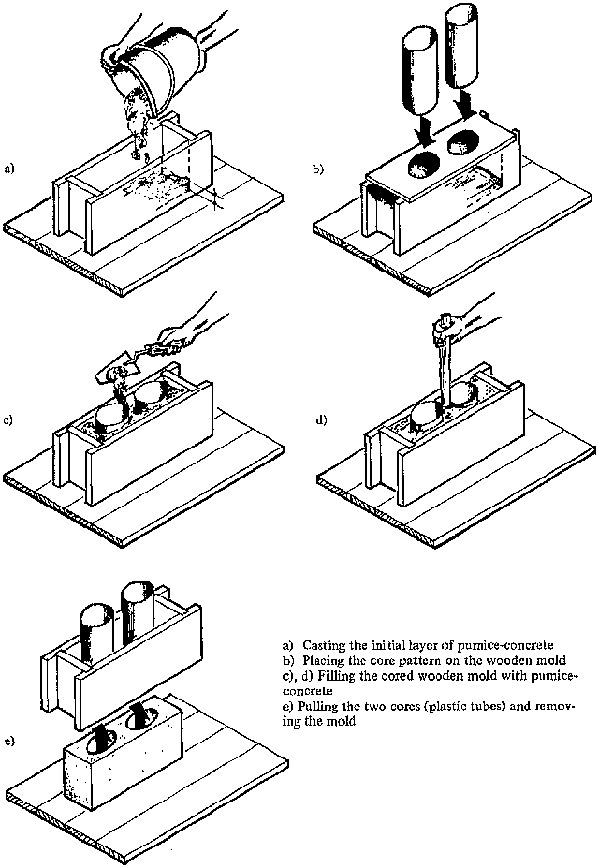
Follow this procedure for making two -cavity pumice-concrete blocks:
- Place the wooden mold on a support (wooden board).
- Cover the bottom of the mold with about 2 cm of pumice concrete (Fig. 33a).
- Put the core pattern (for plastic tubes or wooden blocks) on the mold (Fig. 33b).
- Insert the tubes or blocks for the cavities.
- Remove the pattern.
- Fill the remainder of the mold with pumice concrete and compact it well (Figs. 33c and 33d).
- Then, slowly and carefully pull the plastic tubes or wooden blocks out of the mold and remove the mold itself (Fig. 33e).
Figure 33: Forming pumice-concrete two-cavity blocks
Leave the block on the board to dry for 4 -5 days. Then stack the blocks to harden for another 4 days. After a total of 28 days, the blocks will have cured sufficiently for transportation and use. Handle the blocks with care, because they break more easily than solid blocks.
If you wish to produce large numbers of cavity blocks, use either steel molds instead of wooden molds or, better, a simple hand -operated mechanical press that compacts the blocks and ejects them from the molds.
Figure 36: Filling the corners with concrete and reinforcing bars
Since cavity blocks have relatively thin walls (approx. 2 - 3 cm), the pumice concrete should have a maximum particle size of about 10 mm, i.e. any fraction above 10 mm will have to be screened out of the pumice gravel prior to mixing the concrete. Screening can be accomplished using simple wire screens with mesh sizes of 10 mm (approx. 3/8") and 7 mm (approx. 1/4"). The recommended mixing ratio reads:
2 parts pumice, 1-6 mm in diameter
2 parts pumice, 6 -10 mm in diameter 1 part (Portland) cement.
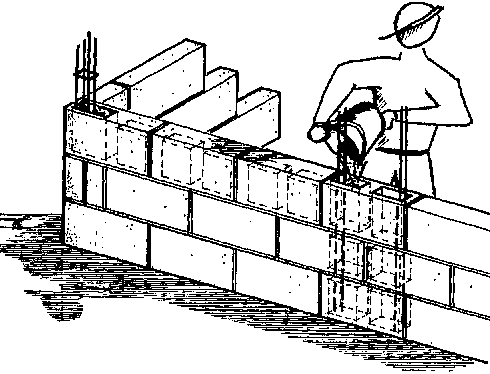
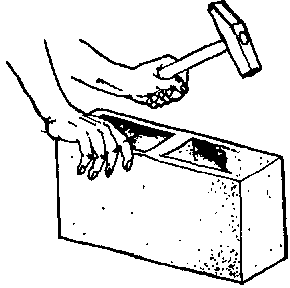
The advantage of cavity blocks is that they weigh less than solid blocks/bricks, which also means that less pumice concrete (and, hence, less cement) is consumed in making enough blocks for a wall of a given size. An additional advantage is that the cavities situated at the corners of the house can be filled with concrete and reinforcing bars to yield a strong framework' which can be very important in areas subject to earthquakes (Fig. 36). To do so, ram the reinforcing bar (or some other round tool) through the block bottoms to get wall-length cavities at the corners (Fig. 37).
Figure 37
Pumice concrete cavity blocks are useful above all else for filling out skeleton structures, but they are also suitable for making load-bearing walls. Different house-building systems based on cavity blocks are discussed in Chapter 4.3.
3.2.4 Pumice wall panels
How self-help builders with little or no training can use pumice to make simple wall panels measuring 100 × 50 × 5 cm or 100 × 50 × 7 cm is described below. Such panels can be used in any of several time-tested special-purpose house-building systems.
The main merit of the relatively small format is that it makes the panels relatively light and accordingly easy to produce, haul and handle -just right for do-it-yourselfers. A panel width of 50 cm and length of 100 cm combine well for a 2.00-m wall height, and openings for doors and windows can be made by simply leaving out a number of panels at the appropriate places.
To make such pumice-concrete panels, proceed as follows:
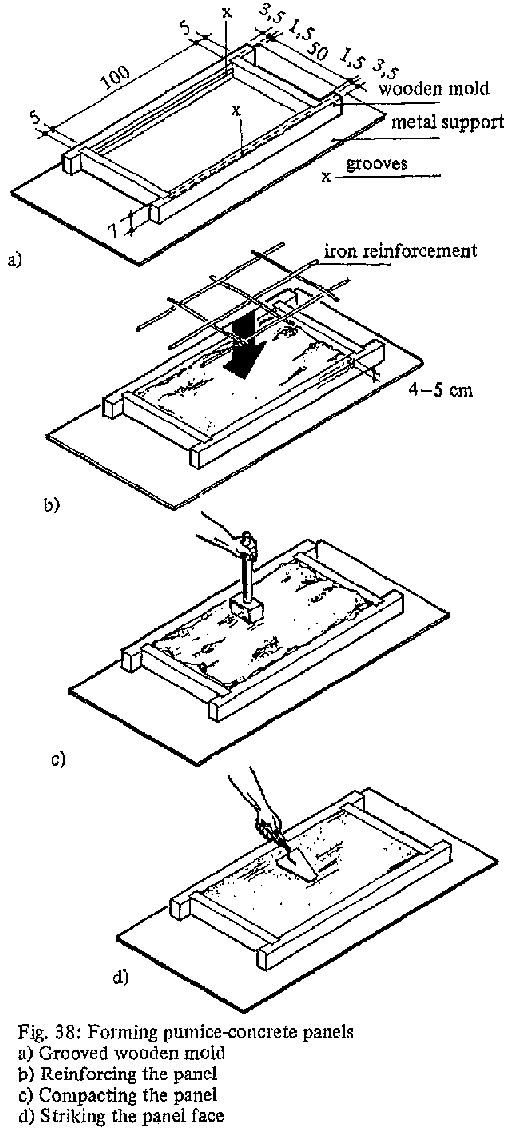
Make a simple wooden box mold out of 5-8 cm thick boards. If a large number of panels are needed, it would be a good idea to make several identical molds. That way, the panels can be stacked to save space. The long sides of the panels are supposed to be grooved. To make the grooves, use strips of wooden trim or plastic tubing (Fig. 38a). Later on, when the panels are being placed, the grooves must be filled with mortar to obtain strong joints. For details on wall construction with pumice-concrete panels, refer to Chapter 4.4.
Figure 38: Forming pumice-concrete panels
The panel-making area must be absolutely level. Each panel should have its own support made of smooth sheet-metal or wood. If nothing else is available, smooth paper or plastic sheeting can be laid out under each mold/panel, as long as the ground is perfectly level.
Considering the size of the panel, it would be a good idea, but not absolutely necessary, to include some form of iron reinforcement consisting of, say, a lattice arrangement of 10 mm (3/8") reinforcing bars sized to match the panels' dimensions. Any panel that will be subject to bending stress (sag), though, should have at least two such bars running lengthwise with several bends/curves (Fig. 38b).
Figure 39: Mold for hollow-core planks
For poring the panels, prepare a soil-moist pumice-gravel concrete, consisting of four parts pumice gravel to one part cement, and fill the wooden frame with it as described in Chapter 3.2.1. Place the reinforcing lattice such that it "floats" at the center of the panel; smooth the surface of the panel with a strike board or trowel (Figs. 38c and 38d). Leave the panels on the ground to set and harden for about five days, after which they can be handle and stacked. Then give them 25 days to cure prior to transportation and placement. In loading the panels for transportation, be sure to protect them against impact and bending, i.e. it is better to arrange them in an upright position instead of laying them flat.
If the floor in question will not be subject to heavy loads, reinforced pumice-concrete cavity planks can be used in place of the reinforced hollow girders (cf. Fig. 40, Chp. 3.2.5). Planks up to 10 cm thick, however, can only be used to span not more than than 3.0 m. In homes of simple construction, however, such reinforced planks can serve well, as long as careful attention is given to reinforcement, installation and handling, in addition to clarification of the acceptable span width with the aid of a stress analyst (structural engineer).
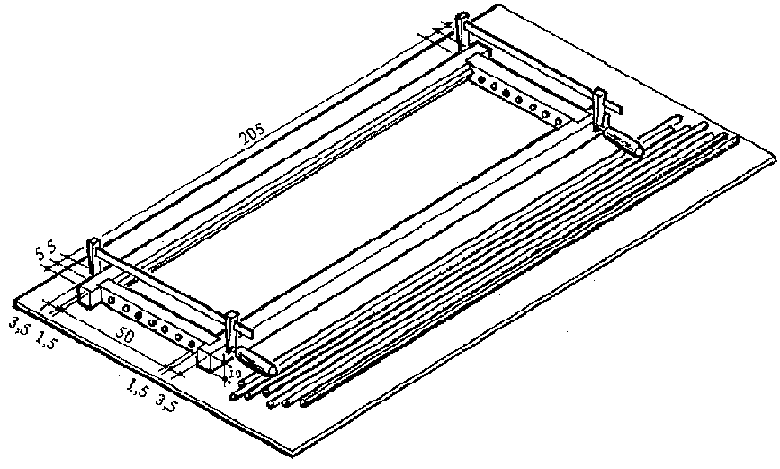
Figure 40: Forming pumice-concrete hollow-core planks
The prime use for such simple building panels is for filling in skeleton structures, although they can just as well be used for repairing existing walls and building new houses. Consider for example the house described in Chapter 4.4. It consists of a skeleton made of channel-section steel into which the panels are inserted. An alternative example consists of a load-bearing wooden framework and inserted panels.
Figure 40 (2)
Figure 40 (3)
- 2.5 Reinforced pumice-concrete hollow -core planks
Compared to the simple type of panel de scribed in the preceding Chapter, it takes somewhat more skill, tools and technical equipment to produce reinforced pumice -concrete hollow-core planks. Consequently, this approach is more suitable for collective self-help building projects than for individual homes. Since easy handling of building members is an important criterion in connection with self-help building projects, care should be taken to avoid making excessively large planks that could not be carried by hand. A maximum length of 250 cm and a maximum width of 50 cm are recommended. The planks used in the model homes discussed in Chapter 4.5 measure 220 × 50 × 10 cm. Planks of that size are just small enough to be carried and placed by four workers.
A relatively large area is needed for producing hollow-core planks. Especially the casting area has to be absolutely level, hard-wearing and easy to clean. The plank molds should be made of solid wood, because they will have to be used repeatedly (Fig. 39). Longitudinal cavities are necessary to save weight. To make them, place plastic tubes or steel pipes in the molds and pull them out after the planks have been compacted. To cast the planks, place the fully assembled wooden molds on a perfectly smooth and level floor panel or on ground covered with plastic sheeting. Alternatively, the floor panel can be coated with used oil before the molds are filled. Soil-moist pumice concrete prepared as described in Chapter 3.2.1 should be used for making the planks.
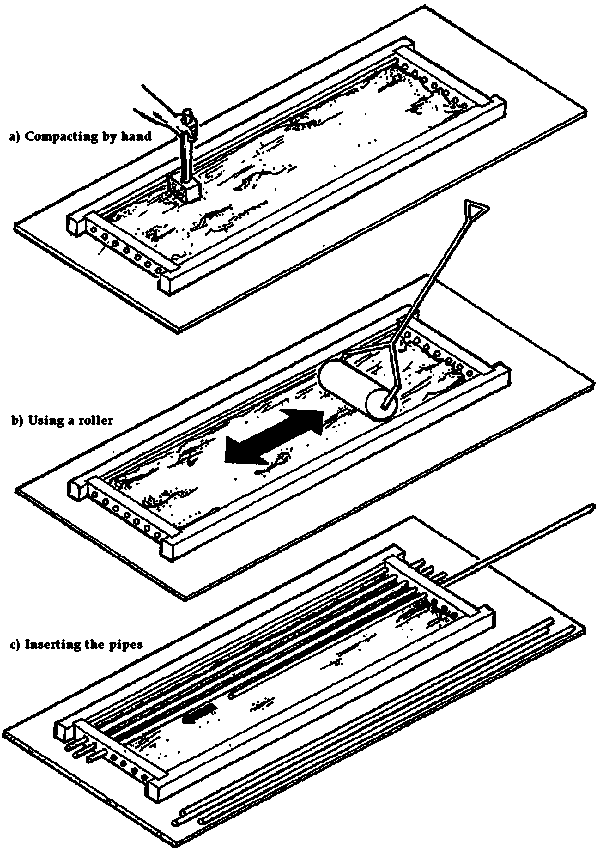
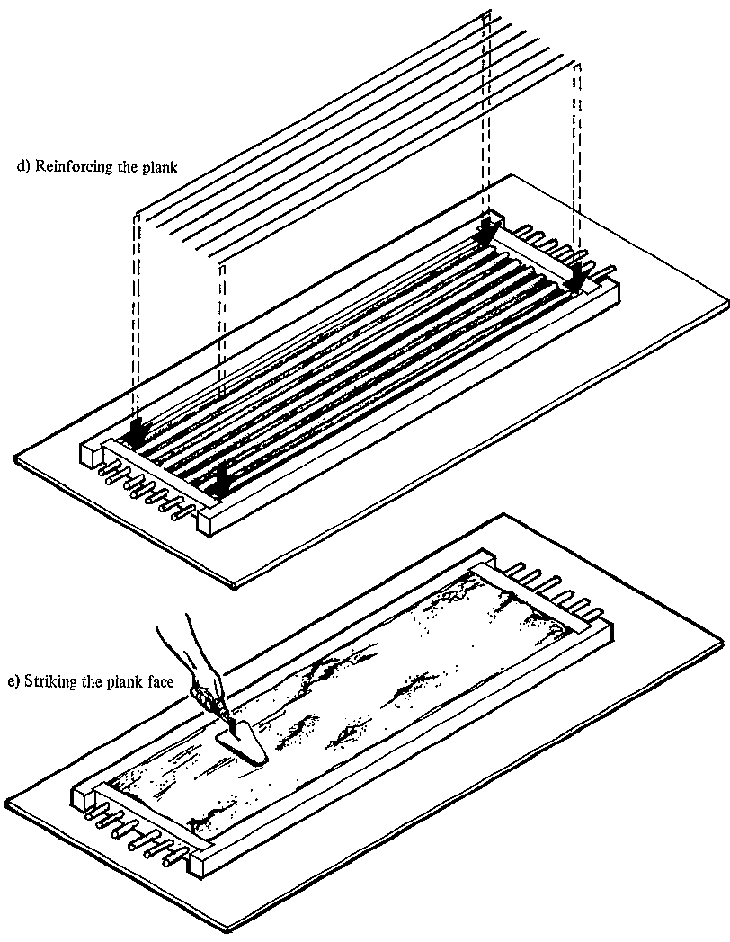
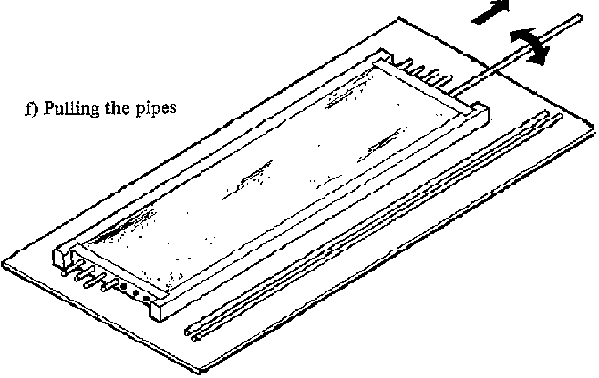
First, pour a 2 or 3 cm thick layer of pumice concrete into the properly prepared mold and carefully tamp it with a broad hand-held compactor. Even better results can be achieved with a roller, e.g. a steel pipe filled with concrete (Figs., 40a and 40b). Try to get the surface as level as possible. Next, insert the pipes or tubing through the holes in the short ends of the molds (Fig. 40 c). Place thin reinforcing rods (do not forget to have them ready) between the core tubes/ pipes (Fig. 40d). Now, fill out the interspaces with a second layer of pumice concrete that just barely covers the pipes/tubes. Again, carefully tamp the concrete with a broad compactor (or use a roller). Then, pour the third and last layer of pumice concrete, compact it, and strike off the surface with a straightedge lath, subsequently smoothing it over with a trowel (Figs. 40e and 40f). Now, carefully twist the pipes/tubes out of the mold and remove the mold from the green plank. Leave the planks on their bases to set and harden for about seven days. After that, they will be durable enough for lifting and carrying. They must be transported in an upright position (as opposed to Lying flat) and will require a total of 28 days curing prior to use (Fig. 41). With a view to achieving uniform quality, the planks should, if possible, be prepared in series in a small production installation. That, in turn' will require the availability of several identical molds and pumice concrete of uniform quality.
Reinforced pumice-concrete hollow-core planks serve well as filler members in various types of frame construction. A simple model house made of load-bearing hollow-core planks is described in Chapter 4.5.
- 2.6 Special-purpose pumice-concrete building members and their applications
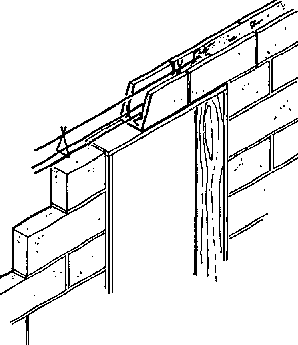
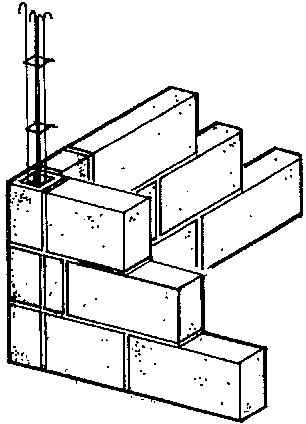
Channel blocks can be very useful (Fig. 42) as form blocks for peripheral tie beams, as lintels for doors and windows, and as filler blocks for anchoring steel door hinges, wall ties, etc. (Fig. 43).
Figure 43: Channel form block in a tie-beam configuration
Channel blocks are made in much the same manner as cavity blocks, except that the core (block of wood) is not placed at the center, but flush with one side of the mold. The walls of channel blocks should be at least 3 or 4 cm thick to make them strong enough to cope with the pressures that arise in connection with pouring and compacting the pumice concrete.
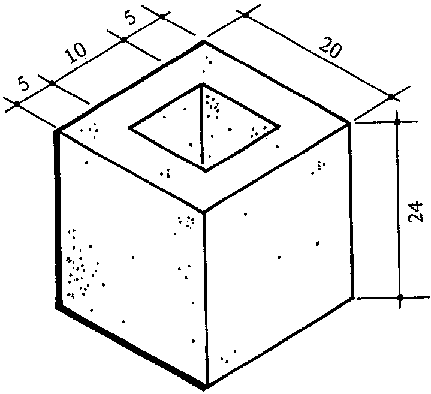
Closed, square hollow blocks serve primarily as form blocks for columns and as chimney blocks (Fig. 44). The blocks must be carefully aligned during placement, or there will be danger that the concrete could push them out of line, resulting in a crooked column. Such blocks serve well as chimney blocks if the clear cross section measures at least 10 × 10 cm and the walls are at least 5 cm thick.
Figure 44: Chimmey block
Naturally, attention should be paid to dimensional accuracy in fabricating the blocks in order to obtain straight, well -functioning chimneys.
Figure 45: Masonry corner with channel block serving as support fromwork
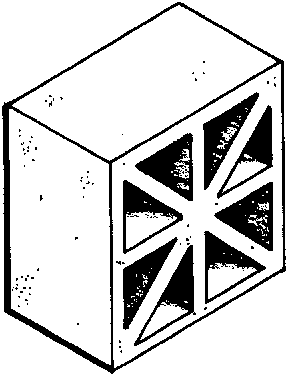
Fine-grained pumice concrete can also be used to make diverse kinds of vent blocks that provide through-wall ventilation without letting in sizable vemin or other uninvited guests (Fig. 46). Such blocks also serve as ornaments and in the construction of ventilated store-rooms. They are made in a manner similar to that used for producing cavity blocks, as described in Chapter 3.2.3. However, we recommend not trying to make blocks of very complicated shape, because pumice blocks are never as smooth as those made of normal-weight concrete.
Figure 46: Vent block
Yet another application for pumice-concrete blocks are intermediate floors. So-called pumice-concrete "hollow floor fillers" can be used in constructing ribbed floors (Fig. 47), e.g. when there is a shortage of form - work material, since such floors consist exclusively of prefabricated members.
The load-bearing beams, i.e. "lattice girders with concrete flanges" are suspended between the walls in a carefully aligned arrangement, with spacing to accommodate the hollow floor fillers. Then the fillers are placed side by side on the concrete flanges of the lattice girders. Check the visible under -face, the seating, the end blocks, etc. and install any supplementary reinforcement that may be considered necessary. After that, place a 5 cm-thick layer of pumice concrete over the fillers. The main function of the pumice in such floors is to minimize concrete consumption and reduce the weight burden in the tensioned zones of the floor.
With the requisite accuracy of static analysis, orderly installation and a small-scale industrial production mode, self-help groups can manufacture so-called "beam floors with pumice-concrete hollow-core plank fillers". The precast hollow planks should measure about 30 × 30 cm, with a length of 3-4 m, and have structural-iron reinforcement in their tension zone. They are placed side by side and then filled with concrete. This yields a very sturdy floor that will carry relatively heavy loads, depending on the span width, reinforcement, and the thick-ness of the pumice-concrete hollow girders.
