Objective:
In this session, you will learn how to build a simple bone drilling simulator with locally available materials.
We define a simple bone simulator as one that has a bone layer, periosteal layer and a plunge detector.
1
Review the learning objectives for this Module.
By the end of this Module, you will be able to:
- Determine which simulator materials you will use, based on materials available
- Build your simple or advanced bone drilling simulator according to guidelines.
- Perform quality control of your simulator and troubleshoot as needed.
2
Read through the information below about the options for your simple bone simulator
Notes on choosing your simulator[edit | edit source]
- We recommend you start with a simple simulator.
- Choose materials that are affordable and readily available for you. Be mindful that some materials are harder to source than others. You are better off choosing materials you can use to practice multiple times than spending all your resources on one perfect simulator that you can use only once.
- Once you practice and feel comfortable with basic bone drilling you can move on to more advanced skills that require complex simulators.
3
Review the layers required to build a simple bone drilling simulator, and possible materials to use for each.
To build a Simple bone drilling simulator, you will need[edit | edit source]
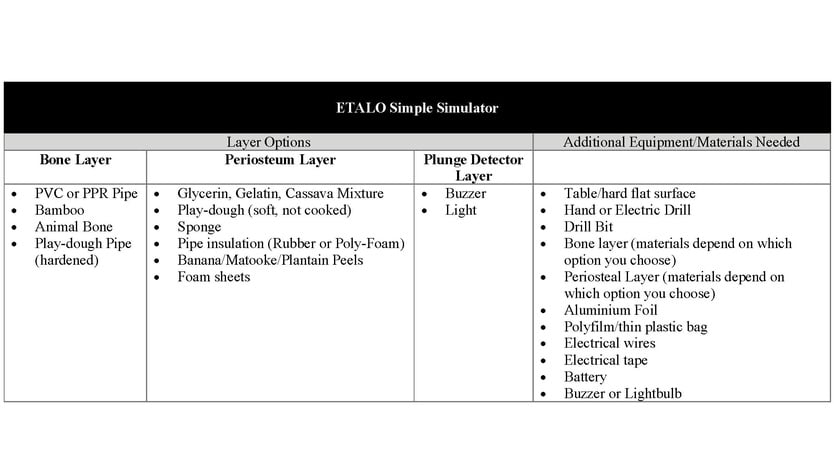
- Bone Layer: Select one of the recommended materials to simulate a bone (see the matrix below)
- Periosteal Layer: Select one of the recommended materials to simulate periosteum (see the matrix below)
- Plunge Detector: Can choose a buzzer or lightbulb detector as described in the Plunge Detector section under Phase 2 Simulator Build
- A stabilizer to secure it - this could be a ball of clay, a friend, a vice grip, or you can make a wood stand for your simple model.
- Watch the video below to see how to assemble and use your simple simulator.
Possible simulator materials to choose from[edit | edit source]
- Every learner will have different constraints on what materials are available therefore we designed our module for maximum versatility.
- Start with a simple simulator. As you become more comfortable with basic drilling skills, move on to more advanced simulators. The more advanced simulators have more layers of tissue to simulate those encountered during the surgical approach to the bone in addition to the drilling of the bone itself.
- Choose materials that are available locally and affordable to you.
- Be mindful of the drawbacks of each material (no simulator is perfect!)
We constructed a matrix of options to choose from for each layer. For a simple simulator, you need a bone layer and something to stabilize it with.
Notes about animal bones[edit | edit source]
- Fresh animal bones are the closest to human bone in their biomechanical properties. However, sometimes they can be expensive and they also spoil easily if not preserved.
- When choosing what animal bone to buy be mindful that the size/breed/sex/age of the animal influence bone size.
- Try to choose a bone with a diameter similar to a human bone you are trying to simulate. The human Tibia diameter is under 12mm. Average length in adults is 36-40cm. So, chose a bone that is under those parameters if possible.

4
Watch these videos showing how to build a simple simulator.
