Sophivorus (talk | contribs) m (Text replacement - "| instance-of = " to "| type = ") |
|||
| (34 intermediate revisions by 11 users not shown) | |||
| Line 1: | Line 1: | ||
[[File:DUHC Raincatchment System night.jpg|thumb]] | |||
[[ | |||
Nicole Vincent designed a rainwater catchment system for the residential property located at 1402 M St in Eureka, California. The owners of the house are principals with Democracy Unlimited of Humboldt County (DUHC). | {{Project data | ||
| authors = Nicole Vincent | |||
| status = Deployed | |||
| years = 2007 | |||
| cost = USD 1,629.30 | |||
| type = Rainwater catchment | |||
| location = Eureka, California | |||
}} | |||
Nicole Vincent designed a rainwater catchment system for the residential property located at 1402 M St in Eureka, California. The owners of the house are principals with Democracy Unlimited of Humboldt County (DUHC). DUHC is a non-profit organization that educates citizens about the illegitimate seizure of our authority to govern ourselves. They design and implement grassroots strategies that exercise democratic power over corporations and governments. DUHC seek to create a truly democratic society by provoking a non-violent popular uprising against corporate rule in Humboldt County that can serve as a model for other communities across the United States.If you would like to learn more about DUHC please check out there website at www.DUHC.org | |||
The rainwater catchment at 1402 M St is just the beginning of their move towards [[sustainability]]. Water collected from the system drip irrigates their vegetable garden,berries, fruit trees, and landscape. | The rainwater catchment at 1402 M St is just the beginning of their move towards [[sustainability]]. Water collected from the system drip irrigates their vegetable garden,berries, fruit trees, and landscape. | ||
==Literature Review== | == Literature Review == | ||
Rainwater catchment System, Rainwater Collection System, Rainwater harvesting process are words commonly used to describe the system we will design and construct. | |||
"Rainwater harvesting is the capture, diversion, and storage of rainwater for landscape irrigation and other uses." The most common type used today, is the roof catchment system. Roof catchment systems use gutters and downspouts, from which water flows by gravity into storage containers, which should be sized to collect as much rainfall as possible. An existing roof is used to capture rainwater that is gravity fed into a storage tank via gutters and down pipes(Texas A&M,2003). | Rainwater catchment System, Rainwater Collection System, Rainwater harvesting process are words commonly used to describe the system we will design and construct. | ||
===Key requirements=== | |||
"Rainwater harvesting is the capture, diversion, and storage of rainwater for landscape irrigation and other uses." The most common type used today, is the roof catchment system. Roof catchment systems use gutters and downspouts, from which water flows by gravity into storage containers, which should be sized to collect as much rainfall as possible. An existing roof is used to capture rainwater that is gravity fed into a storage tank via gutters and down pipes(Texas A&M,2003). | |||
=== Key requirements === | |||
There are a number of key requirements common to all effective tank designs: | There are a number of key requirements common to all effective tank designs: | ||
*A functional and water tight design | |||
*A solid, secure cover to keep out insects, dirt and sunshine | * A functional and water tight design | ||
*A screened inlet filter | * A solid, secure cover to keep out insects, dirt and sunshine | ||
*A screened overflow pipe | * A screened inlet filter | ||
*An extraction system that does not contaminate the water | * A screened overflow pipe | ||
*A soak away to prevent spilled water from forming puddles near the tank. | * An extraction system that does not contaminate the water | ||
* A soak away to prevent spilled water from forming puddles near the tank. | |||
(Gould,1999) | (Gould,1999) | ||
Why spend the time and money to collect rainwater when the city provides you with as much water as a person needs? Well,there is a long investment payback period of about two years for a rainwater catchment system, however, there are many immediate benefits such as the following: | Why spend the time and money to collect rainwater when the city provides you with as much water as a person needs? Well,there is a long investment payback period of about two years for a rainwater catchment system, however, there are many immediate benefits such as the following: | ||
===Immediate Benefits=== | |||
*Landscaping accounts for 30 to 50 percent of a households total water use. | === Immediate Benefits === | ||
*Rainwater is free of salts and other minerals that can be harmful to root growth. | |||
*It will help control erosion and flooding near the house. | * Landscaping accounts for 30 to 50 percent of a households total water use. | ||
*During times of drought or emergencies, a source of water will be available, when other sources are depleted or inaccessible | * Rainwater is free of salts and other minerals that can be harmful to root growth. | ||
* It will help control erosion and flooding near the house. | |||
* During times of drought or emergencies, a source of water will be available, when other sources are depleted or inaccessible | |||
(Texas A&M,2003). | (Texas A&M,2003). | ||
== System Design == | |||
=== Rainwater Collection Pathway === | |||
# Rain falls onto the 541 ft<sup>2</sup> section of roof selected for collection and down to the gutters where it then slides to each of the 4 downpipes. Halfway down it is diverted into PVC pipe that carries the water horizontally at a 2% slope into a 2500 gallon polythylene water tank. An outtake PVC pipe at the bottom of the tank extends ~20ft under the building through the crawl space and ends in the main yard. There are multiple spickets for separate drip irrigation hoses to water different sections of the yard and garden hoses. | |||
= | === Foundation/Crash Pad === | ||
=== | |||
The 104 in. by 104 in. pad gives enough space between the water tank and the house for maintenance or repair access. A perimeter of speed and corner blocks 8"x16" lined with rebar and filled with cement will create the support for the 2500 gallon water tank at 20,000 lb. | The 104 in. by 104 in. pad gives enough space between the water tank and the house for maintenance or repair access. A perimeter of speed and corner blocks 8"x16" lined with rebar and filled with cement will create the support for the 2500 gallon water tank at 20,000 lb. | ||
===Rainwater Storage Tank=== | === Rainwater Storage Tank === | ||
To determine the appropriate size of tank the following were considered | To determine the appropriate size of tank the following were considered | ||
*How much water usage will the house use per month for their landscaping? | |||
* How much water usage will the house use per month for their landscaping? | |||
# What is the total area of the roof? | # What is the total area of the roof? | ||
The house has city water as a back up in case their storage of rainwater is depleted, however, 2000 gallons of stored rainwater will last them up to three months. | I measured the perimeter of the home Length*width = total area | ||
===System Calculations=== | |||
* How much storage will they need for their rainwater supply to last throughout a dry season of 3 months? | |||
The house has city water as a back up in case their storage of rainwater is depleted, however, 2000 gallons of stored rainwater will last them up to three months. | |||
=== System Calculations === | |||
=== Annual Precipitation Table for Eureka === | |||
=== Rainwater tank Storage Data === | |||
To find the data below I used Mathew's calculator (link no longer exists, see [[Basic rainwater collection calculations]] instead) - Tank size: 2500 US Gallons; Roof collection area: ~500 Square Feet | |||
{| class="wikitable" | |||
! Rainfall in. | |||
! Volume US gal. | |||
{| class=wikitable | ! % of Tank | ||
!Rainfall in. | |||
!Volume US gal. | |||
!% of Tank | |||
|- | |- | ||
| 0.05 | | 0.05 | ||
| 16 | |||
| 0.62 | |||
|- | |- | ||
| 0.1 | | 0.1 | ||
| 31 | |||
| 1.25 | |||
|- | |- | ||
| 0.15 | | 0.15 | ||
| 47 | |||
| 1.87 | |||
|- | |- | ||
| 0.2 | | 0.2 | ||
| 62 | |||
| 2.49 | |||
|- | |- | ||
| 0.25 | | 0.25 | ||
| 78 | |||
| 3.12 | |||
|- | |- | ||
| 0.3 | | 0.3 | ||
| 93 | |||
| 3.74 | |||
|- | |- | ||
| 0.35 | | 0.35 | ||
| 109 | |||
| 4.36 | |||
|- | |- | ||
| 0.4 | | 0.4 | ||
| 125 | |||
| 4.99 | |||
|- | |- | ||
| 0.45 | | 0.45 | ||
| 140 | |||
| 5.61 | |||
|- | |- | ||
| 0.5 | | 0.5 | ||
| 156 | |||
| 6.23 | |||
|- | |- | ||
| 0.55 | | 0.55 | ||
| 171 | |||
| 6.86 | |||
|- | |- | ||
| 0.6 | | 0.6 | ||
| 187 | |||
| 7.48 | |||
|- | |- | ||
| 0.65 | | 0.65 | ||
| 203 | |||
| 8.1 | |||
|- | |- | ||
| 0.7 | | 0.7 | ||
| 218 | |||
| 8.73 | |||
|- | |- | ||
| 0.75 | | 0.75 | ||
| 234 | |||
| 9.35 | |||
|- | |- | ||
| 0.8 | | 0.8 | ||
| 249 | |||
| 9.97 | |||
|- | |- | ||
| 0.85 | | 0.85 | ||
| 265 | |||
| 10.6 | |||
|- | |- | ||
| 0.9 | | 0.9 | ||
| 280 | |||
| 11.22 | |||
|- | |- | ||
| 0.95 | | 0.95 | ||
| 296 | |||
| 11.84 | |||
|- | |- | ||
| 1 | | 1 | ||
| 312 | |||
| 12.47 | |||
|} | |} | ||
===Available water calculation=== | === Available water calculation === | ||
Here is a simple worksheet to predict the amount of water available to collect: | Here is a simple worksheet to predict the amount of water available to collect: | ||
# | # Multiply the catchment area by 0.550 to determine gallons per one inch of rain | ||
# Multiply the answer to #1 by the average annual rainfall in our area | |||
# Multiply the answer to # | |||
# This number is an estimate for the number of gallons available to collect in one year | # This number is an estimate for the number of gallons available to collect in one year | ||
===Equation for Eureka, Ca=== | === Equation for Eureka, Ca === | ||
Number of gallons available to collect in one year: | |||
<math>Catchment\ Area\ (ft2)\times \frac{0.550gal}{ft^2\cdot in} \times \frac{38.8 in\ (average\ Eureka\ rainfall)}{year}</math> | |||
=== Equation === | |||
= | <math>541ft^2\times\frac{0.550gal}{ft^2\cdot in} \times \frac{38.8in}{year}=\frac{11,524 gal}{year}</math> | ||
The system will store rainwater in a 2500 Gal polythylene Tank that is 86" or 7ft tall and has a 96" or 7.9ft Diameter. A tank this size can easily interfere with the usable space in the main yard. | |||
The system will store rainwater in a 2500 Gal polythylene Tank that is 86" or 7ft tall and has a 96" or 7.9ft Diameter . A tank this size can easily interfere with the usable space in the main yard. | |||
=== Gutters === | |||
The gutters were cleaned of debris and overhanging branches before we worked on the down pipe connections. | The gutters were cleaned of debris and overhanging branches before we worked on the down pipe connections. | ||
===Downpipes=== | |||
Each downpipe has a diverter that allows the rainwater to flow to the tank or switch it when the tank is full to its original path through the existing downpipe. | === Downpipes === | ||
==Location== | |||
All possible areas were considered for the location of the raincatchment system. The best location for the tank is outside of the main yard at the highest point of elevation. A tank this size | Each downpipe has a diverter that allows the rainwater to flow to the tank or switch it when the tank is full to its original path through the existing downpipe. | ||
A list of the advantages and disadvantages of every area were key to eliminating it down to one area. | |||
===Advantages=== | == Location == | ||
*The tank is out of the way of the owners yard space. | |||
*The site is at the highest point on their property. | All possible areas were considered for the location of the raincatchment system. The best location for the tank is outside of the main yard at the highest point of elevation. A tank this size can easily interfere with the usable space in the main yard. | ||
*The downpipes are close and also hidden from the view of the owners. | A list of the advantages and disadvantages of every area were key to eliminating it down to one area. | ||
===The Four Disadvantages of our chosen location=== | |||
*The gutters are on the second story | === Advantages === | ||
*The ground has a moderate incline | |||
*The tank is far from the main yard (how will they access the water?) We will send the outlet pipe under the smallest section of the house through the crawl space to the main yard. | * The tank is out of the way of the owners yard space. | ||
*There are two large shedding trees that hover over the systems potential gutters. These trees will be trimmed and consistently maintained to increase efficiency of the system. | * The site is at the highest point on their property. | ||
===Flow=== | * The downpipes are close and also hidden from the view of the owners. | ||
=== The Four Disadvantages of our chosen location === | |||
* The gutters are on the second story | |||
* The ground has a moderate incline | |||
* The tank is far from the main yard (how will they access the water?) We will send the outlet pipe under the smallest section of the house through the crawl space to the main yard. | |||
* There are two large shedding trees that hover over the systems potential gutters. These trees will be trimmed and consistently maintained to increase efficiency of the system. | |||
=== Flow === | |||
The water pressure is affected by the tanks water level. As the tank fills the water pressure increases | The water pressure is affected by the tanks water level. As the tank fills the water pressure increases | ||
==Materials/Cost== | == Materials/Cost == | ||
DUHC's raincatchment system needed to be durable yet affordable. | |||
{| class=wikitable | DUHC's raincatchment system needed to be durable yet affordable. | ||
!Qty. | |||
!Description | {| class="wikitable" | ||
!Cost per item | ! Qty. | ||
!Total Cost(incl. tax) | ! Description | ||
! Cost per item | |||
! Total Cost(incl. tax) | |||
|- | |- | ||
| 1 | | 1 | ||
| Norwesco 2500 gal. poly-tank | |||
| $1,093.00 | |||
| $1,093.00 | |||
|- | |- | ||
| 1 | | 1 | ||
| Tank Delivery | |||
| $25.00 | |||
| $25.00 | |||
|- | |- | ||
| 26 | | 26 | ||
| Speed Block | |||
| $2.29 | |||
| $62.54 | |||
|- | |- | ||
| 4 | | 4 | ||
| Closures | |||
| $2.46 | |||
| $11.84 | |||
|- | |- | ||
| 1 | | 1 | ||
| Baseplate Tamper 4hr Rental | |||
| $42.50 | |||
| $44.29 | |||
|- | |- | ||
| 1 | | 1 | ||
| Wheel Barrow rental | |||
| $42.03 | |||
| $42.03 | |||
|- | |- | ||
| 3 | | 3 | ||
| #4 Bar 40gr. | |||
| $5.14 | |||
| $17.42 | |||
|- | |- | ||
| 4 | | 4 | ||
| Bar Bends | |||
| $1.25 | |||
| $5.00 | |||
|- | |- | ||
| 3 | | 3 | ||
| 60 LB Concrete Ready Mix | |||
| $3.49 | |||
| $11.00 | |||
|- | |- | ||
| 0.5 | | 0.5 | ||
| Yard Sand | |||
| $53.30/yd | |||
| $28.65 | |||
|- | |- | ||
| 2 | | 2 | ||
| Adapter 1.5SL1.5MPT | |||
| $1.19 | |||
| $2.38 | |||
|- | |- | ||
| 3 | | 3 | ||
| Couple COMP SCH 40 2" | |||
| $9.99 | |||
| $29.97 | |||
|- | |- | ||
| 3 | | 3 | ||
| 90 degree elbow | |||
| $2.19 | |||
| $6.57 | |||
|- | |- | ||
| 4 | | 4 | ||
| 45 degree elbow | |||
| $2.69 | |||
| $10.76 | |||
|- | |- | ||
| 2 | | 2 | ||
| 2"TEE SCH 40 | |||
| $2.29 | |||
| $4.58 | |||
|- | |- | ||
| 2 | | 2 | ||
| Coupling | |||
| $1.59 | |||
| $3.18 | |||
|- | |- | ||
| 1 | | 1 | ||
| PVC 2" Threaded ball valve | |||
| $11.49 | |||
| $11.49 | |||
|- | |- | ||
| 1 | | 1 | ||
| PVC 2" Union | |||
| $9.49 | |||
| $9.49 | |||
|- | |- | ||
| 1 | | 1 | ||
| PVC bushing 2x3/4 | |||
| $1.59 | |||
| $1.59 | |||
|- | |- | ||
| 1 | | 1 | ||
| PVC 2" male adapter | |||
| $1.25 | |||
| $1.25 | |||
|- | |- | ||
| 1 | | 1 | ||
| SCH80 Nipple 2x3 | |||
| $1.25 | |||
| $1.25 | |||
|- | |- | ||
| 1 | | 1 | ||
| Christy's Red Hot PVC cement 4 | |||
| $3.49 | |||
| $3.49 | |||
|- | |- | ||
| 1 | | 1 | ||
| Ace hacksaw | |||
| $4.99 | |||
| $4.99 | |||
|- | |- | ||
| 1 | | 1 | ||
| Teflon Tape 1/2x520 in | |||
| $2.49 | |||
| $2.49 | |||
|- | |- | ||
| 1 | | 1 | ||
| 3/4 in adapter brass | |||
| $2.49 | |||
| $2.49 | |||
|- | |- | ||
| 1 | | 1 | ||
| 5 faucet manifold | |||
| $8.31 | |||
| $8.31 | |||
|- | |- | ||
| 3 | | 3 | ||
| Bushing 3" to 2" | |||
| $2.29 | |||
| $6.87 | |||
|- | |- | ||
| .6" | | .6" | ||
| PVC 1 1/2" SCH40 | |||
| $1.03 | |||
| $1.03 | |||
|- | |- | ||
| 6 | | 6 | ||
| PVC SCH40 2"x10ft | |||
| $8.99 | |||
| $53.94 | |||
|- | |- | ||
| 4 | | 4 | ||
| PVC SCH40 2"x10ft | |||
| $7.90 | |||
| $31.60 | |||
|- | |- | ||
| 1 | | 1 | ||
| 25'Poly-strap pipe hangers | |||
| $3.29 | |||
| $3.29 | |||
|- | |- | ||
| 1 | | 1 | ||
| Drill Bit 1/4" | |||
| $7.49 | |||
| $7.49 | |||
|- | |- | ||
| 1 | | 1 | ||
| Stainless steel screws #8x1-1/4 | |||
| $14.99 | |||
| $14.99 | |||
|- | |- | ||
| 3 | | 3 | ||
| Diverters | |||
| $18.75 | |||
| $56.25 | |||
|- | |- | ||
| 3 | | 3 | ||
| 2x3x3 PVC Offset Tile adapter | |||
| $2.93 | |||
| $8.79 | |||
|- | |- | ||
! colspan="3" align="right"|Total Cost of System | ! colspan="3" align="right" |Total Cost of System | ||
| $1,629.30 | |||
|} | |} | ||
==Construction== | == Construction == | ||
=== The Tank Pad === | |||
Building a sturdy and level pad for the water storage tank is very important | Building a sturdy and level pad for the water storage tank is very important | ||
When the water tank is at its full capacity of 2500 gallons it will weigh approximately 20,000lbs. | When the water tank is at its full capacity of 2500 gallons it will weigh approximately 20,000lbs. The tank should have the weight of the water evenly distributed. Any slope can cause more weight and therefore pressure on one location of the tank. | ||
=== Materials === | |||
* Ready mix Cement | |||
*Ready mix Cement | * 1/2 yard Sand | ||
*1/2 yard Sand | * 2 yards Medium river rock | ||
*2 yards Medium river rock | * Speed block 8"x16" | ||
*Speed block 8"x16" | * Corner block 8"x16" | ||
*Corner block 8"x16" | * 1/2" Rebar | ||
*1/2" Rebar | |||
===Minimum Equipment Needed=== | === Minimum Equipment Needed === | ||
* Baseplate Tamper (rented) | |||
* Site Leveler and string level | |||
* Wheel Barrow and 5 gallon buckets | |||
* Shovels | |||
== Pad Construction == | |||
*Concrete blocks line the perimeter of the pad with corner blocks cemented together and leveled. | Building a sturdy and level pad for the water storage tank is very important. | ||
<gallery> | |||
File:DUHC_crashpad_1.jpg|Fig.1a Dirt from the main yard was hauled to level the ground as much as possible | |||
File:DUHC_crashpad_2.jpg|Fig.1b The section of dirt under the concrete blocks was compacted with a base plate tamper. | |||
File:DUHC_crashpad_3.jpg|Fig.1c Each corner block is chiseled for rebar to fit through. Four 6X12"deep footings were filled with cement and 1-2 vertical rebar set in for extra strength. | |||
File:DUHC_Rainwater_Vincent_05.jpg|Fig.1e The sand and rock fill was leveled with a broom | |||
</gallery> | |||
* Concrete blocks line the perimeter of the pad with corner blocks cemented together and leveled. | |||
* Rebar was placed along the notches of the concrete blocks | * Rebar was placed along the notches of the concrete blocks | ||
* Bailing wire is tied around each joint where two ends of rebar meet. | * Bailing wire is tied around each joint where two ends of rebar meet. | ||
* Cement was mixed and poured into concrete blocks | * Cement was mixed and poured into concrete blocks | ||
* The cement was allowed to | * The cement was allowed to sit for 3 days | ||
* The | * The padded center was filled with Medium-sized rock | ||
* We topped the pad with a sand layer | * We topped the pad with a sand layer | ||
==The Intake== | == The Intake == | ||
* Equipment | * Equipment | ||
* Extension ladder | * Extension ladder | ||
| Line 261: | Line 450: | ||
* Drill | * Drill | ||
* Hacksaw | * Hacksaw | ||
===Safety=== | |||
=== Safety === | |||
* Glasses | * Glasses | ||
* Respirator(Heavy duty) | * Respirator(Heavy duty) | ||
* Gloves | * Gloves | ||
===Materials=== | |||
=== Materials === | |||
* All pipe is 2" Schedule 40 PVC unless noted otherwise | * All pipe is 2" Schedule 40 PVC unless noted otherwise | ||
* 67ft PVC | * 67ft PVC | ||
| Line 271: | Line 464: | ||
* Polyethylene pipe strap | * Polyethylene pipe strap | ||
* 2"x3" Downpipe diverters | * 2"x3" Downpipe diverters | ||
*2" Couple Comp | * 2" Couple Comp | ||
=== Intake Construction === | |||
<gallery> | |||
File:DUHC_Raincatchment_intake02.jpg|Fig.1a Each downpipe diverter piece was assembled with out glue | |||
File:DUHC_Raincatchment_intake01.jpg|Fig.1b 1.5" long PVC pieces were cut to bring flared fittings together | |||
File:Imageneeded.png|Fig.1c Every piece was laid flat on the ground below its final location on the wall.We assembled every piece possible without glue and marked the cuts needed with an inch for overlap added. | |||
File:Imageneeded.png|Fig.1d On the ground we connected each piece of pipe after it was cut starting from the farthest downpipe from the tank and then worked our way over without glue. | |||
File:DUHC_Raincatchment_intake06.jpg|Fig.1e Each downpipe diverter piece was glued together | |||
File:Imageneeded.png|Fig.2a For each downpipe we measured the distance between the lowest point of the downpipe diverter piece to the point where the house siding meets the cement wall(the ground is an inaccurate measuring point)this gave us the slope of our water pathway to the tank. | |||
File:Imageneeded.png|Fig.2b Once the right slope was calculated we added the length of the diverter piece for each downpipe to its measurement in #4 plus an inch for overlap to get our downpipe diverter insertion cut. | |||
File:DUHC_Raincatchment_intake04.jpg|Fig.2c Starting with the farthest downpipe from the tank I cut the insertion point with a light duty hack saw then inserted the downpipe piece and attached the lower half of the downpipe to the diverter. | |||
File:Imageneeded.png|Fig.2d With assistance I lifted and glued the first 10ft PVC pipe piece into the installed downpipe diverter piece and the polythylene strap was installed. | |||
File:DUHC_Raincatchment_intake_drill.jpg|Fig.2e Drilled through the metal siding cover then screw in to subsurface. | |||
File:DUHC_Raincatchment_intake03.jpg|Fig.3a The second downpipe was cut and the diverter piece installed. | |||
File:DUHC_Raincatchment_intake07.jpg|Fig.3b In order for the intake pipe to follow closely along the house a flexi pipe was added to connect the diverter to the lower downpipe and keep it out of the way. | |||
File:Imageneeded.png|Fig.3c One end of the second 10ft piece was inserted into the couple and the other end was glued to the middle downpipe diverter piece. A strap was inserted. | |||
File: DUHC_Raincatchment_intake_2nd.jpg|Fig.4a The corner piece was lifted and glued into place and one strap installed. | |||
File:Imageneeded.png|Fig.4b We installed two 10ft pipes same as figure and glued the end into the last diverter piece before the tank. | |||
File:Imageneeded.png|Fig.5 From the Tank to the diverter piece | |||
File:Imageneeded.png|Fig.5a I glued a 1 1/2 male adapter was used to screw in the tank female intake piece with a slip on one end for a 1 1/2" x 1 1/2" pvc pipe then inserted and glued a 1 1/2 to 2" slip bushing. | |||
File: DUHC_Raincatchment_intake_tank.jpg|Fig.5b We assembled the pieces to reach the diverter piece without glue and had to hold it up in place to measure the right angles and lengths to cut. Last we glued the pieces together and our intake was complete. | |||
</gallery> | |||
== The Outtake == | |||
=== Materials === | |||
* 33 ft SCH 40 2" PVC | |||
* PVC SCH 80 nipple | |||
* PVC SCH 80 Thread ball | |||
* PVC coupling | |||
* PVC union | |||
* 90 degree elbow | |||
* 45 degree elbow | |||
* 2" to 3/4" reducer | |||
* 3/4" brass hose adapter | |||
* 5 faucet manifold | |||
=== Outtake Construction === | |||
===Outtake Construction=== | |||
<gallery> | |||
File:DUHC_Raincatchment_outtake_end.jpg|Fig.1a I wrapped plumbers tape around the 2" nipple counter clockwise then screwed it into the 2" outlet of the tank. The ball valve was screwed on to the nipple. | |||
File:Imageneeded.png|Fig.1b Next, a 2" threaded fitting with a slip end was screwed into the ball valve. Pipe was cut to fit and a quick disconnect inserted. We used two 45 degree elbows to reach the proper angle for the pipe coming from under the house to the tank. | |||
File:Imageneeded.png|Fig.1d I connected three 10ft lengths of 2" PVC in the backyard and fed it under the house. I crawled under and directed it to the tank connection. Once the I crawled back under the house and glued the three 10 ft lengths together. | |||
File:DUHC_Raincatchment_intake_5manifold.jpg|Fig.1eThe end of the pipe is in the back yard and I glued a reducer to take the pipe from 2" to 3/4". A 3/4" brass hose adapter with plumbers tape was inserted then the five faucet manifold was installed. | |||
</gallery> | |||
== | {{Page data | ||
| keywords = rainwater catchment, rainwater, tank, valve | |||
| sdg = SDG06 Clean water and sanitation, SDG11 Sustainable cities and communities | |||
| published = 2007 | |||
| organizations = Cal Poly Humboldt, Engr305 Appropriate Technology | |||
| license = CC-BY-SA-3.0 | |||
| language = en | |||
}} | |||
[[Category:Engr305 Appropriate Technology]] | [[Category:Engr305 Appropriate Technology]] | ||
[[Category:Rainwater]] | [[Category:Rainwater]] | ||
Latest revision as of 19:02, 18 June 2024

Nicole Vincent designed a rainwater catchment system for the residential property located at 1402 M St in Eureka, California. The owners of the house are principals with Democracy Unlimited of Humboldt County (DUHC). DUHC is a non-profit organization that educates citizens about the illegitimate seizure of our authority to govern ourselves. They design and implement grassroots strategies that exercise democratic power over corporations and governments. DUHC seek to create a truly democratic society by provoking a non-violent popular uprising against corporate rule in Humboldt County that can serve as a model for other communities across the United States.If you would like to learn more about DUHC please check out there website at www.DUHC.org
The rainwater catchment at 1402 M St is just the beginning of their move towards sustainability. Water collected from the system drip irrigates their vegetable garden,berries, fruit trees, and landscape.
Literature Review[edit | edit source]
Rainwater catchment System, Rainwater Collection System, Rainwater harvesting process are words commonly used to describe the system we will design and construct.
"Rainwater harvesting is the capture, diversion, and storage of rainwater for landscape irrigation and other uses." The most common type used today, is the roof catchment system. Roof catchment systems use gutters and downspouts, from which water flows by gravity into storage containers, which should be sized to collect as much rainfall as possible. An existing roof is used to capture rainwater that is gravity fed into a storage tank via gutters and down pipes(Texas A&M,2003).
Key requirements[edit | edit source]
There are a number of key requirements common to all effective tank designs:
- A functional and water tight design
- A solid, secure cover to keep out insects, dirt and sunshine
- A screened inlet filter
- A screened overflow pipe
- An extraction system that does not contaminate the water
- A soak away to prevent spilled water from forming puddles near the tank.
(Gould,1999)
Why spend the time and money to collect rainwater when the city provides you with as much water as a person needs? Well,there is a long investment payback period of about two years for a rainwater catchment system, however, there are many immediate benefits such as the following:
Immediate Benefits[edit | edit source]
- Landscaping accounts for 30 to 50 percent of a households total water use.
- Rainwater is free of salts and other minerals that can be harmful to root growth.
- It will help control erosion and flooding near the house.
- During times of drought or emergencies, a source of water will be available, when other sources are depleted or inaccessible
(Texas A&M,2003).
System Design[edit | edit source]
Rainwater Collection Pathway[edit | edit source]
- Rain falls onto the 541 ft2 section of roof selected for collection and down to the gutters where it then slides to each of the 4 downpipes. Halfway down it is diverted into PVC pipe that carries the water horizontally at a 2% slope into a 2500 gallon polythylene water tank. An outtake PVC pipe at the bottom of the tank extends ~20ft under the building through the crawl space and ends in the main yard. There are multiple spickets for separate drip irrigation hoses to water different sections of the yard and garden hoses.
Foundation/Crash Pad[edit | edit source]
The 104 in. by 104 in. pad gives enough space between the water tank and the house for maintenance or repair access. A perimeter of speed and corner blocks 8"x16" lined with rebar and filled with cement will create the support for the 2500 gallon water tank at 20,000 lb.
Rainwater Storage Tank[edit | edit source]
To determine the appropriate size of tank the following were considered
- How much water usage will the house use per month for their landscaping?
- What is the total area of the roof?
I measured the perimeter of the home Length*width = total area
- How much storage will they need for their rainwater supply to last throughout a dry season of 3 months?
The house has city water as a back up in case their storage of rainwater is depleted, however, 2000 gallons of stored rainwater will last them up to three months.
System Calculations[edit | edit source]
Annual Precipitation Table for Eureka[edit | edit source]
Rainwater tank Storage Data[edit | edit source]
To find the data below I used Mathew's calculator (link no longer exists, see Basic rainwater collection calculations instead) - Tank size: 2500 US Gallons; Roof collection area: ~500 Square Feet
| Rainfall in. | Volume US gal. | % of Tank |
|---|---|---|
| 0.05 | 16 | 0.62 |
| 0.1 | 31 | 1.25 |
| 0.15 | 47 | 1.87 |
| 0.2 | 62 | 2.49 |
| 0.25 | 78 | 3.12 |
| 0.3 | 93 | 3.74 |
| 0.35 | 109 | 4.36 |
| 0.4 | 125 | 4.99 |
| 0.45 | 140 | 5.61 |
| 0.5 | 156 | 6.23 |
| 0.55 | 171 | 6.86 |
| 0.6 | 187 | 7.48 |
| 0.65 | 203 | 8.1 |
| 0.7 | 218 | 8.73 |
| 0.75 | 234 | 9.35 |
| 0.8 | 249 | 9.97 |
| 0.85 | 265 | 10.6 |
| 0.9 | 280 | 11.22 |
| 0.95 | 296 | 11.84 |
| 1 | 312 | 12.47 |
Available water calculation[edit | edit source]
Here is a simple worksheet to predict the amount of water available to collect:
- Multiply the catchment area by 0.550 to determine gallons per one inch of rain
- Multiply the answer to #1 by the average annual rainfall in our area
- This number is an estimate for the number of gallons available to collect in one year
Equation for Eureka, Ca[edit | edit source]
Number of gallons available to collect in one year:

Equation[edit | edit source]

The system will store rainwater in a 2500 Gal polythylene Tank that is 86" or 7ft tall and has a 96" or 7.9ft Diameter. A tank this size can easily interfere with the usable space in the main yard.
Gutters[edit | edit source]
The gutters were cleaned of debris and overhanging branches before we worked on the down pipe connections.
Downpipes[edit | edit source]
Each downpipe has a diverter that allows the rainwater to flow to the tank or switch it when the tank is full to its original path through the existing downpipe.
Location[edit | edit source]
All possible areas were considered for the location of the raincatchment system. The best location for the tank is outside of the main yard at the highest point of elevation. A tank this size can easily interfere with the usable space in the main yard. A list of the advantages and disadvantages of every area were key to eliminating it down to one area.
Advantages[edit | edit source]
- The tank is out of the way of the owners yard space.
- The site is at the highest point on their property.
- The downpipes are close and also hidden from the view of the owners.
The Four Disadvantages of our chosen location[edit | edit source]
- The gutters are on the second story
- The ground has a moderate incline
- The tank is far from the main yard (how will they access the water?) We will send the outlet pipe under the smallest section of the house through the crawl space to the main yard.
- There are two large shedding trees that hover over the systems potential gutters. These trees will be trimmed and consistently maintained to increase efficiency of the system.
Flow[edit | edit source]
The water pressure is affected by the tanks water level. As the tank fills the water pressure increases
Materials/Cost[edit | edit source]
DUHC's raincatchment system needed to be durable yet affordable.
| Qty. | Description | Cost per item | Total Cost(incl. tax) |
|---|---|---|---|
| 1 | Norwesco 2500 gal. poly-tank | $1,093.00 | $1,093.00 |
| 1 | Tank Delivery | $25.00 | $25.00 |
| 26 | Speed Block | $2.29 | $62.54 |
| 4 | Closures | $2.46 | $11.84 |
| 1 | Baseplate Tamper 4hr Rental | $42.50 | $44.29 |
| 1 | Wheel Barrow rental | $42.03 | $42.03 |
| 3 | #4 Bar 40gr. | $5.14 | $17.42 |
| 4 | Bar Bends | $1.25 | $5.00 |
| 3 | 60 LB Concrete Ready Mix | $3.49 | $11.00 |
| 0.5 | Yard Sand | $53.30/yd | $28.65 |
| 2 | Adapter 1.5SL1.5MPT | $1.19 | $2.38 |
| 3 | Couple COMP SCH 40 2" | $9.99 | $29.97 |
| 3 | 90 degree elbow | $2.19 | $6.57 |
| 4 | 45 degree elbow | $2.69 | $10.76 |
| 2 | 2"TEE SCH 40 | $2.29 | $4.58 |
| 2 | Coupling | $1.59 | $3.18 |
| 1 | PVC 2" Threaded ball valve | $11.49 | $11.49 |
| 1 | PVC 2" Union | $9.49 | $9.49 |
| 1 | PVC bushing 2x3/4 | $1.59 | $1.59 |
| 1 | PVC 2" male adapter | $1.25 | $1.25 |
| 1 | SCH80 Nipple 2x3 | $1.25 | $1.25 |
| 1 | Christy's Red Hot PVC cement 4 | $3.49 | $3.49 |
| 1 | Ace hacksaw | $4.99 | $4.99 |
| 1 | Teflon Tape 1/2x520 in | $2.49 | $2.49 |
| 1 | 3/4 in adapter brass | $2.49 | $2.49 |
| 1 | 5 faucet manifold | $8.31 | $8.31 |
| 3 | Bushing 3" to 2" | $2.29 | $6.87 |
| .6" | PVC 1 1/2" SCH40 | $1.03 | $1.03 |
| 6 | PVC SCH40 2"x10ft | $8.99 | $53.94 |
| 4 | PVC SCH40 2"x10ft | $7.90 | $31.60 |
| 1 | 25'Poly-strap pipe hangers | $3.29 | $3.29 |
| 1 | Drill Bit 1/4" | $7.49 | $7.49 |
| 1 | Stainless steel screws #8x1-1/4 | $14.99 | $14.99 |
| 3 | Diverters | $18.75 | $56.25 |
| 3 | 2x3x3 PVC Offset Tile adapter | $2.93 | $8.79 |
| Total Cost of System | $1,629.30 | ||
Construction[edit | edit source]
The Tank Pad[edit | edit source]
Building a sturdy and level pad for the water storage tank is very important When the water tank is at its full capacity of 2500 gallons it will weigh approximately 20,000lbs. The tank should have the weight of the water evenly distributed. Any slope can cause more weight and therefore pressure on one location of the tank.
Materials[edit | edit source]
- Ready mix Cement
- 1/2 yard Sand
- 2 yards Medium river rock
- Speed block 8"x16"
- Corner block 8"x16"
- 1/2" Rebar
Minimum Equipment Needed[edit | edit source]
- Baseplate Tamper (rented)
- Site Leveler and string level
- Wheel Barrow and 5 gallon buckets
- Shovels
Pad Construction[edit | edit source]
Building a sturdy and level pad for the water storage tank is very important.
-

Fig.1a Dirt from the main yard was hauled to level the ground as much as possible
-

Fig.1b The section of dirt under the concrete blocks was compacted with a base plate tamper.
-
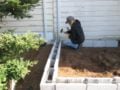
Fig.1c Each corner block is chiseled for rebar to fit through. Four 6X12"deep footings were filled with cement and 1-2 vertical rebar set in for extra strength.
-

Fig.1e The sand and rock fill was leveled with a broom


- Concrete blocks line the perimeter of the pad with corner blocks cemented together and leveled.
- Rebar was placed along the notches of the concrete blocks
- Bailing wire is tied around each joint where two ends of rebar meet.
- Cement was mixed and poured into concrete blocks
- The cement was allowed to sit for 3 days
- The padded center was filled with Medium-sized rock
- We topped the pad with a sand layer
The Intake[edit | edit source]
- Equipment
- Extension ladder
- 8ft A-frame ladder
- Tool belt
- Drill
- Hacksaw
Safety[edit | edit source]
- Glasses
- Respirator(Heavy duty)
- Gloves
Materials[edit | edit source]
- All pipe is 2" Schedule 40 PVC unless noted otherwise
- 67ft PVC
- Christy's Red Hot PVC Cement
- Polyethylene pipe strap
- 2"x3" Downpipe diverters
- 2" Couple Comp
Intake Construction[edit | edit source]
-

Fig.1a Each downpipe diverter piece was assembled with out glue
-

Fig.1b 1.5" long PVC pieces were cut to bring flared fittings together
-

Fig.1c Every piece was laid flat on the ground below its final location on the wall.We assembled every piece possible without glue and marked the cuts needed with an inch for overlap added.
-
Fig.1d On the ground we connected each piece of pipe after it was cut starting from the farthest downpipe from the tank and then worked our way over without glue.
-

Fig.1e Each downpipe diverter piece was glued together
-
Fig.2a For each downpipe we measured the distance between the lowest point of the downpipe diverter piece to the point where the house siding meets the cement wall(the ground is an inaccurate measuring point)this gave us the slope of our water pathway to the tank.
-
Fig.2b Once the right slope was calculated we added the length of the diverter piece for each downpipe to its measurement in #4 plus an inch for overlap to get our downpipe diverter insertion cut.
-

Fig.2c Starting with the farthest downpipe from the tank I cut the insertion point with a light duty hack saw then inserted the downpipe piece and attached the lower half of the downpipe to the diverter.
-
Fig.2d With assistance I lifted and glued the first 10ft PVC pipe piece into the installed downpipe diverter piece and the polythylene strap was installed.
-

Fig.2e Drilled through the metal siding cover then screw in to subsurface.
-

Fig.3a The second downpipe was cut and the diverter piece installed.
-
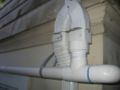
Fig.3b In order for the intake pipe to follow closely along the house a flexi pipe was added to connect the diverter to the lower downpipe and keep it out of the way.
-
Fig.3c One end of the second 10ft piece was inserted into the couple and the other end was glued to the middle downpipe diverter piece. A strap was inserted.
-
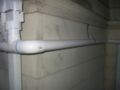
Fig.4a The corner piece was lifted and glued into place and one strap installed.
-
Fig.4b We installed two 10ft pipes same as figure and glued the end into the last diverter piece before the tank.
-
Fig.5 From the Tank to the diverter piece
-
Fig.5a I glued a 1 1/2 male adapter was used to screw in the tank female intake piece with a slip on one end for a 1 1/2" x 1 1/2" pvc pipe then inserted and glued a 1 1/2 to 2" slip bushing.
-

Fig.5b We assembled the pieces to reach the diverter piece without glue and had to hold it up in place to measure the right angles and lengths to cut. Last we glued the pieces together and our intake was complete.


The Outtake[edit | edit source]
Materials[edit | edit source]
- 33 ft SCH 40 2" PVC
- PVC SCH 80 nipple
- PVC SCH 80 Thread ball
- PVC coupling
- PVC union
- 90 degree elbow
- 45 degree elbow
- 2" to 3/4" reducer
- 3/4" brass hose adapter
- 5 faucet manifold
Outtake Construction[edit | edit source]
-

Fig.1a I wrapped plumbers tape around the 2" nipple counter clockwise then screwed it into the 2" outlet of the tank. The ball valve was screwed on to the nipple.
-
Fig.1b Next, a 2" threaded fitting with a slip end was screwed into the ball valve. Pipe was cut to fit and a quick disconnect inserted. We used two 45 degree elbows to reach the proper angle for the pipe coming from under the house to the tank.
-
Fig.1d I connected three 10ft lengths of 2" PVC in the backyard and fed it under the house. I crawled under and directed it to the tank connection. Once the I crawled back under the house and glued the three 10 ft lengths together.
-

Fig.1eThe end of the pipe is in the back yard and I glued a reducer to take the pipe from 2" to 3/4". A 3/4" brass hose adapter with plumbers tape was inserted then the five faucet manifold was installed.

