In today's day and age, both hobbyist and survival horticultural practices are been becoming more of a nor within our culture. As the amount of people entering the hobby increase, there is a growing demand for better and cheaper gardening products. I have also joined in on this new growing hobby and have personally found that commercial horticultural equipment is expensive to purchase; so to combat this, I have embarked on creating a line of 3-D printable hydroponic/agricultural products (all open source of course). The first item that I have created is called a "Hydro halo drip ring", and is used to evenly water plants from a central location using a timer and a water pump.
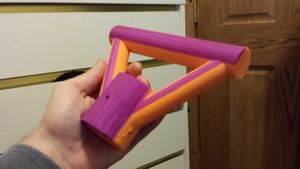
Picture of completed print will be provided later.
Nothing more than basic 3D printing and altering well commented variables to get desired size required
Technical Specifications and Assembly Instructions
I used Openscad for the model, Cura for the slicer, and Pronterface for the controller
Open the .SCAD file in Openscad, and adjust the given parameters to fit your needs. All units are in millimeters
Compile and render the file into a new .STL file
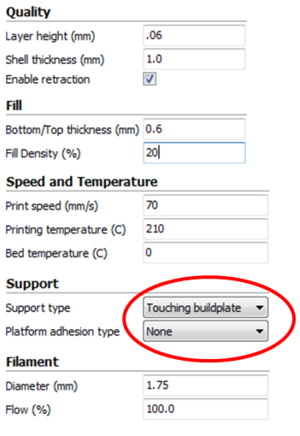
Open the .STL file in Cura
It will likely be vertical, so rotate the model 90 degrees so that it is on its "back"
In the support section of the left toolbar, select "support type" to "touching buildplate"
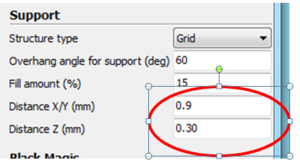
In the Expert Configurations, I suggest increasing the "Distance Z" to .20-.30 to allow the supports to be disconnected easier and leave less residue on the printed model
Choose speeds and layer thickness as ideal for your printer and desired strength
Save the Gcode and then load it into Pronterface and print away
When it is done printing, carefully snap off supprt structure
Use a metal or wood file to remove excess plastic from support residue
Fit handle over the end of your tool, and screw into place
Print Time Estimates
With .06mm thickness, ~16 hours depending on size
With .25mm thickness, ~4 hours depending on size
Assembly time Estimate
10 minutes
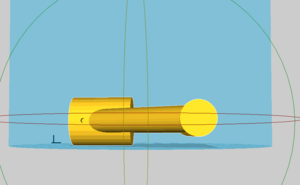
((Note that a handle like this would be better suited for an implement with a shorter shaft, this was just the only shovel like that we had around the house I could put a handle on))
The benefit is not so much in cost savings, although they are there, but the fact that this can be made to easily fit any and all shovel/hoe/tools with long wooden shafts where this would be desired on the end and the ability for a village to make them themselves instead of needing them delivered from some large manufacturing facility