|
|
| Line 1: |
Line 1: |
| To start an article in Appropedia: {{Shortcut|H:CREATE}}<br clear=all>
| | {{777}} |
| | ==Quick Square == |
| | Project developed by [[User:Isac Bench]] |
| | {{Statusboxtop}} |
| | {{status-design}} |
| | {{status-prototype}} |
| | You can help Appropedia by contributing to the next step in this [[OSAT]]'s [[:Category:Status|status]]. |
| | {{boxbottom}} |
|
| |
|
| <center>Enter name and click button to start a page about a specific topic:</center>
| | ==Abstract== |
| {{create topic page}}
| | This quick square or carpenter's triangle is a product that can be found relatively cheap at most hardware stores. This product allows the user to make lines perpendicular or 45 degrees from an existing edge. The advantage of making this 3D printable is that it is cheaper and someone who does not have access to a hardware store may be able to obtain it if they have the capabilities to 3D print. |
|
| |
|
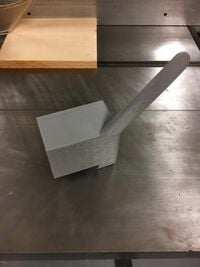
| | [[Image:Tablesawstick.jpg|200px]] |
|
| |
|
| <center>Or enter name and click button to start a page about a specific project:</center>
| | == Bill of Materials== |
| {{create project page}}
| | This part can be fully printed and no other components are necessary. |
|
| |
|
| Or, to begin a page draft which can be moved to the main part of Appropedia later, see [[Appropedia:Incubator]] and enter your pagename there.
| | [https://www.thingiverse.com/thing:4018759 Click Here for STL and Source Code] |
|
| |
|
| ---- | | == Tools needed for fabrication of the OSAT== |
| | # [[AthenaII| MOST Delta RepRap]] or similar RepRap 3-D printer |
|
| |
|
| == Detailed instructions ==
| |
| There are two main ways to create a page:
| |
| # Search for the new title with the Go button. When the search finds nothing, click on the red link "create this page".
| |
| # Create a [[Help:Contents#Links|link]] as usual, then save the page. Clicking on the redlink allows you to start editing the new page (don't forget to save).
| |
| # If you want a prefilled page (with suggested headings etc), decide on the name and enter it in the appropriate box - for a '''[[#Topic page]]''' or '''[[#Project page]]'''.
| |
|
| |
|
| {{TOCright}}
| | == Skills and Knowledge Necessary to Make the OSAT == |
| | Product is to be used on a table saw. Safe operation and knowledge of table saw needed for proper use. |
|
| |
|
| == Experimenting - use the "Sandbox" == | | == Technical Specifications and Assembly Instructions== |
| | Place flat surface on bed and no support material will be needed. |
|
| |
|
| '''NOTE''': Following the instructions on this page will create a page in the main part of the wiki. If you want to experiment with writing something random on a wiki, you're welcome to do that at the [[Appropedia:Sandbox|Sandbox]].
| | Example orientaion below: |
|
| |
|
| ==Detailed instructions==
| |
|
| |
|
| * Type the [[Help:Page naming|name]] of the new page in the '''search''' field to the left.
| |
| ** Use a clear and descriptive name, in lower case except for proper names, and avoid these symbols: & # < > [ ] | { } (see [[Help:Page naming]] for details)
| |
| * Click '''Go'''.
| |
| * If there is no page titled with that name, you can create the page by clicking '''create this page''' under search results.
| |
| * Add information. Do not worry about formatting or completeness if you are not sure how to do it. Others will help and changes are easily made. Be '''[[Appropedia:Be bold!|BOLD]]'''.
| |
| * Please put at least one category tag at the end, for example: <tt><nowiki>[[Category:Renewable energy]]</nowiki></tt>. If you're not sure which category to use, you can add {{tl|catneeded}}, which will ask for other users to help choose categories. If you're keen, you might want to browse the [[Special:Categories|categories]], or create a new one if there isn't a similar one already.
| |
| * Click '''Show preview''' to see what you have created.
| |
| * If you would like be alerted when someone makes a change to this page, select '''Watch this page'''.
| |
| * Add a '''Summary''' and click '''Save Page''' when you are satisfied. Come back as often as you like, to make changes.
| |
|
| |
|
| == Starting with a pre-filled page ==
| |
|
| |
|
| These tools below may be helpful.
| |
|
| |
|
| (If you accidentally try creating a page that already exists, it won't overwrite the page - it will just fill the edit box with the existing page instead - if you're not sure, check and the "page" tab will be a blue link instead of a red link).
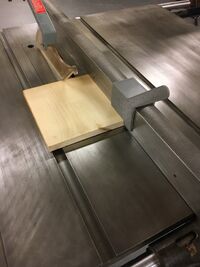
| | Push stick in use can be found below: |
|
| |
|
| === Project page ===
| | [[Image:Pushstickinuse.jpg|200px]] |
|
| |
|
| First, browse the [[:Category:Projects|Projects]] articles and subcategories for examples, and check for collaboration opportunities, i.e. articles similar to what you're considering writing. Once you're ready to create your own page:
| |
| * Type a proposed [[Help:Page naming#Projects|name]] for the new [[:Category:Projects|Projects]] page in the following '''create''' box, and click "Create article".
| |
| * When the edit window opens, there will be some preliminary sample text with comments as hints. Add information about your Projects. Do not worry about formatting or completeness, as others will help and changes are easily made. Be [[A:BOLD|BOLD]].
| |
|
| |
|
| {{create project page}}
| | === Printing / Slicing Settings === |
|
| |
|
| This starts you off with lots of "wiki markup" on the page (i.e. code, but not quite as confusing as computer code). Be sure to remove any code that you don't end up using.
| | Temperature: 210C |
|
| |
|
| === Topic page ===
| | Infill: 15% |
|
| |
|
| If you have some experience with editing a wiki, you might like to use this method. It's usually a good idea to search for the topic first, in case it exists under a different name (and so that you find related pages for the "See also" section.)
| | Supports: No |
|
| |
|
| (If you're not used to wiki markup, this will be confusing - follow the [[#Detailed instructions]] above instead!)
| | Skirt: No |
|
| |
|
| {{create topic page}}
| | Speeds: Print: 90 mm/s, Wall Speed: 70 mm/s |
|
| |
|
| == From the url bar ==
| | Layer Height: 0.20 mm |
|
| |
|
| If you use Firefox or Opera as a web browser and often create pages on Appropedia, you can make it easier and quicker to start editing.
| | Material: PLA |
|
| |
|
| Right-click one of the boxes above, and create a keyword to "search" for the page title you want - but instead of a search, it will give you the editing box pre-filled and ready to start editing!
| |
|
| |
|
| E.g. use "nt" as a keyword for the Topic page creation box, above. ("nt" is short for "new topic" so it's easy to remember).
| | == Cost savings== |
| | Estimated Cost in PLA: $0.58 |
|
| |
|
| == User page == | | Commercial Equivalent: Many varieties of commercial products here is a standard option [https://www.mscdirect.com/browse/tnpla/32840068?cid=ppc-google-New+-+Measuring+%26+Inspecting+-+PLA_sTP3NTJE9___164124448967_c_S&mkwid=sTP3NTJE9|dc&pcrid=164124448967&rd=k&product_id=32840068&gclid=Cj0KCQiAz53vBRCpARIsAPPsz8WZ5uunEZXzJ3j-wrGVze9nb2YK6xSTioYndQ_IZ3R2wi0Plw6p7YUaAlFQEALw_wcB] |
|
| |
|
| You may find it useful and helpful to create a user page first. See [[MediaWiki:Create_a_userpage|create a userpage]] for instructions on how to do that.
| | Commercial equivalent for approx $10 |
|
| |
|
| [[Category:Appropedia help]] | | 3D Printed for $0.58 |
| | |
| | '''Cost Savings ~ $9.42 |
| | |
| | '''% Cost Savings ~ 94% Savings |
| | |
| | == Benefited Internet Communities == |
| | Woodworking Talk [https://www.woodworkingtalk.com/forum.php] |
| | |
| | DIY Chatroom [https://www.diychatroom.com/f14/] |
| | |
| | The Woodworking Patriot [https://thepatriotwoodworker.com/forums/forum/26-the-woodworking-discussion-forum/] |
| | |
| | |
| | |
| | ==References== |
| | |
| | Carpenters Tools Websites |
| | |
| | |
| | [[Category:OSAT 3D-Printable Designs]] |
| | [[Category:Prototyping]] |
| | [[Category:Computer-aided design]] |
Project developed by User:Isac Bench
Template:Statusboxtop
Template:Status-design
Template:Status-prototype
You can help Appropedia by contributing to the next step in this OSAT's status.
Template:Boxbottom
This quick square or carpenter's triangle is a product that can be found relatively cheap at most hardware stores. This product allows the user to make lines perpendicular or 45 degrees from an existing edge. The advantage of making this 3D printable is that it is cheaper and someone who does not have access to a hardware store may be able to obtain it if they have the capabilities to 3D print.
This part can be fully printed and no other components are necessary.
Click Here for STL and Source Code
- MOST Delta RepRap or similar RepRap 3-D printer
Product is to be used on a table saw. Safe operation and knowledge of table saw needed for proper use.
Place flat surface on bed and no support material will be needed.
Example orientaion below:
Push stick in use can be found below:
Printing / Slicing Settings
Temperature: 210C
Infill: 15%
Supports: No
Skirt: No
Speeds: Print: 90 mm/s, Wall Speed: 70 mm/s
Layer Height: 0.20 mm
Material: PLA
Estimated Cost in PLA: $0.58
Commercial Equivalent: Many varieties of commercial products here is a standard option [1]
Commercial equivalent for approx $10
3D Printed for $0.58
Cost Savings ~ $9.42
% Cost Savings ~ 94% Savings
Woodworking Talk [2]
DIY Chatroom [3]
The Woodworking Patriot [4]
Carpenters Tools Websites

