
An otoscope is simple device used in the diagnosis of ear, nose, and throat diseases. It is essentially a magnification lens with a light and speculum to help open orifices and direct the light. It is commonly used to examine the eardrum, which as the border separating the external ear canal from the middle ear, often has characteristics indicative of various diseases of the middle ear space.
OpenSCAD was used to make all the 3D printed parts used in this model.
-

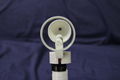
3/4 View
-
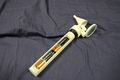
Back View
-
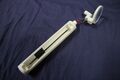
Battery Compartment


Bill of Materials
Printed Parts:
- The main otoscope body weights 20 grams. The approximate cost of this part is $0.50.
- The battery cover weights 6 grams. The approximate cost of this part is $0.15.
- The switch cover weights 2 grams. The approximate cost of this part is $0.05.
- The circular base on which the lens assembly and the ear piece mounts weights 5 grams. The approximate cost of this part is $0.15.
- The ear piece weights 3 grams. The approximate cost of this part is $0.08.
- The lens assembly weights 3 grams. The approximate cost of this part is $0.08.
Other Parts:
- A SMD pushbutton switch is used to activate the otoscope's light. The approximate cost of this part is $0.57.
- A white LED is used to shine light into the ear. The approximate cost of this part is $0.80.
- A 220 ohm resistor is used to limit current draw. The approximate cost of this part is $0.10.
- A 38mm diameter, 150mm focal length concave lens in used. The approximate cost of this part is $3.95.
- About half a meter of 22 gauge solid core wire is used. Cost is assumed to be negligible.
Total cost to manufacture is $6.43
Files
- The OpenSCAD source files and STLs can be downloaded here: Youmagine. Additionally the STL files can be downloaded below.
- File:OtoscopeBody.stl
- File:OtoscopeBatteryCover.stl
- File:OtoscopeSwitchCover.stl
- File:OtoscopeMountBase.stl
- File:OtoscopeLensAssembly.stl
- File:OtoscopeSpeculum.stl
Tools needed
- MOST Delta RepRap or similar RepRap 3-D printer
- Depending on print quality, a knife may be needed to shave away plastic on the edges of the parts that come together.
- Super glue is needed to join the switch cover and the mount base to the main otoscope body.
- A soldering iron and solder is needed to securely attach the electrical components together
- Wire strippers and/or diagonals are needed to trim the wiring
- Rubber bands may be helpful to hold some of the parts together while the glue dries.
Skills and knowledge needed
- You will need to know how to solder [1]
Technical Specifications and Assembly Instructions
- Build Instructions
- Print the main otoscope body in an upright position with supports - this will give a much better finish at the top. Then cut two wire, one about 180 mm long for the positive connection and one about 70 mm long for the negative. Using the tip of the wire strippers, strip 30mm of insulation off the end and curl the exposed wire to create a spring-like shape. The short wire will go through the hole in the middle, while the long wire will lay in the groove in the bottom of the battery compartment.
- Print the battery cover laid down on the print platform, no supports needed. You can place batteries in the compartment and cover it up now.
- Solder the end of long positive lead that comes through the slot to the bottom of the pushbutton. On the opposite side, solder on end of a 220 ohm resistor.
- Print the switch cover, and while it will snap in place over the top of the main body, some glue is recommended.
- Print the mount base and glue it onto of the switch cover. The slot should be at 90 degrees to the pushbutton (it doesn't matter which way). Both the resistor lead and the negative terminal lead should be poking through the slot.
- Print the lens assembly with the lens holder down on the print platform. Clean up the inside edges and snap the 38mm lens into place.
- Print the speculum with the tip facing up.
- Slide an LED into the lens assembly opening and feed the leads out the bottom. Carefully solder these leads to the resistor and the wire coming out of the mount base.
- Carefully push the now soldered wire back through the slot in the mount base so that the lens assembly sits flush on the mount base. Use a couple drops of glue to hold it in place.
- finally, take the speculum and position it so that the LED light shines through the wide end and out the narrow cylinder. Use a few drops of glue to hold it in position.
- Total print time estimate is 171 minutes.
- Main otoscope body - 87 min
- Battery cover - 19 min
- Switch cover - 4 min
- Mount base - 22 min
- Speculum - 22 min
- Lens assembly - 17 min
- Assembly time will take around 30 minute to solder and wait for the glue to set.
-
Initial wiring and assembly
-
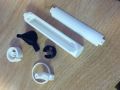
3D Prints


Common Problems and Solutions
- A more powerful LED could be used to help direct more light into the patient's ear. Also, many commercial versions have variable light intensity, this could possibly be implemented by using a potentiometer.
- The speculum is not adjustable, an interchangeable system would be beneficial to accommodate different size orifices.
Cost savings
- Assuming PLA plastic costing $0.025 per gram is used ($25 per 1kg spool), the otoscope can be built for $6.43
- A inexpensive home use otoscope costs approximately $30.00
- This results in a savings of $23.57 as the otoscope can be printed for 21% of the commercial equivalent
References