
Trillium Charter School custom Galton board

| Type | Probability board |
|---|---|
| Authors | Shane Ball Derek Beatty Sean Ruzicka Ryan Sullivan |
| Location | Arcata, California, United States |
| Status | Deployed |
| Years | |
| Made | Yes |
| Uses | education, science |
The Trillium Charter School custom Galton Board was a student led project to design, create, and deliver a custom Galton Board to Trillium Charter School. Spanning the Spring 2023 semester, students from Cal Poly Humboldt's ENGR 215 were tasked with conducting research, designing a solution, prototyping and testing their design, constructing, and delivering a finished project to Trillium Charter School.
In order to be successful the custom Galton Board needed to meet the following specifications:
- Design based on a Galton Board
- Portable
- Fits on desktops and small tables
- Demonstrates probability and variables
- Safe to use.
Additional considerations for this project included:
- Project being used for lessons
- Project will be used by kids in the TK - 5th grade age group
- Will be used recreationally
- May be used daily
- May be subject to increased wear and tear.
Objective statement
[edit | edit source]The objective of this project is to deliver a customized Galton board that demonstrates the mathematical concepts of probability and variables.
Criteria
[edit | edit source]The criteria and constraints shown below are the list of variables in which the custom Galton Board design process was guided by.
(0-10 Highest)
| Criteria | Constraint | Weight |
|---|---|---|
| Ease of Use | Easily assembled and used by children | 10 |
| Fun Factor | Operator enjoys their experience | 10 |
| Safety | Operator is not injured during usage | 10 |
| Portability | Able to be moved by young children | 8 |
| Educational | Visualizes mathematical concepts | 8 |
| Interactivity | “Show, don’t tell” experience | 8 |
| Durability | Will withstand daily use for several years | 8 |
| Storability | Can be easily stowed away | 7 |
| Adaptability | Able to be utilized for lessons and individual use | 6 |
| Cost | Within budget and little to no upkeep cost | 6 |
| Visibility | Easily recognizable and understood | 6 |
Prototyping
[edit | edit source]These are examples of some of the prototypes we made during the prototyping phase.
The first prototype we created for this project was made out of cardboard, metal pegs, and a lot of hot glue. Prototype one was used to test the 1-inch peg spacing concept along with the channeled dropper and collector. Due to a lack of peg stability, prototype one failed to produce an adequate distribution. The channeled dropper succeeded in the prototype but was removed from the final design based on client's feedback.
The second prototype we created was constructed utilizing scrap wood, wooden poles, and metal hinges. The peg field of prototype two was created via hand drilling resulting in less precision and off-centered pegs. While the peg spacing succeeded during testing, the prototype demonstrated the need for a higher level of precision when creating the peg field. Prototype two also raised safety concerns regarding the design of the board and the inclusion of metal table-leg hinges. Closing prototype two into its compact position proved to be more difficult than expected and had a high likely hood of causing injury to the operator. Ultimately the metal table-leg hinges would be removed from the design and replaced with prop mechanism utilized in the final design.
- Prototyping
-
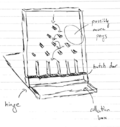 Early sketched concept of custom Galton Board
 -
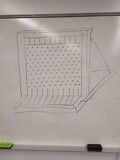 Concept drawing of custom Galton Board
 -
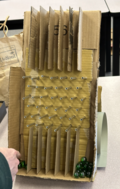 Cardboard Prototype testing channeled dropper and 1 inch peg spacing.
 -
 Materials used in construction of second prototype.
 -
 Front view of second prototype with hand drilled peg field
 -
 Side view of second prototype showing folding support mechanism.


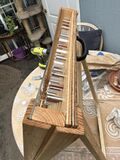
Final product
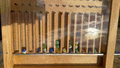
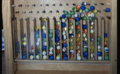
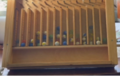
[edit | edit source]Peg Field
The peg field utilized in the final design uses a 1 inch spacing between all pegs in the horizontal and vertical directions. Each row is also horizontally offset by 1⁄2 inch from the previous. In total there are 15 rows of pegs, with odd numbered rows (starting from the top) containing 15 pegs and the even numvered rows containing 14 pegs. The pegs themselves are a 1⁄4 in diameter and approximately 1 1⁄4 inch in length. These peg dimensions were chosen such that they did not extend past the frame of the display and prevented the marbles from deviating from their expected probable pathways. The pegs were roughly sanded at their insert points and inserted into the holes with wood glue to keep them in place.
Peg Materials
The pegs utilized in the Trillium Probability Board are made from a variety of materials and materials of different internal thickness. The materials and thickness used for the pegs are:
- Stainless steel .028”,
- Stainless steel .035”,
- Aluminum .035”,
- Aluminum .049”,
- Acetal resin .035”,
- Copper .014”.
The result of the different materials and thicknesses is the generation of unique tones when the marbles collide with pegs. This provides additional auditory accessibility for the operator.
Display Frame
The Display Frame of the custom Galton Board was constructed using 1/4 inch birch plywood, 1x2 cedar planks, 3/8 corner pine corner cuts, and an acrylic sheet. The birch plywood was used as the backboard of the display frame and location of the peg field CNC cuts. The 1x2 cedar planks were then attached to the backboard with the use of screws. With the cedar planks in place, the acrylic sheet was placed on top of the cedar planks such that it was parallel to the birch backboard. The acrylic sheet was then secured to the cedar planks with screws. The pine corner cuts were then utilized to cover the edges of the frame and prevent the different layers from being pulled apart.
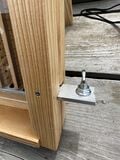
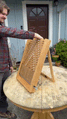
Prop Mechanism
The custom Galton Board features a propping mechanism that retracts into the back of the main display board. The prop mechanism was created using 1x2 cedar planks that are connected to the back of the main display board with metal hinges. Chains connect to the bottom of the prop mechanism to the main display board to prevent the operator from overextending the prop mechanism and causing damage to the Trillium Probability Board. Additionally, a magnet locking system is attached to the prop mechanism and main display board to keep the mechanism in the shut position during transport and storage.
Collection System
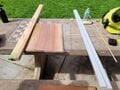
The custom Galton Board utilizes a collection system featuring vertical channeled collectors and a sliding dropping mechanism. The collection system was created using repurposed meter sticks as they were appropriately sized for the system and introduced an additional educational aspect. After marbles have fallen through the peg field, they are collected within the channels created by the vertically placed meter stick segments. This collection system allows for a distribution curve to be shown within the display face of the board and gives the operator the ability to accurately measure the height of each segment with the use of the meter stick segments. When the marbles are ready to be released a notched aluminum bar is horizontally adjusted, allowing for the marbles to fall into the collection pit below.
-
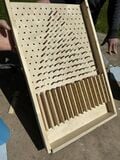
 Front view of custom Galton Board with temporary dropper insert
 -
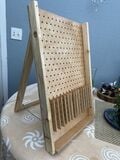
 Side view of custom Galton Board showing prop mechanism, chain, and collection box
 -
 Top view of custom Galton Board showing layers and position of materials
 -
 Aluminum dropper and handle


Construction
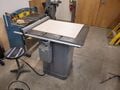
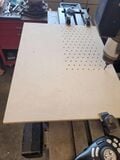
[edit | edit source]Construction of the custom Galton Board began with the backboard. Using a table saw we trimmed a sheet of 2.5 x 4 ft birch plywood into our 19 x 24 inch backboard. A CNC machine was then utilized to drill 1/4 inch holes through the backboard and create the insert holes for the pegs. Each peg hole has a 1 inch vertical and horizontal spacing between other peg holes and the outer edge of the board. In addition, each alternating row is offset by 1/2 in from the one above.
With the backboard complete, the front display frame was created with 1x2 inch furring strips, which were cut to match the length of the backboard. Two pieces were screwed into the top of the vertical edges of the backboard and one piece along the bottom horizontal edge. The top was left top open to serve as the entry point for the marbles. A 1/4 inch thick sheet of plywood was also cut to the dimensions of the backboard and secured to the backside of the backboard.
In total there are 15 rows of pegs. The odd numbered rows, beginning from the top, each contain 15 pegs, while the even numbered rows contain 14. While the pegs utilized in our design include a variety of materials and of varying thickness, the outer diameter of each piping used is 1/4 inch. The piping was then cut into 1 1/4 inch segments. Each peg was then sanded on its entry side, coated with wood glue, and inserted into the peg holes.
Once the frame was secured and pegs in place, the sheet of acrylic was cut to match the dimension of the backboard with the use of a table saw. The acrylic sheet was then placed on top of the framed backboard and secured with screws.
With the acrylic sheet firmly attached to the frame, 3/8 inch pine corner trim was cut to match the vertical dimensions of the backboard (24 inches). The trimmed was then attached, with screws, along the vertical edge of the board on both the front and rear sides to assist in securing the acrylic sheet and rear plywood cover.
With the completion of the display frame, a prop mechanism was constructed with 1x2 inch cedar planks to create a rectangular perimeter. The prop mechanism was then screwed into the back of the display frame using metal hinges that would allow it swing open and allow the board to stand.
- Construction
-
 Backboard cut down to size with table saw
 -
 Peg field insert holes drilled out with CNC machine
 -
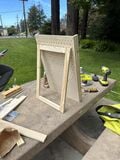 Prop mechanism and display frame attached to backboard
 -
 Wood stained to improve durability and visual appeal
 -
 Piping cut down to pegs using pipe cutters and inserted into board
 -
 Metersticks cut down to desired length and attached to backboard to serve as dividers for collection system
 -
Side view showing dropper mechanism insert hole and prop mechanism chain
-
Top view showing different layers and placements of materials


Video instructions
[edit | edit source]Below are some video instructions.
.gif)
Bill of materials
[edit | edit source]The total cost was $203 for the construction of prototypes and the final product. See the cost breakdown in the table below:
| Material | Quantity | Cost per unit | Total |
|---|---|---|---|
| Stainless Steel Tube 0.028" Thickness | 1 | USD 10.26 | USD 10.26 |
| Stainless Steel Tube 0.035" Thickness | 1 | USD 17.40 | USD 17.40 |
| Aluminum Tube 0.035" Thickness | 1 | USD 15.44 | USD 15.44 |
| Aluminum Tube 0.049" Thickness | 1 | USD 18.39 | USD 18.39 |
| Acetal Resin Tube 0.035" Thickness | 1 | USD 9.90 | USD 9.90 |
| Copper Tube 0.014" Thickness | 1 | USD 16.66 | USD 16.66 |
| Meter Stick (10 pack) | 1 | USD 43.39 | USD 43.39 |
| 2 1/2 x 4 ft Birch Plywood | 1 | USD 12.75 | USD 12.75 |
| 1 x 2 in Spruce Furring Strips | 2 | USD 3.20 | USD 6.40 |
| 3/8 in Pine Corner Trim | 1 | USD 18.50 | USD 18.50 |
| Brass Hinge | 1 | USD 6.29 | USD 6.29 |
| 18 x 24 x 0.10 in Acylic | 1 | USD 18.31 | USD 18.31 |
| Chain | 2 | USD 1.99 | USD 3.98 |
| Magnet | 4 | USD 0.28 | USD 1.12 |
| Handle | 1 | USD 4.49 | USD 4.49 |
| Grand Total | USD 203.28 | ||
Operation
[edit | edit source]The two figures below show how the collections dropper mechanism works and how the hinged setup works.
-
 Collection mechanism dropper
 -
 Setup for board


Maintenance
[edit | edit source]Some maintenance details follow.
Maintenance schedule
[edit | edit source]This is when to maintain what.
- Daily
- Make sure marbles are in marble storage
- Monthly
- Carefully wipe front cover of board with microfiber cloth
- Yearly
- Apply new coat of stain if needed.
Conclusion
[edit | edit source]Testing results
[edit | edit source]In this Testing Results section, the process and results of testing conducted on the custom Galton Board are shared and explained. The primary focus of testing was conducted on the peg field and collection system of the custom Galton Board. The testing methods used included limited sample size testing, continuous usage peg testing, and stress testing for the collection system.
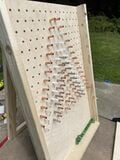
The limited sample size testing involved dropping a limited number of marbles into the custom Galton Board. The purpose of this test was to determine the minimum number of marbles needed for a normal distribution curve to become visible to the operator. On average it took approximately 50 marbles, with a tolerance range of 5, for a normal distribution curve to become clearly visible. It should be noted that the distribution curve is dependent on the input position, leading to less accurate distribution curves if the input region is continuously changed.
In the continuous usage peg testing, the collection mechanism was left open such that all marbles would drop into the collection box. Marbles were then continuously loaded into the Trillium Probability Board for five-minute intervals, to test for notable errors or issues within the peg field. The results of this testing method did not produce any notable errors with standard sized marbles. Nonstandard sized marbles (> 1/2 inch) had the potential of becoming stuck between the side of the frame and a peg.
The final testing method utilized was a stress test of the collection mechanism. This testing method involved inserting a meter stick into adjustable slider mechanism and releasing a significant amount of marbles into the custom Galton Board. The mechanism was then observed in order to determine if the collection system would break or distort. Throughout the testing, no issues were noted with the channeled dividers, while the locking mechanism saw minimum distortion. While testing was conducted with a meter stick slider, the aluminum slider is expected to have similar or better performance.
-
 Stress Test of custom Galton Board collection mechanism
 -
 Formation of normal curve with limited sample size


Lessons Learned
[edit | edit source]If we built it again, we would not drill all the way through the plywood backboard so that we wouldn't need the back trim piece which would save some weight. We would also make the sideboards smaller to save some weight. In addition to these, we would also add a little extra spacing between the last row of pegs and the outer boards to add a little extra space for the variation of marble size.
Next Steps
[edit | edit source]Next steps involving the custom Galton Board would include decorating the backboard with mathematical indicators to better represent the probability of the pathways taken by the marbles, creating a lesson plan that incorporates the custom Galton Board into the student's curriculum, and creating games utilizing the custom Galton Board further promote student interest.
Troubleshooting
[edit | edit source]Please see the following table for some basic troubleshooting.
| Problem | Suggestion |
|---|---|
| If marble becomes stuck | Safely flip the board to dislodge marble. If marble remains stuck, unscrew protective screen from frame and remove by hand. |
| Marble stuck in dropper mechanism. | Dropper mechanism is designed for standard sized (1/2 inch) marbles. If a nonstandard sized marble becomes stuck in dropper mechanism, unscrew handle from either side and completely remove dropper mechanism to remove stuck marble. |
| Chain detaches from backboard/ prop mechanism. | Loosen locking screw, wrap chain around locking screw, and tighten locking screw. |
Team
[edit | edit source]- Shane Ball
- Ryan Sullivan
- Derek Beatty
- Sean Ruzicka
References
[edit | edit source]
| Authors | |
|---|---|
| License | CC-BY-SA-4.0 |
| Organizations | Cal Poly Humboldt |
| Cite as | Lonny, Sean.Ruzicka, ThomasLee (2023–2024). "Trillium Charter School custom Galton board". Appropedia. Retrieved July 10, 2026. |