
Trillium Charter School busy board

| Type | |
|---|---|
| Authors | Sasha Cahill Spencer Sandeen Jordy S Lopez Everett Brown |
| Location | Arcata, California |
| Status | Deployed |
| Years | |
| Made | Yes |
| Replicated | No |
| Uses | education, science |
The Busy Board is a project completed by four members of Engineering 215 class of spring 2023. It is a board in which numerous features were attached for Trillium students to play with, fidget with, and learn from while waiting in the lunch line. The board was installed in the hallway at Trillium Charter School on April 19, 2023. The contributors were Jordy Lopez, Spencer Sandeen, Everett Brown, and Sasha Cahill. They worked under the guidance of their professor, Lonny Grafman, and specifications of their clients, Trillium teacher Katie Dens and the students.
Background
[edit | edit source]ENGR 215 partnered with Trillium Charter School in Arcata, California, to improve the condition and quality of the school in various ways and provide real-world projects for ENGR 215 students. This particular project seeks to create an entertaining and educational alternative to the relatively unstimulating poster-board featuring old student projects in the same part of the hallway.

In this way, students impatiently waiting in line for lunch would have a way to somewhat constructively release their energy, and, through the specific nature of the Busy Board features, gain some education.
Problem statement
[edit | edit source]The objective of this project is to create a fixture on the wall of the Trillium hallway that distracts students and allows them to fidget while they wait in line for lunch. Ideally, the board also includes features that stimulate mental growth and allow students to physically interact with moving objects.
Criteria
[edit | edit source]Our criteria for the busy board were conceived with the clients priorities of interactivity and educational value in mind.
They are listed in the following table in according to decreasing weight or relative importance:
| Criteria | Description | Weight (1-10) |
|---|---|---|
| Feasibility | Features have to be achievable from the production end | 9 |
| Maintainability | Features on the board have to be easily cleaned and disinfected by the Trillium staff | 8 |
| Attainable | Features and materials necessary for the features have to be physically attainable within the time frame of the project. | 8 |
| Understandability | Features have to be fairly readily understandable to kids K-5th grade | 8 |
| Durability | Features have to stand the test of time and abuse by kids | 7 |
| Replayability | Features should stay interesting as long as possible, based on the level of fun and creativity involved with the feature | 7 |
| Cost | Features should be priced according to our budget | 6 |
| Educational Value | Features should provide some educational value, up-front or subtly, to the students | 4 |
Prototyping
[edit | edit source]These are examples of some of the prototypes we made during the prototyping phase.
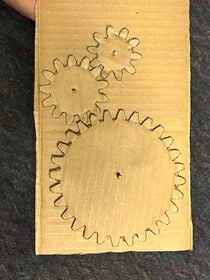
The cardboard gear prototype (top left) was created by Everett Brown. It featured functioning cardboard gears that spun on a fixed axis on top of a cardboard piece. The gears featured a 1-1.3-2 ratio, which reflects the diameters of the gears. Through this prototype we learned that gears require extreme precession to function properly, as they must spin continuously and fit into each other's grooves. In part for this reason, we opted for purchasing pre-made gears during the construction of our final product, whereas we may have opted for attempting to build one ourselves had we not had this prototype.
The pulley prototype (top middle) was created by Spencer Sandeen. It was the second rendition of a pulley prototype made for this project (first one not shown). This one was fully functional, as it was able to pass by two pulleys with minimal friction and carry a small basket of wood. It was larger than the pulley that was eventually implemented on the final board, but this prototype was valuable in visualizing the pulley feature as a final product.
The lock puzzle prototype (top right) was created by Everett Brown. It featured 4 flaps, connected at alternating sides, which opened and closed. The idea behind this feature was to have a different kind of lock at each flap, have kids experiment with locks and learn how to open them, and potentially reveal some picture or surprise underneath. This specific prototype was most valuable as a prototype for desire, in that it demonstrated what we wanted the final lock puzzle to look like.
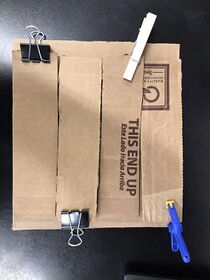
The complete busy board prototype (bottom left) was a compilation of all our to-scale prototypes laid out on a likewise to-scale cardboard cut out. This prototype functioned as a prototype for desire in that it allowed us to see if and how all the pieces would fit together on the board. In addition, having a to-scale prototype introduced some transportation issues, as we had to cut it in half to bring it to Trillium and demonstrate it to our client. While we didn't end up having to do this for the final product, successive prototypes and planning at the time were built around the idea that the board could be split if necessary.
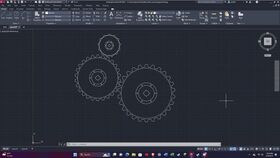
The auto-cad gears (bottom middle) were made by Everett Brown. They show how gears with a 1-1.3-2 gear ratio would fit together and look. This prototype aided in developing our skills at the deceptively tricky task of creating perfect diameters for each gear and having each gear tooth be near identical to the next. As stated previously, it was in part due to our prototyping of gears that we opted for pre-made gears as opposed to trying to construct them ourselves.
The sketch-up complete prototype (bottom right) was made by Jordy Lopez. It includes all the features we believed at the time would go onto the board in the desired places. Dimensions of the board are included. Due to our inability at the time to transport the complete 8 x 4 product to Trillium School, this prototype shows the board cut in half, as this was believed to be something we might have to do.
- Various prototypes
-
 Gear prototype
 -
 Pulley prototype
 -
 Lock puzzle prototype
 -
 Full-size busy board prototype
 -
 Auto-cad gear prototype
 -
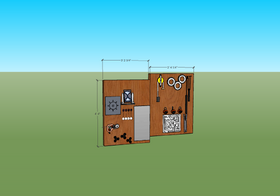 Sketch-up busy board prototype


Final product
[edit | edit source]
This is the Completed Busy Board in place at Trillium Charter School.
Construction
[edit | edit source]Below are images depicting the construction process.
-
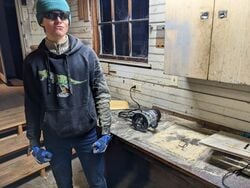
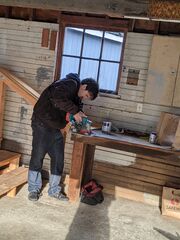 Everett using a saw at the work table
 -
 Installation of the Busy Board
 -
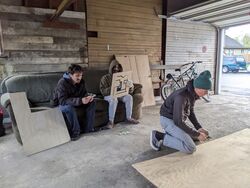 Building the Busy Board at Jordy's - 1
 -
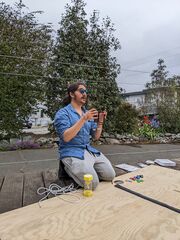 Jordy deliberates over the Newton's Cradle in hand
 -
 Sasha looks up from outlining the Peg Maze
 -
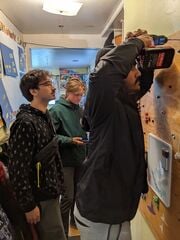
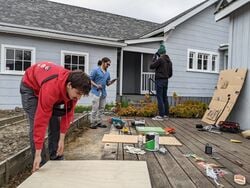 (Left to right) Everett Brown, Jordy Lopez, Sasha Cahill over the Busy Board setup
 -
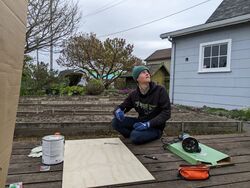
 Sasha after routing the Peg Maze
 -
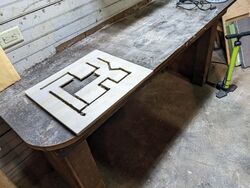 The Peg Maze just after being routed


Prior to Jordy moving into a house near downtown Arcata, we did not have a definitive place to build the project. We had been prototyping in Everett's dorm and in the lab classroom for Engineering 215. After Jordy's house became an option, the process of building and storing the board became very much easier.
After compiling most of the materials needed for building the board, we began work on the actual board on Friday, 4/14/23. The board we purchased was 8 x 4 ft., meaning its dimensions did not have to be adjusted in any way. It was also previously smoothened on one-side per our request, which made meeting our criteria of safety much easier. Despite that fact that the board was relatively smooth on one side, there was much sanding to be done. Once the board was properly sanded and loose wooden strips were torn away, the board was lacquered and stained to improve its visual appeal and enhance its safety even further.
Most of the features for the board required preparation before they were fixed to the board. The padlock was cut from a 1/8 sheet of plywood and attached to the board with screws and hinges in such a was that the flaps open freely but close in place to be re-locked. Gear exhibit #1 was repurchased from amazon, and it needed some preparation before installing. The magnetic pieces inside the gears that were there to make it potentially attachable to a magnetic surface such as a refrigerator had to be removed, and a bolts were inserted in their place. The holes had to be pre-drilled and the bolt screws inserted by hand. Since the gears require such a high level of precision, there were one or two erroneous holes that had to be re-drilled, but the gears functioned effectively after completion. The Newton's Cradle was pre-purchased as well, and it was notable one of the more flimsy items on our board. To enhance its strength, we had workers who happened to be present at Jordy's house at the time cut very specifically sized pieces of wood to fill the black areas between the frame of the Newton's Cradle. These were then glued on with wood glue to the frame. The final Newton's Cradle was wood-glued to the board, which unfortunately proved to be an unsuccessful solution. Much like gear exhibit #1, the Fidget Spinners had to have their center piece removed so a bolt screw could be threaded through them. The ball bearings which allow the fidget spinners to spin were kept in place. The fidget spinners, especially with the board in a vertical orientation, spin effectively on these screws. The Whiteboard was obtained through a friend of ours and was attached with wood glue. The markers are held on through magnetism. The Trillium Flowers were among the last items included on the final product. They were painted to the area around the bottom of the board with purple and white paint to reflect the natural color of the Trillium flower. The stems were painted on after the above photo was taken. The Pulley exhibits had to be attached to the board with the projected motion of the weights and ropes in mind, as they would potentially infringe on other features. A nylon rope is threaded through a pulley at the top in pulley exhibit #1, and at the top and bottom in pulley exhibit #2. Both ropes are tied at one into a knot to ensure the rope does not fall through the pulley and become dysfunctional. The plastic loops which contain the tied ends of the rope have since been replaced with metal loop screws. The fishing weights have also been replaced with similarly weighted but differently composed items due to failure to meet the safety criteria. The Peg Maze was cut from the same 1/8 piece of plywood as the lock puzzle. The track was drawn out before cutting, with enough space left on all sides to account for the spacers which would have to go between the maze and the board. It was cut with a plunge router. The peg was created with about 4 in. of a dowel attached with a screw to a small (~1 x 1 in) piece of wood. The wood piece is between the peg maze and the board, on the same elevation as the spacers, to contain the peg inside the maze. Gear exhibit #2 was pre-purchased and glued onto the board with wood glue. The handle of the Padlocks were threaded through loop screws and another metal implement, with much care given to the design such that the students could open the lock without taking it off the wall. The Rotating Hourglass was pre-purchased, but the mounting solution was a topic of much discussion. The final solution is a small wooden piece, 1/8 in, attached to the board with a screw but not tightly, such that it can still spin. This wooden piece is attached at both ends to the hourglass, such that the hourglass can rotate on the rotating wooden piece.
After construction commenced on Friday, 4/14, we managed to finish the board with enough sophistication such that it could be mounted at Trillium at about 1 am on 4/19. The board was delivered to Trillium Charter School later that morning with the help of a friend with a truck that could hold the board in full.
The board was attached to the wall later that day, with five 2 in. screws, penetrating the wood and heading into a stud, 3 at the top of the board and 2 at the bottom.
Video instructions
[edit | edit source]Instructional Video for Busy Board
[edit | edit source]Bill of materials
[edit | edit source]The total cost was $547 for the construction of prototypes and the final product. See the cost breakdown in the table below:
| Item | Amount | Cost per unit | Total |
|---|---|---|---|
| Padlock Combo 1-7/8" — Get at the thing store | 4 | USD 7.19 | USD 28.76 |
| Elmer's School Glue — 3' x 2', yellow | 1 | USD 2.12 | USD 2.12 |
| Sandpaper | 4 | USD 2.20 | USD 8.80 |
| Luggage Combo Lock | 1 | USD 12.59 | USD 12.59 |
| Catch Draw Deco BB | 1 | USD 5.39 | USD 5.39 |
| Hinge Deco | 1 | USD 7.19 | USD 7.19 |
| Cupboard Turn 1-1/4" SB | 1 | USD 4.49 | USD 4.49 |
| Hinge Deco 1-5/16BR CD2 | 2 | USD 7.73 | USD 15.46 |
| Rotating Hourglass | 1 | USD 7.99 | USD 7.99 |
| Barrel Bolt 2" Zinc | 3 | USD 6.29 | USD 18.87 |
| Pulley SGL WSVL 1" | 1 | USD 3.59 | USD 3.59 |
| Hardware | 33 | USD 0.63 | USD 20.79 |
| 4 x 8 15/32 CCX P.T.S Plywood + Delivery Charge | 1 | USD 107.54 | USD 107.54 |
| Plywood AC 1/4 -2'x4' - Ace Hardware Mckinleyville | 1 | USD 27.99 | USD 27.99 |
| Glue Titebond8oz Franklin - wood glue at Hensel's | 1 | USD 5.94 | USD 5.94 |
| 2HP Fixed Base Router - Harbor Freight | 1 | USD 59.99 | USD 59.99 |
| Ace Stain Brush Flat 4" - Hensel's | 1 | USD 8.49 | USD 8.49 |
| Deft Lacquer Sand Slr Qt AND Stain Minwax QT - Hensel's | 2 | USD 15.29 | USD 30.58 |
| Newton's Cradle | 1 | USD 13.99 | USD 13.99 |
| Fidget Spinners | 1 | USD 10.99 | USD 10.99 |
| Brush Art 144PC CYL ASST - Hensel's | 3 | USD 0.59 | USD 1.77 |
| Dowel Round 3/8"X48" ORG | 1 | USD 5.03 | USD 5.03 |
| Whiteboard 12" x 16" - Amazon | 1 | USD 16.99 | USD 16.99 |
| Novelty Zipper - Amazon | 1 | USD 13.00 | USD 13.00 |
| Wooded magnetic gears - Amazon | 1 | USD 28.99 | USD 28.99 |
| 2Pc Pkg Bank Sinker - Hensel's fishing weights | 1 | USD 4.24 | USD 4.24 |
| Boldt U 1/4x3/4"X1-1/2" | 3 | USD 2.15 | USD 6.45 |
| Screw Eye. 191X1-13/16CD5 | 3 | USD 2.69 | USD 8.07 |
| Purple paint - Arcata Art's Store | 1 | USD 5.60 | USD 5.60 |
| White Board 12" x 16" - Amazon | 1 | USD 16.99 | USD 16.99 |
| Caterpillar Gears - Amazon | 1 | USD 13.40 | USD 13.40 |
| Novelty Zipper - Amazon | 1 | USD 13.99 | USD 13.99 |
| Newton's Cradle - Amazon | 1 | USD 13.99 | USD 13.99 |
| Grand total | USD 547.06EUR 470.47 <br />GBP 399.35 <br />CAD 678.35 <br />MXN 11,406.20 <br />INR 40,947.44 <br /> | ||
Operation
[edit | edit source]These are 4 of the features on the Busy Board and how to operate them. It should be noted that not all busy board features are included in this section, as it is believed to be readily apparent how to operate the features not described below.

The lock puzzle is the feature most worthy of operational instructions. Each of the first 3 flaps at the top are flipped outwards by opening a lock, and each flap reveals a number, which, when put together, yield the combination for the lock containing the fourth flap.

The Newton's Cradle is operated by pulling one of the exterior hanging balls away from the others and letting it fall back towards the other balls, illustrating the concept of transfer of momentum.

The pulley exhibits are operated by pulling down on the end of the rope which has a knot tied. This allows the rope to be pulled through the pulley and the weight to be lifted, with a varying degree of difficulty based on the number of pulleys (1 or 2).

The Rotating Hourglass is operated by rotating the hourglass in either the clockwise or counter-clockwise direction. If all the sand starts in the upper half of the hourglass, the sand will flow for approximately 3 minutes. It should be noted that the tape in this photo was very temporary and was removed shortly after this picture was taken.
Maintenance
[edit | edit source]The Busy Board should most likely be wiped down and disinfected fairly regularly, as its primary purpose is to be touched extensively by kids. Presumably this would be done by the Trillium Maintenance staff There may also be repairs of some kind or another.
Maintenance schedule
[edit | edit source]- Daily
- No daily maintenance required
- Weekly
- Wipe down of the busy board with disinfecting wipes or preferred method of disinfecting
- Monthly
- No projected monthly tasks
- Yearly
- Board repairs, which could range widely, depending on the brutality of child involvement and insecurity of board items, from replacement of features (or addition of features should there be a desire for such) to marker replacement.
Conclusion
[edit | edit source]Testing results
[edit | edit source]As of 5/3/23, the board has been in place at Trillium for about a week but has not been viewed in action by any of the team members. We have received several important pieces of information which are indicative of necessary changes. The markers for the whiteboard have been stolen, the newton's cradle fell off, one of the plastic loop holes to hold the knotted end of the pulley rope has broken, and the kids are asking why the painted Trillium flowers do not have stems.
Discussion
[edit | edit source]Each of these problems should be rectified on 5/4/23. The newton's cradle, as it was the flimsiest board item, will be replaced by a steering wheel, firmly implanted into the board with a wood screw. The plastic loop holes which contain the knotted end of the pulley rope will be replaced by metal loop holes. The trillium flowers will have stems painted. The markers will likely remain unresolved, as there are numerous markers in the classroom that can be used at any given time.
Lessons learned
[edit | edit source]We learned much about the design process through this project.
We learned that maintaining focus, drive, and cohesiveness through 3 and a half months of a project is difficult, and requires extensive cooperation and coordination between team members.
We learned that distribution of labor is necessary and trust in one's teammates and the work they provide is essential.
We learned how better to operate various equipment, including a plunge route and circle saw. We learned better prices for all sorts of hardware and construction devices.
We learned what a complete, real world project looks like when completed using the Engineering design process.
Next steps
[edit | edit source]Next steps include fixing the things mentioned above on 5/4/23.
Troubleshooting
[edit | edit source]| Problem | Suggestion |
|---|---|
| The peg has become disconnected from the peg maze | Attempt to reinstall the peg inside the maze, especially at the T-intersection of the path towards the bottom left of the maze |
| A fidget spinner does not turn | Attempt to loosed the bolt screw on which the spinner rotates |
Team
[edit | edit source]Engineering 215 class of spring 2023, Cal Poly Humboldt.
| Authors | Sasha Cahill, Everett Brown, Shrodie's Lamb, Spencer Sandeen |
|---|---|
| License | CC-BY-SA-4.0 |
| Organizations | Cal Poly Humboldt |
| Cite as | Sasha Cahill, Everett Brown, Shrodie's Lamb, Spencer Sandeen (2023–2026). "Trillium Charter School busy board". Appropedia. Retrieved July 22, 2026. |