
Swetman Makerspace plastic recycling machines

| Type | |
|---|---|
| Authors | Michael Spencer Hoyt Akira Brady |
| Location | Arcata, California, United States |
| Status | Deployed |
| Years | |
| Made | Yes |
| Replicated | No |
| Uses | education, science |
| Map | |
|---|---|
| Location | Arcata, United States |
| Coordinates |
For an introduction to design class in the Spring of 2025, we worked on figuring out how to use a system involving three Polyvora plastic recycling machines in the Swetman Makerspace. The completion of this project allows for students to recycle plastics that had previously been garbage in this makerspace.
Background
[edit | edit source]In 2024, the Cal Poly Humboldt engineering makerspace bought three Polyvora plastic recycling machines: the Polyvora Shredder Pro, the Polyvora Extruder Pro, and the Polyvora Injector Pro to reduce waste associated with 3d printing, among other things. While these machines were placed in the current makerspace, they were not completely set up. One goal of this project was to set up these machines so that students in the future can use them with significantly less hassle. Our client, Matt, desired special information regarding the warnings related to the operation of the machines and the design of a lid for the Polyvora Shredder Pro to prevent plastic that is being shredded from coming out the top, and a funnel for the Polyvora Shredder Pro to ensure that plastics coming out the bottom require less cleanup.
Problem statement
[edit | edit source]The objective of this project is to find the knowledge and create infrastructure that allows for the implementation of a system that allows students to safely and effectively use already existing plastic recycling machines in the local makerspace.
Criteria
[edit | edit source]The below table shows the criteria used to evaluate each solution that it was relevant to.
| Criteria | Description | Weight (1-10) |
|---|---|---|
| Air Quality | The presence and reliability of a plan to minimize any potential air quality hazards created from melting or burning plastics. | 10 |
| Safety | The ability for students who have received relevant training to safely use the machine and students who have not received relevant training to safely work around the machines | 10 |
| Cost | The total cost of production of additions to the machines | 7 |
| Durability | The amount of time that additions to the machines last | 9 |
| Cleanliness | The extent to which this system requires custodial services after use | 7 |
| Aesthetics | The extent to which additions match the demeanor or the area | 3 |
| Ease of Use | The ease with which students can learn to use the machines and set up the machines before use | 8 |
| Small Footprint | The amount of space that the system of machines takes up while maintaining a safe working environment | 8 |
Prototyping
[edit | edit source]A large portion of this project was using pre-existing machines to find operational procedures that work for the space they are located in. Each machine had a different process for use, and different outcomes for what needs to be done. As such, the prototyping process includes, for these purposes, the process used for while figuring out the machines.
Prototyping for the Shredder Pro
[edit | edit source]At the start of the project, the Makerspace had an understanding of how to operate the Shredder Pro and had used the Shredder Pro before the project began. As such, much of the project here was designing and building features and posting information to improve the safety and efficiency of the Shredder Pro. The two features that were decided on were a lid to keep things from coming out, and a funnel, to ensure that shredded plastic ends up in the target container rather than on the floor.
The first two prototypes built were a cardboard lid and a cardboard funnel. These prototypes were built with the intention of testing the function of each feature: from them, it was found that simply covering the top of the Shredder Pro was typically sufficient to prevent plastic from coming out, and that there was a necessity to cover a side of the outlet of the Shredder Pro that would accumulate shredded plastics and allow them another route to the floor.
Later prototypes for the Shredder Pro included a cardboard catchment system that fit within the Shredder Pro, which was rejected due to the possibility of it overfilling and creating challenges for students. A wooden lid was built to test the functionality of wood as a cover -- it was found that a wooden lid was heavy enough to protect users from even the heaviest plastic pieces that may be released. A test was run as to whether it was worth it to shred the plastic twice. It was feared that large plastic shreds could damage the machines, so we figured that some form of size control is valuable. We recommend shredding plastics twice, although viable alternatives to this strategy likely exist.
- Prototypes for the Shredder Pro
-
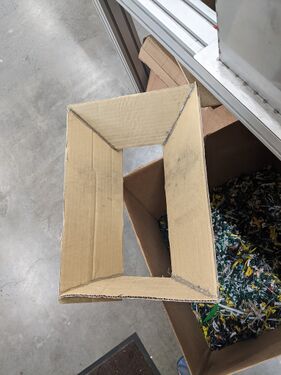 The first prototype for the funnel for the Polyvora Shredder Pro. This design was ultimately modified because it failed to cover an opening that allowed plastics to exit the machine.
 -
 Insertable catchment system for Polyvora Shredder Pro - Denied due to low capacity to catch plastics
 -
 Plastic that has been shredded once by the Polyvora Shredder Pro. This plastic is observably larger than the plastic that has been shredded twice.
 -
 Plastic shredded twice by the Polyvora Shredder Pro. This plastic is observably smaller than the plastic shredded once.
 -
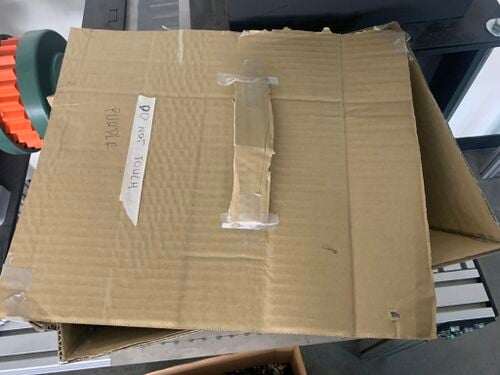 The first prototype for the lid of the Shredder Pro. This prototype helped determine the dimensions of the later designs.
 -
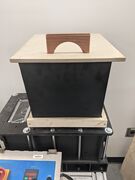
 This is the second lid for the Shredder Pro. This prototype helped inform handle design. The general design was used for the final product, but a hinge and attachment to the machine was added to make the design more secure.


Prototyping for the Extruder Pro
[edit | edit source]When this project started, the Extruder Pro had yet to be turned on at the Swetman Makerspace. As such, much of the prototyping for this machine was learning about the systems that are present in the machine and the systems that should be in place for the machine to run.
The first part of prototyping for the Extruder Pro was turning it on, which went well, and then adjusting the temperatures, which was challenging, as several of the displays read temperatures well above the target temperature. Changing some of the temperature settings resolved that problem.
Once the temperature settings were working, running plastic was relatively self-explanatory, although issues existed with the nozzle that extrudes plastic. During the first test of extruding plastic, there was a near mishap with a threaded nozzle that was resolved by exchanging the nozzle for an unthreaded nozzle. Users who are working with this machine and extruding into the air with the intention of learning more about the machine should be careful to avoid extruding plastics using a threaded nozzle. Later problems included the nozzle unscrewing during use, plastic sticking to the inside of the nozzle, and plastic dripping into the threads that attach the nozzle to the Extruder. Most of these problems are currently unresolved, although being aware of these issues is an important first step.
A mold was delivered near the end of this project. While testing this mold, we used the temperatures 185, 185, and 175 degrees Celsius for barrel 2, barrel 1, and the nozzle, respectively (working from the first point reached by the plastic to the last). These temperatures were used to fill approximately 1/3 of a four foot by one inch by two inch mold with recycled PLA. For molds of larger sizes, better connections, different plastics, or simply the mold being filled more, other temperatures may be preferred.
- Photos from use of Polyvora Extruder Pro
-
 Extruder Pro extruding plastic into the air. This method was used to figure out the machine due to a lack of available molds. Temperatures may be different when extruding into a mold.
 -
 PLA clogging the output of the Polyvora Extruder Pro. This can be an issue especially if the nozzle was removed too soon after use, at which point molten plastic can get into the threads with which to connect the nozzle.


Final product
[edit | edit source]This project has resulted in a better understanding of the Shredder Pro, Extruder Pro, and Injector Pro located in Cal Poly Humboldt's Swetman Makerspace. We have created videos on how to use the Shredder Pro and Extruder Pro, and have a better understanding of what is needed to work the Injector Pro. Per our client's request, we have also created additional features, primarily a lid and a funnel, to enhance the safety and ease of use for the Shredder Pro.
Location of the Machines
[edit | edit source]We moved the Polyvora Shredder Pro in place of the Extruder Pro and vice versa. By having the locations of these machines swapped, the Extruder will have more room to operate with larger molds and would be within fire code by having the electric motors of the machines further away from the fire extinguisher in the Makerspace. There was also the issue of providing compressed air to the Injector Pro, which was possible through the mobility of an air compressor that is located elsewhere in the Makerspace.
Lid for the Shredder Pro
[edit | edit source]During the making of the solution from section 4.4.2, we decided to not risk the chances on damaging the hopper of the Shredder Pro so we decided to add a belt at the bottom of the hopper and adding two necks to the back of it which would go up to the top of the hopper where we can then attach the lid with hinges on both necks. This can be seen in the photo gallery under "Building a Lid for the Shredder Pro", where nothing would be attached to the hopper itself but would be implemented around it. Though we realized later on that it would be beneficial to add two necks on the back left and right. The materials used for this would be 2 pine wood, 1 16 x 14 in plywood, 4 #9 x 2” Wood Screws, 4 #6 x 1-¼” Interior Wood Screws, 5 #6 x ½” Wood Screws.
Funnel for the Shredder Pro
[edit | edit source]The funnel for the Shredder Pro was constructed out of plywood and wood glue due to the ease of construction related with those materials and the availability of these materials. Its form is a right trapezoidal prism with base heights of 9.5 and 14 inches for the bottom and top, respectively, and side lengths of 9 and 10 inches. The inside is hollow to allow for the transport of plastic particles. It is oriented such that the slanted side is opposite the motor under the blades for the Polyvora Shredder Pro. It is connected to the frame of the Shredder Pro through four bolts threaded through aluminum rivet nuts to compress the funnel in place, with each bolt in a groove built into the frame of the Shredder Pro. This compression is intended to avoid stressing the joints, which, in our case, were glued due to time and material constraints.
Air Quality Solution
[edit | edit source]During our prototyping, we realized that under normal circumstances, the HVAC system was effective, although it would be good practice to open nearby doors in order to remove fumes produced by the Extruder Pro and Injector Pro, and just having the doors of the Makerspace was enough to ventilate the space. If there was to be a situation where the plastics are overheated, the fume extractor in the shed of the Makerspace can be moved into the space and would be able to remove any toxic fumes produced.
Construction
[edit | edit source]Two structures were built to assist with the safe use of the Shredder Pro. A lid was created to prevent plastic particles with unsafe velocities from exiting the hopper, and a funnel was constructed to catch shredded plastic and assist them in ending up in the box for shredded plastic.
Building a Lid for the Shredder Pro
[edit | edit source]The lid is built off of a frame that surrounds but does not at all damage the hopper for the Shredder Pro. The general design consists of a rectangle of wood that fits snugly around the bottom of the hopper connected to two necks that are connected via hinges to the lid. This ensures a relatively secure attachment of the entire lid piece.
To construct this frame, 1 by 1.5-inch pine boards of appropriate length are screwed together to snugly fit around the base of the hopper for the Shredder Pro. Use 2” wood screws, and pre-drill as appropriate. Use one screw per corner.
To the top of each piece that will become a neck, screw a hinge to the side opposite the Shredder Pro, with the joint on the upper side such that it does not get in the way of attaching the lid. Pre-drill as needed.
From there, attach the two necks of the same wooden material that runs from the base previously made to the height of the top of the Shredder Pro hopper, connected near the back corners. Use two 1 ¼ inch wood screws to connect the vertical piece to the frame on the side opposite of the control panel, pre-drilling as appropriate. The two screws per neck helps prevent rotational movement once these pieces are installed.
To the mobile flap of each hinge, attach the lid such that it is approximately level with the rim of the Shredder Pro.
A handle is likely desired. To construct this, screw an arch of some sort onto the top of the lid in a place that feels comfortable. Pre-drilling will be needed, depending on the design of the handle.
If this design is too wobbly, as it was for us, connect the two necks using a diagonal piece of wood. Ensure that the frame fits snugly around the hopper. If it does not, use shims as appropriate to create a tighter fit.
-
 The final lid for the Polyvora Shredder Pro
 -
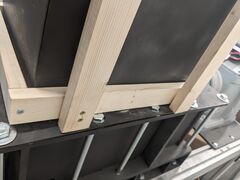 The base attachment for the lid constructed for the Polyvora Shredder Pro
 -
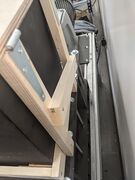 A general view of the necks for the lid of the Polyvora Shredder Pro


Building a Funnel for the Shredder Pro
[edit | edit source]The funnel is a hollowed out trapezoidal prism constructed out of plywood and bolted to the interior of the Shredder Pro. To create this, cut two trapezoids with parallel sides measuring 14 and 9.5 inches, and legs measuring 9 and 10 inches, such that there is a right angle on either side of the 9 inch leg. Drill two holes into each of these pieces centered 3.5 inches from the longer side. The diameter of these holes should be exactly the same as the smaller exterior diameter of rivet nuts used in later steps. The exact lateral position of these holes does not matter, but more stability exists when these holes are further from the center, but not so close to the edges such that the boards crack. Next, cut two rectangles out of plywood such that their width is 9.5 inches minus twice the thickness of the plywood, and a height of 9 and 10 inches. For instance, this project used ¼ inch plywood, so the width of the rectangles was 9 inches. These four pieces are glued together to create a trapezoidal prism with an open top and bottom as seen in the images below.
Push a rivet nut through each hole, such that compression of the sides will hold the nut in place. Place the funnel into the area where shredded plastic comes out and tighten the bolts until snug. If rivet nuts are not available, two hex nuts (one on either side of the frame of the funnel) on each bolt should be able to hold the funnel in place, although this was not tested in this project. In this project, the bolts did not line up with the grooves, largely due to poor measurement. While this attachment method works, we recommend measuring more precisely than we did, and using bolts of adequate length to fit snugly within the grooves. The bolts we used were not long enough to connect the funnel utilizing the grooves.
- Shredder Pro funnel design process
-
 Construction of a funnel for the Polyvora Shredder Pro.
 -
 Final design for the Shredder Pro funnel. This funnel was built with extra wood on the slanted leg of the trapezoid, but that wood was removed once it was realized that the extra wood prohibited the fit we desired, with the rim of the funnel lined up with the outer limit of the outlet for the Shredder Pro.
 -
 The funnel attached to the Shredder Pro. Ensure that it does not interact with the teeth before running the Shredder.
 -
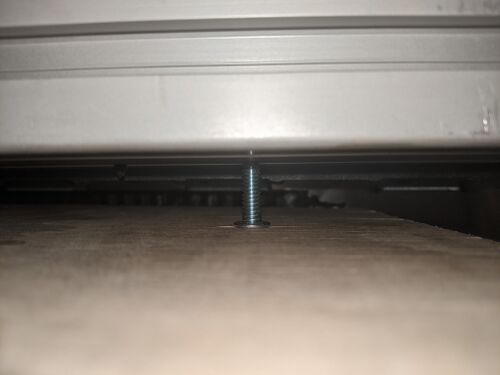 A bolt holding the funnel in place. Four of these are present. This is a photograph looking upwards.
 -
 The inside of the funnel, viewing the same bolt as the previous image. Note the rivet nut that was used to secure the bolt in place. This is a photograph facing upwards into the machine.


Video instructions
[edit | edit source]Instructional videos on how to run the Polyvora Shredder Pro and Extruder Pro.
Bill of materials
[edit | edit source]Below is a table detailing the costs of materials used for this project. There was an upfront cost of purchasing these machines of $10,995, $8,275, and $3,650 for the Shredder Pro, Extruder Pro, and Injector Pro, respectively.[1] Purchasing or constructing molds creates additional costs.
The table below shows the costs of the materials used. Note that the plywood, along with various other lumber products, hardware, and tools, were generously supplied by the makerspace requesting this project. The plywood is measured in square feet.
| Item | Amount | Cost per unit | Total |
|---|---|---|---|
| Strap Hinge | 1 | USD 6.51 | USD 6.51 |
| Plywood | 10 | USD 0.00 | USD 0.00 |
| Grand total | USD 6.51EUR 5.60 <br />GBP 4.75 <br />CAD 8.07 <br />MXN 135.73 <br />INR 487.27 <br /> | ||
Operation
[edit | edit source]Each machine is operated in a different manner. The primary focus of this section is running the Shredder Pro and the Extruder Pro without a mold attached. The Extruder Pro was tested with a mold, but we believe that we were missing pieces for appropriately attaching the mold to the Extruder Pro.
Running the Shredder Pro
[edit | edit source]This machine can be turned on by flipping a switch on the control board and rotating the safety dial ninety degrees clockwise to the "ON" position. After this machine is turned on, a capacitor will charge, after which the screen will light up, and an operator can turn the blades on using a dial that controls the speed of the blades and a "RUN" button. Reversing the blades regularly using the button marked “REV” will decrease the chances of jamming. This machine should be turned off by turning the blade speed to 0, turning the blades off, rotating the safety stop to “OFF” and flipping the ON/OFF switch to the “OFF” position. We recommend shredding plastic twice to decrease the size of the shredded plastic, although other methods, such as sieving or using the plastic as is, may work depending on the situation.
Running the Extruder Pro
[edit | edit source]Running this machine without a mold creates chunks of plastic but allows students to experience setting the temperatures and running the machine. Running this machine with a mold (we used a beam mold, but other molds may exist) creates what the mold is intended to make. The procedures relating to the machine remain the same. Attaching the mold is the only major difference that we observed when utilizing the mold, although our tests were limited to about a third of the length of the four-foot mold. Temperature settings may differ between molds, but this was not tested within this project.
In order to run this machine, there is a safety stop and a switch that prevents accidental activation. To turn the machine on, flip the switch to the "ON" position and rotate the safety stop 90 degrees clockwise to the "ON" position. This will charge a capacitor, presumably to prevent damages to the machine when it is turned off. Once the capacitor is charged, the temperatures can be set by pressing the "SET" button and then using the up and down arrows on their respective sensors, which read the observed temperature on the top and the target temperature on the bottom. Once those sensors are up to temperature, the operator can start running plastics through the machine by placing finely shredded plastics in the hopper and using the dial on the “VFD” display to control the rotation of the screw that moves the plastic along the machine. When done using this machine, it is important to purge the machine by running it until little or no plastic comes out, in a process known as 'purging' the machine, which helps minimize plastics inside the machine at the start of the next use. Once that is done, this machine can be turned off by turning the extrusion speed to 0, turning the extrusion off, turning the safety stop to the “OFF” position, and flipping the ON/OFF switch to “OFF”.
If you are extruding into a mold, you can hopefully attach the mold by screwing it into the threads of the Extruder Pro. We suspect that we were missing the piece that allows this threading. As such, pressing the mold against the nozzle using an unthreaded nozzle works, at least for beams of less than one foot in length. We have only created truncated beams using this method. At some point, this method may become unreasonable, due to the heat at the end, leakage at the connection point, or simply the inconvenience of holding the beam in place.
Running the Injector Pro
[edit | edit source]It should be understood that this machine requires electrical power for heating as well as compressed air to supply adequate pressure for injection molding. This machine does not run when there is not a mold or a nozzle.
While we have not as of yet figured out how to operate this machine, we understand the need to use a mold to stop the plastic from escaping, and we understand the need for a mold. Temperatures are set for the barrel and the nozzle by controllers comparable to those found on the Extruder Pro. Pressure and displacement of plastic is controlled at the air compressor by the hose on the Injector Pro. Injection molding is done by filling the barrel and the mold with plastic pieces, heating the system, and compressing the plastic pellets with the molten plastic. This system is limited to 350 cubic centimeters of plastic.[1]
While attempting to learn this machine, we used a brick mold purchased from Polyvora. We lacked a nozzle that attached to the bottom of the Injector Pro and thus fitted the machine to the mold without a nozzle. Any seal present was from the force of gravity, as we were unable to fit a jack under the mold. This fit required removing the guard that typically protects from a heat hazard. We do not recommend this method, as it may not be adequate under pressure. We also have not successfully used this method to fill a mold. While running the machine, it is important to ensure that the rod providing pressure to the plastics lines up with the hole that the plastic goes into. It is also important to ensure that the plastic is in the barrel long enough to be at temperature. We had a problem with the rod getting stuck in the barrel and have not found a way to resolve it.
Maintenance
[edit | edit source]We recommend basic maintenance, including oiling moving parts and ensuring that the machine runs smoothly. This was not tested during this project, and further information on the impact of this on the machines is needed.
Polyvora Shredder Pro
[edit | edit source]• No specific maintenance was recommended by the producers.
Polyvora Extruder Pro
[edit | edit source]• Purge plastic after every use:
◦ Run machine while hot until plastic stops coming out[1]
• Leave nozzle on while machine is still hot
◦ To remove nozzle, heat up machine to low temperature, and remove nozzle using heat-resistant gloves
Polyvora Injector Pro
[edit | edit source]• Lubricate the Air Motor with hydraulic oil through the air valve once or twice a month, likely based on use. The exact procedure has not yet been tested.
Conclusion
[edit | edit source]Testing results
[edit | edit source]The primary experiments carried out in this project involved the impacts of shredding plastics twice and qualitatively testing the air quality. Everything else was largely trial and error or internet research. Testing for criteria outside of air quality is largely not applicable due to the biggest objectives being getting the machines to work.
Shredding Plastics Twice
[edit | edit source]In testing the impacts of shredding plastics twice, it was observed that twice shredded plastics were observably smaller than once shredded plastics. It was not tested whether or not this had an impact on the viability of the other machines to process these plastics, although we intentionally avoided large pieces of shredded plastic while working with once shredded plastics.
Air Quality
[edit | edit source]We qualitatively tested the impact of running the Extruder Pro on the air quality by running the machine while relying on the standard airflow of the room and with a nearby door open. While an odor was produced while the doors were open, localized air filters could be placed at the source, which helped significantly.
Funnel
[edit | edit source]The funnel captured a majority of the plastic coming out of the Shredder Pro. Future models should measure more precisely to ensure a tight fit to the sides and use a less steep slope on the sloped edge in order to improve the proportion of plastic shreds caught.
Discussion
[edit | edit source]Lid
[edit | edit source]While shredding plastics that were denser than what has been done before, we learned that the lid for the Shredder Pro could successfully protect users from ejected plastics while the lid was closed. Through this experience, we declare that the lid meets the safety criterion.
Shredding Plastics Twice
[edit | edit source]Twice-shredded plastics are, in this system, noticeably smaller than plastics that have been shredded once, and work well in the Polyvora Extruder Pro. Once-shredded plastics are either habitually or by necessity sorted through by size to improve machine function. As such, we strongly recommend shredding plastics twice before use in either the Extruder Pro or the Injector Pro. That said, we have not tested the difficulty of using once-shredded plastics in the Extruder Pro or Injector Pro.
Air Quality
[edit | edit source]We believe that for incremental use, the HVAC system in the Swetman Makerspace (the makerspace where these machines are located) is adequate for incremental use of the plastic recycling machines. For extended use, we recommend opening nearby doors to improve ventilation. If air quality declines with open doors, the Swetman Makerspace possesses an air filter that can be run to improve the air quality. If you are concerned about air quality, charcoal air filters can be purchased using the search terms "Charcoal filter mask". We have not tested and do not endorse any model or brand.
Lessons learned
[edit | edit source]- When organizations are open about the use of their product, the product gets more use
- In situations where inadequate instructions are present for appropriate use, trial and error may be needed to properly use the machines
- Start working on deliverable pieces of projects well before the deadline
Next steps
[edit | edit source]- Learn how to use the Extruder Pro with molds
- Learn how to use the Injector Pro
- Optimize temperature settings for Injector Pro and Extruder Pro
- Optimize speed settings for Shredder Pro and Extruder Pro
- Learn what each setting and setting combination does to the Extruder Pro
- Set up a system to sequester the oldest plastic and recycle newer plastics
- Figure out blending plastics for color
- Figure out blending different aged plastics for durability
- Learn how to adequately purge the Extruder Pro
- Optimize settings with types of plastic that are not PLA
Troubleshooting
[edit | edit source]| Problem | Suggestion |
|---|---|
| Does not turn on | Make sure it is plugged in |
| Extruder panel is overheating | Turn temperature down. If "OUT" light is off, the segment should no longer be heating up. |
For more specific or technical issues with these machines, contact Polyvora using the following contact form: Contact – Polyvora
Team
[edit | edit source]References
[edit | edit source]| Authors | |
|---|---|
| License | CC-BY-SA-4.0 |
| Organizations | Cal Poly Humboldt |
| Cite as | Spencerjhoyt, Lonny (2025–2026). "Swetman Makerspace plastic recycling machines". Appropedia. Retrieved July 12, 2026. |