
Swetman Makerspace Tool Cart Organization System, ENGR 205, Spring 2025
| Type | |
|---|---|
| Authors | Lonny Grafman Emilio Replace with your accounts |
| Status | Deployed |
| Years | |
| Made | Yes |
| Replicated | No |
| Uses | education, science |
| Map | |
|---|---|
| Location | Arcata, United States |
| Coordinates |
The Desperados Engineering Team developed a Tool Cart Organization system. The design was made in Spring Semester 2025 at Cal Poly Humboldt Makerspace. The makerspace was losing time and tools to a lack of organization before this project.
Background
[edit | edit source]Engr 205 a class based on assigning real life projects met Cal Poly Humboldt's Makerspaces needs for someone to upgrade their space. Multiple big stations needed to be improved, or documented to improve the efficiency of the Makerspace. Team Desperados designed and implemented a tool cart organization system. The system needed to make the staff and students interactions with tool carts shorter and easier. The tool carts needed to become tools themselves, not something you had to think about.
Problem statement
[edit | edit source]The Objective of this project is to design, test, and manufacture a tool cart organization system that is the same in every tool cart. The system should make using the tool carts intuitive, and cut down on time of people finding tools, and putting them away. It can involve multiple methods for overall organization.
Criteria
[edit | edit source]Include a brief intro to the criteria and then include a table with constraints and weights (0-10 highest).
| Criteria | Description | Weight (1-10) |
|---|---|---|
| Safety | Nobody should hurt or get hurt using this system | 10 |
| Using surrounding carts to make one complete tool cart | We must identify what a complete tool cart looks like | 9 |
| All of tools are marked for individual carts. | Each tool is connected to a specific cart | 9 |
| Tool Separation | The tools aren’t overlapping and have their own spots | 9 |
| Book-keeping | Staff can easily tell when something is missing | 9 |
| Expandability | There’s room and means to add tools in the future | 8 |
| Aesthetics | The system looks good | 7 |
| Replaceability | When something breaks it can be replaced easily | 7 |
| Cost | Under $500 in material cost | 7 |
| Portability | Ability to move system around after finishing placements | 6 |
| Organizing Multiple types of tools | How individual tools should be grouped together | 5 |
| Durability | How much damage the tools can take from general wear and tear | 4 |
Prototyping
[edit | edit source]The team came up with 3 rounds of prototyping for the tool cart organization system. Each prototype was an attempt at a different component of our final result.
Prototype #1
[edit | edit source]This prototype focused on how well the 3D printed grids would fit into the tool carts. The grids were meant to fit in cleanly but there are limits to their size. We learned that once tools on set in the grids won’t slide around.

Prototype #2
[edit | edit source]The second set of prototypes are using the laser engraver to cut out colored words to label the tool cart. We put electrical tape, acrylic marker, and labels to indicate which cart to tools went to. The electrical tape doesn’t always stay on so we had to tape the ends. We considered spray paint but it was out of our budget.


Prototype #3
[edit | edit source]With this prototype we are testing out the open source Gridfinity designs for wrench holders. This design failed because the gaps for the wrenches individually were not wide enough and snapped. We will have to design our own holsters for the power tools because of their odd shape.

Final product
[edit | edit source]The final product is a multi method tool organization system with most drawers having a black square grid on the bottom. Each tool has a custom 3D printed holster that fits neatly into the grid. That slotted connection keeps the tools and grid from sliding around. Each tool is labeled with either a colored piece of electrical tape, acrylic marker, or labels of corresponding color to a tool cart. Each tool cart has a labeled word of a color and is the color it spells to complete the color coordinating organization. Each drawer has a label on the outside roughly identifying what tools will be inside.
The final product is meant to ease the finding and putting away of tools. The color matching between carts and tools is intuitive when putting things away. Gridfinity's format allows staff to quickly look into drawers and know what is missing.


Construction
[edit | edit source]This system was constructed over a few months with the bulk of it being 3D printing and labeling tools
Hammer System:
- Find a sheets of foam that are the same dimensions as the drawer's base
- Find the dimensions of both hammers
- Sketch where hammers should be laid out on the foam
- Cut out holes for hammers to lay

Hammer Draw Out 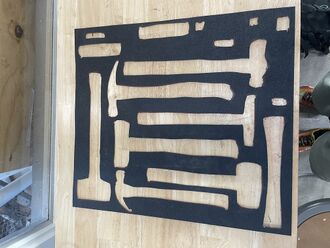
Hammer Cutout - Place the sheet of foam with the cutouts in the drawer
- Lay hammers in their cut out location


Grid Printing:
Each grid had to be printed one at a time and each print took 45 minutes,

Tool Holster Printing:
Same as the grid printing we sourced some of our holsters from the open source platform as well as created new holsters for tools that weren’t currently available.
Laser Printing Tool Cart Labels
Laser printed Red, Orange, Yellow, Green, Blue, and Purple for labeling external tool Carts.

Video
[edit | edit source]
Bill of materials
[edit | edit source]Below is a list of materials and their prices leading to our total cost of the project.
| Item | Amount | Cost per unit | Total |
|---|---|---|---|
| 3D Printing Filament | 16 | USD 9.75 | USD 156.00 |
| Acrylic Markers | 6 | USD 4.72 | USD 28.32 |
| Electrical Tape — Although we used 6 colors, 2 were provided by the Swetman Makerspace. | 4 | USD 1.57 | USD 6.28 |
| Acrylic Boards — Provided by the Swetman Makerspace free of charge. | 6 | USD 0.00 | USD 0.00 |
| Grand total | USD 190.6EUR 163.92 <br />GBP 139.14 <br />CAD 236.34 <br />MXN 3,974.01 <br />INR 14,266.41 <br /> | ||
Operation
[edit | edit source]- 3D print and place the Gridfinity base plates into the tool cart drawers.
- Inserts all of the Gridfinity tool holsters into the tool cart drawers.
- Sort tools by frequency of use, place the more commonly used tools up front and less commonly used tools further back.
- To get the tool you want, simply just pick it up from the tool holster
- To return a tool, simply place it back into the holster
- To add more tools or create more space, simply move the tool holsters to fit your workplace needs.
Maintenance
[edit | edit source]Maintenance of the organization system is minimal and simple. The tool holsters can go anywhere on the grid base as long as the tools fit in that one drawer. There is enough room in each drawer to put tools back in. The only maintenance necessary will be if a 3D printed holster breaks
Maintenance schedule
[edit | edit source]Daily Maintenance:
- Have students report broken PLA
- Reprint Broken Pieces
Weekly
- Scan Carts for broken grid or tool holsters
- Reprint Broken Components
Monthly
- Check security of tool labeling
- Reprint labels or retape
Yearly
- Check security of all labels including, tools and carts
Conclusion
[edit | edit source]Results
[edit | edit source]Our project went well the only downfall was the amount of printing this project takes with filling up 6 tool carts.
Discussion
[edit | edit source]Results went swimmingly with success in all parts.
Lessons learned
[edit | edit source]- Identify Problems, the scope, and deal with it by conducting research and gathering information
- Brainstorm solutions, don't just jump on the first one or the best looking one
- Be thorough on your research, it is the foundation of your entire project
Next steps
[edit | edit source]We hope to expand this Gridfinity solution to the new tools in the tool carts to keep them organized and space efficient!
Troubleshooting
[edit | edit source]| Problem | Solution |
|---|---|
| Tool Holster Breaks | 3D print new holster with designs given |
| Labels Wear Out | Either tape or use acrylic marker to fill in wear and tear |
| Difficulty finding tools | Rearrange the drawer to have commonly used tools more accessible and less used tools less accessible |
| Parts or tools gone missing | Look at the inserts to see what tool is missing in tool cart |
| Dust or debris in drawer | Take out all holsters and grids and tools and clean, then replace everything back to normal |
| If anything breaks | Print out new one using 3D printer |
Team
[edit | edit source]Students of the Cal Poly Humboldt Engineering Program Spring 2025.
- Shota Lam
- Dennis Wheeler
- Daniel Melendez
- Hudson Mckinny
References
[edit | edit source]
| Authors | |
|---|---|
| License | CC-BY-SA-4.0 |
| Organizations | Cal Poly Humboldt |
| Cite as | Shota Lam profile pic.jpg (2025). "Swetman Makerspace Tool Cart Organization System, ENGR 205, Spring 2025". Appropedia. Retrieved July 15, 2026. |