Create the page "30 amp charge controller" on this wiki! See also the search results found.
- the charge controller. 4 Wire the panel positive wire to the 30 amp breaker and then wire the panel positive from the 30 amp breaker to the charge controller35 KB (2,516 words) - 07:29, 9 July 2024
- array to the 30Amp breaker, then into the charge controller 7 Caption Connect the negative wire from the PV array into the charge controller 8 Caption Connect20 KB (1,974 words) - 20:47, 18 June 2024
- (40 Amp-hour battery *.50 charge needed /.62 solar panels Amps) * 1.25 = 40 hours total charge time. Charge Controller I also have a 12V 4.5A charge controller22 KB (3,677 words) - 21:11, 18 June 2024
- relay. The energy that is less than 24 volts goes to the charge controller. The charge controller, among other functions, regulates battery's voltage. The24 KB (3,342 words) - 15:27, 4 September 2024
- panels. Female DC Load Plug Plug to provide power for a DC load 3-Solar Charge Controller/Monitor Monitors voltage from the battery, current from the array,15 KB (1,615 words) - 20:18, 18 June 2024
- positive lead of the charge controller. Then I connected the negative lead of the PV panel to the negative lead of the charge controller. Keeping the positive20 KB (3,267 words) - 17:21, 18 June 2024
- batteries to the charge controller 2nd - Connect the solar panels to the charge controller 3rd - Connect the inverter to the charge controller The inverter12 KB (1,036 words) - 16:06, 18 June 2024
- 10 amp pulse-width modulation charge controller, mounted on the inside wall-flush side of the rack. See Construction for connection order to charge controller30 KB (4,463 words) - 12:47, 12 September 2024
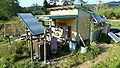
- Mounting the Charge Controller Box and Battery installation: Cutting the Charge Controller Box mount The tupperware housing for the charge controller box Attaching15 KB (2,144 words) - 18:59, 18 June 2024
- for Growers." <http://www.specialtycrops.colostate.edu/CSU_CSA/SCP_csu_csa_growers.htm#top> (Feb. 10 2010)38 KB (4,631 words) - 15:52, 29 January 2024
- Humboldt's appropriate technology program. Lonny provided a PV module, charge controller, battery, and inverter; these components and the desire to learn about8 KB (1,230 words) - 13:31, 5 September 2024
- the Solar Panel to the Charge Controller 8:56 Breaking Down the Inverter Plug 9:45 Connecting the Inverter to the Charge Controller 1 This portion of the38 KB (5,298 words) - 18:37, 18 June 2024
- It took around 30 minutes of pedaling to get the charge controller back to reading 100%. After pedaling enough for the charge controller to read 75%, it35 KB (4,721 words) - 17:52, 18 June 2024
- Step 3: Wire into the charge controller. Step 4: From the charge controller to the battery. Step 5: From the charge controller to the inverter. Step 6:12 KB (1,173 words) - 18:53, 22 August 2023
- solar modules and battery charge level are controlled using a Morningstar Prostar 30 Amp solar controller. This controller has one input for the solar panels21 KB (3,003 words) - 13:29, 28 February 2024
- with the charge controller. 3 Unfortunately, the charge controller was beyond repair and it needed to be replaced. The previous charge controller was 3520 KB (1,951 words) - 22:24, 18 June 2024
- system with charge controller, fuse, battery, DC outlets, and inverter. 3D rendering of final 40W photovoltaic system with charge controller, fuse, battery19 KB (2,726 words) - 15:05, 28 February 2024
- Solar Pathfinding at installation site Voltage Controller: When installing a PV system a voltage controller is needed to manage the flow of energy from the20 KB (2,722 words) - 20:24, 18 June 2024
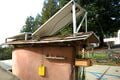
- Solar Charging Station which was created as a solar charging station for students to charge electronics while outside. There is a battery, charge controller18 KB (2,380 words) - 18:33, 18 June 2024
- circuit the PV array or load while connected to the controller. This will DAMAGE the controller. The controller should be protected from direct sunlight. Ensure9 KB (1,238 words) - 18:26, 29 January 2024