
Loam Plaster (How to make it)

These instructions describe how to make your own loam plaster. The following instructions are based on a project involving around 5+ less experienced people.
1. Preparation
[edit | edit source]1.1 Machines and equipment
[edit | edit source]1.1.1 General information
[edit | edit source]
The right tools/machines make work easier, faster and safer. When purchasing tools and machines, do not simply buy the cheapest ones, as they are usually not at all suitable for our projects, are imprecise and break quickly. This can quickly lead to frustration - and it can also quickly become dangerous. For our purpose, we need robust machines that also work well over a long period of time. For you, this means that the machines need e.g. to be oiled and maintained regularly. Well maintained, such machines can last a lifetime, i.e. they can be of service to you long after the house has been built.
It is advisable to create a central location where unused tools can be stored and retrieved. If a tool is broken, this should be reported to the person responsible for the machine at the next opportunity.
1.1.2 Basic Tools List
[edit | edit source]Note: The number of materials and tools required depends on the size of the project.
To get an idea, Column # shows the recommended number of tools needed for a group of 5. Minimum is always 1.
| # | Name | Comment |
|---|---|---|
| 1 | Shovel | |
| 2 | Hoe | To mix and move the loam mix. |
| 1 | Sponge | |
| 1 | Hammer | If you have the choice: its best to buy one with hooves to remove nails. |
| 3 | Metal trowel | Classic one handed version. |
| 3 | Dipper | To scoop the material from, e.g. the bucket to the trowel. |
| 5 | Very stable bucket | The buckets are in heavy use - thin buckets wont last long. |
| 3 | Ruler or tape-measure | e.g. rulers that can be folded and stored in the pants. |
| 1 | Ladder | Choose one that is stable and most important: has the right height. |
| 1 | Broom | A solid one, to keep the area clean and prevent people falling over things or slip out in wet straw. |
| 5 | Work gloves | Woven work gloves with a protective plastic are a good choice. Wear it especially, when working with heavy tools to avoid blisters, to have a better grip or as a protection against scarves, etc. |
| 1 | First aid kit | Including in particular disinfection solution (alcohol), bandages, leukoplast tape and wound healing ointment. |
1.1.3. Material needed for a sieve
[edit | edit source]| # | Name | Comment |
|---|---|---|
| x | Wooden slats for outdoor use | |
| 1 | Wood saw, manual or electronic | Pay attention to the right blade: some are for stone, some for wood etc. |
| x | Screws (no slotted screws) | If there is no other way, use nails and hammers. |
| 1 | Electric screwdriver |
1.1.4 Optional but recommended
[edit | edit source]| # | Name | Comment |
|---|---|---|
| 1 | Duct tape | General purpose tool, its super strong and durable. |
| x | Cover material | Sheets and normal tape. |
| 3 | Cutter knifes | General purpose tool. |
| 1 | Rake | To spread the mixtures, choose a very solid one not the one with the fine metal. |
| x | Tarps | If you don't want the substrate to mix with the clay (e.g. if only one grass pitch is available), you can look out for old banners from events. |
| 1 | Plasterer metal ruler | This metal ruler is often more than 1 meter long, and used to level out the wall. Some have teeths, to scrape off overlapping material. It is often not needed, but when the walls have to be straight then its a must. You can see the tool in the following video. |
| 2 | Large trowel | To work faster and to make the surfaces more flat over a large area |
| 2 | Small spatula | For finer parts and work |
| 2 | Sturdy cloth bags | For transporting e.g. gravel or straw, that is filled in bags. even heavy stones can be transported in bags, much easyer. |
| 1 | Mixing machines | Electric mixing machines can also be used for pre-mixing. From handy tools up to bigger construction mix machines. |
| 2 | Light source (e.g. halogen construction lights 400W and more) | Always good to have, not only when it gets dark but also for rooms that are dark in the morning/evening. |
| 1 | Jukebox/speakers | |
| 1 | Power generator | Its not cheap but to have a strong source electricity is often needed for machines etc. Calculate in, that power generators can make problems from time to time. |
| x | Medicine such as anti-allergy drugs for straw work | |
| x | Sturdy, waterproof gloves | Only when working with paint, for example. |
| 1 | Blackboard with chalk, including magnets and sponge | It is optional but highly recommended. |
1.2 Time considerations
[edit | edit source]As clay only dries slowly (1 mm per day), sufficient time should be allowed. It should also be noted that rainy periods, for example, can massively increase the drying time. Our materials not only have a long drying time, but can also freeze. As soon as the temperature falls below 0 degrees Celsius at night, you should no longer work outside. The same applies, of course, if it is not possible to heat indoors.
2. Loam Tests
[edit | edit source]
The quality and suitability of Loam for plastering can vary greatly depending on the location. It is therefore worth scouting out several locations for sampling. As a general rule, the loam for loam-samples, like clay in general, should always be taken at least 30 cm below the surface. The soil on the surface, known as topsoil, contains too many organic components (roots, grass, humus, etc.) and is therefore unsuitable. Clay can often be obtained cheaply or even free of charge without much effort when excavating for a house, for example.
2.1 Jar test
[edit | edit source]Fill the jar half full with a sample. Then fill up the rest with water and shake well for approx. 1 minute. Then leave to stand for at least 1 day so that the individual components settle. This test gives us an approximate idea of the composition. Example: jar filled to 5 cm with clay mix, of which 2.5 cm is clay = 50 per cent clay content.
2.2 Smell/odour and taste test
[edit | edit source]A simple smell test is one way of determining whether a loam contains a lot of humus. A high humus content should be avoided whenever possible. A taste test is necessary for the salt test, which is particularly recommended for locations close to the sea. If the loam is salty, it is unsuitable.
3. Sieving
[edit | edit source]Loam often contains large stones and impurities we don't want. Leaving these in would mean constantly removing them during work, which is annoying. We use a sieve to remove these impurities, allowing us to make both coarse and fine plaster.
3.1 Basic organization when sieving
[edit | edit source]
It often and quickly happens that it is no longer clear what has already been sieved and what has not. Or mixtures get mixed up, there are piles of unclear mixtures etc. This is particularly unfortunate because a lot of time is always spent on sieving. Accordingly, neither the filtered material nor the valuable working time should be wasted because of such things. The pile-system must be clear to every worker. Nobody should start somewhere, transport the filtered material somewhere or make a pile somewhere.
Below is an example of a possible workplace organization. The example also shows well how many substances are involved (and should not be mixed). But it also shows that we are dealing with more than just a few work steps. A visual example like this also makes it easier to explain to workers - especially if there are language difficulties. The system should not be changed by individuals without having a talk with the team.
3.2. The Sieve
[edit | edit source]The parameter size of the sieze can be chosen freely, but should not be too fine. The finer the sieve, the exponentially longer it takes to filter the materials. As the time required can be enormous, it is worth buying several mesh sizes or sieves and trying them out. If you find that the time required is too high, the sand can alternatively be purchased from a gravel works so that at least this no longer needs to be sieved.
Overview of the mesh sizes of the sieve
[edit | edit source]- Clay slurry/glue: 0.5 cm.
- Base coat: 1 cm and larger.
- Top coat: 0.7 cm.
A stainless steel screen is recommended. The strainer should be screwed down securely as it is subject to high loads. Expect, that the sieve will have to be repaired after a certain time.
All materials should be as dry as possible before sieving. If you notice during test sieving that it is not going well, the material must be spread out on the ground and dried - in a place that is permanently protected from rain and, at best, wind. The materials should not be stored directly on grass or other organic surfaces. Where only grass is available, the top layer must be removed (10 cm, preferably 30 cm). Otherwise, this unwanted grass soil, the root system and seeds, for example, can find their way into the mixture. If you have one, you can also use a robust tarpaulin and then the substrate is no longer so important.
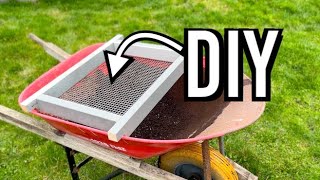
3.2.1 Example of a sieve
[edit | edit source]3.2.1.1 Version A
[edit | edit source]Wooden frame construction, 200 x 80 cm, bar or wood as rear support. The sand is thrown against the sieve (no force necessary). Over time, material collects on the ground in front of the sieve. This material can be thrown against the sieve 2-3 more times before it can be considered sifted out. The sieved material should be stored separately (see basic organization during sieving).
3.2.1.2 Version B
[edit | edit source]Wooden frame construction, 100x100 cm. The filter can be placed on two buckets, for example. Alternatively, the sieve can also be used in the same way as version A (with rear support). This version is only suitable to a limited extent, e.g. if straw has to be sieved, you can see a example here:
4. Working Organization
[edit | edit source]Poor work organization can increase the time required incredibly, lead to frustration and a poor result. It is not uncommon for even larger house construction projects to fail because this factor is neglected.
To prevent this from happening, a minimal work structure is needed. This means that there is a work structure in the work that is familiar to every worker. Such a solution can look like this:
| Time | What | Comment |
|---|---|---|
| 08:00 - 09:00 | Work | Start of work. |
| 09:00 – 09:30 | Break (20-30 minutes) | |
| 09.30 – 12:00 | Work | |
| 12:00 – 13:00 | Pause | |
| 13:00 – 14:30 | Work | |
| 14:45 – 15:00 | Pause | |
| 15:00 – 15:30 | Work | Tidying up the construction site. At 3:30 p.m. everything is cleaned and covered. |
| 15:30 – 16:00 | Tidying up | Tidying up the construction site and, if necessary, meeting. At 4:00 p.m. everything is cleaned, covered and the work is stopped. |

Optional, a whiteboard or writing board.
4.1 Working Conditions
[edit | edit source]Due to the demanding nature of the work, its recommended that working hours should be max. 7 hours per day and 4 days per week. With more working hours, people tend to have negative effects and it doesnt mean that if people work more hours on the paper, the output will be accordingly higher. This also means, for example, that we do not start a new finishing coat at 2 p.m. if it requires three hours to complete. Depending on the location and situation, such as midday heat, adjustments should be made accordingly. If adverse conditions are foreseeable, such as extreme heat, a consensus on the daily schedule should be reached through discussion.
If meals are organized by the work team, those responsible should start preparing approximately 1.5 hours before lunch. A rotation system can be implemented for cooking duties and posted on the board for clarity.
For example:
- Monday: Hans & Fernanda.
- Tuesday: Petra & Ali.
Work assignments should align with individual preferences. People with fine motor skills should not be limited to intricate tasks, and those who are physically strong should not be doomed to carry heavy loads all the time. Providing variety and rotating work stations is beneficial. For instance, a person who mixed the plaster two days ago should know how it needs to be mixed again. Additionally, consider allergies, such as straw allergies, when assigning tasks.
4.2. Technical Tools for Organizing Work etc
[edit | edit source]The use of a etherpad has proven to be a very good, to store and save informations by everyone: https://etherpad.wikimedia.org/, a advanced version with more tools can be done here: https://board.net/. dont forget that you are responsible to make backups, e.g. file-> print->create pdf and save it or just copy+paste it into your notes. if you need more tools, check https://degooglisons-internet.org/en/list/
4.3 Work Safety
[edit | edit source]When working in Construction, its important to take security seriously. Accidents are common and when you take part in a longer construction project, its almost sure that you have to deal with a emergency situation. prepare for it and make clear to the team, that its everyones responsibility to participtate in a safe workplace
In general, the following applies:
- There is a first aid kit, and everyone knows where to find it. This location also has an emergency procedure and emergency contact number. In areas with no cell phone connection, there is a explanation how to get help. when you are in a rural area, you also want additional first aid equipment, such as torniquets or instructions to keep people alive before reaching a hospital.
- An easy-to-follow system is the "3-S System": 1) Safety – Ensure the scene is safe, 2) Secure and Provide First Aid – Check the condition of the injured and administer first aid if possible, 3) Seek Help – Call emergency services for professional assistance.
- Before the end of work, the workplace should be tidied up. This includes sorting and returning equipment to the warehouse, cleaning it if necessary, and collecting any items. To allow time for this, we stop work about 20-30 minutes before the end of the day. We should especially protect outdoor equipment from rain and storms, sweep the ground, and roll up cables. Additionally, while cleaning up, we should check what we need for the next day and replace any broken tools (e.g., trowels). Watch the security notice for each tool. Find out about the "kickback". Oils and maintain the devices regularly. For most electric machines, safety and use instructions are required: this means a exprienced person has to explain you, how to use it. In addition to the safety aspect, this also reduces the fact that the (often expensive) machines and equipment are used improperly and thus break more quickly.
- Everyone knows where to find water in an emergency.
- Generally speaking, it is better to buy tools of good quality, even if they cost a little more, because the tools of poor quality may be inaccurate and wear quickly. There is a central place where unused work equipment is stored and retrieved from there. If a piece of equipment is defective, this will be communicated to the responsible person at the next opportunity. Do not use defective devices.
- Since loam can be very slippery, we have to pay special attention to the risk of slipping. Loose cables (e.g. from the cable drum) should be placed at the edge or hung on a nail along the wall. If there is a cable at a passage, it should be secured in a way, so that no one can trip over it.
5. Loam Mix Tests
[edit | edit source]
To determine the best mixture and what drying times they have, create test areas with different mixtures. It's best to do this directly on the wall where the final plaster will be applied. These test areas can be removed before applying the final plaster.
The size of the test areas should be at least 20x20 cm to provide a representative result. They should be placed on various, more challenging sections of the wall (like uneven parts etc.). When they work in the worst areas, they work everywhere.
It’s important to write down the exact mixtures and their proportions, similar to a recipe in cooking, so they can be reproduced. This is crucial if more material is needed than expected.
the basic mixture is:
- 70% sand/stone/silt
- 28% clay
- 2% is additional stuff like straw or horse poop
An example recipe might look like this:
- 1 part of clay from a good source.
- 2 part of river sand (not beach sand!)
- 10 buckets of water
- 2 bucklets of fine straw
- 1 bucket of horse poop
If using buckets, agree whether it means a full boiler or if, for example, the last 5 cm should be left empty. so you can precisely remix new material if needed.
Fibers and additives, such as horse poop, are optional but recommended. Fibrous additives improve the plaster’s flexibility, reducing the risk of cracks. However, coarse or excessive fibers can be visible in the plaster, so testing is important.
Common fibrous additives can be:
- Straw (very common).
- Tree needles.
All additives should be dry (e.g., do not use wet straw). Fibers must be free of large impurities and can be sieved for finer quality.
Choose a are of ground to do the mixing, that doesn't become too wet. A sunny spot is beneficial if the mixture needs to "moan" or swamp for a longer time. remember, not to mix it directly on the Grass. For smaller Quantities you can mix them in buckets.
Examples of final mixes:
First Coat:
- 2 buckets of very clayey soil.
- 8 buckets of sand.
- 1 bucket of fine/sifted straw.
- 1 bucket of horse poop.
Finish Coat:
- 2 buckets of very clayey soil.
- 8 buckets of sand.
- 2 buckets of horse poop.
The mixing process should be similar to baking, where ingredients are combined methodically: first you make a pyramide, then you scoop a hole in the middle and litle by little you add the different parts and start to mix it, from the inside out until everything is mixed. Stomp and mix the mixture with your feet until its good mixed. The longer you mix, the better it will be, especially if you have a lot of material. Make sure there are no dry spots left by moving the material around with a rake. If you use a tarp, you can fold it over the mixture like a blanket, which makes mixing easier. The goal is to get a smooth and even mixture.
Prepare the mixture at least 24 hours before you need it. The clay needs this time to absorb the water. This process will continue, but after 24 hours, it will be okay to use. Cover the mixture overnight to protect it from rain, which can add too much water. You can also store the mixture for the winter. Freezing or getting have it soaked during a summer can actually improve the mixture - actually it is traditionally often done. Before using the plaster, mix it again and check its consistency.
6. Plastering the walls
[edit | edit source]The wall should be clean, strong, and free of dirt. Remove or treat any beading areas (areas where no water sticks to it). If the surface is too smooth, make it rough by carving lines into it or hammering small notches into hard surfaces. In this guide, we’ll start with a mud brick wall. If the wall has been dry for a long time, moisten it with a brush or if you have larger walls, you can try to use the hose with low pressure. just dont soak it. Ideally, the surface looks cloudy. If unsure, splash some water on the wall and wait at least 20 minutes.
If want to use a mesh, cut the mesh-sizes to the right size beforehand (e.g., 10 x 2.20 meters). This way, you only need to place them while plastering. Note: Mesh should overlap at least 15 cm to the next piece. For tricky areas, like where concrete meets brick, place a extra mesh in these spots.
Work systematically from one side (left or right) and move forward. You can choose how to finish the surface, but dont work too long on it (this can lead to cracks).
Use a hand spatula to separate corners and joints. This helps because these points often move a lot, and if the clay can’t keep up with the movement, it cracks. So, it’s important to separate these areas beforehand.
Once the last layer has fully dried (this takes multiple weeks), brush the surface with a hand broom to remove any loose sand. Avoid using water as it can leave streaks or marks.
Glossary
[edit | edit source]- Clay: Binder.
- Loam: Mixture between clay and sand.
- Soil/Earth: General Term for Material from the Ground, including topsoil, ground soil etc.
- Adobe: A word mainly used in spanish countries and US, to describe sun dried bricks or buildings made this way (Adobe House).
| Authors | |
|---|---|
| License | CC-BY-SA-4.0 |
| Cite as | Niels (2024–2025). "Loam Plaster (How to make it)". Appropedia. Retrieved July 15, 2026. |