
Kelsey 3-lid 5-gallon bucket design

| Type | Compost bin |
|---|---|
| Authors | Kelsey Martin |
| Location | Arcata, California |
| Status | |
| Years |
I developed a household size composting system with a rotating 3-lid design, in Humboldt County, California. I wanted a system that would be easy to use and implement in a standard home, for an affordable price. Before this project, my household did not have a compost system set up, so I was able to start from scratch. The design I decided to go with is a small scale version of a design my appropriate technology group and I developed for The Community Center of Appropriate Technology (CCAT) at Cal Poly Humboldt in Arcata, CA. You can see this project here CCAT compost system 2020. On this page you should find all the necessities, from cost & supplies to maintenance & operation, to implement this system in your own home.
Background
[edit | edit source]This is a satellite project from my team project designed for The Community Center of Appropriate Technology (CCAT) at Cal Poly Humboldt in Arcata, CA. To see the large scale design: CCAT compost system 2020. This page is a small scale version that I designed for my own 3 person household. Being a student, I am on a tight budget, so I did not want to spend a large sum of money, but I did not want this to affect the aesthetics of the project. I also had to keep in mind that my housemates have not composted before, so the system needs to be accessible for them. As well as, Humboldt County has moderate temperatures and considerable precipitation, so the climate needed to be taken into account for design and construction of the project.
Problem statement
[edit | edit source]The objective of this project is to design and construct an affordable composting system that can be implemented at home. My goal was to develop a system large enough for a household of 3 adults, while small enough that is it easy to make, maintain, and construct. The rotating 3-lid design was something I developed to make multi-batch composting more accessible and organized.

Construction
[edit | edit source]- After supplies have been purchased. You first want to drill holes in the buckets, around the rim and on the bottom. I made the holes on the bottom of the bucket slightly smaller than those around the rim. It is also possible to drill holes around the other rim of the lid, to allow for more water vapor to exit. Note that this should not be done if the system is being implemented outdoors in rainy climates. If holes are drilled in the lid, make sure to cover the lids from the rain if the system is outside. You mostly likely want to keep out extra moisture, since your food scraps produce water vapor when breaking down.
- Once holes have been drilled. You want to use the gorilla tape to fasten the insulation to the outside of the buckets, and the inside of the lids. This will probably require you to cut the insulation to fit the buckets and lids correctly. Make sure to fasten the insulation on the lids with enough tape, as to not leave gaps or holes for water vapor to get between the insulation and the lid. The water vapor will condense and remain in there.
- Once insulation has been attached. You can prepare your stencils. (This step is not required, depending on how you go about adding symbols to your lids. For this step, implement the necessary actions for putting your symbols on the lids.) I cut off the top of my poster board to make the stencils, leaving enough of the material to make an instructional poster on how to use the system. I cut the piece of poster board a just removed into thirds and one each third I drew the symbol I wanted. I then cut out the symbol, leaving it vacant for spray painting.
- The next step is to attach the stencils to the tops of the lids. I used tape to fasten them on the lids. Once you have them placed and taped, use preferred color spray paint to spray the vacant area of stencil and leave to dry. Once dry, you can remove the stencils and your buckets are finished.
- With the remaining poster board, draw your matching symbols and a corresponding blurb on what each lid means. I hung mine above my compost buckets on the side of my house with excess gorilla tape.
- If you're like me, and live in a rainy climate, use a watering proofing spray to protect your poster and lids from being washed away.
-
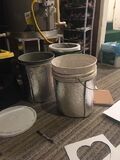
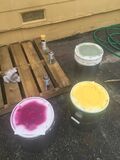
 Insulating the Buckets
 -
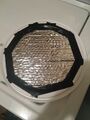 Insulation of the lids
 -
 Drilled holes in buckets
 -
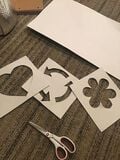 stencils
 -
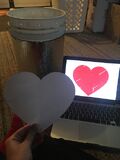 Tracing for stencils from images on laptop
 -
 Using stencils to spray paint designs on buckets
 -
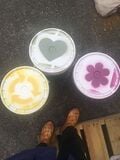 Finished designs
 -
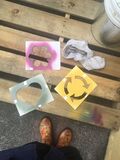 Stencils after spray paint
 -
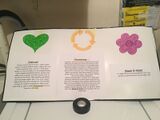 Instructional Poster


Short video on how to construct the system!
Costs
[edit | edit source]Fortunately, the 5 gallon buckets were donated to me, but I have included them in the table below. The wooden pallet is also something that can be found at hardware stores, etc. for free. If you do not have markers at home that can be used for the poster, this will be an additional cost. Unless, the poster can be made on a computer. I used spray paint for the lids, but permanent markers and other options can be used for lower costs. If you want to use spray paint, only 1 can is required, as long as different symbols are used to keep the lids different. This will save you money as you will not need a whole can of paint for the lids. You will also need something to turn the compost. Most garden tools can be used for this, since the buckets are relatively small. I recommend using a compost crank, but that will add to your budget.
| Quantity | Material | Source | Cost ($) | Total ($) |
|---|---|---|---|---|
| 3 | 5 gallon buckets w/ lids | Ace Hardware | 3.99 + 2.99 | 20.94 |
| 1 | Reflective Insulation 24 in.W x 25 ft.L (could buy less) | Ace Hardware | 25.00 | 25.00 |
| 1 | Gorilla Tape 1 in.W x 30 ft.L | Ace Hardware | 3.99 | 3.99 |
| 1 | Poster Board Paper | CVS Pharmacy | 1.49 | 1.49 |
| 3 | Spray Paint | Ace Hardware | 3.99 | 11.97 |
| Total Cost | 63.39 | |||
Operation
[edit | edit source]Once set up, the rotating lid system should be simple and straight forward to use and maintain.
Maintenance
[edit | edit source]This is a step by step guide on how to maintain and operate the rotating 3-lid system using 5 gallon buckets.
Schedule
[edit | edit source]- Daily
- Turning compost (3-7 days/week)
- Weekly
- Adding food scraps and browns (carbon materials) as need
- Checking temperature and moisture
- Checking for needed rotations of lids
- Monthly
- Harvesting finished compost
- Checking for needed rotation of lids
- Possible cleaning of buckets
- Yearly
- Cleaning of buckets
- Every few years
- Possible change of insulation or retaping

Instructions
[edit | edit source]This is a step by step guide on how to maintain and operate.

The first lid (Green Heart) is the accumulation of food scraps, as well as, adding carbon materials to maintain an aerobic (with oxygen) process and keep it from turning anaerobic (without oxygen). Once Bucket has been filled, leaving a few inches from the brim, it is ready for the yellow processing lid. (keeping in mind that as food scraps become compost they can shrink in volume up to 15 times smaller.)

The second lid (Yellow Rotate Symbol) is for the batch of compost that is processing. This is the one you want to keep an eye on the most. This bin is for processing the scraps when you accumulated enough from the first. The scraps in this bin will require aerating (i.e. turning of the pile), and monitoring of temperature and carbon to nitrogen ratio. These are important for maintaining a healthy and quick compost. If the temperature and carbon-nitrogen ratio are good, the compost should not leech out much liquid, a handful of the material should feel like a wrung out sponge (moist but not releasing liquid). Once this lid has been placed on the bucket, it will remain until the composting food scraps and carbon materials have turned to finished compost. After this, the final purple flower lid can be placed on it for use in the garden.

The third lid (Purple Flower) is where finished compost will be stored for easy access and availability.
Conclusion
[edit | edit source]Lessons Learned
[edit | edit source]I learned that implemented a composting system into your home is actually relatively easy. Almost anyone could do it and for even cheaper than I put into it. I also learned that it is very valuable to have connections within your community. Having support and helping hands was a wonderful gift during this project.
Troubleshooting
[edit | edit source]| Problem | Suggestion |
|---|---|
| Rain Proofing | I used a waterproof spray for coating boots and shoes on the lids and poster to protect them from rain. |
| Excess Moisture | Leave lid off or lightly on so more water vapor can be released. |
Team
[edit | edit source]References
[edit | edit source]
Make sure to include other relevant categories at the bottom, e.g.,, etc.
| Authors | |
|---|---|
| License | CC-BY-SA-4.0 |
| Organizations | Cal Poly Humboldt |
| Cite as | Shiloki587 (2020–2025). "Kelsey 3-lid 5-gallon bucket design". Appropedia. Retrieved July 9, 2026. |