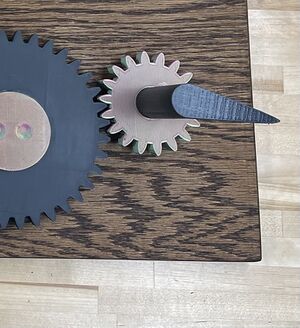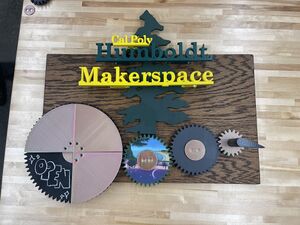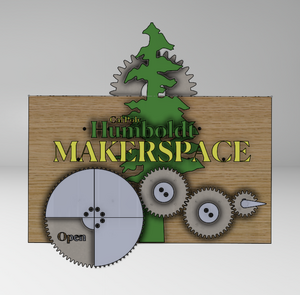
Team Loose Screws designed and constructed the entry sign for the new Cal Poly Humboldt (CPH) Makerspace, as a part of the Engineering 205 Fall 2023 class. The main purpose of the sign was to easily identify the space, while drawing in passersby and matching the theme of CPH. An interactive component implemented so that the status of the room could be displayed and changed with gear rotation.
Background[edit | edit source]
Cal Poly Humboldt is undergoing many changes as expansion continues in the conversion to a Polytechnic University. Part of this change includes the opening of 2 brand new Engineering Makerspaces for the Fall 2023 semester. This change means there are many projects needed to tailor the spaces to optimize functionality and create a unique Humboldt feel. Consequently, the client for Engineering 205 Intro to Design, Fall 2023 is the Cal Poly Humboldt Makerspace, represented by Devin Ketchum, Makerspace Director. The Task for Team Loose Screws is to create and build an entry sign for the door to the Makerspace in the Natural Resources Building Room 213.
Problem statement[edit | edit source]
The objective of this project is to create signage for the Makerspace in the Natural Resources building that alerts of the presence of the Makerspace while also demonstrating the capabilities of the space. A secondary objective is to create a community feeling unique to the Cal Poly Humboldt Engineering program.
Criteria[edit | edit source]
All criteria for the project are developed through collaboration with the client. Constraints on those aspects of design limit how the project must be constructed. Each criterion is assigned a value from 1-10 equal to its overall importance in the construction process. The criteria and constraints of this design project are as follows:
| Criterion | Constraint | Weight (0-10 High) |
|---|---|---|
| Aesthetic | Looks better than Current NR Signage (there is none) | 10 |
| Safety | Must meet CPH safety standards | 10 |
| Functionality | Informs about purpose and motivates to use space more than current signage | 10 |
| Mountability | Must be mountable onto the NR door without altering door | 9 |
| Cost | Must cost less than $300 to produce | 9 |
| Durability | Still able to function after at least 1 year of use | 8 |
| Portability | Can be carried by at most 2 people | 7 |
| Interactivity | Has at least 1 interactive component | 7 |
Prototyping[edit | edit source]
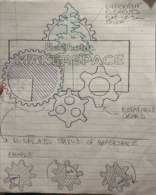
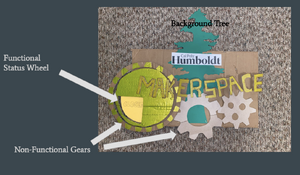
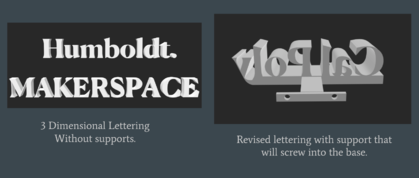
The prototyping process began with a hand-drawn design from the team's initial idea, as seen in Figure 2. From there, a physical prototype was created with cardboard and construction paper to determine the size and layout of the sign; this can be seen below in Figure 3. A majority of the prototyping that followed was completed in SolidWorks since most of the sign's parts are 3D printed. As seen on the left in Figure 4, the lettering was initially modeled with each letter as their own part. We quickly realized that the text had to be connected and put on supports so they protrude past the gears, therefore not interfering with their motion (on the right in Figure 4). The final design that was decided upon by the group is shown in Figure 5.

Final product[edit | edit source]
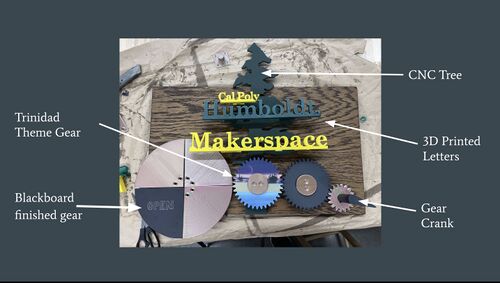
The photo to the right shows the final outcome of the Cal Poly Humboldt Makerspace entry sign. There are labels to allow for easy identification of the individual components. The gears rotate to spin the status wheel, allowing the user to display the status of the space. Overall, the sign matches the theme of Cal Poly Humboldt; and identifies and showcases the new Makerspace.
Construction[edit | edit source]
The Cal Poly Humboldt Makerspace sign is created through the use of many different materials and machines. The user needs to have knowledge on designing in CAD in order to replicate the moving gears, gear parts, and lettering. The backboard is cut out of a 27.75" by 17.635" piece of plywood and then stained with Minwax wood stain in the shade of Honey. The tree part of the sign is drawn and downloaded into a PDF which is then sent to the CNC router to cut out of a 1/2" thick piece of plywood.
With general knowledge of how to use CAD and Solid Works, the user should be able to recreate the small gear, two medium gears, and large gear by following a 1:4 gear ratio in order for it to function properly in the end. The user must also design fitting gear fasteners in order for the gears to be mounted onto the sign. The lettering is created the same way in Solid Works and made with text supports in order to mount effectively onto the sign.
Once everything is done the user must start by attaching the tree to the baseboard using wood glue and a couple of screws placed for extra support. In order for the gears to function properly, the tree needed to have the trunk cut off of it, just where the medium gear would go. Then the user must screw down the gear fasteners onto the back board with appropriate spacing between them, in order for the gears to function correctly. In order to keep the gears in place, the user must then glue a gear covering (also designed in SolidWorks) over each gear fastener / gear.
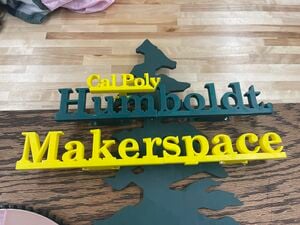
The final step in assembling the Makerspace Entry Sign is attaching all the lettering on top of the base board / tree. The user may use gorilla glue to place the letters down then use screws through the text supports to permanently attach the lettering.
Video instructions[edit | edit source]
Reference the video below to see how the gears function in order to turn the status wheel of the sign.
Humboldt Makerspace sign Functioning
Bill of materials[edit | edit source]
The table below is an itemized list of the cost of materials used.
| Item | Amount | Cost per unit | Total |
|---|---|---|---|
| 3D printing filament — Donated | 4 | USD 0.00 | USD 0.00 |
| Construction paper | 2 | USD 4.00 | USD 8.00 |
| Plywood plank — Donated | 1 | USD 0.00 | USD 0.00 |
| Wood plank — Donated | 1 | USD 0.00 | USD 0.00 |
| Wood stain | 1 | USD 10.00 | USD 10.00 |
| Chalkboard Finish Paint | 1 | USD 8.50 | USD 8.50 |
| Screws | 20 | USD 0.35 | USD 7.00 |
| Grand total | USD 33.5EUR 28.81 <br />GBP 24.46 <br />CAD 41.54 <br />MXN 698.48 <br />INR 2,507.48 <br /> | ||
Operation[edit | edit source]
For most, operation of the sign is simple: view it, and enter the Makerspace! Or alternatively, come back later. However, for those with the authority to change the displayed status of the space, instructions to do so are as follows:
Maintenance[edit | edit source]
The sign only requires infrequent maintenance: dusting every 1-2 months, and the occasional reprinting of a 3D printed part that may need replacing (expected to only occur very rarely).
Maintenance schedule[edit | edit source]
- Monthly
- Dust the sign.
- Yearly
- Check the sign for obvious wear and tear that may indicate the need to reprint a part.
Conclusion[edit | edit source]
Testing results[edit | edit source]
The final product was successfully assembled, and functions as anticipated. The gear crank on the smallest gear successfully turns the large gear 1⁄4 of the way and shows the correct status symbol. Some adaptations were made along the way to ensure a functional product. Some adaptations included cutting the trunk off the tree so the gears were all level with each other, and completely removing the gear behind the tree because it would interfere with the ability to hang the sign. The only testing needed was the turning of the gears.
The product has proved to be functional in alerting passersby of the existence of the Makerspace and sparking curiosity in students and faculty. The final product also has a working interactive component which was one of the main goals and criteria of this project.
Discussion[edit | edit source]
The tests were done to make sure the sign would function correctly, and everything would stay together because the sign will ultimately be hung on the door for a long period of time. It was important that the sign functioned properly and was aesthetically pleasing to catch the eye due to the chosen criteria. The final product met all the possible criteria on the list, besides durability because it won't be determined until after 1 full year of use.
Lessons learned[edit | edit source]
This project was a major learning lesson for the entire Loose Screws Team. Learning how to properly use the new tools in the makerspace including the 3D printers was a long process for this team. Every component of the final product was done through learning and asking questions, there was no previous reference for this team to refer to for help, and every step of the way was a learning experience. The team worked alongside the makerspace coordinator, Devin Ketchum, in order to make sure everything went as planned.
Next steps[edit | edit source]
For the best outcome, the sign will need to be dusted as needed every month and occasional paint touch ups. If a sign component, such as the small Cal Poly lettering, were to start coming off over time, it would also need to be re-glued.
Troubleshooting[edit | edit source]
For further assistance email zts12@humboldt.edu
| Problem | Suggestion |
|---|---|
| Part breaks/deteriorates | 3D Print new part using files provided |
| Chalk not applying to status wheel | Clean, spray with Chalkboard finish paint provided |
Team Loose Screws[edit | edit source]
- Zach Sherman
- Ruben Vadas-Williams
- Erin Stafford
- Celeste Joyner
References[edit | edit source]
