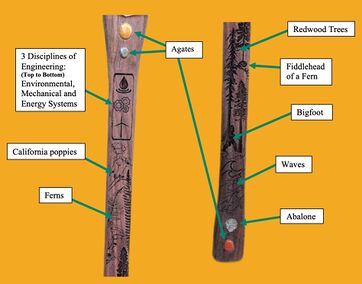
Cal Poly Humboldt (CPH) has transitioned into a polytechnic university, which means the focus has shifted to involve more hands-on technology-based learning. A big aspect of this shift is welcoming a new engineering makerspace filled with an array of equipment needed to design and develop an assortment of projects. To showcase the capabilities of the new Makerspace, Team Dreamwave Innovators created a Lumberjack’s Axe with CPH's school spirit encapsulated throughout the design to inspire future creators. This project was created for Engineering 205: Introduction to Design in Fall 2023.
Background[edit | edit source]
With an incredibly diverse array of cutting edge tools, the Cal Poly Humboldt Makerspace has the potential for students to create great things. At the time of this writing, there weren't any examples showcasing what the space is capable of. That's where the need for this project arose. In the Fall 2023 semester, the Dreamwave Innovators sought to make something that would inspire other students in this space as a part of their final project for Engr 205. Students at Cal Poly Humboldt, Haley Corder, Kyle Ellis, Ayden Hamanaka and Erick Herrera, make up the team Dreamwave Innovators. The Cal Poly Humboldt Makerspace is the client for which the Dreamwave Innovators were creating for. The Fogbreaker's Axe is the deliverable in which the Dreamwave Innovators fulfilled the need for showcasing what students can create in the Makerspace. Paying homage to the themes of the Humboldt community and utilizing many of the cutting edge tools within the Makerspace, the Fogbreaker's Axe is a stellar example of the Cal Poly Makerspace potential.
Problem statement[edit | edit source]
The objective of this project is to create a stellar example of what the Cal Poly Humboldt Makerspace is capable of. From dreams to reality, it is the intent for the Fogbreaker's Axe to inspire the CPH community through creation. Utilizing many of the cutting edge tools, this axe is a beacon of possibility that showcases the immense potential of the Cal Poly Humboldt Makerspace.
Criteria[edit | edit source]
The creation of criteria for a project allows for measurable and quantifiable goals aimed at defining the success of a project. Table 1 shows the set criteria for this project with descriptions and weights showing the importance of each criterion.
| Criteria | Description | Weight (1-10) |
|---|---|---|
| Equipment Utilization | Must include at least 5 pieces of equipment found in the Makerspace | 10 |
| Wow Factor | Must inspire students and visitors at the Makerspace | 9 |
| Aesthetics | Must look better than the Marching Lumberjack's Axe | 9 |
| Saftey | Must not be sharp enough to cause harm | 7 |
| Cost | Less than $400 ($100 from each group member) | 6 |
| Portability | Must be able to be held by most of the campus students | 6 |
Prototyping[edit | edit source]
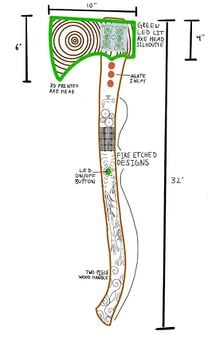
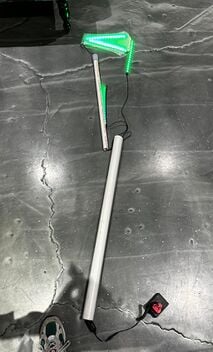
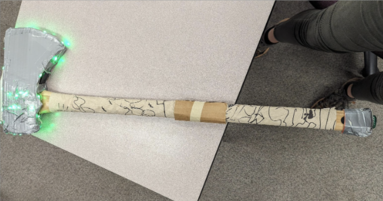
Multiple prototypes were created throughout the design process. The initial sketch, Figure 1-A, incorporates all of the different components discussed during brainstorming sessions. Overall the final design was very similar with only a few things different; such as the H shape, the design on the axe head, and the placement of the symbols and stones on the handle. Figure 1B shows the first physical prototype created with automotive interior LEDs and PVC. This protype was used to visualize size and for inspiration for the final design. In Figure 1C, the second prototype designed to test both functionality and appearance. This prototype was crafted using cardboard, an axe handle purchased from Ace Hardware, and constructed using duct tape. The second prototype was created specifically to assess the size and shape of the axe head. The Ace Hardware handle was customized by adding doodles drawn on a paper towel, and the axe head was given a traditional lumberjack-style appearance. This secondary prototype also served to experiment with button placement. Velcro stickers were strategically placed at different locations on the axe, and the feedback from individuals helped us determine the most intuitive spot for activating and deactivating the lights.
Final product[edit | edit source]
The final product consists of three major components: a 3D printed axe head, a handmade and laser etched wooden handle, and a 12 volt LED light system powered with a rechargeable internal battery. The axe head is composed of a two-piece set of 3D printed shells. The two pieces fit together and are connected by three pins found in the corners. The head was designed using the 3D modelling software, Solidworks and Fusion 360. The head measures about 12.5” x 8” x 2”. The two-piece head will be made of plastic used by the Stratasys F370 3D Printer. The axe handle is made of walnut using the bandsaw, belt sander, and orbital sanders. The handle is 39” long and 2” wide. The head of the handle is sanded to fit inside the 3D printed axe head. The battery is in a square cut out found on the handle inside the axe head. The axe handle has a laser etched design along one side of the length of the handle. The design is created digitally using Adobe stock images and PicsArt. The design includes symbols covering the three disciplines of engineering offered at Cal Poly Humboldt. The design also has many symbols representing Humboldt County such as redwoods, ferns, poppies and the bigfoot. The design is laser etched on the handle using an Omtech laser engraver cutting machine. The handle also has a gemstone inlay. There are two gemstones located above the laser design and one stone below the design at the base of the handle. There is also an abalone fragment on the bottom of the axe handle. The stones are of variable depth as they are different sizes. They range from ½” to ¼” deep. The stones are glued into notches created by a Dremel.
Construction[edit | edit source]
Wooden Handle[edit | edit source]
To create the handle you will need to cut a piece of walnut into a 2x4 then you can draw a rough shape of the axe handle in pencil on the wide part of the axe handle. You will use the bandsaw to cut the axe handle into the rough final shape. You then use the table sander and hand sanders to shape your axe and smooth all edges. You then sand the axe handle top to the right dimensions to fit the axe head. You can also use the table router to round the edges and help smooth overall.
3D Printed Axe Head[edit | edit source]
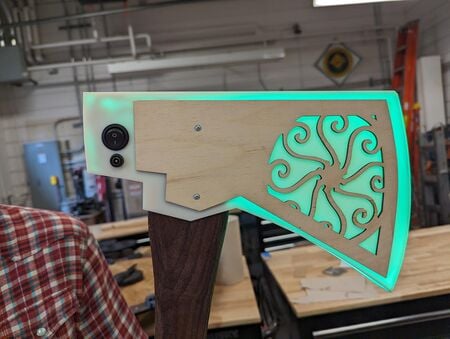
The head of the axe was constructed with an engineering grade 3D printer and designed using computer aided design (CAD) software. Using Fusion 360 CAD software, the axe head was designed to meet the specs of our project. After saving the CAD design as a .stl file, we imported the file into GrabCAD, which is the splicing software we used. From there, we exported it as a .cmb file and used a Stratasys F370 Engineering Grade FDM printer to print the axe head into two pieces. Which was made with 3D printer filament. After that, any excess material was sanded down and removed. As you can see in the final design, the axe head has some aesthetic wooden designs on it. These were created and designed in a laser etching machine and super glued onto the axe head. The 3D printed axe head is hollow on the inside to house the electrical components which are detailed elsewhere in this section. To complement these components, holes were drilled in the head of the axe to fit the on/off switch and the charging port using a drill press. All of the components were installed into the axe head with the electrical components in the right place and the axe head secure over the handle of the axe. The handle of the axe fits into an opening on the axe head and goes almost all of the way through. Since the axe head was constructed in two pieces with female and male fit supports on each side, the axe head fit together like a clam shell. Once the fit was snug, with the two halves of the axe head fitted together, four screws were drilled through the axe head, two on each side, into the wooden handle. This precaution is to ensure the fit is extra secure.
Here are the two stl files:
Electrical Components[edit | edit source]
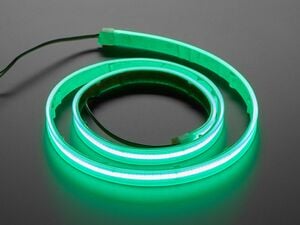
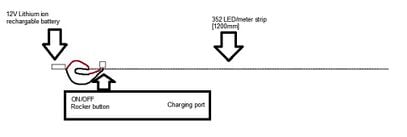
The electrical component of the axe was composed of items that were bought online either through Amazon.com or Adafruit.com. These included: the 12V rechargeable battery pack,[1] power pigtail plugs,[2] rocker switches,[3] and an LED light strip.[4] The components along with the diagram are shown below.
Video instructions[edit | edit source]
Bill of materials[edit | edit source]
The two tables below show the breakdown of costs spent on this project from prototyping to creation. Table 1 shows the cost to replicate the Fogbreaker's Axe and table 2 shows the total spent on prototyping. The total spent on the entire project is USD $244.28.
| Item | Amount | Cost per unit | Total(USD) |
| Walnut 5 1/2’ x 4” | 1.00 | 87.99 | 87.99 |
|---|---|---|---|
| Flexible LED Strip | 1.00 | 11.95 | 11.95 |
| Mini SP002E Controller | 1.00 | 6.99 | 6.99 |
| Rechargeable Li-ion Battery | 1.00 | 16.99 | 16.99 |
| Battery Charger | 1.00 | 9.89 | 9.89 |
| Round Rocker Switches | 1.00 | 6.99 | 6.99 |
| 3D filament | 1.00 | 20.00 | 20.00 |
| Linseed Oil (Maintenance) | 1.00 | 8.99 | 8.99 |
| Total: | 169.79 | ||
| Item | Amount | Cost per unit | Total(USD) |
| Addressable LED lights | 1.00 | 13.99 | 13.99 |
|---|---|---|---|
| LED Button | 1.00 | 2.50 | 2.50 |
| 2x4x8 | 1.00 | 10.00 | 10.00 |
| 3D filament (prototypes) | 1.00 | 25.00 | 25.00 |
| Ace Hardware Axe Handle | 1.00 | 23.00 | 23.00 |
| Total | 74.49 | ||
Operation[edit | edit source]
Outlined in the section below is operation of the Fogreakers axe. One can compare the operation use to that of a rechargeable flashlight.
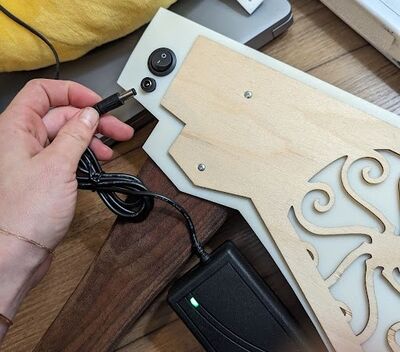
As you can see in the picture there is a toggle switch that powers the electrical components and a charging port to charge the axe. The "O" on the on/off switch is the off position and the "I" is the on position that controls the lights. The port below the on/off switch is where the battery is recharged. The charging chord adapter needed to charge the axe is DC barrel plug.
Maintenance[edit | edit source]
Maintenance on the Fogbreakers axe is expected to be very minimal. There are weekly, monthly and yearly maintenance activities detailed below. Maintenance can be performed by the average citizen. Nothing is technically complex to maintain.
Maintenance schedule[edit | edit source]
- Daily
- None
- Weekly
- Recharge the battery
- Monthly
- Dusting
- Yearly
- None
- Every 2 years
- Wipe the wooden handle with linseed oil
Conclusion[edit | edit source]
Testing results[edit | edit source]
Testing results concluded that the handle size/shape should be thicker and flatter to accommodate laser burn design. Handle design should include the Cal Poly Humboldt logo, locally sourced rocks and shells, and the names of individuals who worked on project. Button placement needs to be towards the top of the axe head. Battery placement should be within handle, not head. Head dimensions should be larger than the prototype. Light placement should be inside of head rather than outside.
Discussion[edit | edit source]
After testing results were identified, the handle width and the surface area on the axe head faces to be laser-etched were increased. The handle design includes an official Cal Poly Humboldt logo, locally sourced tumbled stones, an abalone shell and the team name and individual names. The button was placed on the back of the axe head. The battery was placed within the top of the axe handle. The axe head was printed larger than the prototype and used a FDM 3D printer Stratasys:F370 with white plastic. The lights were placed along all the edges within the axe head which illuminated the 3D printed axe head much more even than if they were to be outside.
Lessons learned[edit | edit source]
If this project were to bee recreated, there are a few lessons learned that should be incorporated into the new build. Instead of using walnut and linseed oil for the handle of the axe, a lighter wood or stain could be used. With the combination of stain and wood used, the handle came out darker than would have been preferred. As a result, the laser-etched designs are not recognizable from a long distance away and can only be seen up close. In the head of the axe, the electrical component density is very large. To mitigate this, a larger axe head should have been made or the electrical components should have been wired in a way that didn't put outward pressure on the axe head. The wiring placement negatively affected the fit of the two 3D printed axe head pieces. Instead of drilling into the axe head, the aesthetics would have looked better if screw holes were implemented into the 3D printed design to fit the axe head to the wood handle.
Next steps[edit | edit source]
Going into the future, it is the intention for the axe to be stored in the Cal Poly Makerspace. At the writing of this post, there isn't a wall mount for it to live. Dreamwave Innovators have a design idea for the wall mount: the new Cal Poly Humboldt logo. The plan is to create the Humboldt "H" with the wood CNC machine and mount it in the new makerspace. To be finished sometime in 2024. We are excited for this project to inspire future makers to create stellar things in our makerspace!
Troubleshooting[edit | edit source]
| Problem | Suggestion |
|---|---|
| Battery dies or lights turn on. | Plug into the charger cable |
| Lights don't turn on after plugging into charger | Remove securing screws from axe head and open axe head. With a multimeter, test for continuity on either side of battery pack. If no continuity, replace the battery pack. If continuity, test continuity at various points on the circuit. If capable, resolder the section without continuity. If not able or if other electrical problems persist, contact Kyle Ellis at kpe6@humboldt.edu or Ayden Hamanaka at agh38@humboldt.edu. |
Team[edit | edit source]
For the Fall 2023 school semester the Dreamwave Innovators Team consists of:
References[edit | edit source]
- ↑ https://www.amazon.com/KBT-Rechargeable-Connector-Replacement-Compatible/dp/B0C2414BQF/ref=sr_1_1_sspa?crid=T17004GK5O8B&keywords=12v%2Bbattery%2Bpack%2Brechargeable&qid=1702076178&sprefix=12v%2Bbattery%2Bpack%2Brechargeable%2B%2Caps%2C133&sr=8-1-spons&sp_csd=d2lkZ2V0TmFtZT1zcF9hdGY&th=1
- ↑ https://www.amazon.com/43x2pcs-Connectors-Security-Lighting-MILAPEAK/dp/B072BXB2Y8/ref=pd_bxgy_img_d_sccl_1/143-6977219-2743926?pd_rd_w=bpTao&content-id=amzn1.sym.839d7715-b862-4989-8f65-c6f9502d15f9&pf_rd_p=839d7715-b862-4989-8f65-c6f9502d15f9&pf_rd_r=W5YA8H2X8W28P9RA8DTS&pd_rd_wg=REWfu&pd_rd_r=9e808a4c-a267-4bcf-a775-deec2cc32251&pd_rd_i=B072BXB2Y8&psc=1
- ↑ https://www.amazon.com/DaierTek-Rocker-Switch-Household-Appliances/dp/B07S1MV462/ref=sr_1_1_sspa?crid=2R57LVLILHNL7&keywords=12v+switch&qid=1702076221&sprefix=12v+switch%2Caps%2C132&sr=8-1-spons&sp_csd=d2lkZ2V0TmFtZT1zcF9hdGY&psc=1
- ↑ https://www.adafruit.com/product/4847
