
Homemade Wheel Hoe

| Type | |
|---|---|
| Authors | Charlie Tennessen |
| Status | |
| Years | 2014 |
| Made | Yes |
| Replicated | No |
| Cost | USD 150 |
Make your own wheel hoe at a fraction of the cost of buying a new one.
Wheel hoes are fantastic labor savors in larger gardens and organic farming. Unfortunately, they are still a boutique item and usually cost at least $150. Folks who are handy in the shop can build one from an old child's bicycle very inexpensively.
Advantages:
- Be more productive in the field
- Control weeds without chemicals
- Ability to cultivate more acreage
- Save money over purchasing new
- Re-purpose a bicycle meant for the landfill
- Custom size the unit for your specific situation
Project goals
[edit | edit source]- Inspire new builders of homemade wheel hoes
- Inspire new designs of wheel hoes
Design
[edit | edit source]- Start with a small-sized child's bicycle. Smaller wheels make the hoe a little handier.
- Remove the chain, pedals, crank, front fork, cables, accessories, and just generally pull everything apart.
- We will be using commercially available tools on this project. This hoe will be fitted to accept an oscillating stirrup hoe ($26.99), and a turning plow ($20.99). You can also use a 3 or 5 tine cultivator-style hoe and fabricate a mount for it.
- Cut the main for-and-aft frame tubes out, and cut the two front forks off of the steering column. Leave the back triangle of the frame alone. This part of the bike will form the basis of our wheel hoe.
- Weld or braze the steering column into one of the main frame tubes. Use whichever tube fits up better. We are using all TIG welding on this particular project.
- Align this assembly with the upper part of the rear frame fork assembly and weld it together. Take your time getting the metal clean and a tight fit prior to welding. It is difficult to fill gaps when welding thin-wall tubing.
- Now put the rear wheel back on and re-install the handlebar into the steering column. It's helpful to mount the handlebars so that you have adjustment in both directions.
- Get a feel for a comfortable working height and prop up the unit at that height. Ideally, at this height the lower forks of the rear bike frame are parallel to the ground now.
- Figure out your tool mounting system. For Hoss tools about 6" is the right height for the mounting plate.
- Fabricate the tool mount, install the tool, and go cultivate something!
-
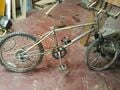 A small bike suitable for building a wheel hoe out of.
 -
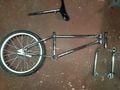 All accessories have been removed and the bike cut apart into pieces. We will be using the rear frame assembly, rear tire, one main frame member, the steering column, and the handlebars.
 -
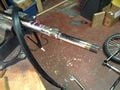 Start by welding the steering column to one of the main frame members. Carefully fitting and cleaning the joint makes welding much easier. This is thin wall tubing and you may want to practice on some of the unused material first. Bronze brazing is probably easier than welding for beginners.
 -
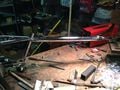 Next attach the lower frame to the long steering column/tube assembly. Fitting up and jigging the joint takes much longer than the actual weld. It works well to just align everything along the axis of the upper fingers of the rear fork assembly.
 -
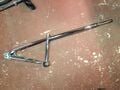 Here is the basic wheel hoe, minus the rear wheel, handlebar, and tool holder. Mount the rear wheel and handlebar, get your desired tool, and start to plan your tool mounting system.
 -
 Prop up the wheel hoe at your desired handlebar height and figure out how to mount your desired attachment. For Hoss tools, a mounting plate around 6" off the ground is just about right. You should have some height adjustment later by changing how the handlebar is mounted and tightened into place.
 -
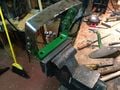 For this project we have decided to use a 2" x 3" piece of angle iron as the tool mounting plate. Here we are drilling mounting holes for the oscillating hoe attachment. This unit will also accept a turning plow when finished.
 -
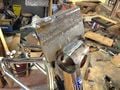 Here we have finished welding the angle iron mounting plate to the bicycle's crank housing. Fabricate the mount so that the tool is close to the wheel. Too far away and the hoe becomes more awkward to use.
 -
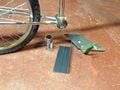
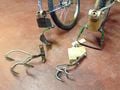 Here are some different options for tools and tool mounting. Use the materials and techniques you are comfortable with.


Costs
[edit | edit source]We have yet to pay for a bike. High quality attachments can be purchased online for $20-$30 each, just search on "wheel hoes" and see what comes up. The oscillating hoes are highly effective in the garden, probably the single most effective tool for your wheel hoe. You could also re-purpose the tool end of a hand-type garden cultivator, or experiment with cultivator teeth. Scrounge around and see what you find.
Next steps
[edit | edit source]I would love to see someone create a no-weld version of this hoe. I am welding this because 1) I can, and 2) I want to play with my TIG welder. But not everyone welds, and it would be useful to be able to build these without welding or brazing.
Conclusions
[edit | edit source]Get out and grow food!
Contact details
[edit | edit source]Charlie Tennessen https://www.facebook.com/charlie.tennessen
| Authors | |
|---|---|
| License | CC-BY-SA-3.0 |
| Cite as | AnrchyAcres (2014–2025). "Homemade Wheel Hoe". Appropedia. Retrieved July 17, 2026. |