Members[edit | edit source]
Christopher Grace
David Swanson
Background[edit | edit source]
The Custom Stand Up Paddleboard project is part of Michigan Technological University's BoardSport Technologies Enterprise. It is a senior capstone project that aims to develop a cheap and open source method for manufacturing top of the line paddleboards.
Materials and Techniques[edit | edit source]
Epoxy[edit | edit source]

Epoxy was chosen as a layer of Solarez epoxy between foam and fiber. This layer will give a more resilient layer to help with adhesion. Solarez epoxy does not harden fully, but remains a tacky epoxy to help give these properties. A layer of Super Sap INF from Entropy Resins was used for the outer layer. This will provide the hard shell needed for the board, and it will help increase overall strength. Both of these epoxies are resistant to UV light as well, which in essential when developing a board to be used in intense sunlight.
Super Sap INF was used for the sample testing. After we ran out, Entropy Resins stopped making Super Sap INF. Super Sap One was substituted.
Foam[edit | edit source]
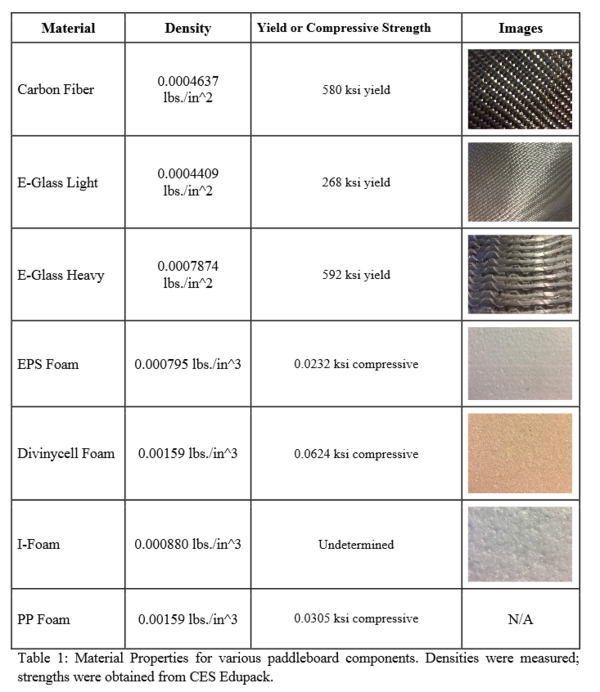
The Foam will be the center of the board. It will provide the buoyancy to keep the board afloat. After reducing our possible materials down to three foams, we selected Expanded Polystyrene (EPS), Divinycell Foam (PVC cross-linked), and I-Foam. Polypropylene(PP) was also tested as we did not have all material properties on I-Foam, which is a mix of PP and EPS. By testing PP we were able to predict some of the expected properties of I-Foam. These can be seen in table 1.
EPS foam was the final selection.
Fiber[edit | edit source]
The fiber layer of the board will be just across the bottom. Because of the loading of a paddleboard, the fiber on the bottom will be in tension. This is where they will lend to most strength to the board. Putting fibers on top of the board would just add to the cost with minimal strength benefits. The three fiber choices, seen in table 1, are Carbon Fiber, E-glass heavy weight, and E-glass light weight.
The final fiber choice is carbon fiber. This was obtained from Protech Composites, who has had an ongoing relationship with BST in the past. They have made donations and helped significantly with previous projects. We ordered 7oz, 3k, 2x2 twill sheets of fiber that were big enough to cover the whole bottom face, approximately 12 foot by 4 foot. The pricing for one sheet is $54.75 with $13.58 for shipping for a total of $68.33.
Two layers of light fiberglass were used on the top of the board to prevent micro cracking in the epoxy and prevent footprints in the foam.
Stringer[edit | edit source]
Stringers help to provide additional stiffness to the board. While all testing we done without a stringer in it, the addition of a stringer is standard and cannot harm the board.
A 1/8" balsa stringer was chosen during the manufacture of the blank by Marko Foam
Blank Manufacturing[edit | edit source]
The model for the paddleboard is larger than any current CNC machine at Michigan Tech. To solve this problem, we considered both hand shaping the board and contracting out the board. Hand shaping would save on costs but would provide a lower quality board. The contracting of the board will obviously provide an easier and higher quality board, but with a cost. We decided to contract the board out to Marko Foam. The total cost was $298.97 plus $233.00 for shipping. The blank was quickly cut and shipped. While we are currently still waiting on the blanks arrival, Marko has helped significantly during the entire process. The PO is linked.
Fin and Fin Box[edit | edit source]
several fin layouts were debated. Originally, a 5-fin design was chosen. This would have enabled the fin layout to be changed between a full 5-fin set, a thruster set (3 fins), a 4 fin set, or just a center fin. This enables the board to be optimized for any conditions. In order to ease the difficulty of manufacturing and lower the cost, just a center fin design was selected. This is a general fin that will allow the board good stability and tracking on the portage canal, next to which Michigan Tech lies.
An FCS fin set was purchased from Foam EZ. This was installed onto the bottom of the board following the fitting guide instructions.
Graphics[edit | edit source]
The possibility of printing custom graphics arose when another BST team purchased ink and rice paper for graphics printing on snowboards. Because of the size of the paddleboard, for full body graphics additional rice paper will be needed. If just small graphics are needed, no new materials will be needed. If printing graphics is done, the graphic sheet will be laid under the epoxy on the top of the board.
Another possible method of adding graphics is hand painting the top face of the board. If this is done, the paint will have to be compatible with the foam and the epoxy, and proper drying time will be needed.
Painting may allow for an easier graphic design, but paint and painters Melbourne tape will be needed. Custom printing designs will give a cleaner layup and graphic, but it will be harder to design and print. Both options are being considered.
The final decision was to dye the epoxy used for the top fiber, and to leave the bottom carbon fiber clear. The dye was selected because it was easy and minimized the amount of extra layers needed. Additional graphics could be incorporated into future boards.
Process Selection[edit | edit source]
Using Granta CES, three possible processes were selected. Autoclave, vacuum bagging, and hand layup. Hand layup was chosen as it has the lowest associated cost.
Significant research was done into the layup techniques in order to try and perfect our process, but hands on practice could help in the future. Below are some videos that were used, along with many not listed. The general layout was first using UV epoxy between the foam and fiber. We did not have enough sunlight, so this step would be eliminated in the future. Next, normal 2-part epoxy was layered over the carbon on the bottom of the board. While 3/4 of the way hardened, the fibers were cut even with razors. The board was then flipped and the two layers of fiber with epoxy between and on top were added. Next, the entire board was sanded smooth and wiped clean. A final hot coat of epoxy was added to ensure a smooth finish, and then a surface coat (not epoxy) was added.
Cutting Fiberglass for the Bottom
Laminating and Fiberglassing the Bottom
Costs[edit | edit source]
Possible Composites[edit | edit source]
During the selection of foams and fibers, CES Edupack was used to decide upon which materials were good possibilities. The 3 foams and 3 fibers were selected based on density, strength, price, and water acceptability. By optimizing these constraints we developed the final choices for testing. The charts we used to select the materials are below.
As mentioned above, the three foam choices are EPS, I-Foam, and Divinycell. The three fiber choices are Carbon Fiber, E-glass heavy, and E-glass light. More detail on the selection of these materials and the choices made can be seen in the semester report below.
-
Density vs. Price
-
Tensile Strength vs. Density
-
Water vs. Price
-
Density vs. Compressive Strength
-
Price vs. Density
-
Tensile Strength vs. Density
-
Water vs. Price
CAD Model[edit | edit source]
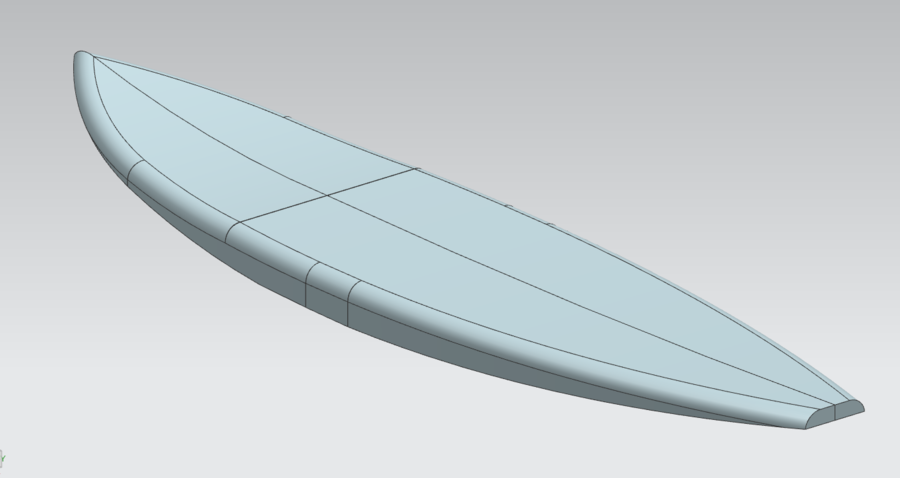
The CAD model was based off over several industry standard boards. The pointed tip will help with tracking across the water, maximizing use the material properties we are striving for. Selecting the title to this section links to the CAD model page.
-
Top View
-
Side View
-
Front View
-
Back View
-
Full View
Sample Testing and Data Analysis[edit | edit source]
From each of the foam and fiber choices, 9 total composite layups can be made. The samples were made to specify the ASTM requirements discussed below.
Two ASTM tests were selected to test for the expected modes of failure in our board. Knowing that the worst failures of the board could either fail from the delamination of the fiber or from brittle fracture, we tested both of these. ASTM D2344M and ASTM D7264M were the two tests we used to test laminate strength and flexural strength, respectively. Each combination of layup was tested with at least 5 samples. This gave 45 samples for each test and 90 samples total. This was done in order to ensure a significance in the results of the testing.
After the testing was competed, the data was analyzed through MINITAB, a statistical analysis software. Both interaction plots and main effects plots are shown here. The interaction plots show which combinations work best together. for example, I-foam does not work well with any fiber. This is because during manufacturing, the I-foam did not adhere well to the fiber with our epoxy choice. The main effects plots, also used in the final selection of materials, show which materials significantly affect the measured results. For example, EPS and I-foam both significantly decrease the weight of the board, as they are below the dotted line.
-
Laminar Strength
-
Flexural Strength
-
Cost
-
Weight
-
Laminar Strength
-
Flexural Strength
-
Cost
-
Weight
FEA Testing[edit | edit source]

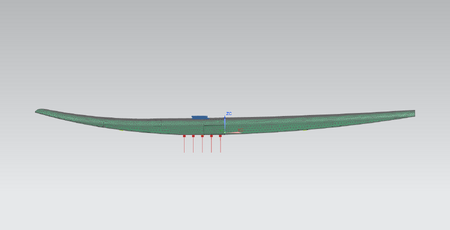
FEA, or Finite Element Analysis, is a method of running simulations on a CAD model in order to get predicted results of displacement and stress. By entering in the material properties, expected forces, and constraints, we are able to simulate what stresses a paddleboard would undergo during riding. The loading scenario is shown here, as well as the resulting images of displacement and stress.
-
Divinycell & Carbon Fiber
-
Divinylcell & E-glass Heavy
-
Divinylcell & E-glass Light
-
EPS & Carbon Fiber
-
EPS & E-glass Heavy
-
EPS & E-glass Light
-
PP & Carbon Fiber
-
PP & E-glass Heavy
-
PP & E-glass Light
-
Divinycell & Carbon Fiber
-
Divinylcell & E-glass Heavy
-
Divinylcell & E-glass Light
-
EPS & Carbon Fiber
-
EPS & E-glass Heavy
-
EPS & E-glass Light
-
PP & Carbon Fiber
-
PP & E-glass Heavy
-
PP & E-glass Light
Final Selection[edit | edit source]
There are four main criteria used in selecting the final board composition, Weight, Cost, Strength, and Ease of manufacture. Obviously, the board must also pass the FEA tests and be predicted to be in use with an acceptable safety factor.
-
Flexural Strength Results
-
Laminar Strength Results
Strength was a vital component of the selection. As seen in the graphs here, and in the main effects plots, EPS and divinycell are the strongest two foams. Carbon fiber is the strongest fiber with heavy glass close behind.
-
Cost Results
-
Weight Results
As shown both here and in the main effects plot for cost, EPS and light glass are the cheapest materials with I-foam and carbon fiber being the second cheapest materials.
For weight, EPS is the cheapest with I-foam close behind. Both carbon fiber and light glass are approximately equal in weight and less than heavy glass.
Ease of manufacture was decided upon while pressing the samples for testing and while searching for materials in large enough blocks for a paddleboard. As noted earlier, I-foam had trouble adhering to the fibers, and was thus elimated as a possible candidate. Divinycell is not made in blocks large enough to manufacture a paddleboard blank out of, thus it was also eliminated.
After all of the above methods were considered, a decision of EPS foam and carbon fiber was made. Although Divinycell and carbon would have yielded the strongest board, divinycell and carbon are both expensive, and divinycell is not able to be found in large blocks. EPS gave similar strength results, and although carbon was expensive, its benefits in all other categories outweigh the cost of it.
-
FEA Validation
After the FEA simulations had been run, the results were put into this chart. By comparing the FEA stress values to the flexural strength of the material that was calculated, we determined the safety factor of each composite. This ensured that the final selection would not break based on our simulated environment. The results from this show that our board has a safety factor of approximately 3.5.
Manufacturing[edit | edit source]
Has not begun
Results[edit | edit source]
Reports[edit | edit source]
Semester Report[edit | edit source]
The semester report was submitted to the materials department at the end of the first of two semesters this project will run. It summarizes all major decisions during the first section of our project.
Final Report[edit | edit source]
The final report will be submitted at the conclusion of this project.
Final Presentation[edit | edit source]
The final presentation was given to summarize the years work. Only the slides, not voice, are listed here.


