At Cal Poly Humboldt the course Engr 215 allows one the real life experience through service learning. During the Fall semester of 2009, our team, the Muddy Cobbers, worked on a design project for the Campus Center for Appropriate Technology (CCAT). The goal of the project was to implement a solution that would protect and beautify the cob installations at CCAT.
Background[edit | edit source]

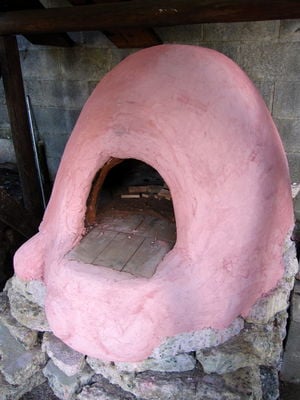
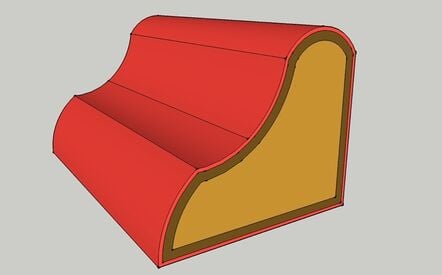
The Campus Center for Appropriate Technology has two cob installations a bench and an oven. These were both student project built in approximately 2005.
Cob is a type of earthen building material composed of clay, sand, and straw. At CCAT, these cob installations are demonstrations of appropriate building techniques.
Problem statement and criteria[edit | edit source]
While cob is a very durable material in some climates, like Humboldt County's, it must be sealed. Weather plays a large role in the degrading of cob and without a proper seal, like a plaster, the cob will not last very long. Since being built, signs of weathering were already apparent in both the bench and oven. Our team was presented with this problem: find a way to protect and beautify the cob installations.
Criteria
The criteria considered for this project were decided upon by our group with help from CCAT's directors. The criteria were then ranked by their importance starting with the most important.
- Durability: Our solution must be durable enough to preserve the finished product, withstand Humboldt county weather conditions, and resist potential minor vandalism. In their current condition as untreated cob, the bench and oven are not very weather resistant or damage resistant.
- Aesthetics: Our solution must improve the aesthetic appeal of the bench and the oven in the eyes of the CCAT directors and visitors to CCAT. The aesthetics must be improved in a way that is appropriate and long lasting.
- Appropriateness: Our solution must use methods, materials and technologies that are as local and sustainable as possible. Both cob installations demonstrate an appropriate sustainable building material and method, our solution should be aligned with this demonstration.
- Maintainability: Our solution must be maintainable by the CCAT directors and volunteer workforce with reasonable ease.
- Safety: Our solution must ensure the bench be safe enough to sit on, and the oven safe to cook with. Both installations are currently safe to use so our solution need only maintain the current level of safety if not improve upon it.
- Cost: Our solution must cost less than $325. An appropriate solution should cost significantly less than this if local, used, and free materials are applied to the problem.
- Demonstrableness: Our solution will exist as an extension of alternative building techniques and materials already employed at the CCAT house. It must exemplify those methods and materials.
Testing[edit | edit source]
With our project, the testing phase served as a particularly important role. A series of tests are performed on a large number plaster mixes across a variety of ratios in order to determine the most applicable plaster for our project. Each plaster is tested for scratch resistance using a metal scraper. In our tests we rate each sample from 1 to 5, 1 being the least scratched. Each plaster is tested to determine how much dust it gives off. This is done using a brush. Again each sample is rated from 1 to 5 1 being the least dust. Each sample is tested for compressive strength. Weight up to 150 lbs is applied and the plaster is said to either tolerate more compression, or not as much compression. Since this test applies to humans sitting on the bench, we look for plaster that can tolerate the weight of a human being. Each plaster sample is observed for cracking during the drying process. Finally each plaster is subjected to a water resistance test. Each sample is sprayed with a hose gently for 30 seconds and signs of decay are observed. This is measured in terms of how many seconds it took for significant decay to appear.
Description of final project[edit | edit source]
a two layered plaster design was chosen. The first aspect of our design is a base coat made of one part clay and soil, one part sand and one part sawdust. This layer is applied relatively heavily to reshape the bench in minor ways and to fill in holes and cracks from wear and tear. The fill coat also provides a clean smooth surface to apply a finish coat to. Out of twenty eight samples that we tested this mixture held up the best.
The second coat was applied for both aesthetic purposes and to provide long lasting durability. This plaster mixture uses a ratio of 1 part mixed hydrated lime and water to three parts sand. This mixture is similar to one used by CCAT before, and it is recommended in Green Building.

Instructions for Implementation[edit | edit source]
Begin by taking note of soil in the local area and prepare soil tests to find a soil with an appropriate soil content. Reference section II for further information on appropriate soil content. Prepare tests for the soil in order to determine if soil may need added components. Prepare the cob surface for work to be done on it, by smoothing out protruding areas or removing excess dust. Have trowels, sand, sawdust, a hose, rags, and a workspace prepared for the day of plastering. On the designated plaster day, begin by sifting the decided upon soil through wire mesh to remove large particulate matter. Also at this time spray down cob surfaces with water so that it is slightly saturated. Mix equal parts soil, sand, and sawdust together well. These ratios may differ depending on soil content, they are the ratios we chose to use. Again, reference sections II and III for information on ratios and soil. Using trowels, apply smooth thin layers of plaster to surface. Repeat for each necessary coat. An earthen plaster is a fine finish plaster for mild to moderate use and mild exposure. This is a good place to stop if the earthen plaster is pleasing and the plastered object does not need exceptional protection. In CCAT's case, another step is necessary and so we also chose to apply a lime-based plaster as a finish coat.
Hydrated lime is best preslaked, that is soaked in water for as long as possible before use. So once it is decided that lime will be used, immediately begin soaking hydrated lime in water. When preslaking, mix well and leave about 2 inches of water on top of the putty in order to prevent the lime from reacting with CO2 in the air. When it comes time to apply the lime, it rolls on much like the earthen plaster. Wet the first plaster coat, and apply with trowels, Lime is caustic and care must be taken to protect the skin. The lime can be dyed with iron oxide by adding it to the putty to achieve a preferred shade. After the first layer of putty is laid down, take the tiles prepared for mosaic seats and set them in the wet lime. When all the tiles are laid down, trowel more putty over the top of the tiles. Using a clean rag, wipe the tops of the tiles and smooth the plaster between tiles. After the plaster is somewhat dry, rags can be used again to smooth it down and get a nice finish.
Costs[edit | edit source]
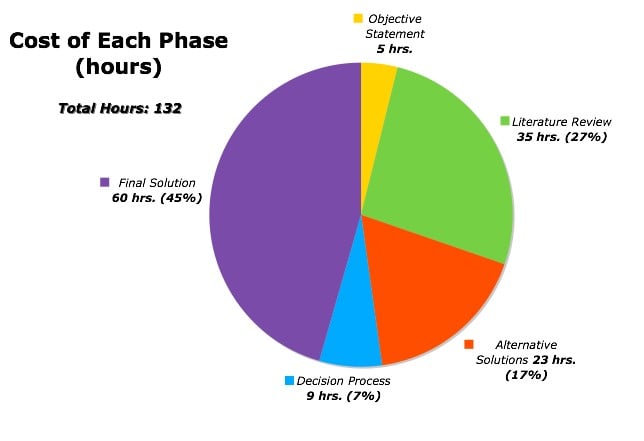
The costs of the project include design time, labor time and material costs. These costs are composed of first: a pie chart depicting the number of hours spent on each phase of the design process. Second: a table illustrating material costs. Third: a table depicting the potential costs of maintenance and repair.
Design Cost[edit | edit source]
As of November 9th 2009, the total working hours are 102. The hours needed to formulate each phase are portrayed as percentages below in the piechart. There is overlap amongst the phases so some values are approximate. Phase five is incomplete and the time depicted is the total thus far.

Implementation Cost[edit | edit source]
The cost of materials is depicted in the table below. Since some materials were donations there is a difference in the market value of some items.
| Materials | Quantity | Our Cost Each ($) | Our Cost TOTAL ($) | Market Value Each ($) | Market Cost TOTAL ($) |
|---|---|---|---|---|---|
| Hydrated lime (50 lb bag) | 3 | 14.03 (purchased one bag only) | 14.03 | 14.03 | 42.09 |
| Pulverized Kaolin (50 lb bag) | 1 | 18.80 | 18.80 | 18.80 | 18.80 |
| 30 mesh Sand (50 lb. bag) | 6 | 4.99 | 29.94 | 4.99 | 29.94 |
| 1/4" mesh (1.19 FT) | 1 | 2.38 | 2.38 | 2.38 | 2.38 |
| Old growth redwood (2x4 piece) | 1 | 0.00 | 0.00 | 16.00 | 16.00 |
| FiberTech landscaping border (3.5"x5/16"x16') | 1 | 10.89 | 10.89 | 10.89 | 10.89 |
| Screws for FiberTech (bags each) | 3 | 3.59 | 10.78 | 10.78 | 10.78 |
| Threading bolts for FiberTech (bags each) | 1 | 8.46 | 8.46 | 8.46 | 8.46 |
| Tiles for mosaic | many | 4.00 | 4.00 | 16.00 | 16.00 |
| Ceramic pieces for mosaic | many | 0.00 | 0.00 | 20.00 | 20.00 |
| Grand Total= | 99.28 | 175.34 |
Maintenance Cost[edit | edit source]
In order for the cob bench to last as long as possible some maintenance may be necessary. Maintenance tasks will involve patchwork of damaged plaster or re-application of mosaic pieces. The bench and oven should receive an annual assessment of the extent of their degradation and/or damage and that point one should decide whether it needs maintenance. Annual assessments are best choice because of the natural materials used in the bench and oven. Maintenance costs in time and hours are dependent on the amount of damage to the bench and/or oven. The table below depicts different annual cost scenarios.
| Time (hrs.) | Annual Costs ($) | |||||
| Amount of Damage | Assessment | Labor | TOTALTIME(hrs.) | Assessment + Labor (at $8/hr) | Materials | TOTALANNUALCOST($) |
|---|---|---|---|---|---|---|
| Minimal Damage | 0.25 | 1 | 1.25 | $10.00 | $20.00 | $30.00 |
| Medial Damage | 0.25 | 2.25 | 2.5 | $20.00 | $20.00 | $40.00 |
| Considerable Damage | 0.25 | 3.5 | 3.75 | $30.00 | $20.00 | $50.00 |
Discussion and next steps[edit | edit source]
The Muddy Cobbers and CCAT are happy with the finished product. It is good to know that these cob installations will serve a multitude of purposes. For instance, while the bench provides visitors a leisurely place to relax they will also bbe learning about an appropriate building technique.
Our hope for future CCAT directors and volunteers is that these installations will continue to serve their myriad of purposes. We believe that upkeep of the cob installations will allow this to happen for a long time. Below we have provided a quick tutorial on repair:
Maintaining the bench: http://www.youtube.com/watch?v=xsiir87en6E
Links to prior work on CCAT cob bench and oven[edit | edit source]
Bench:
- photos of the construction of the cob bench: http://learn.humboldt.edu/gallery/lrg3/main.php?g2_itemId=2887
Oven:
- student page for the construction of oven: http://www.pequals.com/at/earthenoven/
- another student page that took to work on the oven: http://www.pequals.com/at/natoven/applying_the_cob.htm
Other links
- http://www.networkearth.org/naturalbuilding/cob.html
- http://en.wikipedia.org/wiki/Cob_(material)
- http://web.archive.org/web/20210313000645/http://ilovecob.com/
- http://web.archive.org/web/20210305150829/http://www.cobcottage.com/whatis
Thanks to[edit | edit source]
Fire Arts Center for donating the ceramic incorporated into the bench!
References[edit | edit source]
- Guelberth, Cedar Rose and Chiras, Dan. (2003). "The Natural Plaster book" Earth Lime and Gypsum plasters for Natural Homes. New Society Publishers. Gabriola Island, BC, Canada.
- Chiras, Dan (2003). "A Plaster Primer". Mother earth news. Feb/Mar. 2003. Issue 196. P. 64.
- Crews, Carol. (1993) "Earth Plasters and Aliz".<www.thelaststraw.org/bonusarticles/earthplaster> (Sept. 25th 2009)
- Ecology Building Society (2009). "The Tumbledown House Renovation." <http://web.archive.org/web/20111126143047/http://www.ecology.co.uk:80/html/aboutus/casestudies/tumbledown.htm> (Sept 24th 2009)
- Meagan, Keely (1993). "For Love of Mud" <www.thelaststraw.org/bonusarticles/earthplaster> (Sept. 25th 2009)
- Miles, Kevin, Swingler, Paul. (2007-2009) "Cob", "Lime Plaster", "Lime Render", "Lime Wash". <http://web.archive.org/web/20111104104534/http://www.sublimerenovations.co.uk/cob.html> (Sept. 24th 2009)
- Smith, Michael G. (2001) "Cob Plastering Q and A. <www.greenhomebuilding.com./QandA/cob/plastering> (Sept 24th 2009)
- Smith, M. and Evans, I. "Questions and Answers about Cob." < http://www.networkearth.org/naturalbuilding/cob.html > (September 26, 2009).
- Durand, L. "Natural Composite Architecture: Building Without the Use of Lumber, Concrete, Steel, or Petroleum Products." < http://www.networkearth.org/naturalbuilding/composite.html> (September 26, 2009).
- Smith, M. "The History of Cob." <http://www.networkearth.org/naturalbuilding/history.html > (September 26, 2009).
- Wu, J (2004). The CCAT Earthen Oven. <http://www.pequals.com/at/earthenoven/> (September 27, 2006).
- King, B. (1996). Buildings of Earth and Straw, Ecological Design Press, Sausalito, Cali., 52-55.
- Christopherson, R. W. (2007). Environmental Ecosystems, Pearson Prentice Hall, Upper Saddle River, NJ.