
CCAT's Vermicomposting Bin

| Type | Compost bin Vermicompost system |
|---|---|
| Authors | eyc1@humboldt |
| Location | Arcata, California |
| Status | Deployed |
| Years | 2006 |
| Made | Yes |
I am very excited to be posting directions for building your very own home vermiculture bin! The methods employed will produce a bin appropriate for a household of 3-5 people and should last a number of years if constructed properly. There of course are many types of bin designs out there and I wanted the creative opportunity to design my own. In looking for ideas in a gardening magazine, I noticed a pentagon shaped planter for gardens whose shape I really liked. A pentagon is also practical because compost is less likely to get stuck in the corners as often happens in normal square shaped boxes, preventing the organic materials from cycling properly.
I decided to make a two-part stackable bin so that using the finished compost would be easier. Once the compost is processed it is easy to take off the top section, dump the compost in the garden, and put it on top to be filled again. The partitioned design is also improves aeration to speed up the composting process. Aeration is also provided by the holes drilled in the sides of the bin.
The bottom of each bin section is finished with wire mesh to keep the compost in place. The holes of the wire mesh are large enough to allow worms and microbes to enter the system and speed up decomposition. The top is simple plywood cut to size with a brass handle and L-brackets to keep the lid in place. The bin was lastly finished with natural organic linseed oil as a sealer for endurance in the elements and general durability.
I hope you enjoy!
Project Description
[edit | edit source]Materials
[edit | edit source]- 80-2" Di-chromate screws
- 30-3" Di-chromate screws
- 12-1" Di-chromate screws
- 2-bundles of 1"*3"*36" Douglas fir location stakes
- hand saw
- wood cutter
- protractor
- measuring tape
- hand drill
- 5 feet of 1.5" mesh chicken wiring
- staple gun
- staples
- chrome handle for lid
- 3'*3' piece of plywood
- wire cutting sheers
- fine precision wire cutting sheers
- 5 L-brackets
- Organic natural Linseed Oil
Steps
[edit | edit source]- Cut all wood into identical pieces
- Arrange base layer of pentagon
- Build up each layer screwing in 2" screw every 3rd layer
- Cut rectangular airation holes with hand saw periodically
- Every 6th layer screw in 3" screw
- Stop when base stackable bin is at 17 layers
- Staple wire mesh onto bin surface covering one side
- Add 18th layer ontop of wire mesh
- Use regular sheers to cut wire to pentagon shape
- Use precision sheers to clean up pokey sides
- For second stackable bin repeat steps #1-10
- Cut plywood to pentagon shape
- Attach chrome handle and L-brackets on each side of pentagon
- Seal final product with organic natural Linseed Oil
Methods
[edit | edit source]- Fig 2: I purchased these Douglas Fir stakes from ACE hardware, which the cheapest prices that I could find locally.
- Fig 3: All stakes should be cut in half and the ends of all stakes angled at 108 degrees.
- Fig 4: Create base of pentagon by connecting five cut wood stakes. Always keep the shorter end of the stakes facing outwards.
- Fig 5: Finished pentagon base.
- Fig 6: For each successive pentagon layer stagger the stake positions as shown to add support and overall durability.
- Fig 7: Screw 2" screws every third staggered layer and screw 3" screws every fifth staggered layer.
- Fig 8: Ensure to place 2 screws at each corner.
- Fig 9: Side view of staggered pentgon layers.
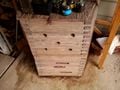
- Fig 10: Finished first section of vermicomposting bin, eighteen layers high.
- Fig 11: Use hand drill to drill airation holes, five on each side of bottom section of verm bin. This is actually correcting the error I made of not cutting airation holes with each successive pentagon layer (see common errors to aviod section).
- Fig 12: Close up of the edge of the vermicomposting bin.
- Fig 13: Screw on wire bottom of finished bin section.
- Fig 14: Add one stake layer on top of wire bottom.
- Fig 15: Use 2" screws to attach the single stake layer ensuring 2 screws on each corner.
- Fig 16: Use both basic wire sheers to cut an even pentagon shape of wire mesh bottom. Use precise wire sheers to clean up pokey sides around the bin.
- Fig 17: Finished wire bottom.
- Fig 18: Use hand saw to cut rectangular airation holes. I did not have a set procedure about when and where I placed these rectangular airation holes. I simply cut them every couple of layers as needed.
- Fig 19: Finished cut rectangular airation holes for the top section of the vermicomposting bin.
- Fig 20: Add the chrome handle with 2" dichromate screws to the center of plywood top. I simply used scrap plywood that I recieved for free from a wood pile. Cut plywood into identical pentagon shape using electric wood saw.
- Fig 21: Add L-brackets with 1" dichromate screws, one L-bracket for each side of plywood pentagon top. For added security of plywood bin top staying in place(i.e. if you have lots of racoons in your area)you can add nails into L-bracket holes by drilling small holes into bin sides allowing a nail to fit in the hole and secure the top in place.
- Fig 22: Finished Bin top.
-
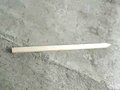 Fig 2: Start with uncut Douglas Fir stakes.
 -
 Fig 3: Cut all stakes.
 -
 Fig 4: Create pentagon base.
 -
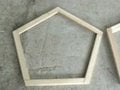 Fig 5: Finished pentagon base.
 -
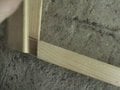 Fig 6: Stagger each successive pentagon layer.
 -
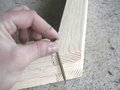 Fig 7: Screw every 3rd layer together.
 -
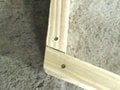 Fig 8: Ensure to place 2 screws at each corner.
 -
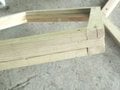 Fig 9: Side view of staggered layers.
 -
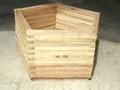 Fig 10: Finished first section of verm bin.
 -
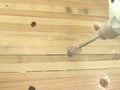 Fig 11: Drill circular airation holes in first section.
 -
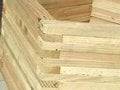 Fig 12: Close up of edge of bin.
 -
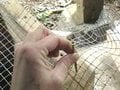 Fig 13: Screw on wire bottom of finished bin section.
 -
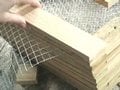 Fig 14: Add one stake layer on top of wire bottom.
 -
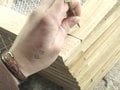 Fig 15: Attach stake layer with 2 screws on each corner.
 -
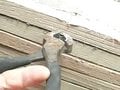 Fig 16: Use wire sheers to cut even pentagon shape of wire.
 -
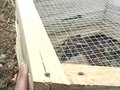 Fig 17: Finished wire bottom.
 -
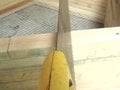 Fig 18: Use hand saw to cut rectangular airation holes.
 -
 Fig 19: Finished airation holes.
 -
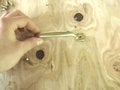 Fig 20: Add handle to center of pentagon shaped plywood.
 -
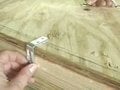 Fig 21: Add L-brackets, one to each side of plywood top.
 -
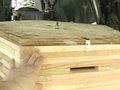 Fig 22: Finished Bin top.


Final Construction
[edit | edit source]Conclusions
[edit | edit source]This was a very fun and satisfying project to have worked on throughout the semester. I have an approximate catalogued work time of 32 hours that I spent on the bin. This probably seems like a lot of time but it would have gone much faster if I had a useful webpage such as this to follow step by step.
Common Errors to Avoid
[edit | edit source]- It is good to make sure that each angle of the bin is exactly fit with the layers above and below it. If this rule of thumb is followed, you will have nice smooth surfaces along each face of the pentagon. I didn't realize that I had a poorly framed base initially in which the angles of the pentagon were not lined up. This took much time to fix because I had already screwed many layers together before I realized the error, after which I had to undo a lot of work to fix the angles.
- Cut airation holes as you build up each layer of the bin. It was difficult to drill holes in the final project as there were screws everywhere and everytime I hit a screw it caused the drill to dull and kick back.
- I should have kept better symmetry with the airation rectangles that I cut in the top bin, merely for improved aesthetic purposes.
Final Comments
[edit | edit source]I am very pleased with the finished product of this design. The HSU Campus Center for Appropriate Technology[1] has already begun to put the bin in use. It is a sturdy design that will last them for years to come. I am glad that I could assist them in adding to the rich landscape of sustainable practices at Cal Poly Humboldt.
Update October 2014
[edit | edit source]The bin is still functional and at the CCAT house. However, it is not currently in use. The bin is outside of the home by the kitchen, away from the other compost bins. The placement was to facilitate feeding the worms fresh compost regularly, but instead it is forgotten about at times. When the bin was in use, there were two common problems.
I met Kelly, the creator of this project, when she was leading a composting workshop at the CCAT. There she explained to me the trouble they had remembering to keep the bin moist enough for the worms. As a result, the bin would dry up sometimes and the worms would leave or die.
There were nightcrawlers in the vermicomposting bin at a time as well and they hybernate. This disrupted and slows down the composting cycle. Redwigglers are advised to use for this composting.
-
 The bin currently.
 -
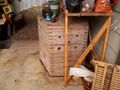 By the kitchen door.
 -
 Leading a composting workshop at CCAT.


| Authors | |
|---|---|
| License | CC-BY-SA-3.0 |
| Organizations | Campus Center for Appropriate Technology (CCAT), Cal Poly Humboldt |
| Cite as | Ymile, AndreaGerman (2006–2025). "CCAT's Vermicomposting Bin". Appropedia. Retrieved July 24, 2026. |