
CASA Student Farm compost system
| Type | Compost System |
|---|---|
| Authors | Henry Culver Penelope Alcaide Khalil Younger Alaide Butterworth |
| Status | Deployed |
| Years | |
| Made | Yes |
| Replicated | No |
| Uses | education, science |
| Map | |
|---|---|
| Location | Arcata, United States |
| Coordinates |
ENGR 205 group, "Team Salad" designed and constructed A multi-staged compost system for the Critical Agriculture Studies & Agroecology program (CASA), as a part of the Engineering 205 Spring 2026 class. The main purpose of the compost system was to create a space for onsite composting in the student farm.
Background
[edit | edit source]Critical Agriculture Studies & Agroecology (CASA) is a academic pathway combining hands-on farming with cultural and agricultural studies. With the creation of this field, a student farm has been created and shall expand to 8 acres soon. With this increase in size a new composting system needs to be built to manage the increase in production.
Literature Review
[edit | edit source]This section contains information pertaining to fields of study around composting. The specific fields included are composting methods, sensor monitoring, construction materials, and the learning techniques that would help teach students about compost.
Compost Makeup
Compost is a product which benefits plant growth in a stabilized and sanitized way[1].[2] mentions how the compost system produces high quality compost while minimizing smell and pest exposure. This system uses “Browns” or carbon rich materials, “Greens” which are nitrogen rich materials, moisture, and aeration. Browns mostly consist of woody materials such as woodchips, leaves, and plant stalks. Greens mostly consist of fruit and vegetable scraps, grass clippings and less green materials such as coffee grounds, eggshells, and teabags. Other food items such as bones, fats, meats, and dairy products should be avoided since they attract rodents and do not fully break down.
Materials
There are several outdoor worthy plastics. Polyethylene is super light and durable being able to withstand weather well and resist impacts[3]. Polypropylene has high strength, rigidness, but sufferers from potential warping when exposed to heat. Acrylonitrile Butadiene Styrene (ABS) is fairly tough and more heat resistant than polypropylene but degrades in the presence of uv radiation.
There are various different woods to focus on and wood is sorted into two categories, hard and soft wood. Hard wood is rot resistant and weather resistant, while soft wood is significantly more rot prone and less weather resistant. Some wood to consider is black cherry. Black cherry is a hard wood which forms a straight grain which is easy to work with, is significantly durable and rot resistant . However black cherry has the fall back of being prone to come with sapwood on the edges of planks, the living part of the tree that is significantly rot prone and much softer. There is also coast redwood to consider which is a softwood but is abundant in the local area and is still fairly rot resistant while being easy to work with.[4]
Sensor Systems
The main sensor types that are important and relevant to this project are moisture sensors, temperature sensors, nitrogen sensors, and carbon dioxide sensors.
Moisture sensors are necessary for monitoring compost piles, as they allow the composters to make sure that the piles have enough liquid. Moisture sensors work by measuring the pile’s ability to conduct electricity,[2] so the higher the voltage, the higher the moisture. This can actually be done using an electrical probe. However, prolonged use can change the conductivity, which can cause major errors in calculations. If you use an electrical probe it must be cleaned regularly.
Temperature sensors are also seen as vital since unmonitored piles can reach temperatures above 160 degrees.[2] One possible method would be to use a ceramic thermistor- a temperature sensor via resisting electric current flows[5]
One common technology used is a thermocouple. Thermocouples have many different material types depending on the job. A couple dependable options for compost could be Type K or Type T[6],[7] They are known to be cost effective and have a good resistance to any temperature a compost pile could realistically reach. The most effective placement for this would either be on the surface or in the center. The center may be the best for monitoring the pile as a whole, however the surface may help with understanding the effect the environment has on it [tc-inc thermo]. Given this information I think it may be the most relevant information for compost temperature tracking.
There is much research around CO2 sensors for compost. This is largely due to the necessity of tracking the amount of greenhouse gases industrial composters produce.[8] Currently though, it is still listed as difficult, with technologies not being able to adapt to it as easily. It is still very much possible, specifically with the use of NDIRs. NDIRs measure gases by measuring how much infrared light they absorb.[9] NDIRs happen to work very well with CO2 sensing. They are also known to be low cost[10] and low weight. However, they are very dependent on the temperature and humidity of the area. This could make them more difficult to calibrate for compost monitoring. A custom NDIR system would require the user to do much work to make sure it is properly weather resistant, especially because of things like dust. As it currently stands IR systems are the only systems well compatible with CO2 monitoring for composting. A similar sensor called a potentiometric sensor could also be used for nitrogen.
Materials
There are several outdoor worthy plastics. Polyethylene is super light and durable being able to withstand weather well and resist impacts[11]. Polypropylene has high strength, rigidness, but sufferers from potential warping when exposed to heat.[11] Acrylonitrile Butadiene Styrene (ABS) is fairly tough and more heat resistant than polypropylene but degrades in the presence of UV radiation.
There are various different woods to focus on and wood is sorted into two categories, hard and soft wood. Hard wood is rot resistant and weather resistant, while soft wood is significantly more rot prone and less weather resistant. Some wood to consider is black cherry. Black cherry is a hard wood which forms a straight grain which is easy to work with, is significantly durable and rot resistant.[4] However black cherry has the fall back of being prone to come with sapwood on the edges of planks, the living part of the tree that is significantly rot prone and much softer.[4] There is also coast redwood to consider which is a softwood but is abundant in the local area and is still fairly rot resistant while being easy to work with.[4]
Environmental Education
Educating students in the environmental sciences benefits best using certain instructional methods rather than traditional classroom subjects. Both experiential and experimental learning are methods in which learning within these science disciplines can be fully effective.
Experiential learning is the process of learning through direct experience and active engagement, and is commonly used in environmental education to help students understand real world systems. It shifts the mode of learning from being lecture-based to learning through carefully chosen experiences followed by analysis.[12] Kolb, an educational theorist, describes learning as a continuous cycle involving concrete experience, reflective observation, abstract conceptualization, and active experimentation.[13] This iterative approach strengthens understanding by allowing learners to observe cause and effect relationships in real world environments
Learning through experimentation and the scientific method is another important modality used in environmental education. Students must learn to isolate variables and control conditions in order to search for cause and effect relationships.
Effective experimental design includes three types of variables: independent, dependent, and controlled. An independent variable is the factor that deliberately changes or is manipulated to test its effects. It is the presumed cause in a cause and effect relationship. A dependent variable is the outcome that is measured during an experiment. It relies on the independent variable and shows how the system responds to changes. Controlled variables are conditions that are kept constant throughout the experiment so they do not affect the results.[14]
In experimentation, it is important to design a system that allows for these variables to be controlled and manipulated. A well designed experiment should involve repetition, meaning that there should contain more than one subject in an experimental group. Replicated systems strengthen comparisons between independent and dependent variables, showing that results are consistent across multiple identically constructed conditions.[15]
Problem statement
[edit | edit source]The objective of this project is to create a compost system for the purpose of managing organic waste on the Student Farm, and to educate users on how compost works.
Criteria
[edit | edit source]Criteria were ranked on a 1-10 importance scale, where 10 denotes the highest priority.
| Criteria | Description | Weight (1-10) |
|---|---|---|
| Volume of compost produced | How much compost is produced | 7 |
| Teaches compost use | How easy is it to use this system to inform people on how compost is made and how to make it themselves | 10 |
| Ease of maintainence | How easy is it to upkeep | 7 |
| Environmental Appropriateness | Minimizing the effect the system has on the local ecosystem and the effects obtaining the materials has on their ecosystems | 7 |
| Easy to build | How easy is it to assemble and maintain | 3 |
| Easy to use | How intuitive and easy the system is to use | 9 |
| Cost | How much does it cost to build and maintain | 3 |
Prototyping
[edit | edit source]Our first prototype was made of popsicles steps and was made to demonstrate different door systems we can up with. The main gain of this prototype was that we that the best way for it to open was by having planks that can slide upwards and out.

The second prototype was a model to demonstrate how the finish product would look
Final product
[edit | edit source]Our final product was the beginnings of a compost system. Problems arose at the end of our project which demanded we constructed it offsite. Without a way to transfer the fully built project to the farm, our final product is multiple pieces of the system. The rear and front walls are fully assembled as well as the roof. the center beams are assembled separately and will be attached when fully put together. This design helps with easy construction on site by maximizing construction before delivery.
Construction
[edit | edit source]Tools needed:
- Shovel
- Drill
- Hammer
- Miter Saw
- Router
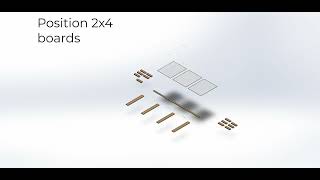
To construct the project, preparations must be made. Cut 4''x4''x8' wood in half. It is necessary to route the wood posts. 3ft out 4ft of each post will be routed to be 1/2'' deep and 3/8" wide. Four posts will be routed on two sides, next to each other, not parallel to each other. The other 4 will be routed on three sides.

Insert sketches
The next thing to prepare is the plywood. Cut the both woods according to the image. By the end you should have 4 3''x3'', 4 2''x3'', and scrap 2''x1''s.

To Prepare for the lid cut the plastic from 48" into 40''. Discard the extra 6'' piece. The 96'' into three equally sized pieces. horizontally lining each of these three pieces, insert a 5"x1/2"x3' board. Lay a cross piece over on the top and bottom of the roof and secure the boards and plastic adjacent to each other. Add a center beam to help add support to the plastic sheets and the structure as a whole and a second beam along the front for added structure.
The six 3' x 3' pieces of plywood will need 6 big holes drilled into them with a hole saw.
Dig 6 holes in a 2 row, 4 column pattern. Each hole should be 4 inches wide and be a foot deep. In each hole put a routed post. The routed parts should face inward, and the posts with 2 routed sides should be put in the corner holes.
The next step will be to attach the plastic to the plywood boards. This is to ensure chemicals from the plywood does not leech into the compost, and to make the plywood last longer. There are two different methods of doing this. The first method is to staple the plastic to the plywood. The plastic is only necessary for the sides of the plywood will be on the inside of the compost bin. This methods is necessary for at least the 3 front boards. The other method is to wrap the plywood in the plastic and the nail the plywood into the posts, which also requires it to be done later. This method is not available for the front 3'x3' pieces but is available for all others, and the most efficient method for the middle 2 boards.
After the pieces have been covered in plastic staple chicken wire over the holes.


Slide the plywood into the routed posts. The 6 boards with chicken wire over them will be the front and back pieces. If you have not attached the plastic to the plywood do that now.
Nail the back boards into the the posts. The other boards (besides the front ones) can also be nailed in for extra security. Attach hinges to top of back posts.
Video instructions
[edit | edit source]A good way to display a process is by making a video explaining your process. See Template:Video for information on how to add and annotate videos.
Bill of materials
[edit | edit source]Description of costs, donations, the fact that this is just proposed, etc. For a simple cost table, see Help:Table examples#Cost Table and Template:Bill of materials for two nice formats.
| Item | Amount | Cost per unit | Total |
|---|---|---|---|
| Hinges - Order here [1] | 2 | USD 7.66 | USD 15.32 |
| Plastic - Order here [2] | 1 | USD 98.28 | USD 98.28 |
| 448DF (wooden 4x4x8') - Get it here [3] | 4 | USD 12.00 | USD 48.00 |
| Nails - Get it here [4] | 1 | USD 5.99 | USD 5.99 |
| Plastic sheet - get it here [5] | 1 | USD 33.99 | USD 33.99 |
| 3/8x4'x10' Plywood - Get it here [6] | 2 | USD 20.85 | USD 41.70 |
| Screws - Get it here [7] | 12.99 | USD 1.00 | USD 12.99 |
| Screws - Get it here [8] | 1 | USD 8.99 | USD 8.99 |
| Grand total | USD 265.26EUR 228.12 <br />GBP 193.64 <br />CAD 328.92 <br />MXN 5,530.67 <br />INR 19,854.71 <br /> | ||
Donated Materials and where to get them:
| Item | Amount | Cost per unit | Total |
|---|---|---|---|
| Chicken wire - Get it here [9] — Chicken wire - Get it here [10] | 1 | USD 19.99 | USD 19.99 |
| Grand total | USD 19.99EUR 17.19 <br />GBP 14.59 <br />CAD 24.79 <br />MXN 416.79 <br />INR 1,496.25 <br /> | ||
Sensors
Sensors are not included with the compost bin, instead we are giving this recommendation.
Operation
[edit | edit source]To operate our system you can do two things. The first is to lift the lid. This provides upper access to the compost within. You can also slide off the front panel to get horizontal access to the interior of each compartment.
Maintenance
[edit | edit source]The needed maintenance for this project will be the replacement of broken parts as well as maintenance needed for healthy compost
Maintenance schedule
[edit | edit source]- Daily
- Turn Compost
- Open the lid in the morning and close the lid at night
- Monthly
- Slowly over a few weeks transfer compost leftwards through the bins until the final bin were it can stay.
- Yearly
- The plywood walling should last an absolute minimum of 1 year, replace when necessary
- boards may get damaged in this time as well, this too should be replaced when necessary.
- Every 10 years
- The plastic roofing may crack after a few years of constant sun exposure and will need to be replaced when too much damage has occured.
Conclusion
[edit | edit source]Testing results
[edit | edit source]- Due to safety restrictions at the farm site, full on-site testing of the compost system was not possible during the project timeline
- Design features such as removable panels and lid were reviewed for usability
Discussion
[edit | edit source]- During testing, team found that the panels and lid were difficult to grip comfortably
- Results from testing led to the addition of handles on both the removable panels and the lid to improve usability
Lessons learned
[edit | edit source]- Learned how the composting process works
- Learned how factors like moisture, airflow, and temperature affect the speed and quality of composting
- Gained a better understanding of sustainable waste management
- Developed collaboration skills with teammates and client
- Improved time management and communication skills
- Gained experience writing professional technical memos and other engineering documentation
- Learned importance of creating designs that are both functional and easy for users to understand
- Learned importance of early prototyping and designing
- Learned importance of adapting engineering plans when unexpected environmental or safety constraints arise
Next steps
[edit | edit source]- Transport the compost system components to CASA student farm
- Assemble the system on-site
- Ensure all panels, handles, and structural components are securely attached during assembly
- Conduct future on-site testing of compost functionality, durability, and usability after installation
Troubleshooting
[edit | edit source]| Problem | Suggestion |
|---|---|
| Lid does not stay open properly | Ensure the support stick is fully positioned and stable before use |
| Plastic liner becomes detached | Re-staple or secure the construction plastic to prevent exposed plywood surfaces |
| Bin structure feels unstable | Make sure all screws are securely screwed |
| Lid hinges are difficult to move | Remove debris and inspect hinges for damage or loosening |
| Compost is difficult to transfer between stages | Remove front panels fully before moving material between bins |
Team
[edit | edit source]- Khalil Younger- Semester 2
- Penelope Alcaide - Semester 2
- Henry Culver - Semester 2
- Alaide Butterworth - Semester 2
References
[edit | edit source]- ↑ M.M. Dillon Limited., and Cal Recovery Systems Incorporated. (1990). Composting, a literature study, Ontario Environment, <https://www.biodiversitylibrary.org/item/77759#page/16/mode/1up> (Feb. 22, 2026).
- ↑ 2.0 2.1 2.2 “Composting At Home.” (2025). EPA, Environmental Protection Agency, <https://www.epa.gov/recycle/composting-home> (Feb. 21, 2026).
- ↑ “How to choose the best plastic for outdoor use,” Advanced Plastiform, Inc., https://advancedplastiform.com/how-to-choose-the-best-plastic-for-outdoor-use/ (accessed Feb. 22, 2026).
- ↑ 4.0 4.1 4.2 4.3 Ehrh., “Black cherry,” The Wood Database, https://www.wood-database.com (accessed Feb. 22, 2026).
- ↑ Fraden, J., 2016, Handbook of modern sensors: Physics, designs, and applications, Cham : Springer International Publishing : Imprint: Springer, Cham, Heidelberg, New York, Dordrecht, London.
- ↑ TC Measurement and Control, Inc., 2020, “Type K thermocouple sensor / probe,” Type K Thermocouple – Complete Guide | US Supply | TC Inc. [Online]. Available: https://www.tc-inc.com/thermocouples/type-k-thermocouple.html. [Accessed: 18-Feb-2026].
- ↑ “TC measurement and Control, Inc..,” Type T Thermocouple - Leading Manufacturer of Thermocouples | TC Inc. [Online]. Available: https://www.tc-inc.com/thermocouples/type-t-thermocouple.html. [Accessed: 18-Feb-2026].
- ↑ Dankwa, D. D., Boh, M. Y., and Clark, O. G., 2026, “Measuring greenhouse gas emissions from composting: A Comparative Review of Methods,” Waste Management, 210, p. 115250.
- ↑ Fraden, J., 2016, Handbook of modern sensors: Physics, designs, and applications, Cham : Springer International Publishing : Imprint: Springer, Cham, Heidelberg, New York, Dordrecht, London.
- ↑ Curcoll, R., Morguí, J.-A., Kamnang, A., Cañas, L., Vargas, A., and Grossi, C., 2022, “Metrology for low-cost CO2 sensors applications: The case of a steady-state through-flow (SS-TF) chamber for CO2 fluxes observations,” Atmospheric Measurement Techniques, 15(9), pp. 2807–2818.
- ↑ 11.0 11.1 “How to choose the best plastic for outdoor use,” Advanced Plastiform, Inc., https://advancedplastiform.com/how-to-choose-the-best-plastic-for-outdoor-use/ (accessed Feb. 22, 2026).
- ↑ Bartle, E., 2015, Experiential Learning: an Overview. [Accessed: 22-Feb-2026].
- ↑ Kolb, D. A., 1984, Experiential Learning: Experience as the Source of Learning and Development, Prentice Hall, Englewood Cliffs, NJ. [Accessed: 22-Feb-2026].
- ↑ team, C., 2025, “What Are the Variables in a Science Experiment” [Online]. Available: https://www.clrn.org/what-are-the-variables-in-a-science-experiment/. [Accessed: 22-Feb-2026].
- ↑ Harris, K., 2019, “Scientific Method” [Online]. Available: https://bio.libretexts.org/Learning_Objects/Worksheets/Biology_Tutorials/Scientific_Method. [Accessed: 22-Feb-2026].
| Authors | |
|---|---|
| License | CC-BY-SA-4.0 |
| Organizations | Cal Poly Humboldt |
| Cite as | Qualla, Dakotadog0 (2026). "CASA Student Farm compost system". Appropedia. Retrieved July 25, 2026. |