
ETALO Bone Drilling Module/Building an Advanced Simulator
| Part of | ETALO Bone Drilling Module |
|---|
In this session, you will build a more complex bone drilling simulator using locally available materials, perform quality control, and troubleshoot as needed.
An advanced simulator consists of a bone layer, periosteal layer, plunge detector, muscle and skin. This simulator is ideal for the more advanced learner who has practiced good drill control on a basic and simple simulator and would like to practice on a model that simulates an actual surgical patient - an incision needs to be made through the skin, dissection carried down through muscle and onto the bone.
About advanced bone drilling simulators
[edit | edit source]- The advanced simulator is composed of different layers to simulate human anatomy. The table below describes each layer, working from the inside out.
| Layer 1: Bone | This is the internal core of the simulator. |
| Layer 2: Periosteum | Around the bone layer is the periosteum - the periosteum is a fibrous layer of tissue that surrounds the bone that brings in blood supply and has osteogenic properties. It is quite thick in young children and thins out with age. |
| Layer 3: Plunge detector | This is not a layer in humans obviously, but is an important layer for our simulator. If you are drilling bone in a living human and you drill too far beyond the far cortex, you can injure vital structures. As such, the plunge detector layer in the simulator will alert you if you have gone too far passed the cortex and are entering the "danger zone" of causing harm.
This layer is not circumferential in the simulator (does not go all the way around) because if it did and you insert the drill through the detector before even touching the bone, it will trigger the circuit and do so throughout your drilling. So, the aluminum foil of the plunge detector layer should only be about ⅔ - ¾ around the model and your drilling will start through the area where there is no foil. |
| Layer 4: Muscle | Overlying the periosteum is muscle. The exact anatomy of the muscle layer differs significantly depending on what bone you are operating on in the body and what approach you are doing to a given bone, but in general the muscle layer will need to be addressed by retracting the muscle out of the way to expose the underlying periosteum. |
| Layer 5: Skin | This is the outermost layer of the simulator. Skin will need to be incised (cut) and retracted out of the way to expose the muscle layer. The skin can be closed at the end for the user to practice their sewing techniques as well. |
- Our simulator layers can be constructed from a variety of different materials to allow maximum versatility in low resource settings.
- In comparison to a simple simulator the advanced simulator also includes a plunge detector which will help assess your bone drilling skills.
- To construct your simulator, you will start with the bone layer and add to it the periosteal layer, followed by the plunge detection layer, then the muscle layer, and finally the skin layer.
- You can attach the materials with glue or some of the materials are sticky and can be held without glue.
- Some of the materials will decay/rot/dry out quickly so be weary of that and when you are building your simulator.
Options for the different layers of your advanced simulator
[edit | edit source]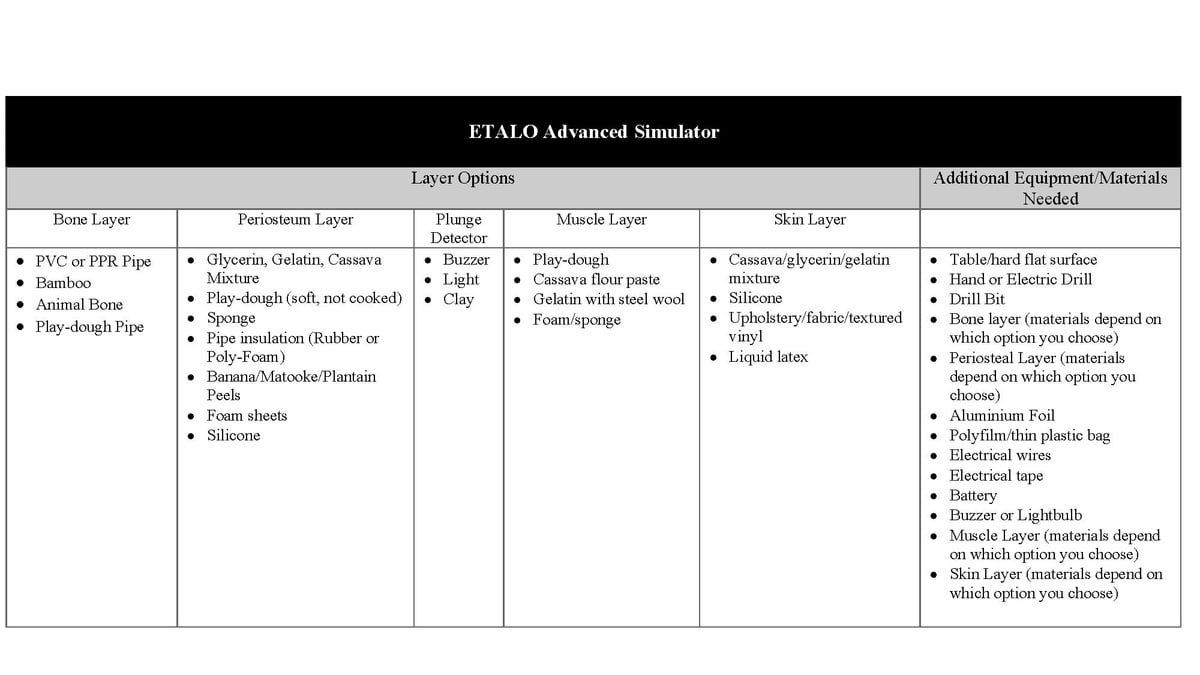

- What materials will you use for each layer of your advanced simulator, including a buzzer, based on what is locally available?
- What is your budget and timeline for building your simulator?
- Check the stability: Make sure that your simulator does not roll on the surface you are working on. If it does, secure it as you did the basic simulator above.
- Test the plunge detector: Make sure your circuit is functional. On the first time that you drill your simulator, you should purposefully "plunge" on the far cortex so that your drill definitely touches the aluminum foil and triggers the buzzer/light. This confirms that the circuit is working correctly to detect future accidental plunges.
| Authors | ETALO |
|---|---|
| License | CC-BY-SA-4.0 |
| Organizations | Global Surgical Training Challenge |
| Cite as | ETALO (2021–2025). "ETALO Bone Drilling Module/Building an Advanced Simulator". Appropedia. Retrieved July 10, 2026. |