
Appleseed Biodiesel Reactor

'Open-source' plans for biodiesel homebrewing equipment, using off-the-shelf parts and a water heater:
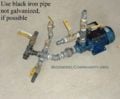
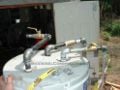
An old water heater tank can be adapted to make a safe and inexpensive biodiesel homebrewing apparatus. An HDPE carboy (white jug in photo) or other tank can become a passive small-scale methanol-catalyst mixer, and an inexpensive centrifugal pump (blue motor in photo) from Harbor Freight tools mixes the two liquids to enable the biodiesel reaction to take place. After a day of settling, the glycerol byproduct can be drained out fairly well- the tanks have a wine-bottle-bottom profile, with a drain at the 'pointed' edge, so separation of two liquids can be reasonably clean. The processor costs about $150 in plumbing and electrical, and about a day or less of work. The tank can be an ancient lime-crusted one scavenged from a dump, or can be bought new for about $200 more.
After draining off glycerol, the same mixing pump can transfer the biodiesel to a 'wash tank' for a water wash to remove methanol and water-soluble impurities. There's an extremely simple 'standpipe' design which requires no welding, which makes a nice minimal tank, the Sean Parks' Standpipe Wash Tank. The standpipe wash tank costs about $30 in plumbing to build. People have built variations which include heating, ways to use plastic barrels, and build-in mistwash heads (which only works for smaller batches).
This system has developed a huge following in the biodiesel community, and there are hundreds of homebrewers who have built or built and modified theirs.
Plans for building the Appleseed
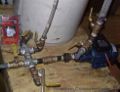
[edit | edit source]there are many possible plumbing variations. Here's the bare-bones original and a parts list, and several variations. Please note that until recently I had an outdated diagram here which you may still find references to on the Web. It's now corrected and so is the parts list:
-
 Simplest plans
 -
 Here's how I now build these, to wrap around the tank slightly (temperature gauge not shown)
 -
 To the right and below are a couple of variations: separate sight tube and extra valves on each tube (I now consider these valves unnecessary)
 -
 Here is the plumbing for my 'bells and whistles' variation, with the temperature gauge shown in original packaging. Temperature gauge numbers MUST start at 100F or lower, not 130F.


I purchase the valves at Harbor Freight Tools, where they cost considerably less than Home Depot and other places. Lowes' is my preferred big box hardware for the plumbing. Local stores like Ace or True Value can be cheap or can be very expensive for plumbing, at random. Home Depot is my last choice- their plumbing section is usually very disorganized and prices are high. Avoid at all costs.
Harbor Freight runs sales on their online or retail stores every few months- so pumps may end up costing about $25 and 3/4" ball valves can be $2 when on sale. valves will bankrupt you on this project- shop around. They range from $6 at Lowes to $12 at some local stores I"ve patronized, and you'll need lots of them.
Shopping List and General Instructions
[edit | edit source](note: all plumbing 3/4 inch unless otherwise noted. All plumbing black iron threaded pipe if possible- galvanized is sometimes the only choice for some fittings but is not preferred due to zinc content):
The modifications needed to an electric water heater are:
Remove dip tube (?) from the top cold water inlet. Dip tubes are underneath any pipes or pipe nipples threaded into the heater. This is the worst part of the operation- undoing any old piping. If it is a two-heating element water heater you might also need to disable the upper element and thermostat- the upper element is usually above the level of the oil you are heating, and would burn out if heated without being covered by liquid. You will also probably also want to mount the water heater on a stand- I use two milk crates stacked together- and strap it to the wall studs for earthquake safety in earthquake country.
I usually disable the upper heating element and thermostat in a two-thermostat water heater processor- because the upper heating element will be above the level of the oil you're heating.
Parts List:
All plumbing 3/4 inch unless otherwise noted. All plumbing black iron threaded pipe if possible- galvanized is sometimes the only choice for some fittings but is not preferred due to zinc content:
- 3" pipe nipple
- 3/4" x 3/4" x 1/2" tee
- close nipples - you'll need 7 of them
- ball valves (3/4")- buy 5 of them (very cheap at Harbor Freight, more expensive elsewhere)
- cross fitting (a sort of four-way tee, available at Lowes' but not at all other hardware stores. Substitute a pair of tees and some close nipples if you cant' find one)
- Bushing: 3/4" by 1/2"- buy 2
- 1/2" close nipple- 2
- 1/2" ball valve
- 1/2" swing check valve
- Nylon or Brass 90degree thread-to-barb fitting: male thread end is 1/2" thread, hose barb end is 3/8" barb, plus hose clamp
- Length of 3/8" vinyl tubing- 3 or 4 feet.
- straight or 90 degree 1/2 inch threaded to 3/8 inch barbed nylon or brass fitting, and hose clamp
- 3/4" Hose Barb (I use plastic grey PVC ones that are sometimes in irrigation departments for about 30 cents each)
- 1 or 2 feet of vinyl tubing as a drain/filler tube. Make this clear rather than braided hose so you can see through it well.
- Union (3/4" of course)
- 1" by 3/4" bushings- 2 . Thread these into the pump with TONS of thread tape or pipe dope- more than you would normally use. The pump threads are straight thread rather than tapered American pipe thread, so they need extra help to prevent leaks.
- Length of BRAIDED 3/4" vinyl hose. Do not use unreinforced nonbraided hose here. Prepare to replace this hose every few months as it deteriorates with heat and biodiesel.
- 90degree elbows-2
- length of pipe nipple approx 12"- 18" (purchase correct size after assembling everything else)
- 2" long pipe nipple- 2
- Automotive mechanical temperature gauge (not 12V electrical type). I prefer the heavy-duty Sunpro one from Pep Boys over the other brands/stores. It should be $15ish. The numbers should start at 100F or lower instead of 130F (the other option at these stores). The biodiesel homebrew supply stores sell some alternatives.
- Proper plumbing to attach to water heater's pressure relief vent and direct any fumes outside if using a pressure relief.
- Water heater strapping, or other earthquake strapping for attaching the processor to your wall studs. I use webbing strapping.
- Pump: This is a '1" Clear Water Pump from Harbor Freight Tools or Northern Tool- $35 part number 1479. This centrifugal pump also allows your 3/4" hose become sight tube (so you know how high the oil level is when filling the processor). Non-centrifugal pumps won't give you this feature, in which case you will need to instead add a tee and another tube as sight tube Give the sight tube a shutoff valve so you don't drain unreacted oil into your biodiesel when emptying the processor. See other plans elsewhere in this book for more details on how this works. You will need to buy a grounded plug and a length of 14gauge power tool cord to wire up the pump as well.
- Heating elements and thermostats: Disable the upper heating element and thermostat.
Disconnect power from the water heater before opening it's electrical panels! I turn 220Volt water heaters into 110 volts and add a heavy-duty 110V plug on a 12 or 10 gauge cord, because we don t usually have 220V outlets easily accessible at the sites where I work. A 220V heating element operated at 110V will put out 1/4 the power output (watts). In practice this usually means that the lower element will heat far too slowly on 110. I purchase a 110V replacement element instead. Thermostats will work at either voltage.
| Authors | |
|---|---|
| License | CC-BY-SA-3.0 |
| Cite as | Oorxax (2009–2024). "Appleseed Biodiesel Reactor". Appropedia. Retrieved July 24, 2026. |