NEW![edit | edit source]
Please check out instructions on our new techniques for developing realistic tissue-like simulators for your training.
Summary[edit | edit source]
The physical simulator is a low-cost, easily assembled, and locally-sourced platform for self-directed training and mastery of reconstructive techniques. It was designed using common materials that are widely available, inexpensive, and quickly assembled using just a hammer or screwdriver and glue. Requiring neither electricity nor internet, it’s both portable and universally accessible.

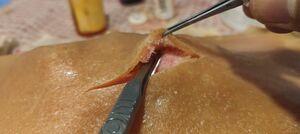
Most importantly, the physical simulator serves as a high-fidelity model of the composite tissue substrate on which local flap surgery is based with anatomic representations for the epidermis, dermis, subcutaneous tissue, and fascia. Using just a marking pen, scalpel, forceps, hemostat, and needle driver, the user is able to physically perform all of the maneuvers constituting flap design, elevation, and inset in nearly the same manner required of an in vivo model.
Furthermore, our singular physical simulator is adaptable to a variety of local flap surgeries without requiring any additional components or modifications. This ensures that the simulator is translatable throughout the continuum of local flap surgery and affords trainees the ability to practice a wide array of local flap procedures.
This page further details the list of items, tools, and costs associated with assembly, installation, operation, and maintenance. No specific skills are background are required to build this simulator given that there is no electrical wiring, circuit construction, computer programming, or other skill-intensive aspects to simulator construction.
Currently, other skin flap simulators on the market cost more than $100 USD and up to $1,000 USD to purchase. Internationally purchased items have the added shipping costs which in many cases can be just as expensive as the primary purchase. Furthermore, having to purchase a simulator means that a user would potentially have to wait weeks to months before the purchased simulator arrives, especially in more remote regions of the world where our intended end users are located.
This means that our locally sourced simulator confers significant cost and time savings compared to any other flap surgery simulator that is publicly available. In fact, our volunteers in South Africa, Cameroon, and Rwanda have confirmed that the total cost for the construction of our physical simulator is no greater than $5 USD only, and therefore significantly more accessible.
Tools & Materials[edit | edit source]
The new tissue simulators[edit | edit source]
The Amosmile team have further developed high fidelity, low cost physical simulators to more closely replicate real tissue. A variety of tissue analogues have been designed, with respective recipes available below. These are used in conjunction with the new tissue simulator assembley videos. The new tissues are muscle, fat, connective tissue and skin.
Muscle[edit | edit source]
Ratio ( Gelatin:Glycerine:H20) - 8:8:2
Food Colouring: Red
Substrate: Wool
- Fill ½ mug of water (20 teaspoons)
- Mix in Gelatin, Glycerine and red food colouring
- Mix in 1-2 handfuls of wool. Mix thoroughly so all fibres are soaked.
- Microwave for 30 sec
- Mix thoroughly again (keeping wool immersed)
- Wait 20 mins!
- Lay on tray
- ‘Baste’ any of the excess fluid left in the mug over the laid out wool, periodically turning the muscle over to ensure an even consistency.
- Continue basting till it has the consistency of jam (Jelly in USA)
- Add to the physical model, continuing to baste until jelly like (Jelo in USA)
Fat[edit | edit source]
Ratio ( Gelatin:Glycerine:H20) - 2:6:12
Food Colouring: Yellow
Substrate: Wool
- MIx the above ingredients thoroughly.
- Add in some wool teasing it out as you add it.
- Mix thoroughly
- Microwave for 30 sec
- Mix again
- Lay on a foil tray teasing it out to a thin layer
- Allow to set for 1 hour
- If you need a thick layer of fat, make multiple layers then glue them together with the connective tissue paste *
*Connective Tissue Paste[edit | edit source]
Ratio ( Gelatin:Glycerine:H20) - 5:2:10
Food Colouring: None
Substrate: None
- Mix the above ingredients in a bowl.
- Microwave for 30 sec
- Wait 5 mins
- Paste between tissue layers.
Skin[edit | edit source]
Ratio ( Gelatin:Glycerine:H20) - 10:4:20
Food Colouring: Pink & White & Yellow ( change amounts according to tan)
Substrate: Stockings - 15 Denier
- Mix the above ingredients in a bowl.
- Microwave for 30 secs
- Spread a cut stocking out on a foil tray as a single layer.
- Pour the mixture over the stocking.
- Turn the stocking over 2 -3 times so that it is evenly soaked.
- Leave aside to set for 1 hour.
Assembly Guide for the new tissue simulators[edit | edit source]
Traditional Felt simulators:[edit | edit source]
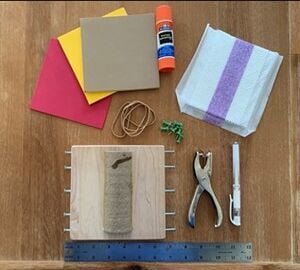
- Wood Block- 15 cm x 15 cm x 2 cm wood block (at least 2 cm thick to hold screws or nails) that serves as the foundation for the simulator
- Screws, Nails, or Thumbtacks - either screws, nails, or thumbtacks can be used to create the 10 pegs (5 each on opposing sides) which will hold the rubber bands. Different combinations of nails and screws as well as sizes and lengths can be used to create the 10 pegs as long as they can be securely fastened to the wood block to hold tension from the rubber bands
- Cardboard Tube or Cylinder - 12 cm to 15 cm long cardboard cylinder that creates the curved surface to enhance the flap simulation (common sources: toilet paper, gift/wrapping paper, fabric/textile rolls, or paper towel rolls)
- Rubber Bands - Any size rubber bands or similar elastic string that can be used to secure the soft tissue construct to the pegs.
- Foam Fabric - 3 pieces of 12 cm x 12 cm x 2mm foam fabric is needed to create a sandwich of fabric representing the various layers of skin and fascia. Any foam fabric or other elastic fabric with at least a 2 mm thickness can work. The foam fabric or selected material should be akin to the area between the thumb and index finger (digitus secundus manus, pointer finger, or forefinger), called the thenar space. The skin is called webbing. The material should stretch no more than taking two fingers and pulling the skin on your forearm.
- Layered Cotton Material - A folder piece of or 2 sheets of 12cm x 12cm cotton material/fabric/sheets. This will be placed between 2 foam fabric pieces (representing the dermis and epidermis) and 1 foam fabric piece representing the fascia to create a flap surgery sandwich block (as seen in the physical model construction video).
- Glue or Tape - Used to secure cardboard tube to woodblock and to attach the different anatomic layers together.
- Screwdriver and/or Hammer - Depending on whether screws or nails were used for the 10 wood block pegs, either a hammer or screwdriver is required. Neither are needed for thumbtacks.
- Hole Puncher - Used to create the 6 holes in the foam fabric. If a hole puncher not available then any other tool that can create the 6 holes is adequate such as the tip of a knife or scissors.

