
ALL-SAFE/Simulator/Ectopic Pregnancy

| Parent | ALL-SAFE/Simulator |
|---|
The ALL-SAFE Ectopic Pregnancy Simulator enables learners to practice identifying and managing ectopic pregnancies through hands-on assembly and procedural simulation. It provides a low-cost, reproducible model to demonstrate pelvic anatomy and simulate ectopic pregnancy within the fallopian tube.
This simulator consists of four components: (1) Uterus, (2) Ovaries, (3) Fallopian Tubes with Ectopic Pregnancy, and (4) Mesosalpinx Assembly.
Learning Objectives
[edit | edit source]By the end of this build and simulation, learners will be able to:
- Assemble a low-cost ectopic pregnancy simulator from common materials
- Identify anatomic landmarks of uterus, fallopian tubes, and ovaries
- Demonstrate placement and identification of an ectopic mass
- Use the simulator for intracorporeal suturing and knot-tying practice
Materials
[edit | edit source]
- 2 large cotton socks
- Plastic wrap (2 sheets)
- Fabric glue or stapler
- Penrose drain (or small plastic glove as substitute)
- Playdough (or homemade dough using flour, Nescafe, food coloring, and salt)
- Toomey syringe
- Suture tie
- Marker or pen
- Tape
- Paper plate
Component 1: Uterus
[edit | edit source]-
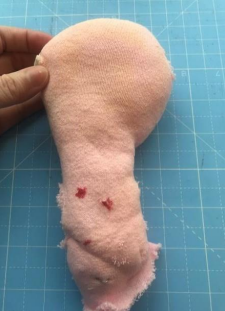 Step 1: Form the fundus
 -
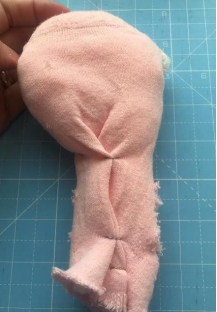 Step 2: Create the Uterine Body shape


Take one large cotton sock and stuff the toe with cotton material (such as another sock, lap pad, or fabric scrap) to form the fundus of the uterus.
Narrow the foot of the sock by folding the end over and securing it with fabric glue or staples to form the uterine body. Trim any excess material.
Component 2: Ovaries
[edit | edit source]Cut two small 5×5 cm squares of cotton fabric. Fold each into a round ball and secure the ends with staples or glue.
Component 3: Ectopic Contents
[edit | edit source]Use bright playdough to simulate the ectopic contents. If playdough is unavailable, prepare homemade dough:
- ½ cup flour
- ⅛ cup salt
- ⅛ cup Nescafe or food coloring
- ¼ cup water
Mix dry ingredients, add water, and knead into a soft, moldable ball. Adjust with flour or water for consistency.
Component 4: Fallopian Tubes with Ectopic Pregnancy
[edit | edit source]Tie off one end of a Penrose drain with a suture approximately one-third from the end. Fill a Toomey syringe with 5–10 cc of dough and inject it into the drain to form the ectopic mass. Secure the opposite side with another tie to contain the dough.
Using a marker, place a circular mark on the superior side of the ectopic pregnancy for intracorporeal suturing practice. Cut 3–4 short (~1 cm) slits in the open ends of the drain to create fimbriae.
Assembly
[edit | edit source]Using glue or staples, secure the midpoint of the Penrose drain (the “tube”) to the uterine fundus so that each half extends symmetrically to either side.
Attach the two fabric ovary models near the fimbrial ends of the tubes using glue or staples.
Place the uterus, tubes, and ovaries between two sheets of plastic wrap, pressing them gently together to hold anatomical shape.
Trim plastic wrap to appropriate size. Tape the model to a paper plate, then tape the plate to a table for stability during use.
Assembly Diagram
[edit | edit source](Add illustrative photo or schematic here.)
Maintenance and Use
[edit | edit source]- Replace playdough after each session.
- Reinforce glue or staples as needed between uses.
- Store in a dry, cool place.
References
[edit | edit source]- ALL-SAFE Consortium: Pan-African Academy of Christian Surgeons, University of Michigan, Southern Illinois University, Soddo Christian Hospital, AIC Kijabe Hospital, and Mbingo Baptist Hospital.
| Authors | Ian-laurel |
|---|---|
| License | CC-BY-SA-4.0 |
| Organizations | ALL-SAFE Consortium |
| Cite as | Ian-laurel (2025–2026). "ALL-SAFE/Simulator/Ectopic Pregnancy". Appropedia. Retrieved July 13, 2026. |